E85 DIY Walbro 485 with E-Flex, Haltech
 08-22-2013, 07:21 PM
#1

I am Upgrading to E85, I have a Haltech Plug and Play and E-Flex sensor on order.
Once I get the E-Flex sensor I will add that the guide !
If you didn’t have a RFS already you would need rails and the lines for the rails plus the fuel basket fuel regulator replacement part from CJM.
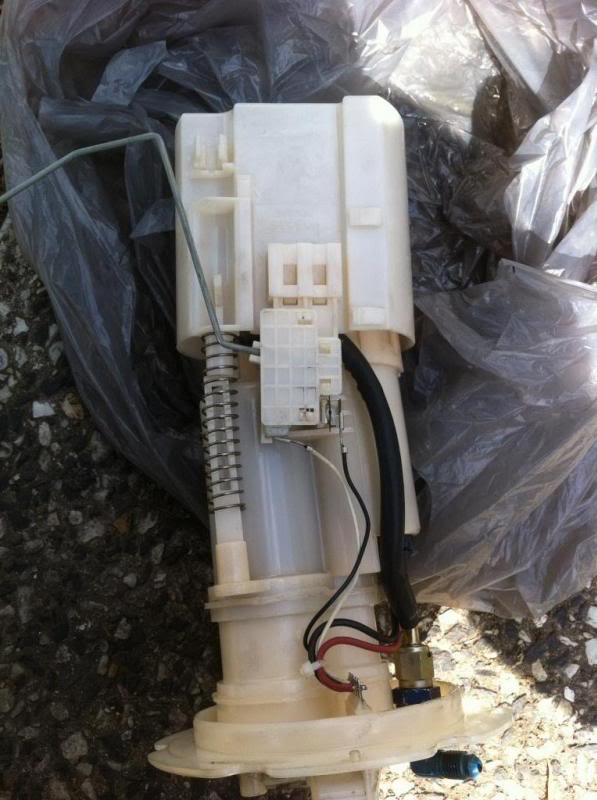
Here is what the AAM stage 1 RFS Fuel Basket -4AN return looks like
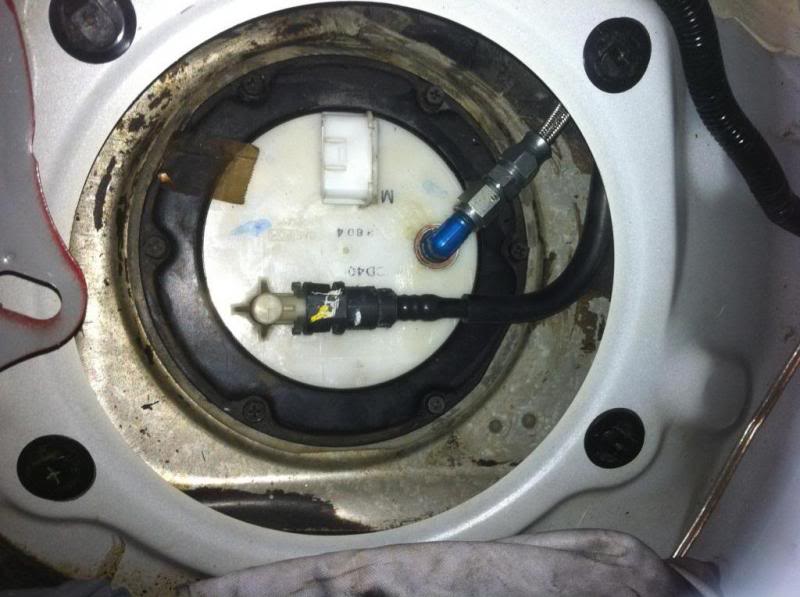
Stock fuel tank connections with -4AN Return
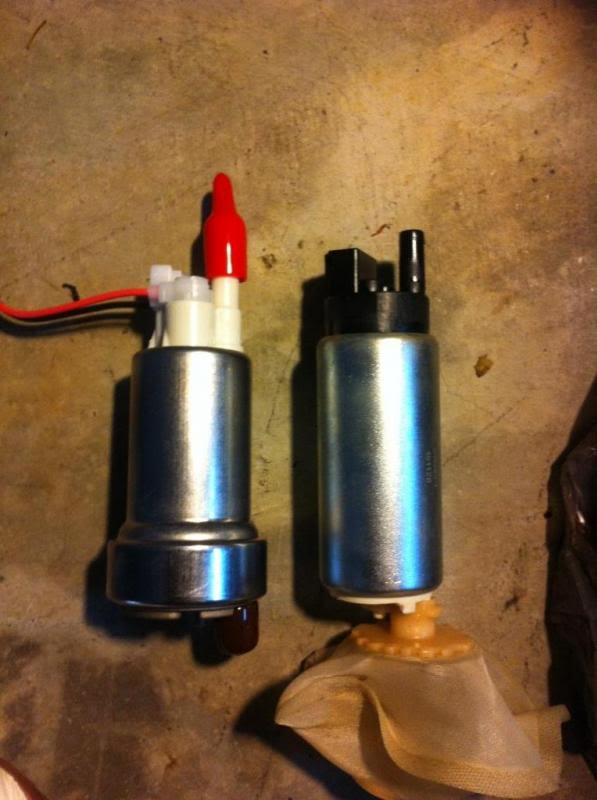
Comparing the DW300ltr pump with Walbro 485
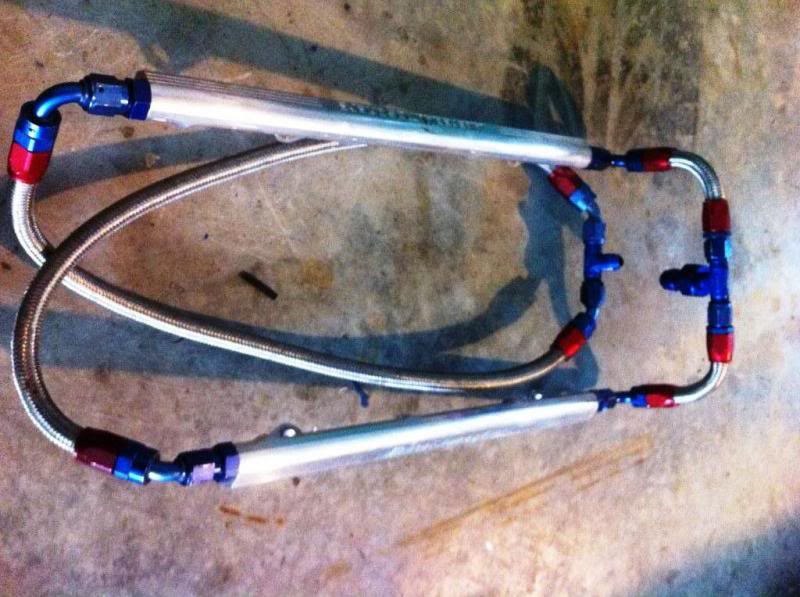
Parts for the Supply and Return lines
1x SUM-220984 PTFE HOSE -6AN X 10'/3M ROLL
1xSUM-220992 PTFE HOSE -8AN X 10'/3M ROLL
2x EAR-800108ERL -8AN ST. SWIVEL-SEAL FITTING
2x EAR-800106ERL -6AN ST. SWIVEL-SEAL FITTING
1x SUM-220166 -6 O-RING TO -6 FLARE FITTING (for FPR, replaces the -6 to -4 fitting)
1x Earl's Performance 9893068ERL Female -6AN to Male -8AN Expander (for rails T-piece)
Parts for the Fuel Basket
1x SUM-220650 -6AN X 1/8 90 JIC NPT (This replaces 1/8 to -4AN fitting, where it screws into the replacement part of the basket regulator)
1x RUS-661250 ELBOW 90DEG FLARE BULKHEAD #6 (This goes into the top of the fuel basket)
2x RUS-683900 -6AN STAT O SEAL (These fit either side of the RUS-661250 fitting)
1x EAR-592406ERL BULKHEAD NUT -6 (This fits on the fuel side of the RUS-661250 fitting)
1x 5.5” Submersible EFI Hose to SAE 30R10 (may have to ebay this, I got it locally)
1x Summit Racing SUM-220711 6AN Twist-Tite Swivel Hose End 90 degree
1x Summit Racing SUM-220706 -6AN Twist-Tite Swivel Hose End 45 degree
1x Earl's Performance 985068ER -6AN MALE Straight Cut O-Ring to -8AN MALE Fitting
1x http://shop.cj-motorsports.com/CJM-F...fpofitting.htm CJM Fuel Pump Output Fitting (You may not need Earls 985068ER if Charles can replace the -6AN fitting he sells with it for you)
Other Parts
1x http://shop.cj-motorsports.com/Walbr...-walbro485.htm Walbro 485lph E85 Pump
1x 32-44mm hose clamp (I had this laying around but get one with smallest screwing mechanism as possible)
Some heat shrink and a soldering iron
Once I get the E-Flex sensor I will add that the guide !
If you didn’t have a RFS already you would need rails and the lines for the rails plus the fuel basket fuel regulator replacement part from CJM.
Here is what the AAM stage 1 RFS Fuel Basket -4AN return looks like

Stock fuel tank connections with -4AN Return

Comparing the DW300ltr pump with Walbro 485

Parts for the Supply and Return lines
1x SUM-220984 PTFE HOSE -6AN X 10'/3M ROLL
1xSUM-220992 PTFE HOSE -8AN X 10'/3M ROLL
2x EAR-800108ERL -8AN ST. SWIVEL-SEAL FITTING
2x EAR-800106ERL -6AN ST. SWIVEL-SEAL FITTING
1x SUM-220166 -6 O-RING TO -6 FLARE FITTING (for FPR, replaces the -6 to -4 fitting)
1x Earl's Performance 9893068ERL Female -6AN to Male -8AN Expander (for rails T-piece)
Parts for the Fuel Basket
1x SUM-220650 -6AN X 1/8 90 JIC NPT (This replaces 1/8 to -4AN fitting, where it screws into the replacement part of the basket regulator)
1x RUS-661250 ELBOW 90DEG FLARE BULKHEAD #6 (This goes into the top of the fuel basket)
2x RUS-683900 -6AN STAT O SEAL (These fit either side of the RUS-661250 fitting)
1x EAR-592406ERL BULKHEAD NUT -6 (This fits on the fuel side of the RUS-661250 fitting)
1x 5.5” Submersible EFI Hose to SAE 30R10 (may have to ebay this, I got it locally)
1x Summit Racing SUM-220711 6AN Twist-Tite Swivel Hose End 90 degree
1x Summit Racing SUM-220706 -6AN Twist-Tite Swivel Hose End 45 degree
1x Earl's Performance 985068ER -6AN MALE Straight Cut O-Ring to -8AN MALE Fitting
1x http://shop.cj-motorsports.com/CJM-F...fpofitting.htm CJM Fuel Pump Output Fitting (You may not need Earls 985068ER if Charles can replace the -6AN fitting he sells with it for you)
Other Parts
1x http://shop.cj-motorsports.com/Walbr...-walbro485.htm Walbro 485lph E85 Pump
1x 32-44mm hose clamp (I had this laying around but get one with smallest screwing mechanism as possible)
Some heat shrink and a soldering iron

The following 2 users liked this post by R6n350GT:
350z-Helsinki (08-19-2017),
JaE35z (03-25-2022)
08-22-2013, 07:21 PM
#2
Step 1
Attach the Earl's Performance 9893068ERLfitting to the bottom of the rails T piece, now we have a -8AN connection.
Step 2
I don’t have a picture but unscrew the -4 straight cut to male -6AN off the bottom of the FPR and replace it with SUM-220166
Step 3
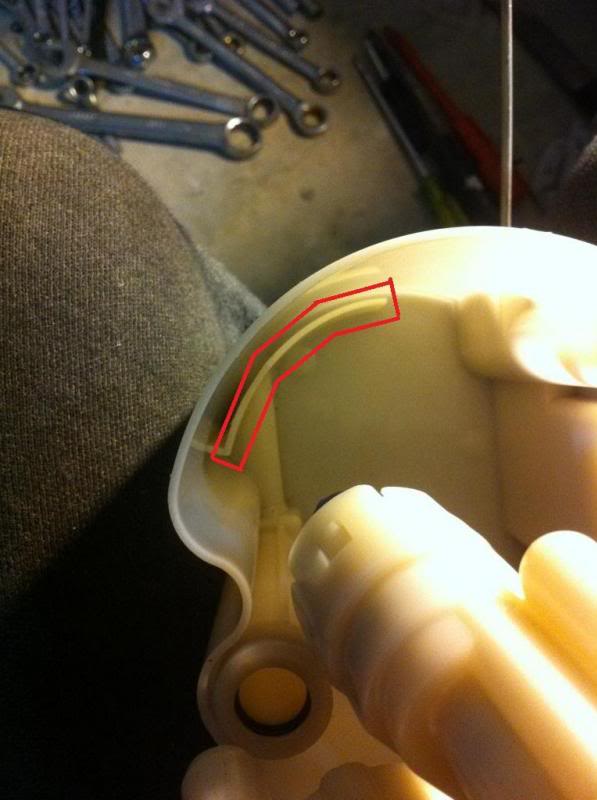
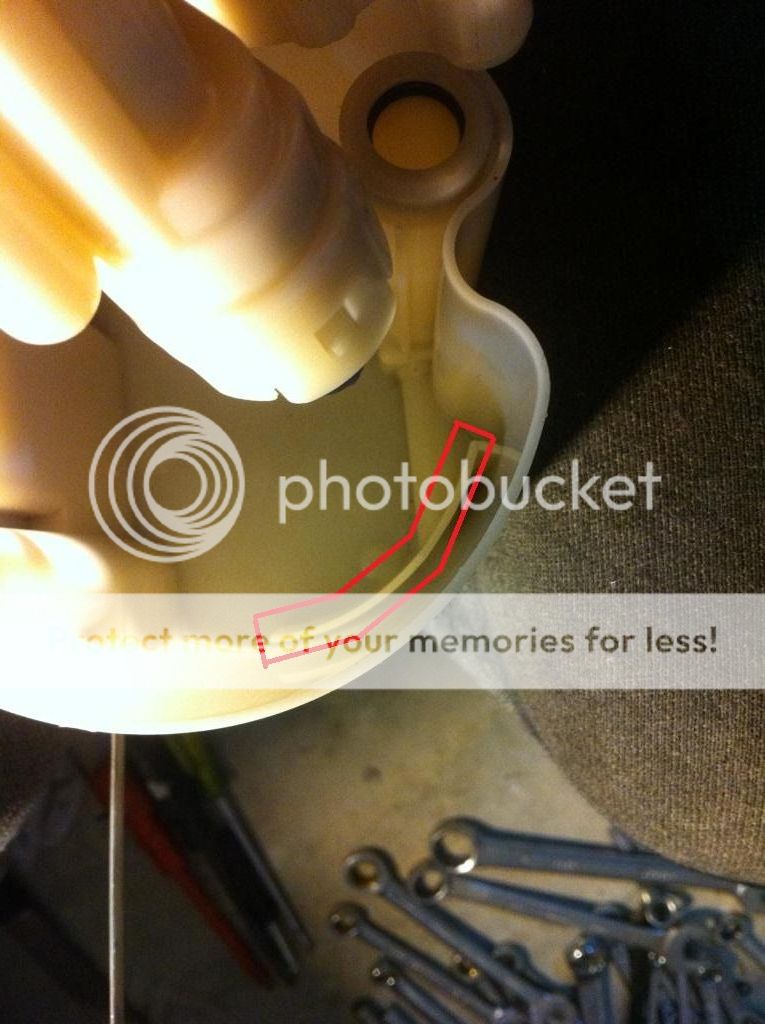
Take off the -4AN parts off the fuel basket. You will need to drill out the hole a little more to fit the bigger -6AN bulk head fitting RUS-661250. You will need to also flatten all the raised ridges so the fitting fits flush. I made the hole too close to the edge of the basket, make it where the red outline is.
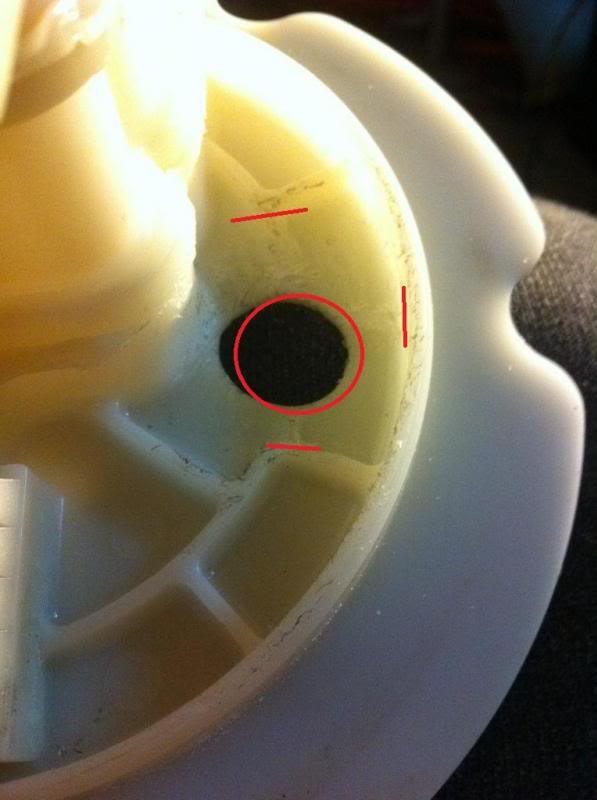
You will need to cut one of the -6AN Stat o Seals RUS-683900 so it fits.
Step 4
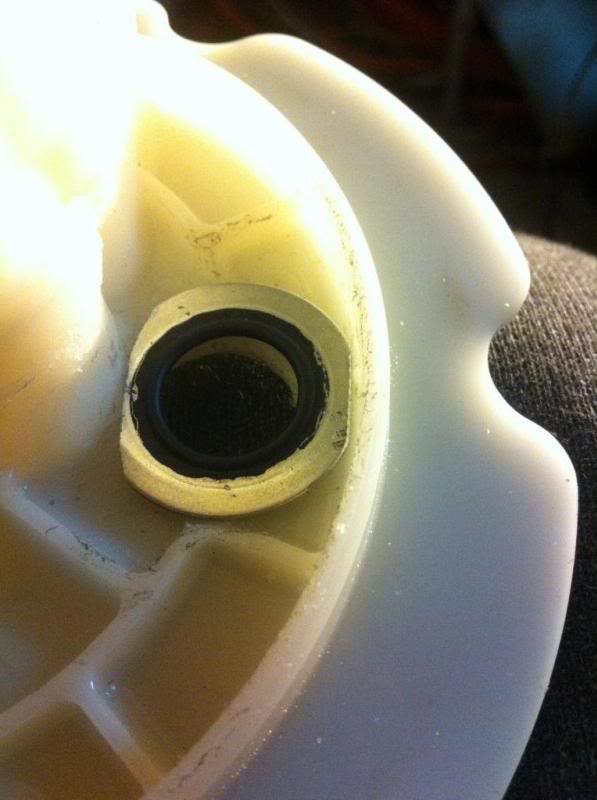
Fit the bulkhead fitting RUS-661250 with the Stat o Seal either side of it. Then put the nut EAR-592406ERL on the end.
Step 5
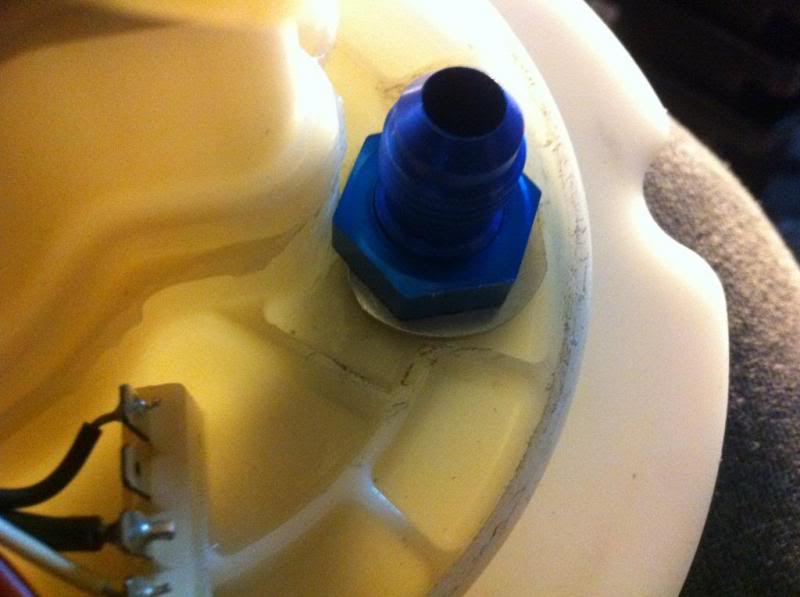
I don’t have a specific picture but fit the 1/8NPT 90 degree to -6AN fitting SUM-220650 into the regulator replacement part.
Step 6
You will need pretty much exactly 11.5 cm of the EFI Hose to SAE 30R10 of the submersible fuel line
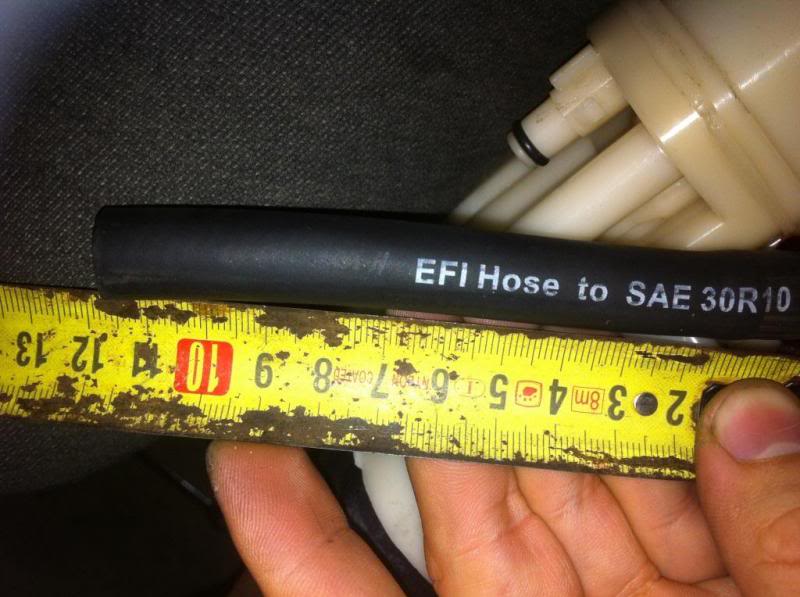
Attach the Summit Racing SUM-220711 90 degree to one end of the hose and the Summit Racing SUM-220706 45 degree to the other end.
Step 7
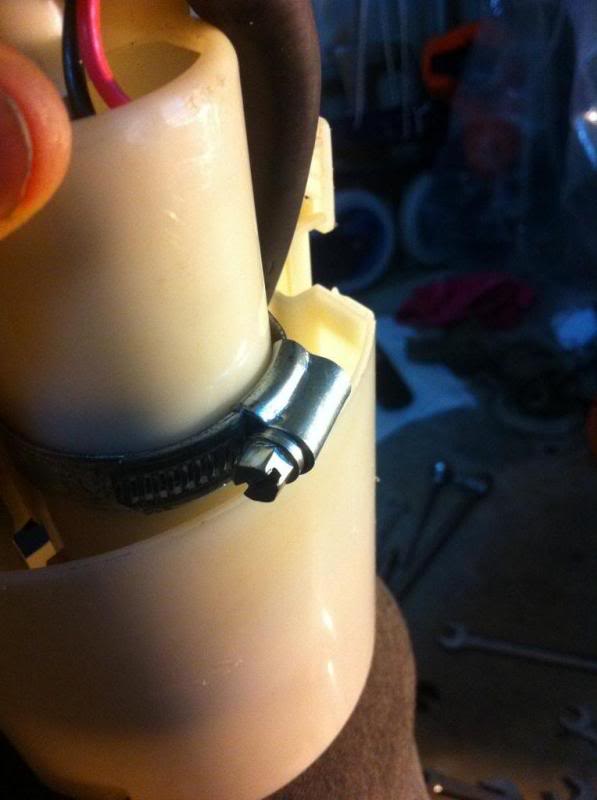
Now we need to prepare the fuel pump, two things need to happen.
1. The top barb off the tank needs to be cut off, see the red line.
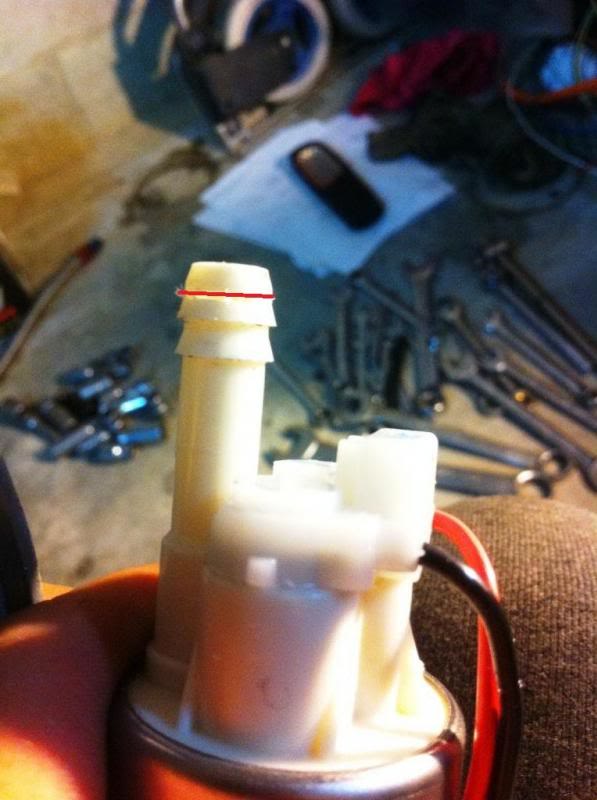
2. The other thing which I didn’t take a pic of is filling down the port the metal o-ring goes over that holds the fuel filter in place. You can either get a larger retaining o-ring clip or file the port down so the stock one fits. Don’t fit the filter until the end.
Step 8
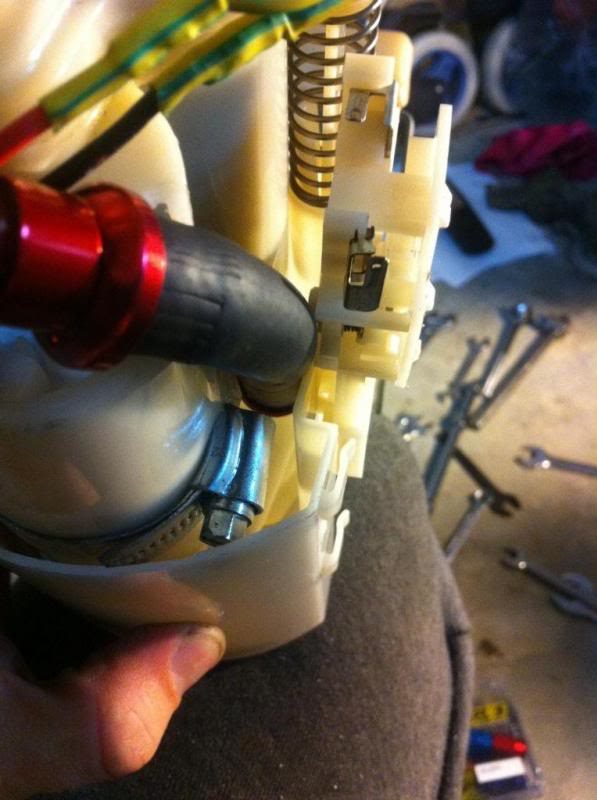
Now the annoying hardish part. A few things must be modified to the basket itself.
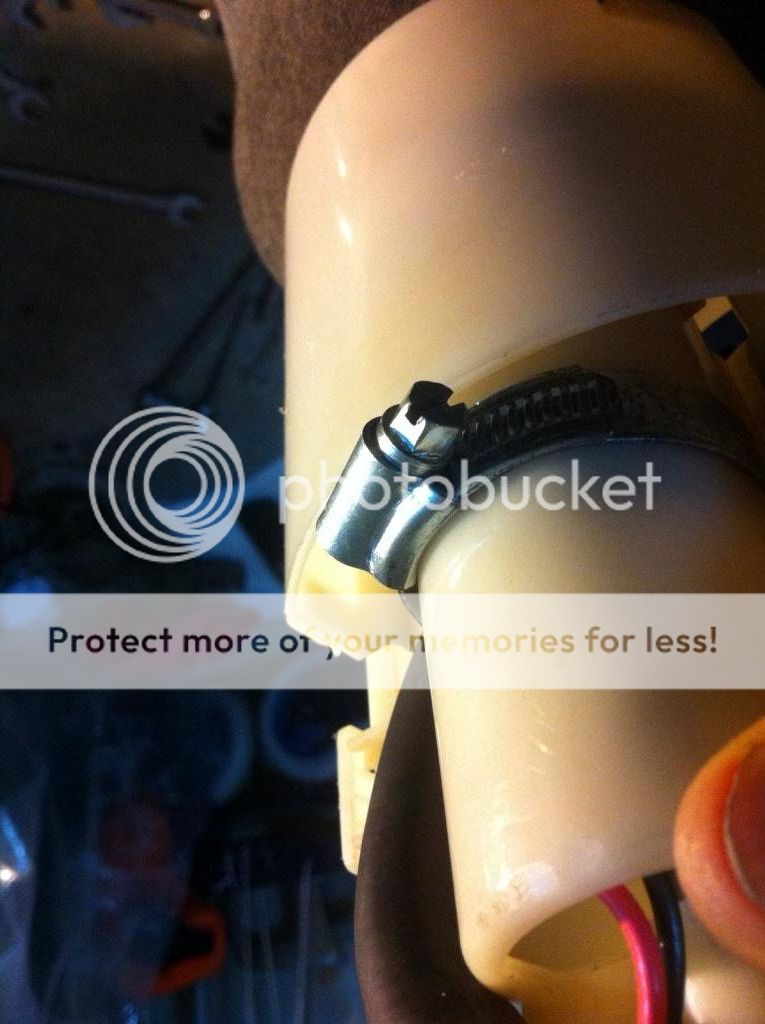
1. Need to cut the bottom of the fuel pump canister holder just below the locking mechanism tabs.
2. You will need to make a slot to fit the clamp through, right near the 3 structural lines. I first made the cut (with a stanley knife) just below the 3 lines but later found I needed to make it 1-2mm further into the lines, so do it where the red line is and down to where you see the clamp currently is.

3. Insert the clamp and draw a black line just after the ridge where it hits the other side. This will help you know where to cut the other side

It should now look like this
You will need to you some multi grips to shape the clamp otherwise you wont be able to get the pump in, you may want to fit the pump in while you do this.
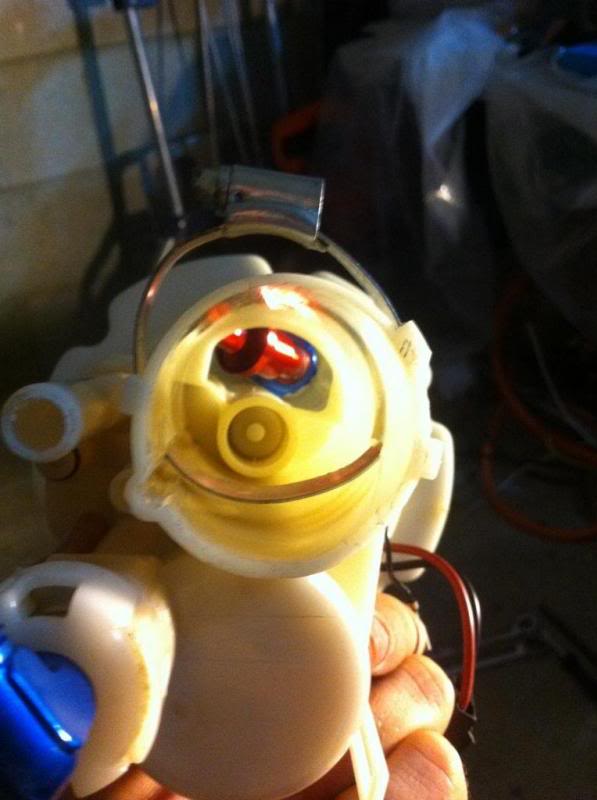
*Make sure the black rubber fitting goes on top of the fuel pump barb you cut previously. The black rubber thing may be stuck inside the fuel assembly still, if it is just leave it in there.
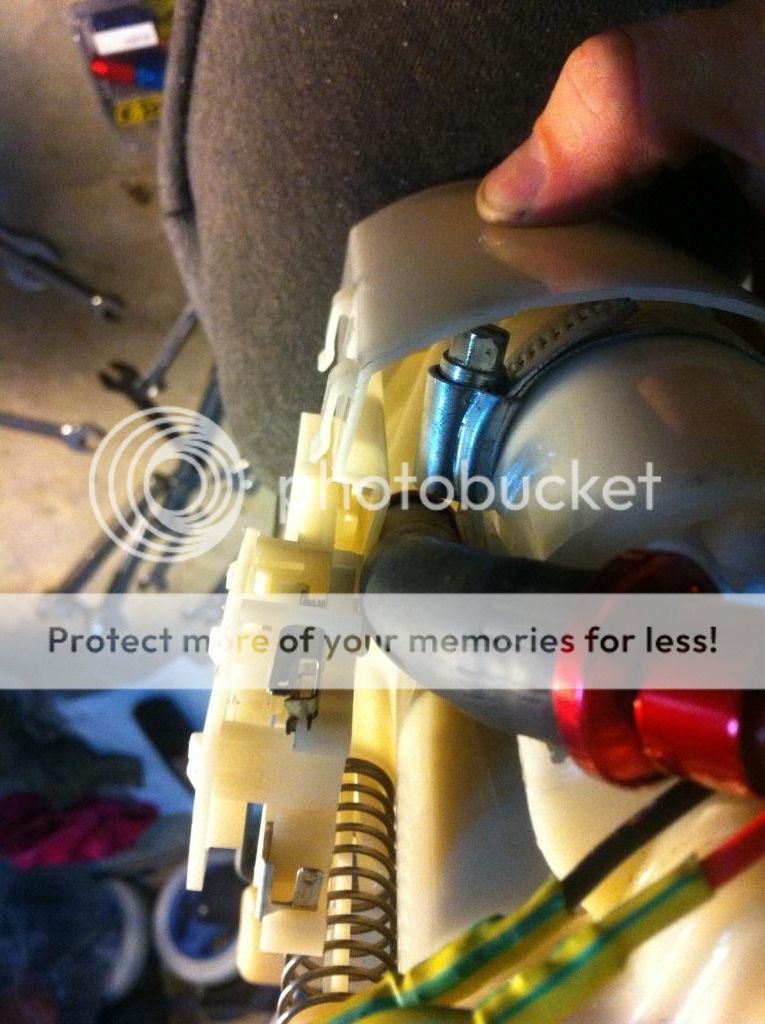
4. You will then need to allow the black hose to fit closer to the side of the fuel basket so you need to cut the 3 structural lines and shave off a bit up the top as you can see in the red.

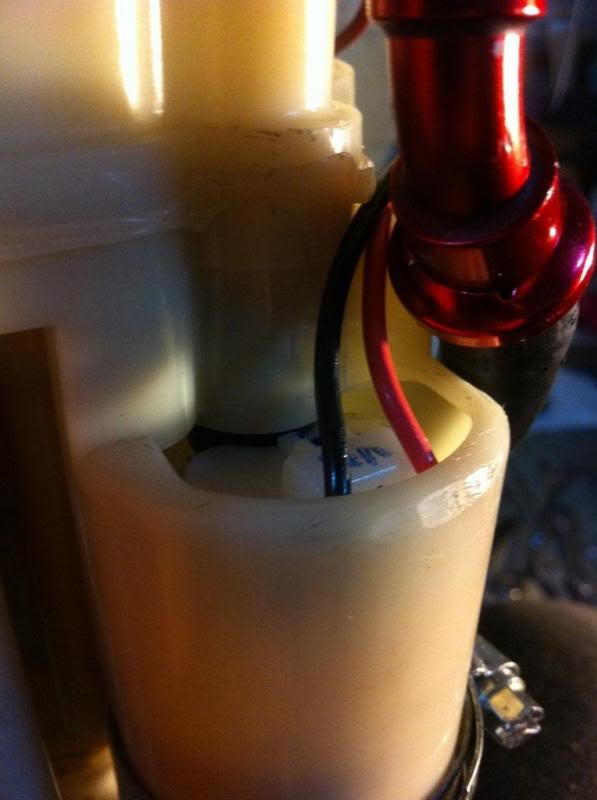
*NOTE* I forgot to mention you need to cut off the fuel pump plug and solder the wires and use heat shrink.
Step 9
If you did everything correctly you should see very little space between the black rubber and the pump.
This is what it looks like with the barb cut
This is what it looks like if you didn’t cut the barb on top of the fuel pump
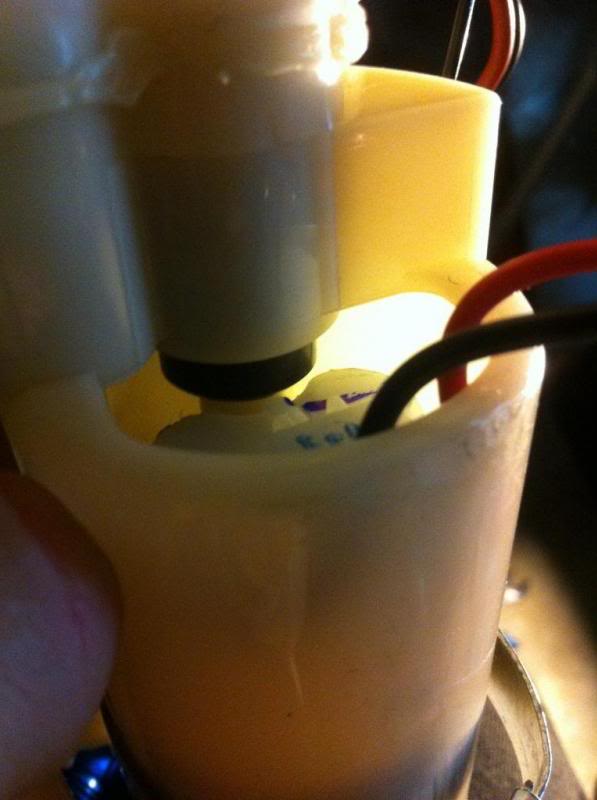
You need as much room at the bottom of the fuel assembly as possible.
It should look like this
You will want to make sure when you tighten the clamp the screw assembly is pushed as close to the red line as possible.
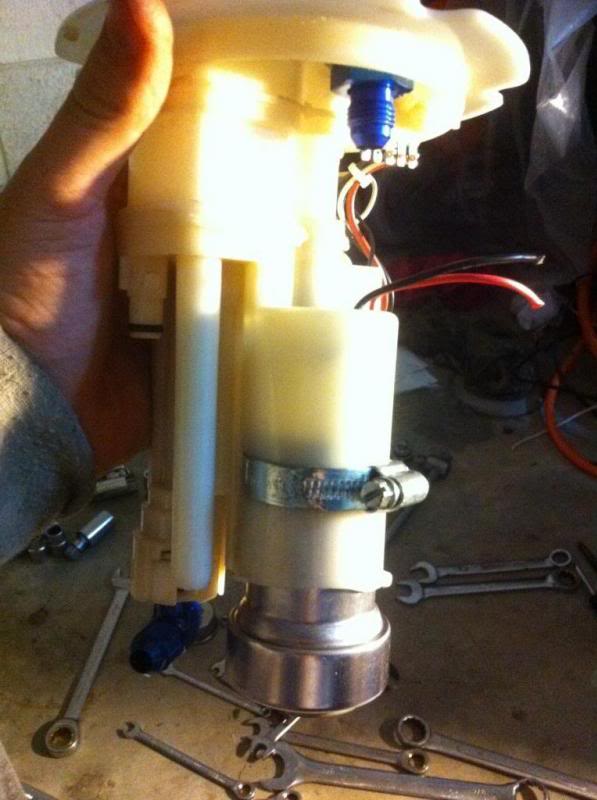
Step 10
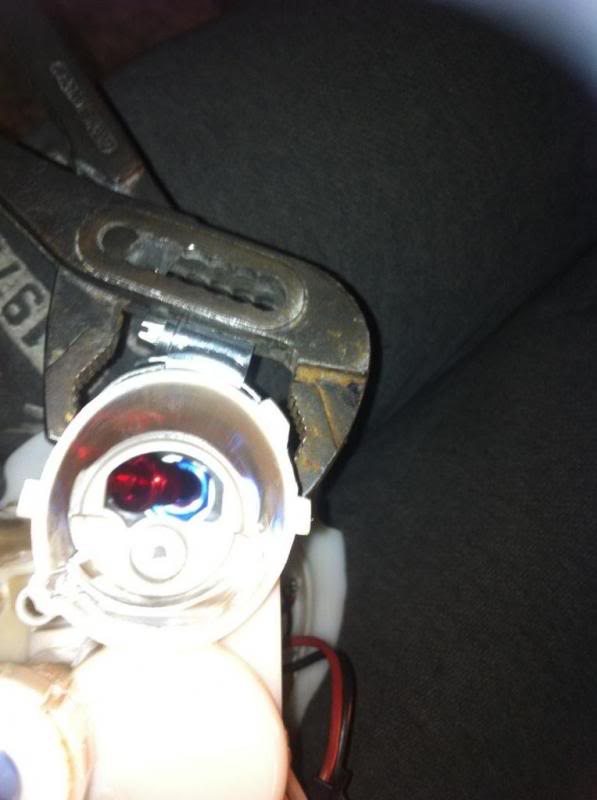
Fit the bottom pump assembly and it should look like this

You will see I initially used a -6AN female to -8 male expander which was wrong as there is not enough room, that is why you replace the fitting that comes with it for a straight cut -6 to -8AN male fitting.
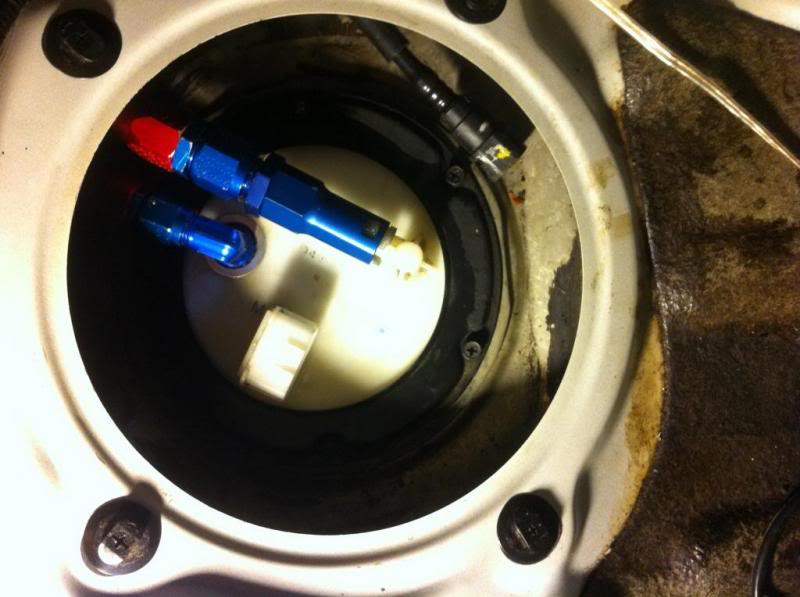
In the fuel tank you can see the space
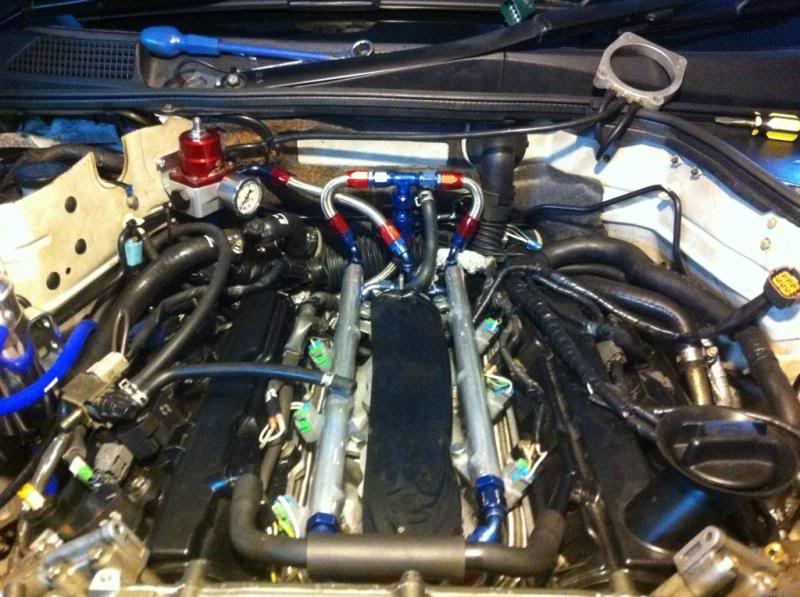
And your going to need some 1000cc injectors at least ! I wanted ID1000s but got a new set of DW1000 for a good price.

Step 11
You will need to run the lines and attach the fittings to the ends but that’s easy, just don’t attach the fittings to the tank side otherwise you won’t get them to fit when feeding the lines through.
Tip: feed through a coat hanger or some wire from inside the car down along outside of fuel tank and out where the stock lines run along the car. Then tie the -6 and -8an lines on separately and pull them up into the tank from inside the car.
DONE - this guide was almost as painful as the above!
Attach the Earl's Performance 9893068ERLfitting to the bottom of the rails T piece, now we have a -8AN connection.

Step 2
I don’t have a picture but unscrew the -4 straight cut to male -6AN off the bottom of the FPR and replace it with SUM-220166
Step 3
Take off the -4AN parts off the fuel basket. You will need to drill out the hole a little more to fit the bigger -6AN bulk head fitting RUS-661250. You will need to also flatten all the raised ridges so the fitting fits flush. I made the hole too close to the edge of the basket, make it where the red outline is.

You will need to cut one of the -6AN Stat o Seals RUS-683900 so it fits.

Step 4
Fit the bulkhead fitting RUS-661250 with the Stat o Seal either side of it. Then put the nut EAR-592406ERL on the end.

Step 5
I don’t have a specific picture but fit the 1/8NPT 90 degree to -6AN fitting SUM-220650 into the regulator replacement part.
Step 6
You will need pretty much exactly 11.5 cm of the EFI Hose to SAE 30R10 of the submersible fuel line

Attach the Summit Racing SUM-220711 90 degree to one end of the hose and the Summit Racing SUM-220706 45 degree to the other end.
Step 7
Now we need to prepare the fuel pump, two things need to happen.
1. The top barb off the tank needs to be cut off, see the red line.

2. The other thing which I didn’t take a pic of is filling down the port the metal o-ring goes over that holds the fuel filter in place. You can either get a larger retaining o-ring clip or file the port down so the stock one fits. Don’t fit the filter until the end.
Step 8
Now the annoying hardish part. A few things must be modified to the basket itself.
1. Need to cut the bottom of the fuel pump canister holder just below the locking mechanism tabs.
2. You will need to make a slot to fit the clamp through, right near the 3 structural lines. I first made the cut (with a stanley knife) just below the 3 lines but later found I needed to make it 1-2mm further into the lines, so do it where the red line is and down to where you see the clamp currently is.

3. Insert the clamp and draw a black line just after the ridge where it hits the other side. This will help you know where to cut the other side

It should now look like this

You will need to you some multi grips to shape the clamp otherwise you wont be able to get the pump in, you may want to fit the pump in while you do this.

*Make sure the black rubber fitting goes on top of the fuel pump barb you cut previously. The black rubber thing may be stuck inside the fuel assembly still, if it is just leave it in there.
4. You will then need to allow the black hose to fit closer to the side of the fuel basket so you need to cut the 3 structural lines and shave off a bit up the top as you can see in the red.

*NOTE* I forgot to mention you need to cut off the fuel pump plug and solder the wires and use heat shrink.
Step 9
If you did everything correctly you should see very little space between the black rubber and the pump.
This is what it looks like with the barb cut

This is what it looks like if you didn’t cut the barb on top of the fuel pump

You need as much room at the bottom of the fuel assembly as possible.
It should look like this

You will want to make sure when you tighten the clamp the screw assembly is pushed as close to the red line as possible.
Step 10
Fit the bottom pump assembly and it should look like this

You will see I initially used a -6AN female to -8 male expander which was wrong as there is not enough room, that is why you replace the fitting that comes with it for a straight cut -6 to -8AN male fitting.
In the fuel tank you can see the space


And your going to need some 1000cc injectors at least ! I wanted ID1000s but got a new set of DW1000 for a good price.

Step 11
You will need to run the lines and attach the fittings to the ends but that’s easy, just don’t attach the fittings to the tank side otherwise you won’t get them to fit when feeding the lines through.
Tip: feed through a coat hanger or some wire from inside the car down along outside of fuel tank and out where the stock lines run along the car. Then tie the -6 and -8an lines on separately and pull them up into the tank from inside the car.
DONE - this guide was almost as painful as the above!
The following 2 users liked this post by R6n350GT:
350z-Helsinki (08-19-2017),
BluestreamDE (10-09-2017)
08-22-2013, 07:23 PM
#3
Mistakes to Avoid
Step 8 & 9 – if you don’t cut the slot into the 3 lines and push the locking mechanism into the red line then this will happen
If you did it correctly it will look like this
Once you are fitting the bottom of the fuel pump assembly in WATCH OUT FOR THIS SWIRL JET WALL. The Fuel regulator port hits it and you cant compress the fuel basket so you cant screw it down to the tank when fitting it, just need to jiggle it so it slides beside this wall and not hitting the top. This stumped me for ages !!
Step 8 & 9 – if you don’t cut the slot into the 3 lines and push the locking mechanism into the red line then this will happen

If you did it correctly it will look like this

Once you are fitting the bottom of the fuel pump assembly in WATCH OUT FOR THIS SWIRL JET WALL. The Fuel regulator port hits it and you cant compress the fuel basket so you cant screw it down to the tank when fitting it, just need to jiggle it so it slides beside this wall and not hitting the top. This stumped me for ages !!

The following 3 users liked this post by R6n350GT:
 07-12-2017, 01:23 AM
#5
Registered User

Mistakes to Avoid
Step 8 & 9 – if you don’t cut the slot into the 3 lines and push the locking mechanism into the red line then this will happen
If you did it correctly it will look like this
Once you are fitting the bottom of the fuel pump assembly in WATCH OUT FOR THIS SWIRL JET WALL. The Fuel regulator port hits it and you cant compress the fuel basket so you cant screw it down to the tank when fitting it, just need to jiggle it so it slides beside this wall and not hitting the top. This stumped me for ages !!
Step 8 & 9 – if you don’t cut the slot into the 3 lines and push the locking mechanism into the red line then this will happen
If you did it correctly it will look like this
Once you are fitting the bottom of the fuel pump assembly in WATCH OUT FOR THIS SWIRL JET WALL. The Fuel regulator port hits it and you cant compress the fuel basket so you cant screw it down to the tank when fitting it, just need to jiggle it so it slides beside this wall and not hitting the top. This stumped me for ages !!
09-10-2017, 08:42 AM
#6
Did you complete the flex fuel sensor installation? I'm having trouble trying to find a nice spot for it. My FPR is installed similary than yours. Pics and list of required fittings would be awensome.
I just finished installing the 485. It was really easy with your instructions. I had the fuel return already set up which made it easier. Thanks alot!
I just finished installing the 485. It was really easy with your instructions. I had the fuel return already set up which made it easier. Thanks alot!
10-09-2017, 01:46 PM
#7
Did you complete the flex fuel sensor installation? I'm having trouble trying to find a nice spot for it. My FPR is installed similary than yours. Pics and list of required fittings would be awensome.
I just finished installing the 485. It was really easy with your instructions. I had the fuel return already set up which made it easier. Thanks alot!
I just finished installing the 485. It was really easy with your instructions. I had the fuel return already set up which made it easier. Thanks alot!
Trending Topics


Thread
Thread Starter
Forum
Replies
Last Post