How-To Repair Stuck / Broken Window Motor ...
 05-22-2008, 09:42 AM
#1
Administrator

Thread Starter
iTrader: (25)
Yet another "How-To" I thought I'd create for the masses of people like myself that have had the similar problem of either one or both of your windows acting funny, getting stuck, won't roll up, or won't roll down.
This is a How-To on how to clean your OEM window motor. The window motor I had to clean was on the passenger side. I don't know exactly how long this cleaning will last, but I can tell you it works. I'm creating this thread for the members like myself who want to give it a shot and see if it works before biting the bullet and dishing out $160 or so on a new motor. Either way, if you decide to just replace the motor, this tutorial will lead you in the right direction.
EDIT: A couple months after I cleaned the original motor, it failed again. I replaced it entirely with one of the refurbished motors listed below. It's 10-1-2009 now and it's still working like a champ. So do yourself a favor and replace it entirely. The cleaning appears to be a temp fix.
EDIT: It's now 6-13-2014. The driver's side replacement motor is still going strong. No problems. I had to change out the passenger's side motor. I used the Cardone motor for the passenger's side also. It's running like a champ. Remember, buy them from O'Reilly Auto Parts. They offer a 2 year warranty.
EDIT: I had time today to locate the replacement motors for each side at the 2 most common auto parts dealers. This is for the individuals who wish to buy a new motor.
Links updated 6/13/14. NOTE: Even if a link no longer works, the part numbers remain the same
Autozone:
Driver's side: Part# 47-1377
http://www.autozone.com/autozone/par...artNumber=true
Passenger's side: Part# 47-1376
http://www.autozone.com/autozone/par...artNumber=true
Advanced auto parts:
Driver's side: Part# 471377
http://shop.advanceautoparts.com/p/c...377&showTitle=
Passenger's side: Part# 471376
http://shop.advanceautoparts.com/p/c...376&showTitle=
O'reilly Auto Parts:
Driver's side: Part# 47-1377
http://www.oreillyauto.com/site/c/de...1200&ppt=C0356
Passenger's side: Part# 47-1376
http://www.oreillyauto.com/site/c/de...1200&ppt=C0356
Edit - Nov 2014
By the way, for those new to replacing the window motor I did build on VO7848 instructions and wrote up a mega guide. Here is the link to the PDF:
http://static.ibsrv.net/autocomm/Con...ep14update.pdf
http://static.ibsrv.net/autocomm/Con...ep14update.pdf
Last edited by 3hree5ive0ero; 11-19-2014 at 08:55 AM. Reason: update

The following 4 users liked this post by VO...:
05-22-2008, 09:46 AM
#2
Administrator
Thread Starter
iTrader: (25)
I decided to make this a 2 day job since I like taking my time, maticulously avoiding mistakes.
The first day I decided to just remove the outer door panel completely, in preparation to actually dissasemble and clean the motor the next day.
Here's a shot of the door prior to dissasembly....
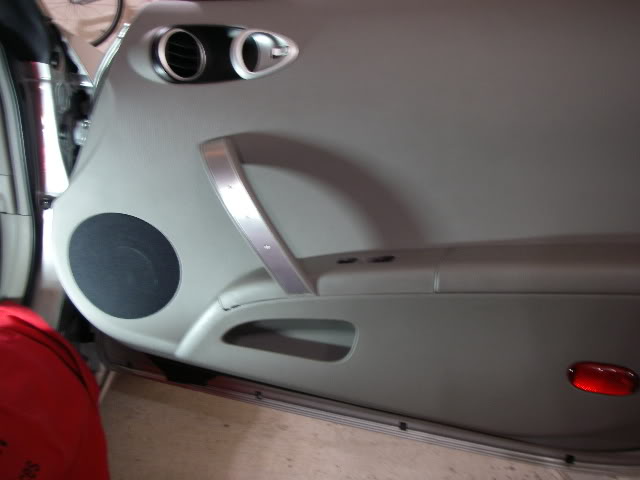
The first day I decided to just remove the outer door panel completely, in preparation to actually dissasemble and clean the motor the next day.
Here's a shot of the door prior to dissasembly....
The following users liked this post:
dboyzalter (07-24-2015)
05-22-2008, 09:47 AM
#3
Administrator
Thread Starter
iTrader: (25)
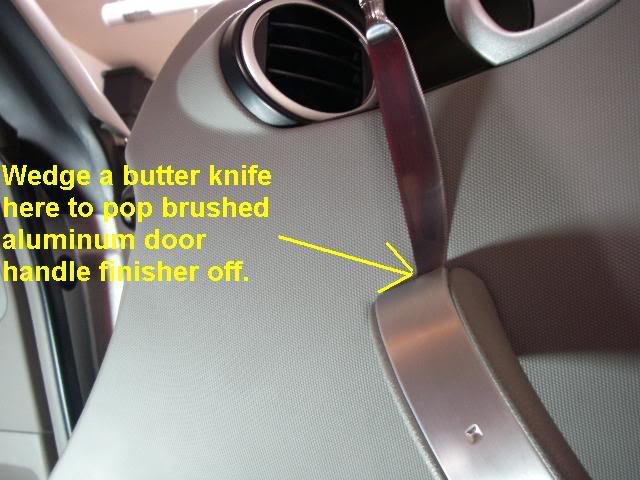
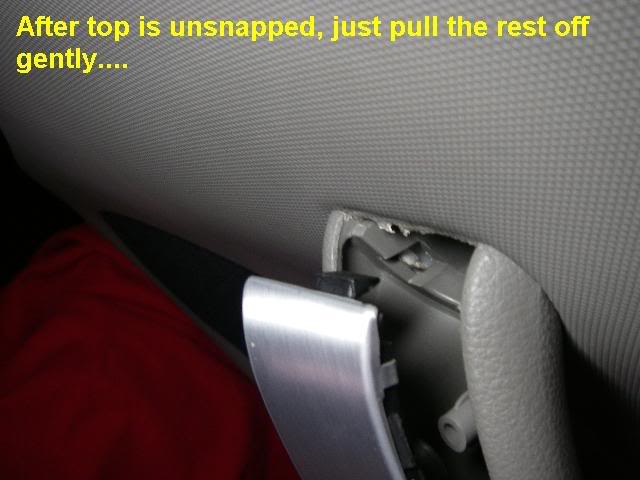
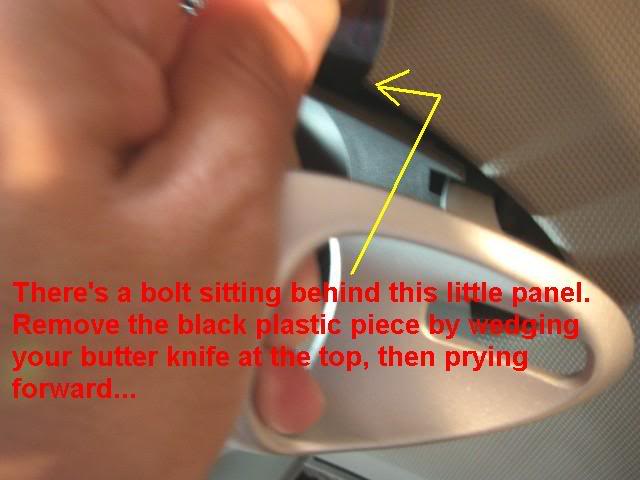
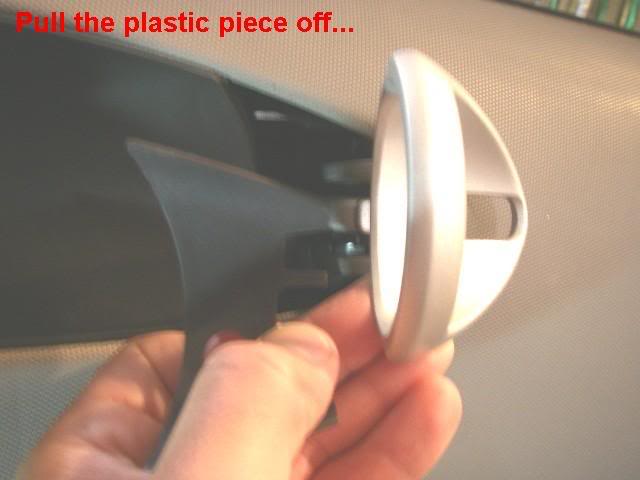
First things first. We start by removing the brushed aluminum door handle finisher. My tool of choice was a butter knife. It's slim and works better than a flathead screwdriver...
The following users liked this post:
dboyzalter (07-24-2015)
05-22-2008, 09:52 AM
#4
Administrator
Thread Starter
iTrader: (25)
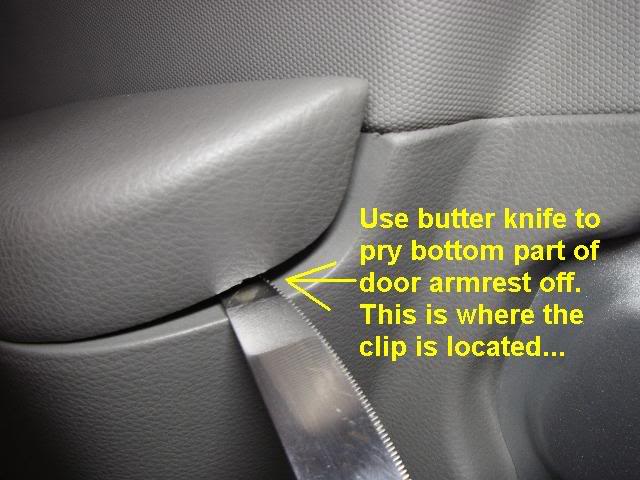
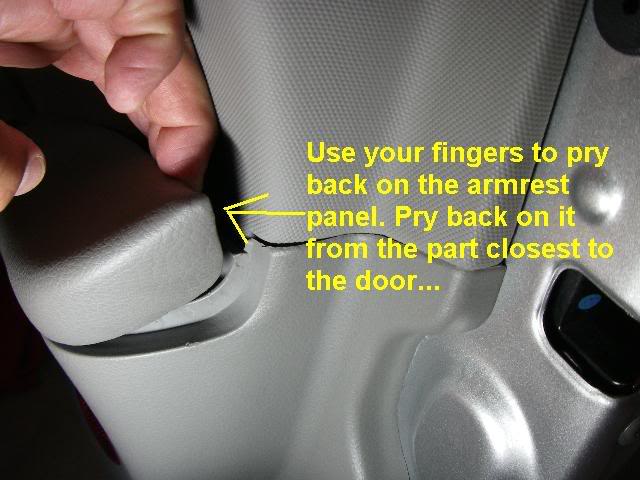
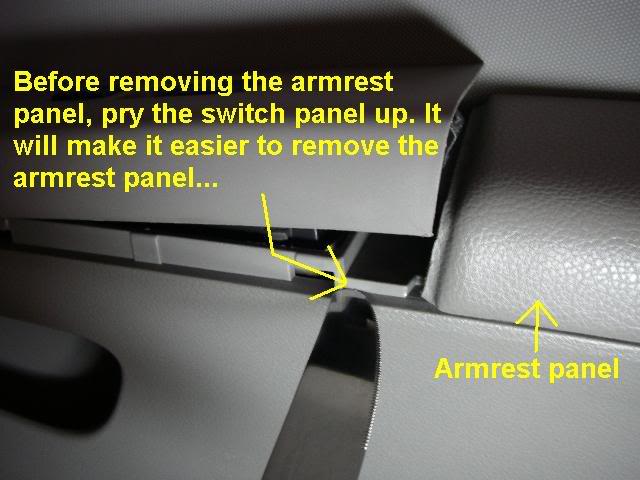
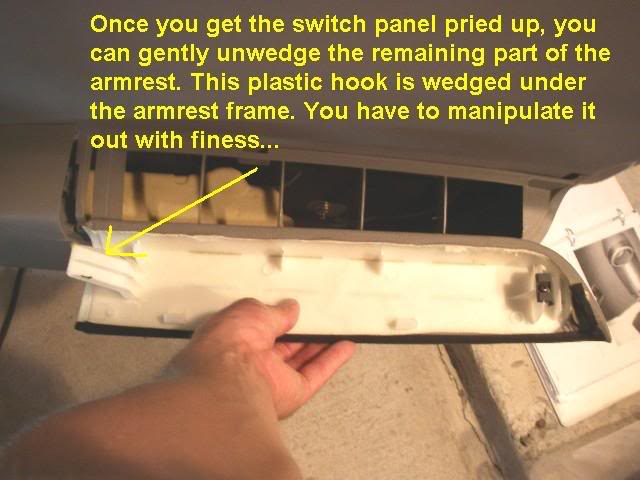
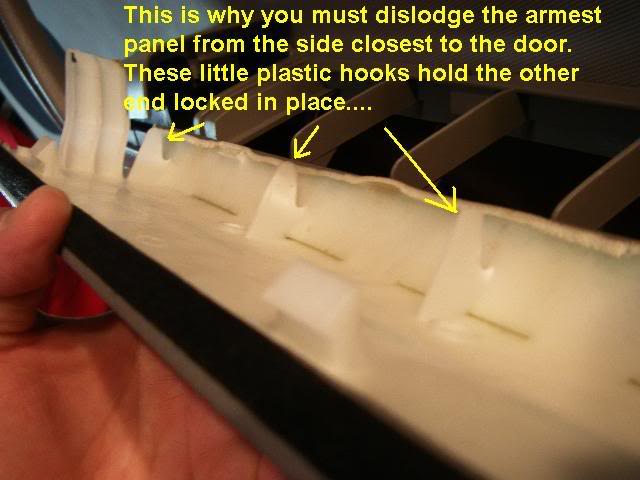
Next we want to remove the armrest panel....
The following 3 users liked this post by VO...:
05-22-2008, 10:08 AM
#5
Administrator
Thread Starter
iTrader: (25)
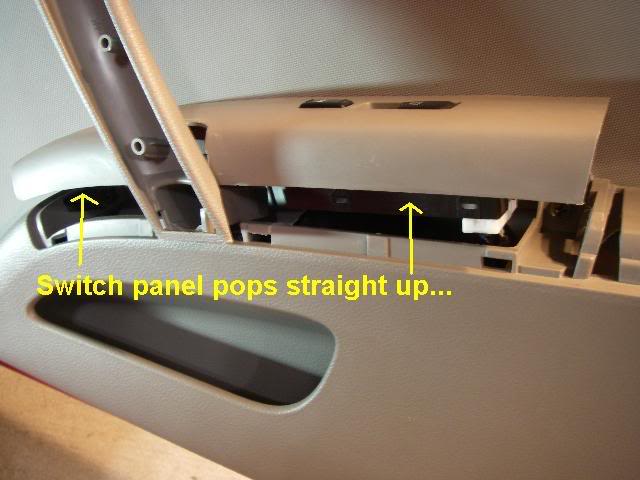
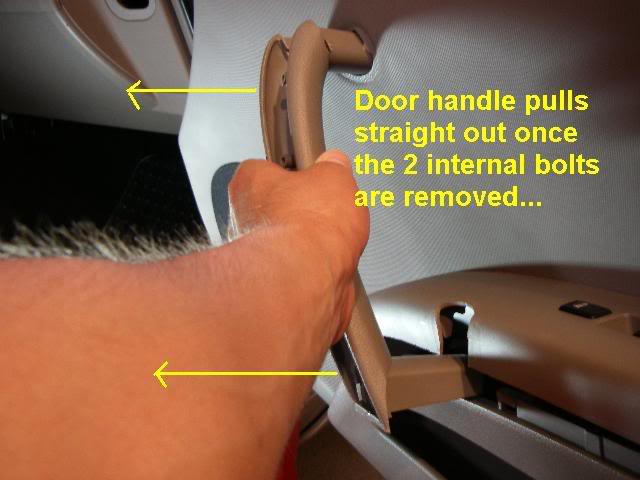
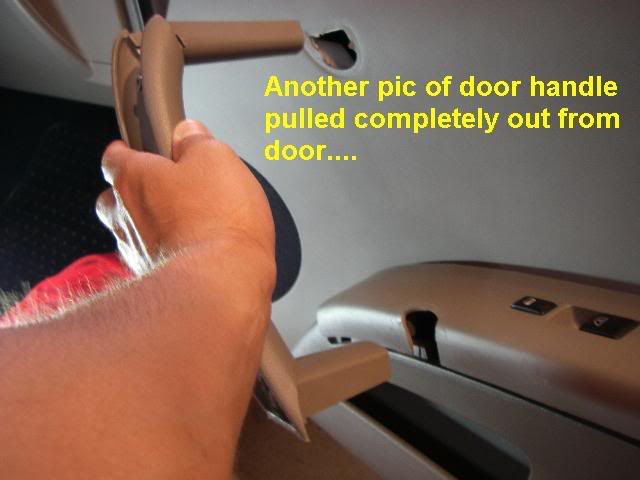
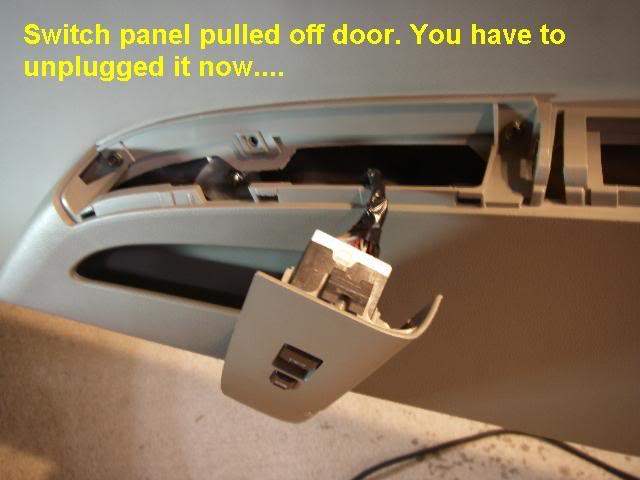
Next step we want to unclip the switch panel completely, remove 2 bolts holding door handle in place, pull door handle off, then remove switch panel from the door....
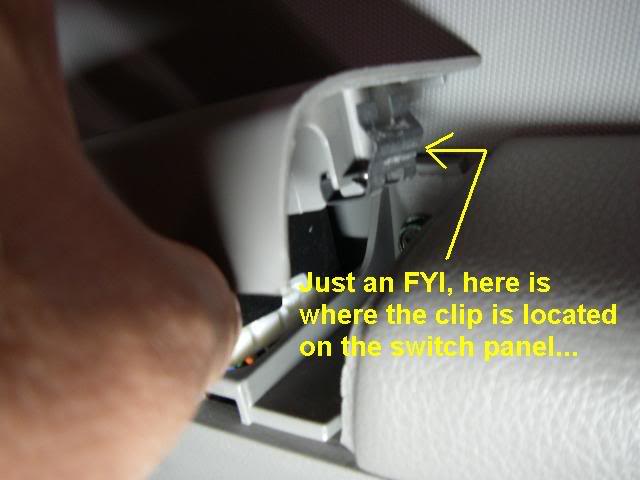
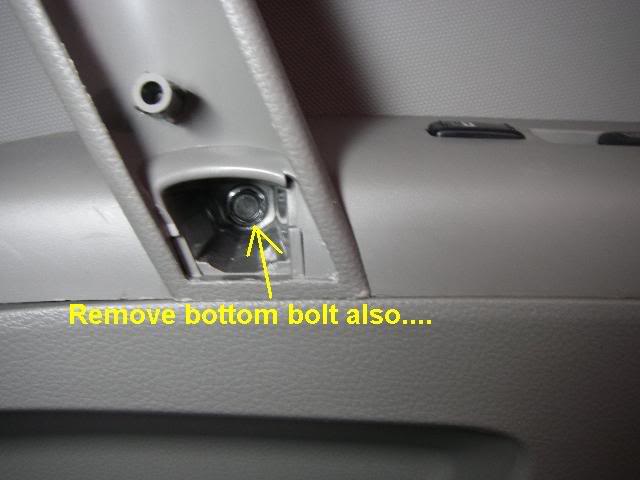
After the switch panel is removed, unscrew the 2 bolts located in the following picture...
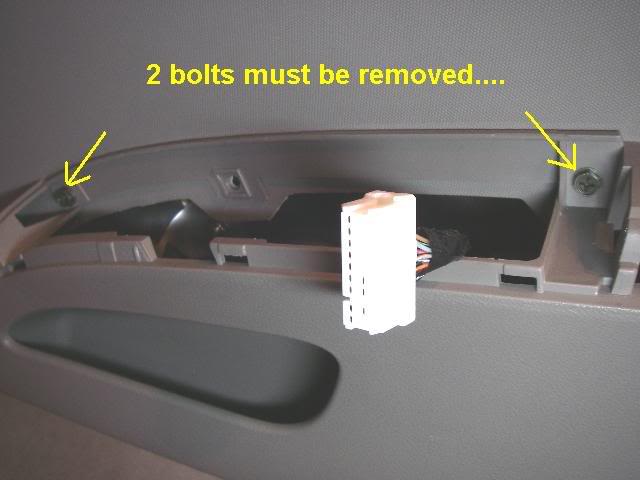
After the switch panel is removed, unscrew the 2 bolts located in the following picture...
The following users liked this post:
dboyzalter (07-24-2015)
05-22-2008, 10:15 AM
#6
Administrator
Thread Starter
iTrader: (25)
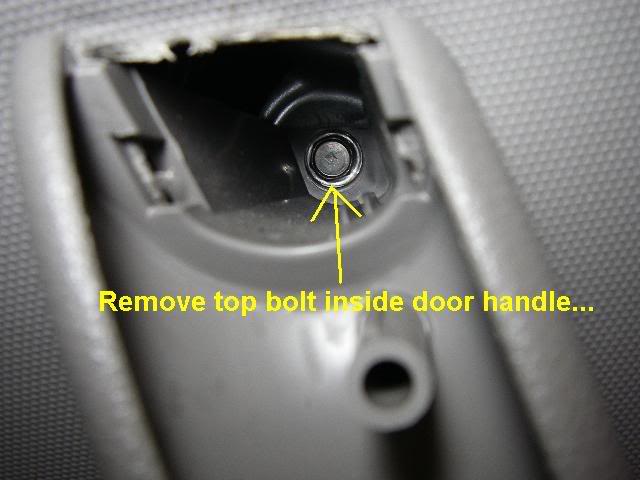
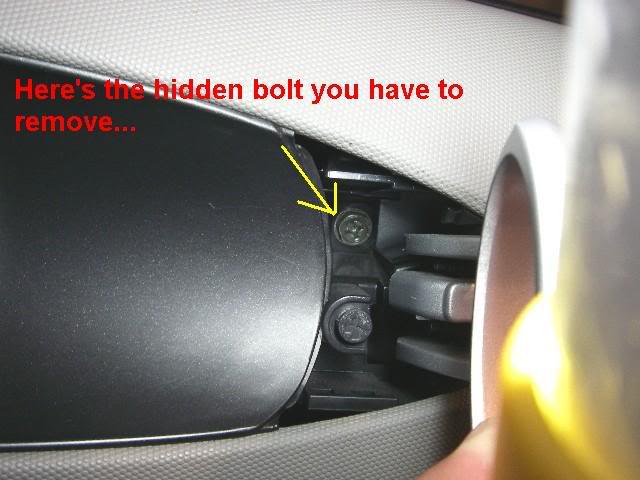
Next step we must remove the hidden screw behind the door lever....

The following users liked this post:
dboyzalter (07-24-2015)
05-22-2008, 10:17 AM
#7
Administrator
Thread Starter
iTrader: (25)
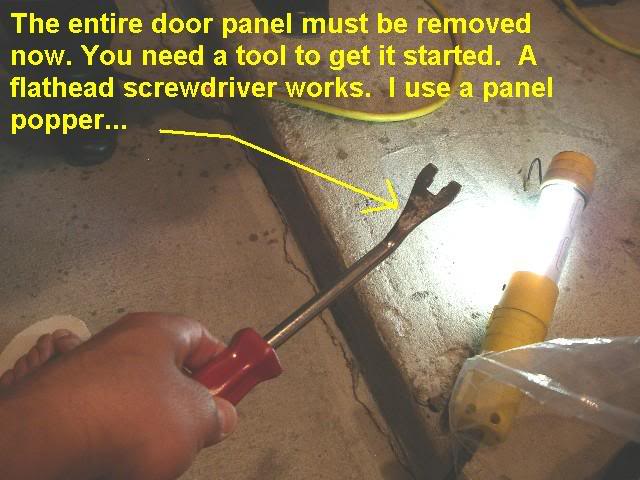
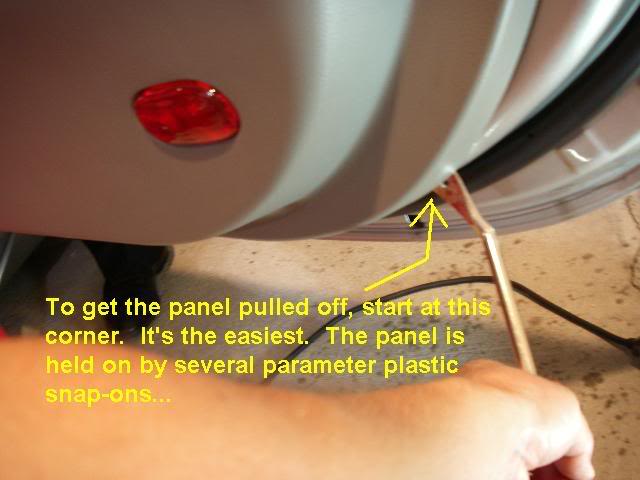
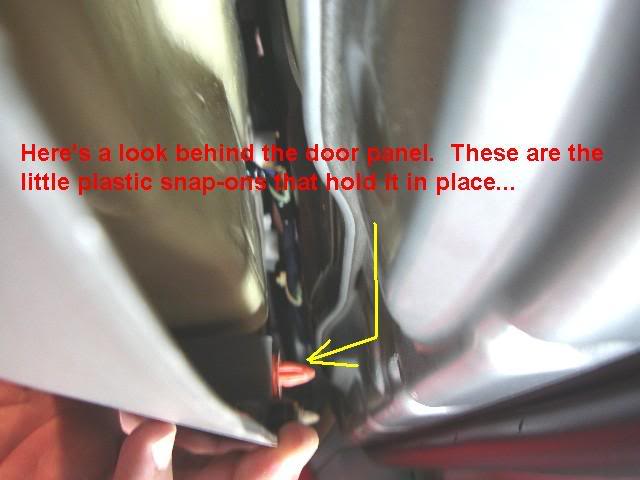
Next we remove the entire outer door panel. Follow the instructions captioned on the pictures....
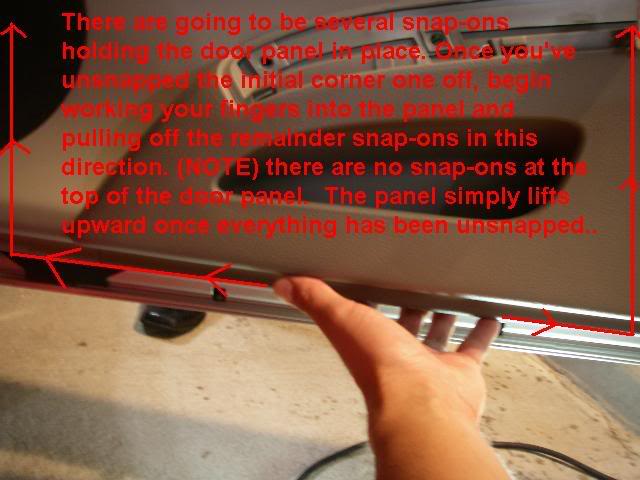
The following users liked this post:
dboyzalter (07-24-2015)
Trending Topics
05-22-2008, 10:25 AM
#8
Administrator
Thread Starter
iTrader: (25)
Once the outer door panel is removed, you'll have to detach the door lever cables in order to disengage the panel from the door....
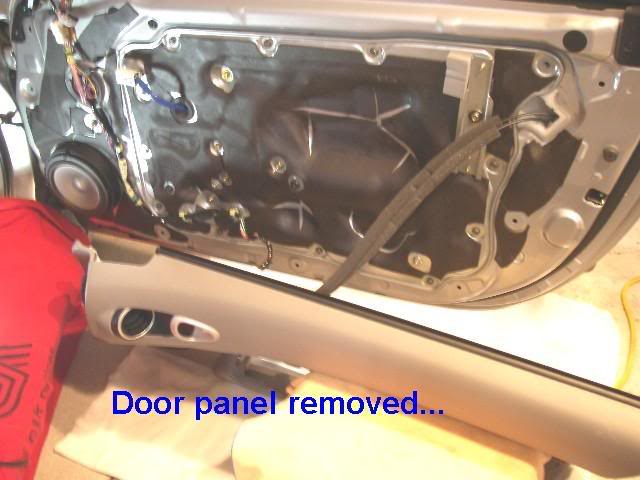
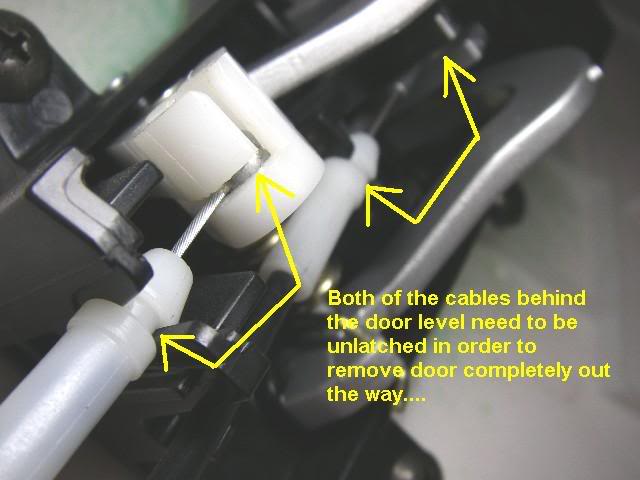
Last edited by VO...; 05-22-2008 at 10:48 AM.
The following users liked this post:
dboyzalter (07-24-2015)
05-22-2008, 10:30 AM
#9
Administrator
Thread Starter
iTrader: (25)
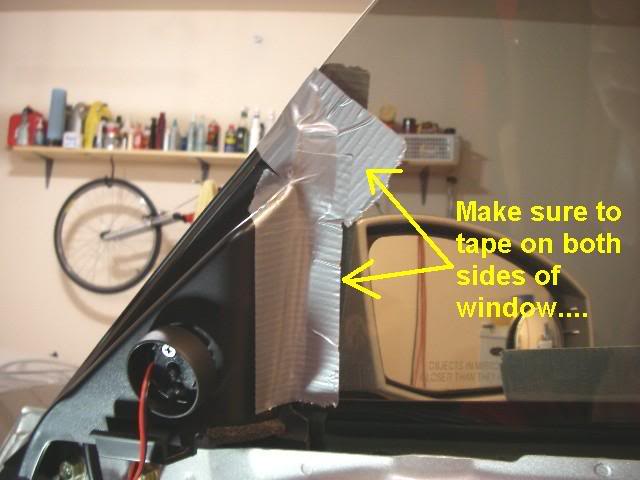
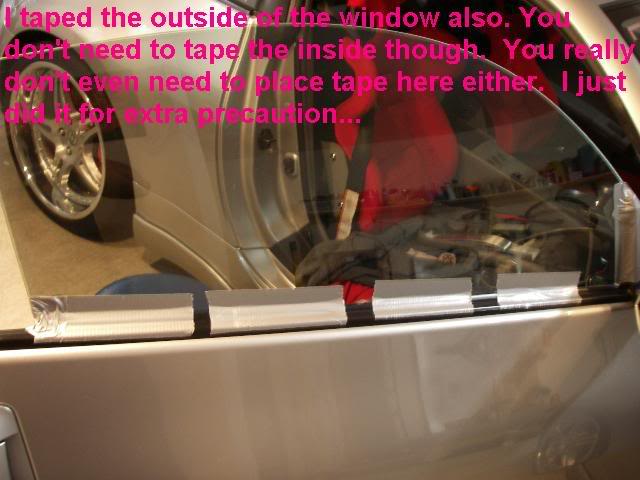
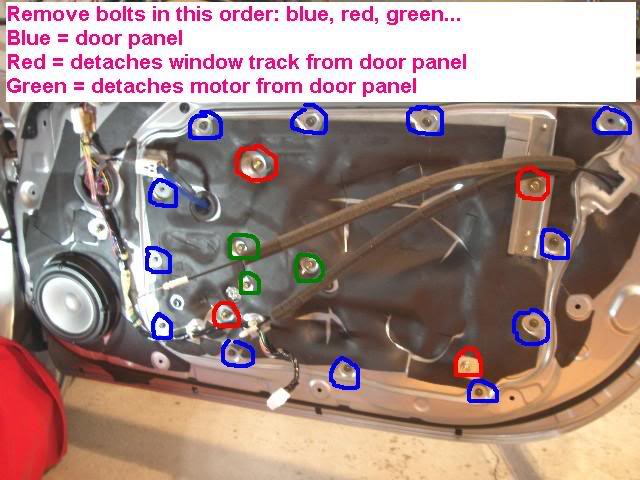
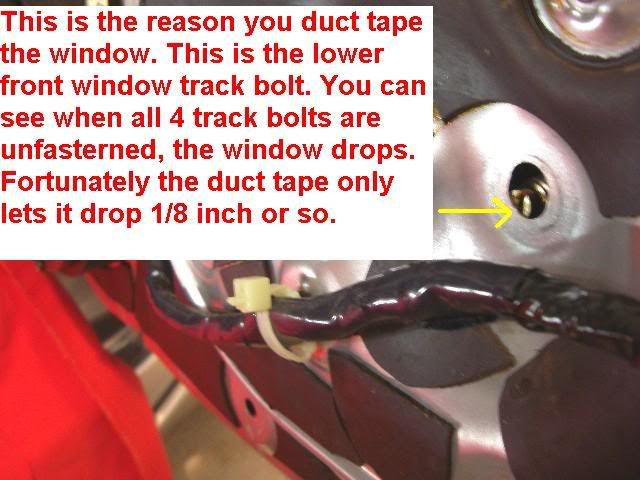
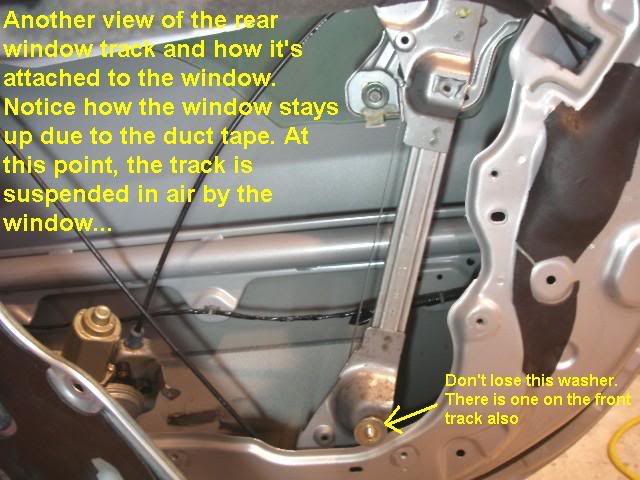
Alright, here's the hard part. Here's the layout of the inner door panel and sequence of bolts you must remove. Before you begin removing bolts, duct tape the window first. *DO NOT SKIP THE DUCT TAPE. IF YOU DON'T HAVE ANY, GO BUY SOME! 
EDIT: 3/15/13 ...I replaced the driver's side motor yesterday with the window stuck in the down position. If the window is in the up position, follow the duct taping procedure, but if it's already in the down position you can still replace the motor easily.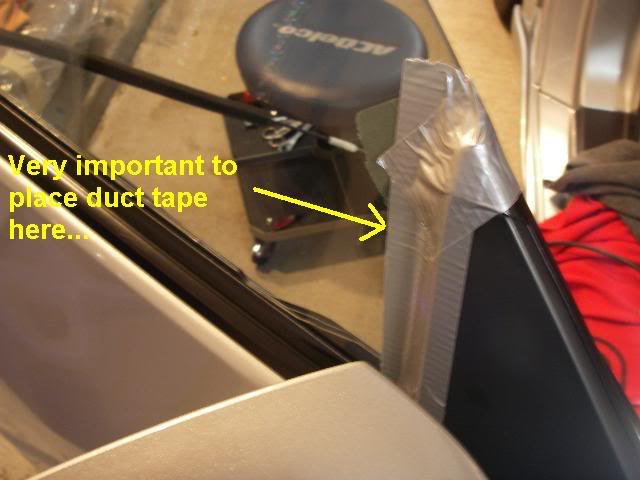
EDIT: 3/15/13 ...I replaced the driver's side motor yesterday with the window stuck in the down position. If the window is in the up position, follow the duct taping procedure, but if it's already in the down position you can still replace the motor easily.
Last edited by VO...; 03-15-2013 at 04:37 AM.
The following users liked this post:
dboyzalter (07-24-2015)
05-22-2008, 10:38 AM
#10
Administrator
Thread Starter
iTrader: (25)
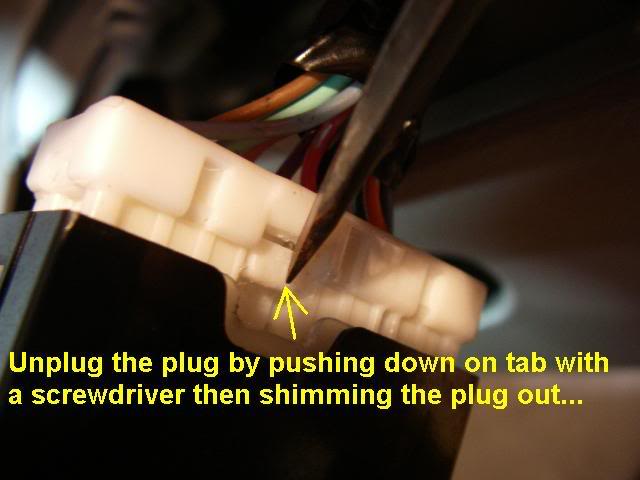
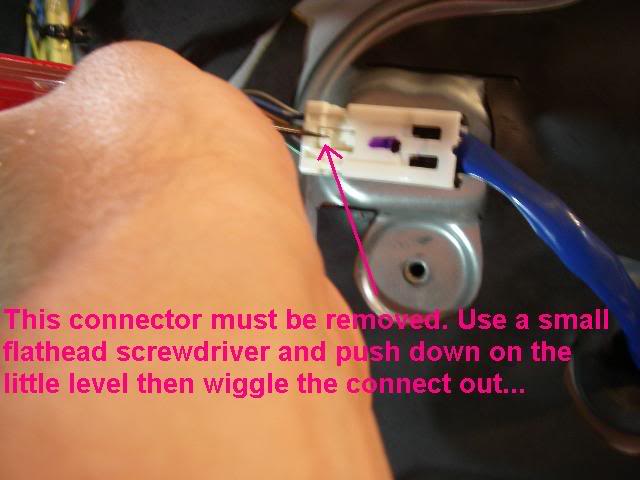
Before removing the door panel, undo this plug...
Here's some extra pics with illustrations to show you what to expect when you start unbolting everything...

Here's some extra pics with illustrations to show you what to expect when you start unbolting everything...
The following users liked this post:
dboyzalter (07-24-2015)
05-22-2008, 10:40 AM
#11
Administrator
Thread Starter
iTrader: (25)
One last thing before opening up the door panel and exposing all the internals...
The following users liked this post:
dboyzalter (07-24-2015)
05-22-2008, 10:43 AM
#12
Administrator
Thread Starter
iTrader: (25)
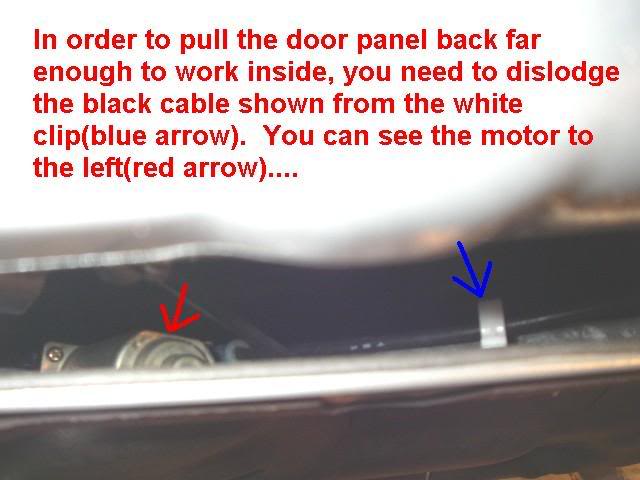
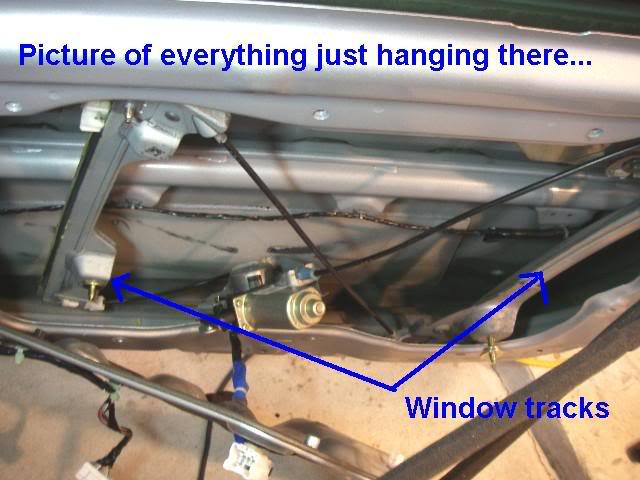
Here's some internal shots of the door once you've pulled the door panel aside...
The following users liked this post:
dboyzalter (07-24-2015)
05-22-2008, 10:45 AM
#13
Administrator
Thread Starter
iTrader: (25)
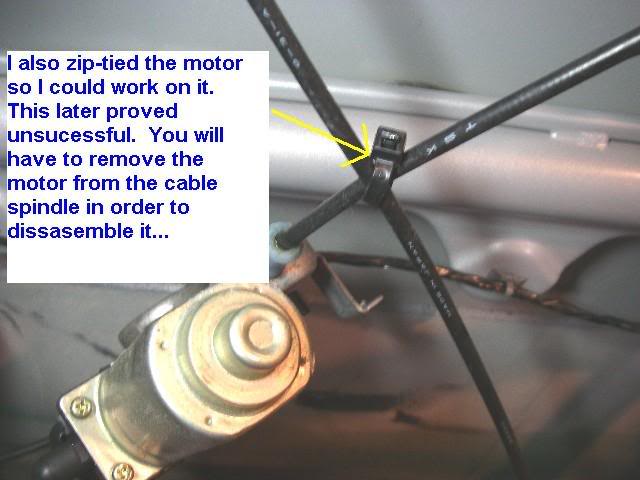
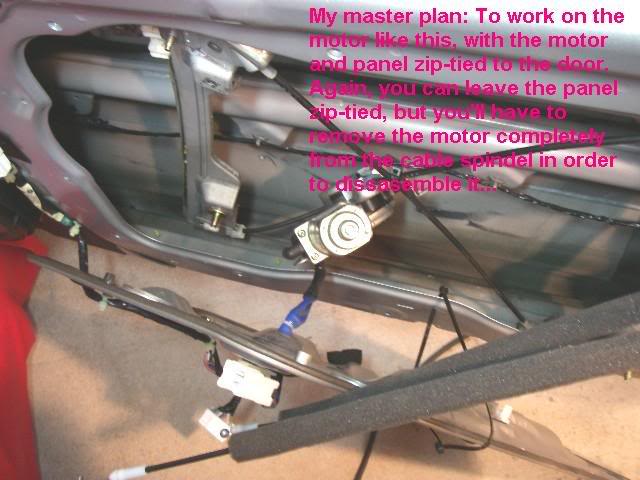
Bright idea, then fail... 
The following users liked this post:
dboyzalter (07-24-2015)
05-22-2008, 10:47 AM
#14
Administrator
Thread Starter
iTrader: (25)
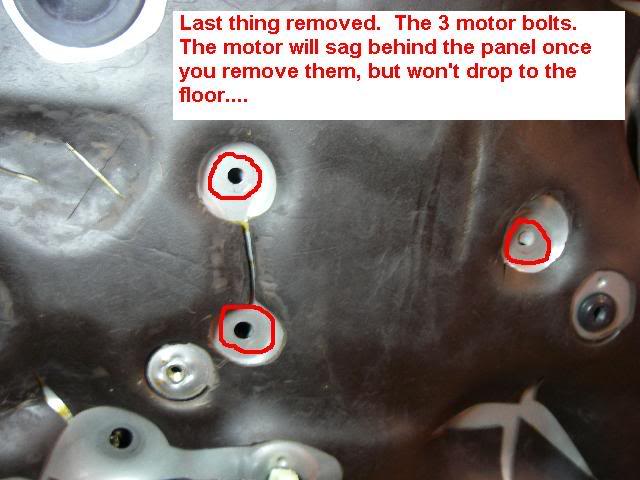
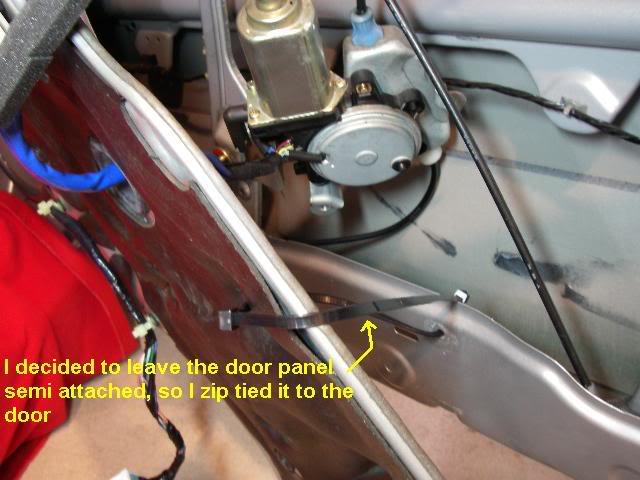
Before I discovered you need to remove the motor entirely from the spindle, this is how things went down...
The following users liked this post:
dboyzalter (07-24-2015)
05-22-2008, 10:50 AM
#15
Administrator
Thread Starter
iTrader: (25)
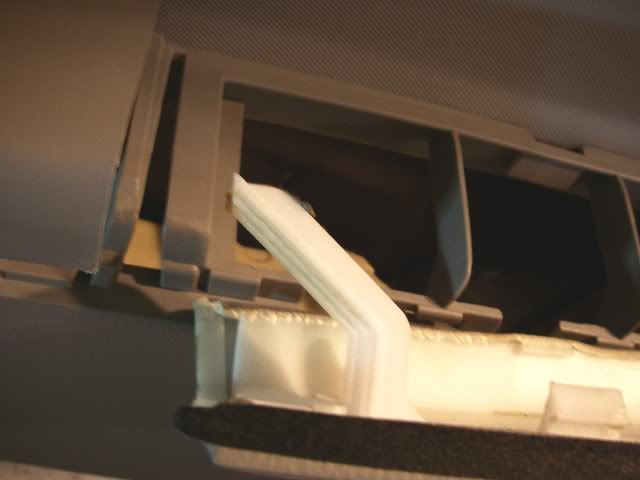
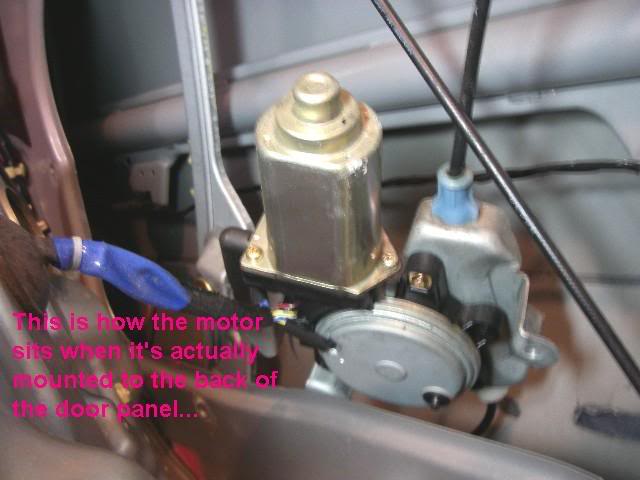
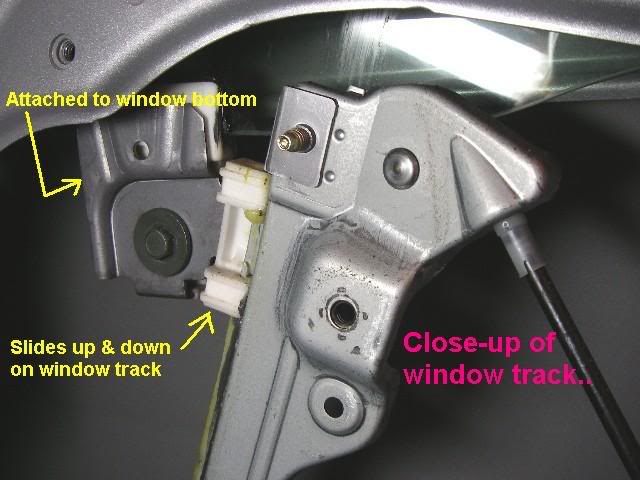
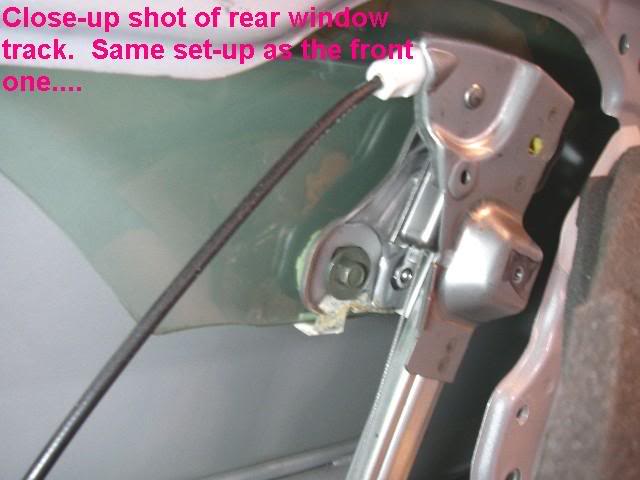
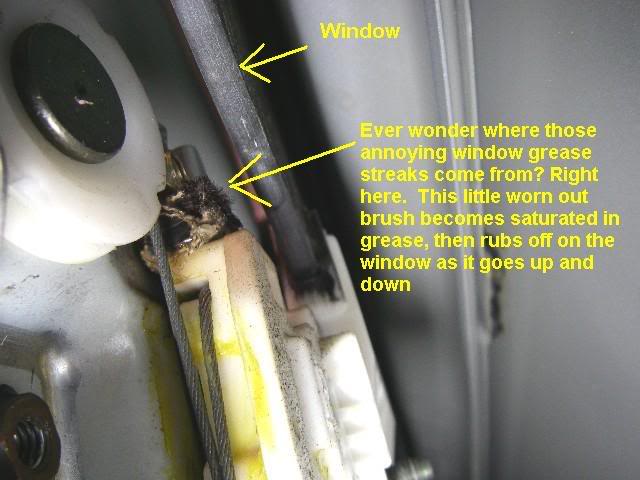
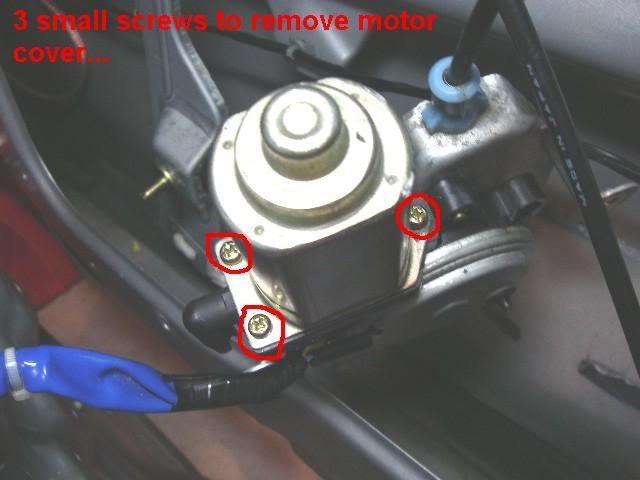
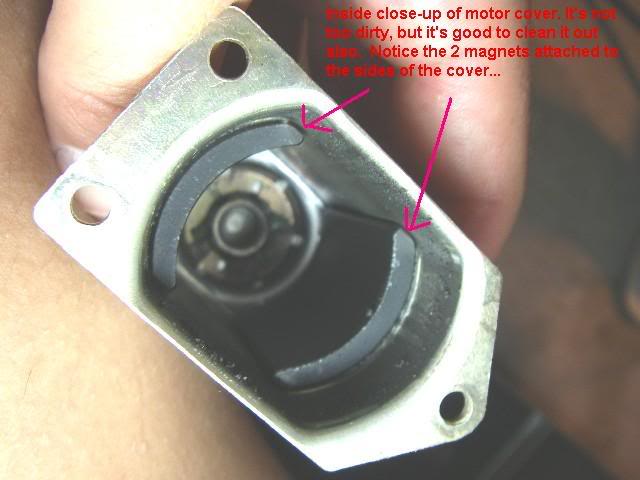
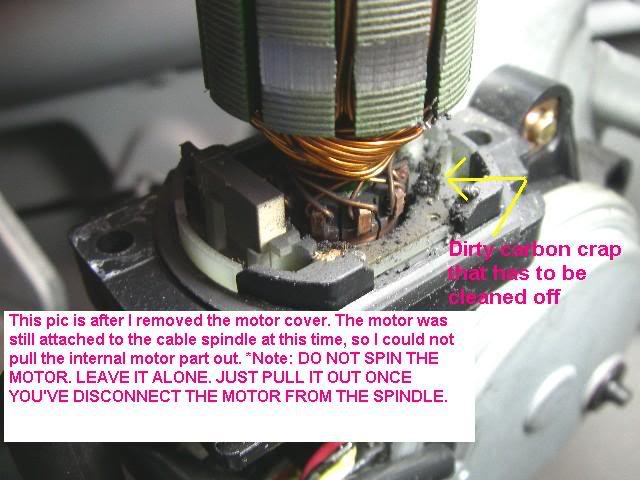
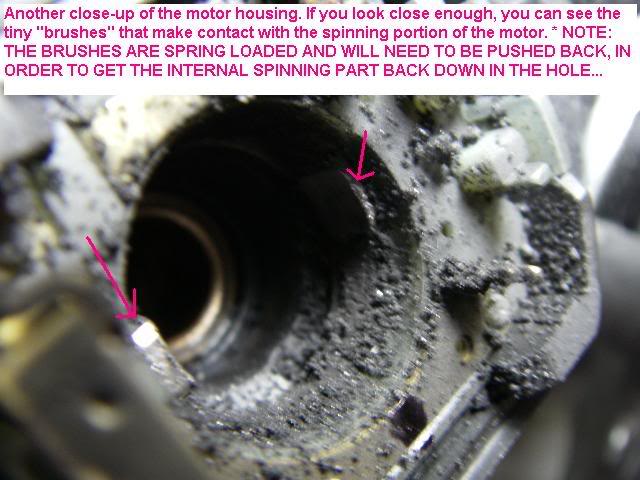
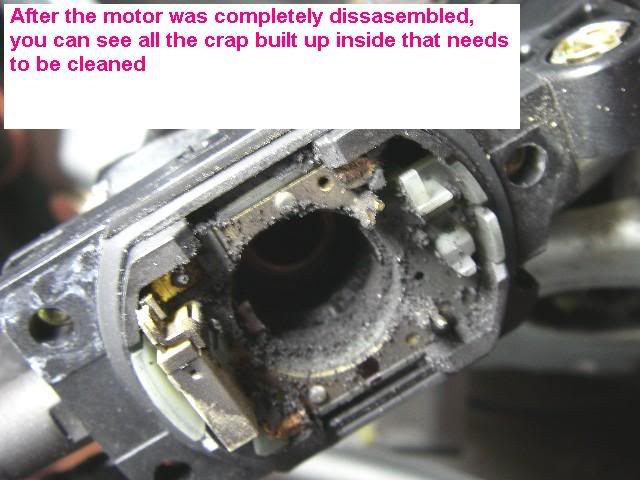
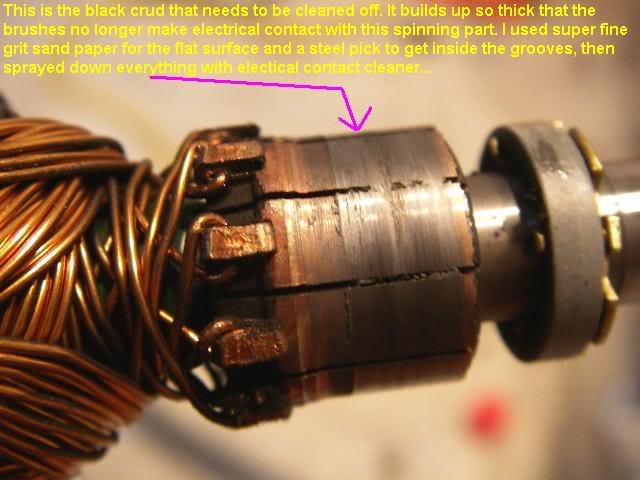
After unsucess with my first course of action, I decided to remove the motor from the spindle.....
Back shot of the spindle/motor assemble....
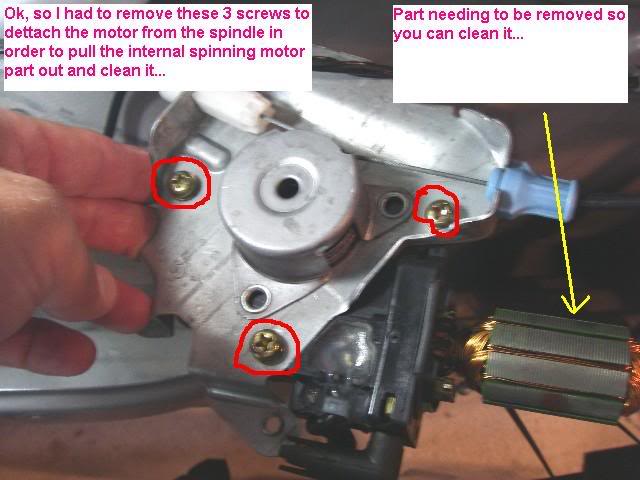
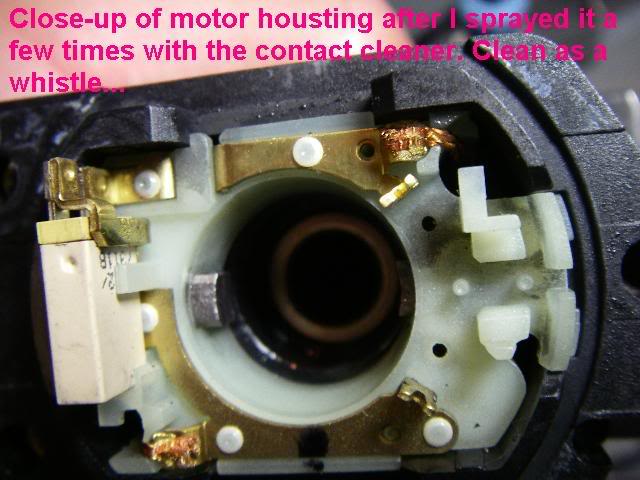
A few shots of what needs to be cleaned...
Back shot of the spindle/motor assemble....
A few shots of what needs to be cleaned...
05-22-2008, 10:52 AM
#16
Administrator
Thread Starter
iTrader: (25)
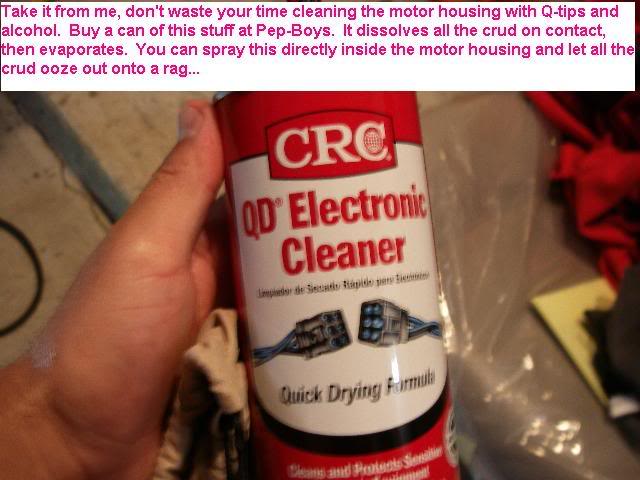
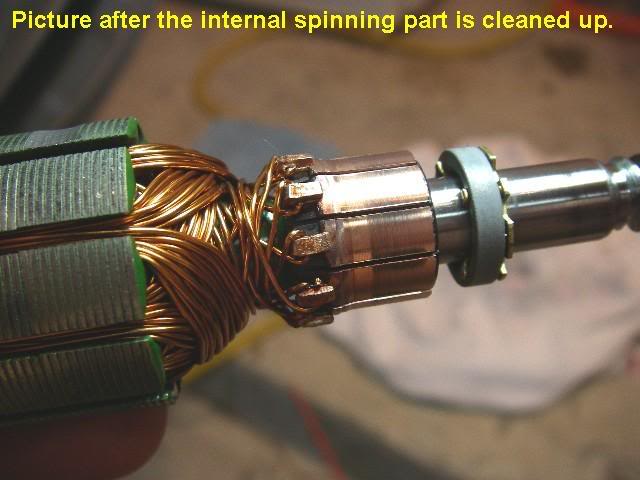
I don't care what ya've heard. Use this stuff or something similar to do the cleaning. I'm all about working smarter, not harder....
A few shots after everything is cleaned up...

A few shots after everything is cleaned up...
05-22-2008, 11:07 AM
#17
Administrator
Thread Starter
iTrader: (25)
Putting everything back is fairly easy. Having your wife or someone help you hold the panel when reattaching it helps a bit, but you can certainly do it by yourself if need be.
Remember to attach the motor to the back of the panel first, then loosely fasten the two bottom 12mm track nuts next. You can loosely attach the two top track bolts after that, then scew in all the remaining 12 panel bolts. Be careful screwing in the 12 panel bolts. They strip easily.
After the inner door panel was back on, I plugged the switch panel in to test it. Just as I thought, when using the "auto up" feature the window rolled up then half way back down.
All I had to do to fix this was perform the "reset" procedure. I've attached a copy of the reset procedure as thumbnails.
You will need to have access to the reset switch. Here it is...
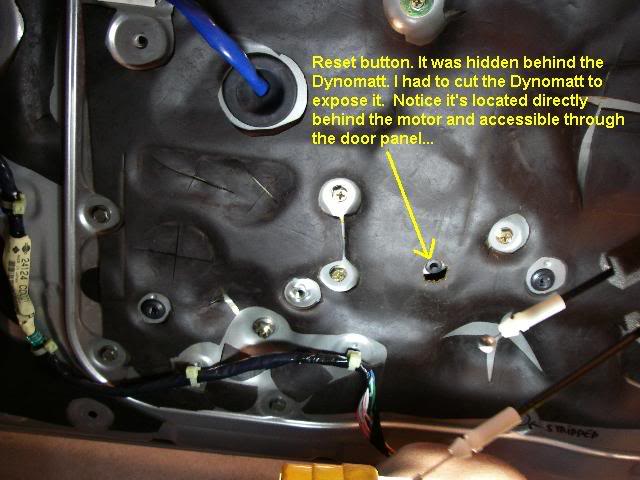
After I completed the reset procedure. Everything worked just fine. I'm hoping this is a long term fix. Only time will tell now.
I hope you guys enjoyed this tutorial.
That is all, OK I'm finished.....
Remember to attach the motor to the back of the panel first, then loosely fasten the two bottom 12mm track nuts next. You can loosely attach the two top track bolts after that, then scew in all the remaining 12 panel bolts. Be careful screwing in the 12 panel bolts. They strip easily.
After the inner door panel was back on, I plugged the switch panel in to test it. Just as I thought, when using the "auto up" feature the window rolled up then half way back down.
All I had to do to fix this was perform the "reset" procedure. I've attached a copy of the reset procedure as thumbnails.
You will need to have access to the reset switch. Here it is...
After I completed the reset procedure. Everything worked just fine. I'm hoping this is a long term fix. Only time will tell now.
I hope you guys enjoyed this tutorial.
That is all, OK I'm finished.....
Last edited by VO...; 05-22-2008 at 11:12 AM.

 05-22-2008, 11:27 AM
#19
Administrator
Thread Starter
iTrader: (25)
Originally Posted by JCat
I can't tell you how timely your post is. My window (motor) just ****.
THANKS FOR POSTING THIS !!
THANKS FOR POSTING THIS !!
05-22-2008, 11:42 AM
#20
Banned

Join Date: Mar 2008
Location: puerto rico
Posts: 2,787
Likes: 0
Received 0 Likes
on
0 Posts
You're a REAL buddy, doing what you did for us, Zed partners! Lamentably, between my job, caring after my 89-year-old mother, & spending quality time with my wife & 2 kids, well, I'm gonna have to pay, either for the clean-up or to get a new motor! Fail...At any rate, I appreciate your selfless action in
trying to help us save a few bucks! The farthest I can go, regarding maintenance on my "Z", is oil changes, tune-up & general stuff (cleaning the K&N with the recharger, battery maintenance, install brake pads, etc.) THANKS, anyway!
trying to help us save a few bucks! The farthest I can go, regarding maintenance on my "Z", is oil changes, tune-up & general stuff (cleaning the K&N with the recharger, battery maintenance, install brake pads, etc.) THANKS, anyway!
Last edited by j.arnaldo; 05-22-2008 at 11:44 AM.

