Project: Nismo roadster


 03-07-2015, 11:02 PM
#202
Ive been battling a nasty flu the lst few days, but when my short-lived energy level was up I was working on installing the rear Autech damper. These dampers were a bit pricey but they are one thing that sets apart the Nismo Zs from the other Zs. I did not have a place to bolt it up to so I had to create my own place. I pulled the trunk apart by removing the carpeting, liner, spare tire and other bits. There is some heavy metal areas around the frame that the convertible top bolts to as well. I positioned the damper just forward of the spare tire in between the frame rails, I needed to attach nuts behind the metal compartments but there was no access. I started to drill access holes with a small hole saw but the metal was too thick. Then I unbolted the convertible top motors on each side which gave me juuuuust baaarely enough room to get my big hands behind the metal so I could get a lock washer and nut in there and bolt the damper in place. I have one side bolted but I was too ill to finish the other side today.
I plan on finshing the other side Sunday and then test drive it to see if I notice a difference. Then I plan on installing the OEM Nismo shocks and springs. I probably should bolt in the front damper first but we shall see.
I plan on finshing the other side Sunday and then test drive it to see if I notice a difference. Then I plan on installing the OEM Nismo shocks and springs. I probably should bolt in the front damper first but we shall see.
 03-08-2015, 05:26 PM
#204
The front damper was a very easy install. I lowered the front of the undertray where it attaches to the front bumper so that I could slide the damper in front of the radiator. then I attached the brackets to the frame of the car. the version 3 bumper allowed me to tighten the bolts on the brackets by going through the front. Next I attach the bar to the brackets and tightened the bolts from underneath. Then I bolted the undertray back to the bumper. I drove the car on a bumpy road that is right down the street from me and it seems to glide over the bumps better. Also I noticed that the car tracks better when turning. I suppose it could be a bit of wishful thinking but I'm sure the dampers must do something. Otherwise nismo would not have installed them.
Back to the spoiler issue.....I removed my V1 spoiler and set the v3 replica spoiler in place. It was obvious that it did not fit right. I held up the spoiler with a stick and took some pictures. Surprisingly, the spoiler really isn't that far off in terms of fitment. The rearward corners are too low which raises up the spoiler on the left and right side front and in the middle of the base. It also pitches the spoiler forward. I believe if I grind down the corners down and smooth it out with some fiberglass resin, that will lower the raised parts down to the level of the trunk. It will also pitch the spoiler backwards and it will give it a more level appearance than is depicted in pictures. Clearly, ABS plastic spoiler would be very difficult to modify. Fiberglass is much easier to work with and it looks like I've got a bit of work ahead of me
Back to the spoiler issue.....I removed my V1 spoiler and set the v3 replica spoiler in place. It was obvious that it did not fit right. I held up the spoiler with a stick and took some pictures. Surprisingly, the spoiler really isn't that far off in terms of fitment. The rearward corners are too low which raises up the spoiler on the left and right side front and in the middle of the base. It also pitches the spoiler forward. I believe if I grind down the corners down and smooth it out with some fiberglass resin, that will lower the raised parts down to the level of the trunk. It will also pitch the spoiler backwards and it will give it a more level appearance than is depicted in pictures. Clearly, ABS plastic spoiler would be very difficult to modify. Fiberglass is much easier to work with and it looks like I've got a bit of work ahead of me
Last edited by DeusExMaxima; 03-08-2015 at 06:24 PM.


 03-09-2015, 02:04 PM
#207
My OEM Nismo Z door panels came in today. They look nice with its unique red stitching and the switch cover is covered with carbon fiber. Id prefer no carbon but thats ok. Id like to get the cup holder lights working when installing the panels. When I have the door panels off, Im going to see why my outside passenger door handle does not work and repair the problem. Hopefully its an easy fix.
03-09-2015, 11:34 PM
#208
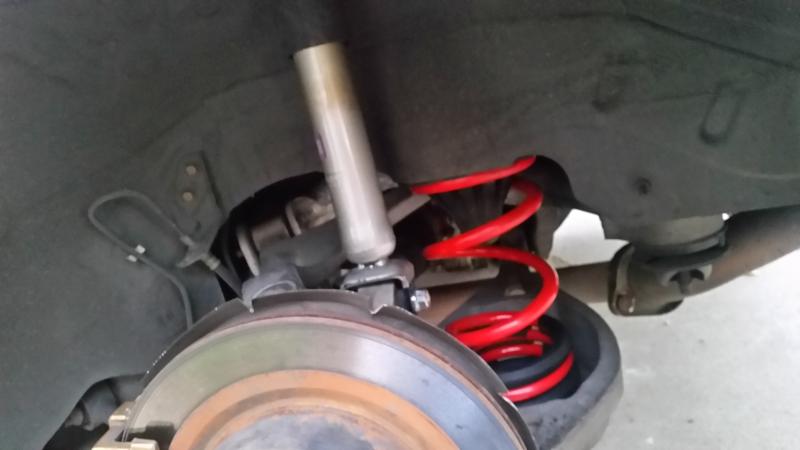
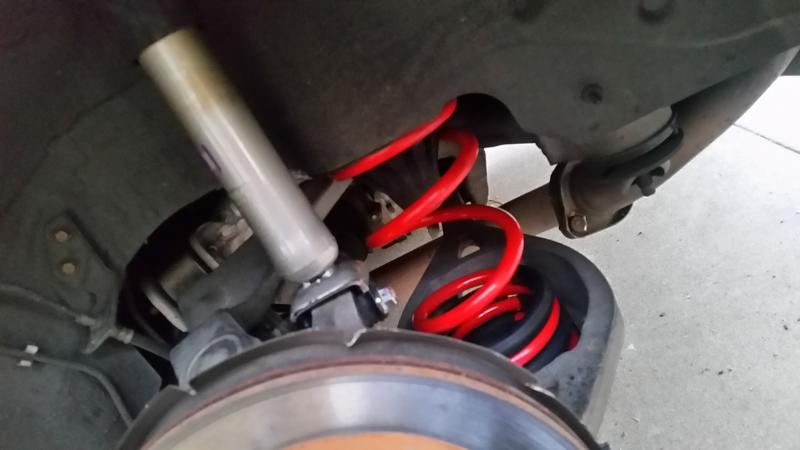
I decided to start putting in the shocks and springs today after work. I only had time to put in one shock and one spring. Before I did that, I took measurements of the ride height of the top of the fender arch to the ground. I noticed the left rear was much lower than the right rear. I thought perhaps the car was on a slope but my driveway is flat. When I got the wheel off I got a good look at the shock absorber and noticed a lot of oil so I figured that shock was blown. When I removed the shock it was clearly blown as I could move it up and down with very little resistance. It is probably also the cause of the clunking sound I've been hearing as it was likely bottoming out over bumps. I also noted that going over bumps resulted in what is called torque steer, where the car steers in a different direction when it goes over a bump, which is very unsettling and possibly a bit dangerous too. I replaced the shock and spring with my OEM nismo unit. I will do the rest of them tomorrow if time permits and I'm looking forward to very much improved handling of the car.

Last edited by DeusExMaxima; 03-09-2015 at 11:36 PM.
03-10-2015, 06:10 AM
#209

I really like that wing on the vert. With the springs, make sure that he bottoms are spun correctly so that they sit all the way in the bottom of the spring cup, if it is still unlevel once both sides are in you can adjust the height a small bit by spinning the spring. I wouldnt go more than about a quarter of a spin though.
03-10-2015, 05:32 PM
#210
I installed the rest of the suspension today and discovered the other rear shock was blown as well. The suspension seems to be fairly level now. I took it for a short drive and the difference is astonishing. I've got somewhere to go tonight so I'll be driving for about an hour and I will have a much better feel of the suspension after I get back.
 03-10-2015, 10:23 PM
#211
I got back from about a 50 mile round trip. The car drives like nrw. It absorbs bumps beautifully but yet it isnt a harsh ride. Ive heard about Nismos being a bit harsh for some, but I dont find that to be the case. The car used to torwue steer on bump and it doesnt do that at all. I think the dampers are smoothing out the ride because it seems quieter when cruising but it tracks through the line on a hard turning freeway ramp very well. Also, it lauches great from a stoplight...no squatting. This suspension seems great for the street and for some track duties too. Great results!!
03-12-2015, 09:53 PM
#212
I started the Nismo door panel swap. While I was in the doors I went to the stealership and got a brand new passenger door handle to replace my broken one. Was easy to do. The door panels...well...not so easy. I had to swap all the little grey cushions, the insulation pad, some of the fasteners, and also the inside handle. Im having difficulty getting it yo fit flush. I think.one of those pads might be in wrong place.. I dunno. Id like to get the cupholder light to work. Maybe I can tap into the switch light circuit?
Did I mention how lovely the suspension is? ))
))
Did I mention how lovely the suspension is?
))
03-13-2015, 01:13 AM
#213

I started the Nismo door panel swap. While I was in the doors I went to the stealership and got a brand new passenger door handle to replace my broken one. Was easy to do. The door panels...well...not so easy. I had to swap all the little grey cushions, the insulation pad, some of the fasteners, and also the inside handle. Im having difficulty getting it yo fit flush. I think.one of those pads might be in wrong place.. I dunno. Id like to get the cupholder light to work. Maybe I can tap into the switch light circuit?
Did I mention how lovely the suspension is?))
Did I mention how lovely the suspension is?
)) 03-14-2015, 10:34 PM
#216
Yesterday evening I took the z to Glendora Mt Rd. Its one of the premier driving roads in the country and it happens to be nearly in my backyard. It's a great place to test suspension and other things on a car as long as you're careful, which I am. The road is curvy and has lots of bumps. The Nismo Z suspension absorbed the bumps beautifully and tracked through the curves perfectly well. The car has tremendous traction and grip. I hv crappy tires on my lovely Track edition rims. With great tires, this car would be just more incredible.
Today I install the long center console from an 08 Nismo Z. I swapped my wire harness since I have heated seat switch, which just popped into the new console from my original console. I install a switch on either side and put the blank in the middle. The cupholder bulb doesnt work so ill get from from Nissan if it proves to be burned out. The manual shifter bezel console WILL NOT WORK on an auto trans car. I bought the proper one from ebay and will sell the manual trans bezel console. I set my old one in the car so I still have climate control. Ill use the white climate control box on the auto trans bezel when it gets here. Then the console project should be finished. After that, im going to start working on the spoiler. Brembo brakes and Nismo z rims are in transit.
For the motor I plan on getting a Morordyne spacer and some sort of y pipe. I dont want to give up comfort for performance so I will not get a cat back. I just want to get about 10-15 hp. An ecu reflash should top off the performance mods.
Id love a hardtop, but $2k is a really hard pill to swallow. If I found a pre owned one, then maybe.
Chassis bracing is very likely in the cards. Also, I may try to seam weld the shock towers and other places on the chassis that are easily accessible. Any advice here?
Last edited by DeusExMaxima; 03-14-2015 at 10:36 PM.
 03-15-2015, 12:22 PM
#218
Yesterday evening I took the z to Glendora Mt Rd. Its one of the premier driving roads in the country and it happens to be nearly in my backyard. It's a great place to test suspension and other things on a car as long as you're careful, which I am. The road is curvy and has lots of bumps. The Nismo Z suspension absorbed the bumps beautifully and tracked through the curves perfectly well. The car has tremendous traction and grip. I hv crappy tires on my lovely Track edition rims. With great tires, this car would be just more incredible.
Today I install the long center console from an 08 Nismo Z. I swapped my wire harness since I have heated seat switch, which just popped into the new console from my original console. I install a switch on either side and put the blank in the middle. The cupholder bulb doesnt work so ill get from from Nissan if it proves to be burned out. The manual shifter bezel console WILL NOT WORK on an auto trans car. I bought the proper one from ebay and will sell the manual trans bezel console. I set my old one in the car so I still have climate control. Ill use the white climate control box on the auto trans bezel when it gets here. Then the console project should be finished. After that, im going to start working on the spoiler. Brembo brakes and Nismo z rims are in transit.
For the motor I plan on getting a Morordyne spacer and some sort of y pipe. I dont want to give up comfort for performance so I will not get a cat back. I just want to get about 10-15 hp. An ecu reflash should top off the performance mods.
Id love a hardtop, but $2k is a really hard pill to swallow. If I found a pre owned one, then maybe.
Chassis bracing is very likely in the cards. Also, I may try to seam weld the shock towers and other places on the chassis that are easily accessible. Any advice here?
Today I install the long center console from an 08 Nismo Z. I swapped my wire harness since I have heated seat switch, which just popped into the new console from my original console. I install a switch on either side and put the blank in the middle. The cupholder bulb doesnt work so ill get from from Nissan if it proves to be burned out. The manual shifter bezel console WILL NOT WORK on an auto trans car. I bought the proper one from ebay and will sell the manual trans bezel console. I set my old one in the car so I still have climate control. Ill use the white climate control box on the auto trans bezel when it gets here. Then the console project should be finished. After that, im going to start working on the spoiler. Brembo brakes and Nismo z rims are in transit.
For the motor I plan on getting a Morordyne spacer and some sort of y pipe. I dont want to give up comfort for performance so I will not get a cat back. I just want to get about 10-15 hp. An ecu reflash should top off the performance mods.
Id love a hardtop, but $2k is a really hard pill to swallow. If I found a pre owned one, then maybe.
Chassis bracing is very likely in the cards. Also, I may try to seam weld the shock towers and other places on the chassis that are easily accessible. Any advice here?
Nissan did a good job of strengthening our chassis. I've never had any flex issues. I've also even had my car jacked up on 3 stands (didn't notice one was low) and there was no droop or flex, even with the convertible top mounts removed (which I suspected to help add rigidity), for months.
03-15-2015, 08:29 PM
#219
i noticed the cup holder light working in the center console. Its interesting because my wiring harness had the connector for the cupholder light even though it did not have a light originally. The connector was taped in the harness. I just untaped it and plugged it in last night I didnt think it worked but it did.
03-16-2015, 10:46 PM
#220
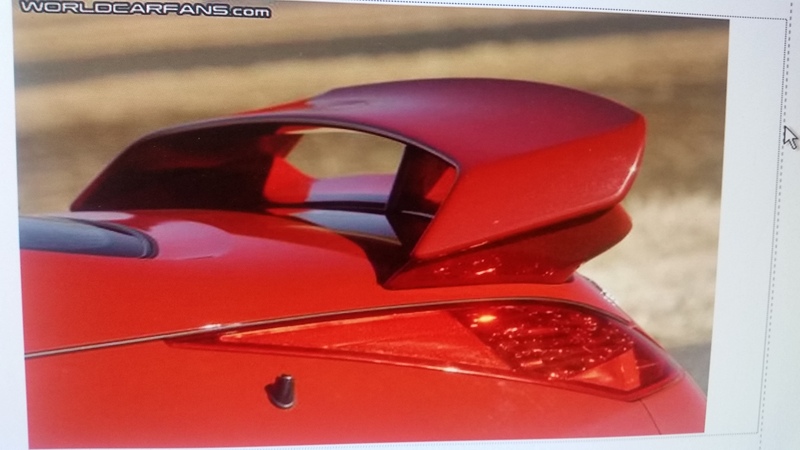
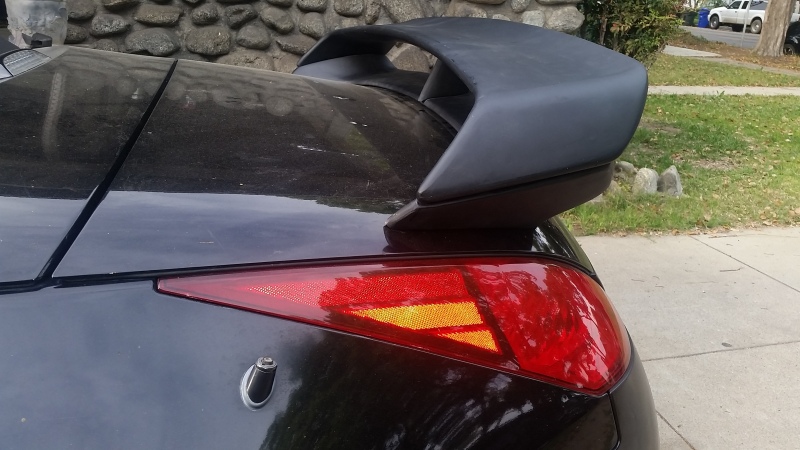
Im struggling a bit regarding setting the rear wing to the trunk. I have been studying pictures of nismo coops and looking at where the wind is a text with respect to the rest of the car. I found a picture that is a close up of the side rear and I positioned my wing according to the picture. I noticed that the leading edge of the spoiler is now flush with the trunk but the rear bottom part of the spoiler hangs off the trailing edge of the trunk.
Pic of Nismo coupe wing
Pic of my wing
Leaing edge of wing:
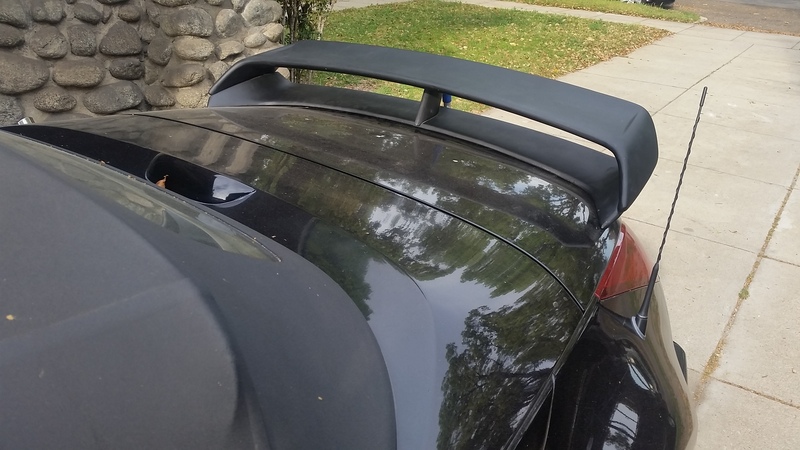
Notice that it is slightly higher in the middle than on the edges. Perhaps if I grind down the edges I will be able to slide the wing forward slightly so that the trailing edge of the wing meets the trailing edge of the trunk
Pic of Nismo coupe wing

Pic of my wing

Leaing edge of wing:

Notice that it is slightly higher in the middle than on the edges. Perhaps if I grind down the edges I will be able to slide the wing forward slightly so that the trailing edge of the wing meets the trailing edge of the trunk