DIY: Making your own [budget] BBK
 07-22-2008, 12:01 PM
#21
Registered User
iTrader: (15)

Join Date: Feb 2008
Location: Southeast
Posts: 75
Likes: 0
Received 0 Likes
on
0 Posts
Looks like a good start. Your mounts kind of scare me though (no offense).
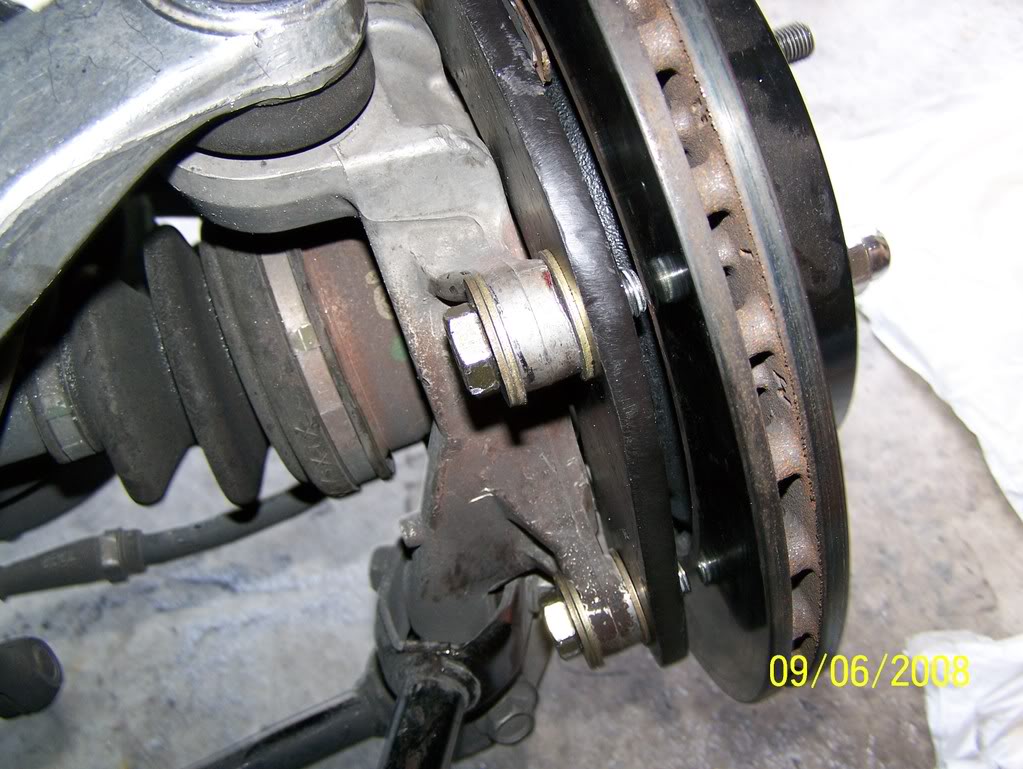
You might have fixed this, but the caliper is off on the upper part.

Just curious but why did you chose to go with the 1.75" pistons and 1.38" on the rear?
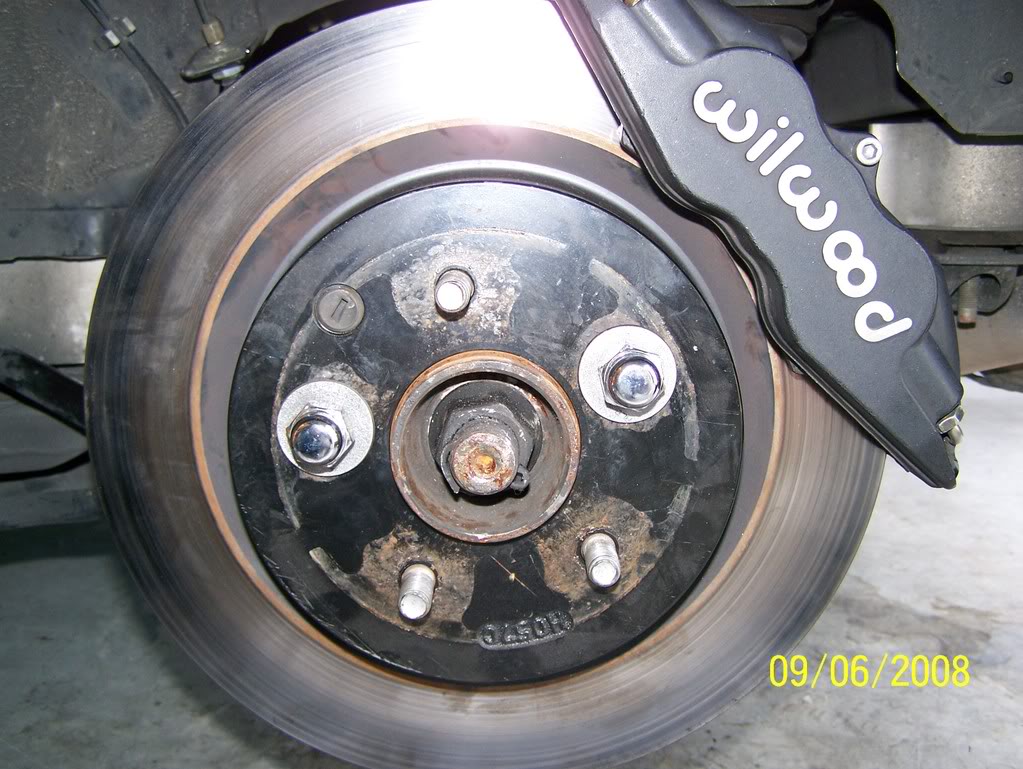
Also, prepare for your rotors to rust in the front. What I would do is take them off and coat them and then when you brake only the surface that the pad comes in contact with will come off leaving you rust free. The reason I say this is because you have about an inch of rotor not being used and they undoubtedly rust.
You might have fixed this, but the caliper is off on the upper part.
Just curious but why did you chose to go with the 1.75" pistons and 1.38" on the rear?
Also, prepare for your rotors to rust in the front. What I would do is take them off and coat them and then when you brake only the surface that the pad comes in contact with will come off leaving you rust free. The reason I say this is because you have about an inch of rotor not being used and they undoubtedly rust.
Last edited by OnADimePBS; 07-22-2008 at 12:05 PM.
 07-24-2008, 06:14 AM
#22

[QUOTE=OnADimePBS]Looks like a good start. Your mounts kind of scare me though (no offense).
no problem, they are a work in progress - made it through 1/2 a day ~ 40 laps at sebring before first sign of trouble, have thicker & better (stronger) steel enroute and the new design has more meat at the point the first one failed
You might have fixed this, but the caliper is off on the upper part.
yes, that pic must have been prior to tightening it all down
Just curious but why did you chose to go with the 1.75" pistons and 1.38" on the rear?
they were in stock? it's better than 1.38 in front 1.75 in rear?
actually i had been reading the stoptech site info and looking at what some of the wilwood kits came with and did the math on the 6 pot kit and figured the 6 pot cal was approximatly equals to a 1.62" 4 pot so i also saw that pot size should go down as the rotors got bigger and since i didn't really increase my rotor size as much as a 13 or 14" inch kit does it would need more piston?
Front Piston areas: 1.75 = 4.81 sq in vs 3.98 stock / 4.12 brembo
Rear Piston areas: 1.38 = 2.98 sq in vs 2.23 stock / 1.95 brembo
f/r ratio: 1.61:1 1.78:1 brem 2.11:1
and had read that they come too much front biased for optimal braking (zeckhausens info? i believe) so tried to back that off some
was concerned with screwing up the abs but while bedding pads and such find it (*seems to) works just fine
if i was ordering again i'd back down to the 1.62 / 1.25 because of MC piston area but 'thrown against seatbelt dyno' (equivalent of butt dyno for engine mods) says i have a very workable ( if sub optimal) combo
my track 'testing' shows that i can go in an extra set of cones before braking
and i can't tell you ( well okay, you probably know) the difference in having brakes that i COULD NOT get to fade, and i was seriously trying to overheat them.. okay i destroyed a bracket, birthing pains , next bracket will be better stronger faster....
[as a engineerish friend told me -> repeated applications of torque (braking) =metal fatigue, Fear it!!]
Also, prepare for your rotors to rust in the front. What I would do is take them off and coat them and then when you brake only the surface that the pad comes in contact with will come off leaving you rust free. The reason I say this is because you have about an inch of rotor not being used and they undoubtedly rust.
spray them with WD40? - yes that is a whopper of a rotor face, the brembo front pads are a little bigger (but thinner) but they must leave a lot of unused rotor too, was hoping it had some sort of tratment that when not rubbed off would protect it, well with lemans sunset i can always call rust an 'accent color'
all in all $$ (but not $$$$!) well spent
no problem, they are a work in progress - made it through 1/2 a day ~ 40 laps at sebring before first sign of trouble, have thicker & better (stronger) steel enroute and the new design has more meat at the point the first one failed
You might have fixed this, but the caliper is off on the upper part.
yes, that pic must have been prior to tightening it all down
Just curious but why did you chose to go with the 1.75" pistons and 1.38" on the rear?
they were in stock? it's better than 1.38 in front 1.75 in rear?
actually i had been reading the stoptech site info and looking at what some of the wilwood kits came with and did the math on the 6 pot kit and figured the 6 pot cal was approximatly equals to a 1.62" 4 pot so i also saw that pot size should go down as the rotors got bigger and since i didn't really increase my rotor size as much as a 13 or 14" inch kit does it would need more piston?
Front Piston areas: 1.75 = 4.81 sq in vs 3.98 stock / 4.12 brembo
Rear Piston areas: 1.38 = 2.98 sq in vs 2.23 stock / 1.95 brembo
f/r ratio: 1.61:1 1.78:1 brem 2.11:1
and had read that they come too much front biased for optimal braking (zeckhausens info? i believe) so tried to back that off some
was concerned with screwing up the abs but while bedding pads and such find it (*seems to) works just fine
if i was ordering again i'd back down to the 1.62 / 1.25 because of MC piston area but 'thrown against seatbelt dyno' (equivalent of butt dyno for engine mods) says i have a very workable ( if sub optimal) combo
my track 'testing' shows that i can go in an extra set of cones before braking
and i can't tell you ( well okay, you probably know) the difference in having brakes that i COULD NOT get to fade, and i was seriously trying to overheat them.. okay i destroyed a bracket, birthing pains
, next bracket will be better stronger faster....[as a engineerish friend told me -> repeated applications of torque (braking) =metal fatigue, Fear it!!]
Also, prepare for your rotors to rust in the front. What I would do is take them off and coat them and then when you brake only the surface that the pad comes in contact with will come off leaving you rust free. The reason I say this is because you have about an inch of rotor not being used and they undoubtedly rust.
spray them with WD40? - yes that is a whopper of a rotor face, the brembo front pads are a little bigger (but thinner) but they must leave a lot of unused rotor too, was hoping it had some sort of tratment that when not rubbed off would protect it, well with lemans sunset i can always call rust an 'accent color'
all in all $$ (but not $$$$!) well spent
07-27-2008, 11:16 AM
#25
Couple of more notes:
while currently waiting for UPS with my better steel / type 4140 / 3/8 plate 1' x 2 ' ~$80 shipped for redoing all 4 brackets ($1430 new total) (from speedymetals.com)
the 4140 has tensile / yield strenghts of 140k / 90k psi vs the 70k/36k psi of the first used steel, a36 from lowes
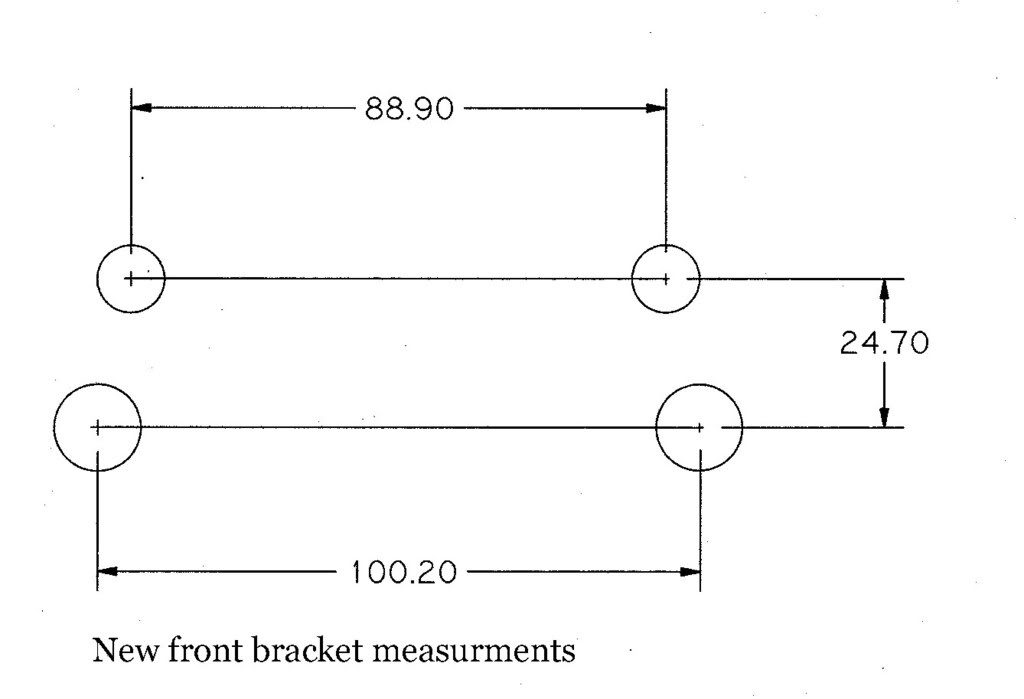
****I Messed up measuring ****
on the front brackets the 18 / 19 mms i kept on about was from the bottom centerline to the BASE (not centerline) of the bottom holes / i measured it from the actual brackets and put it in wrong on the tracing - if you printed it out ( or just count the 1/4" squares on the pic you'll see i labeled ~1 1/8 inches as 19mms - so the top holes are 7/16 or ~ 11mm so 18 or 19 + 5.5= 23.5 to 24.5 which will be the centerline distance) -
**I will make& post exact measurements / pics etc when redoing them next week**
- v. sorry if anyone has been drilling holes in the wrong places!!
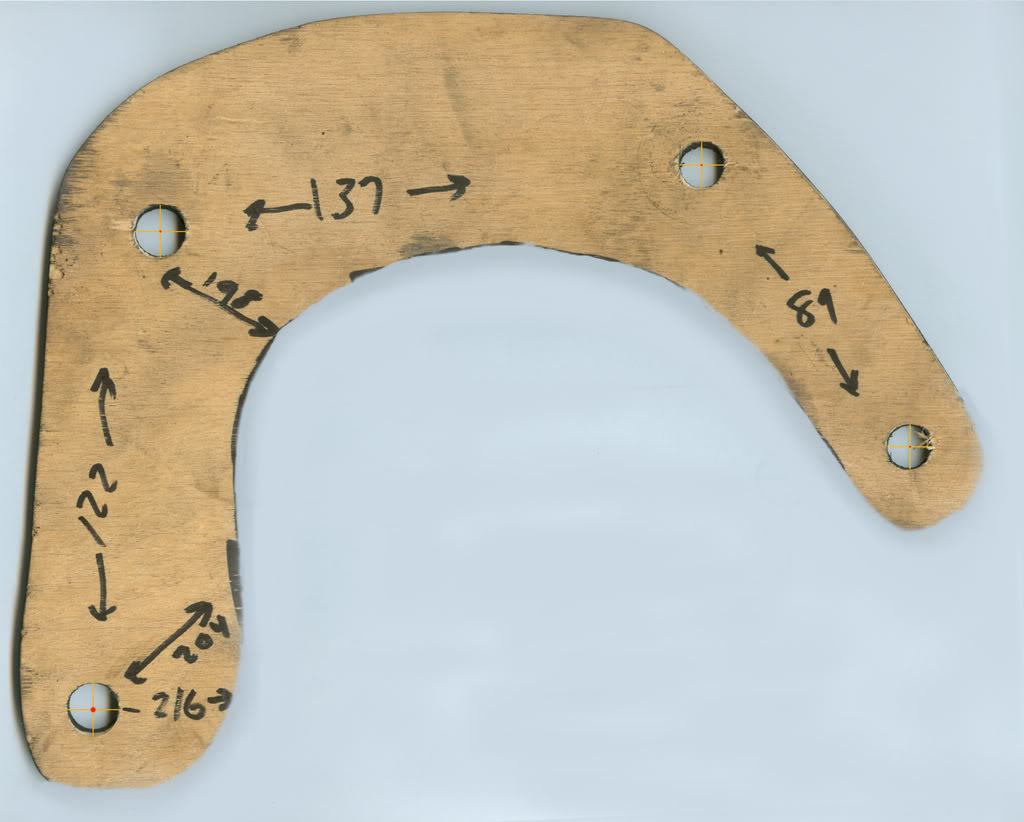
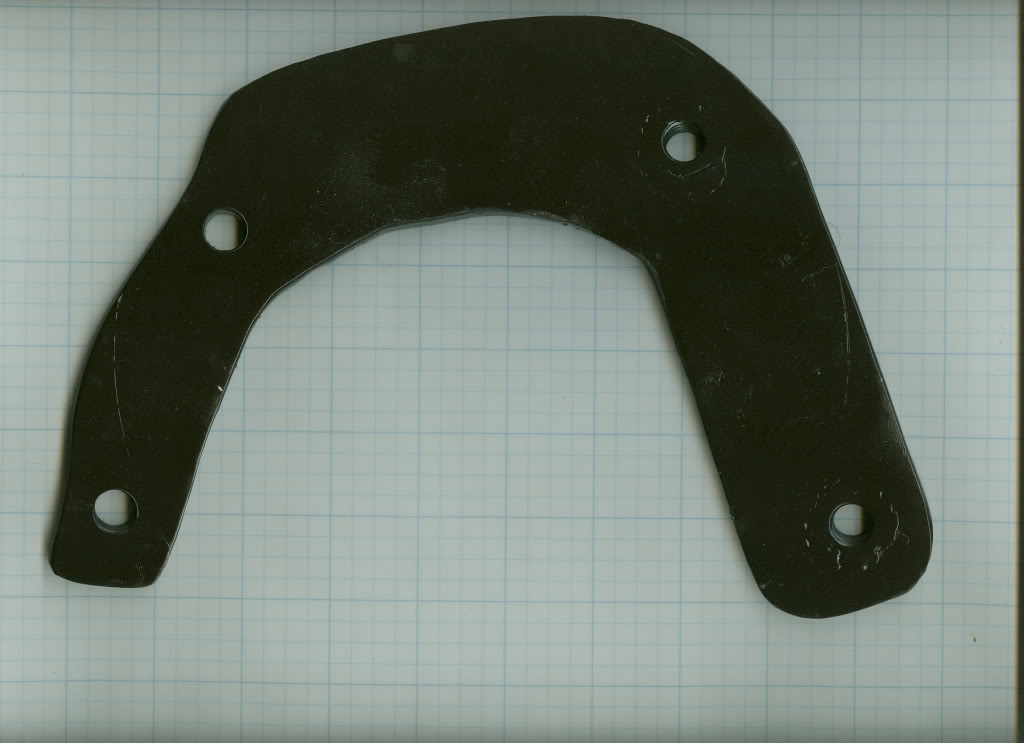
here is the paper template of the new rear bracket exact as on my car at present - the rear calipers & pads and top of rotors align exactly from this template, i scanned the plywood template into photoshop, marked hole centers and then printed it out and it matches the actual template exactly!
[it's currently on the car in basic a36 steel at 1/4" thickness, while the other one is the twin of the one that failed at the track - i've been braking as heavily as i can ( while away from others!) every chance i get on way to / from work etc without further difficulty (got lazy - knew the new steel would get here at some point and didn't want to make another new but short lived bracket)]
the #s are the centerpoint to centerpoint distances of the bolt holes
the left side holes (as on pic posted above) are 122 mm apart (holes are 1/2")
& the right side (caliperside, 7/16" holes) are 89mm (3.5") apart
as indicated the 2 top holes are 137mms and 2 bottom holes are 216mms apart
will try to take some useful pics while making the 3/8" brackets (probably aug 4,5,6th) (will be busy before than getting a goat to sacrifice fri aug 1st during the eclipse!)
unfortunately won't be able to track test it for you until sept13 - the august date is on the weekend of my wife's B-day and she (selfishly!) doesn't want me to go... (of course if she reads this i'll be divorced and free to go!)
more later...
while currently waiting for UPS with my better steel / type 4140 / 3/8 plate 1' x 2 ' ~$80 shipped for redoing all 4 brackets ($1430 new total) (from speedymetals.com)
the 4140 has tensile / yield strenghts of 140k / 90k psi vs the 70k/36k psi of the first used steel, a36 from lowes
****I Messed up measuring ****
on the front brackets the 18 / 19 mms i kept on about was from the bottom centerline to the BASE (not centerline) of the bottom holes / i measured it from the actual brackets and put it in wrong on the tracing - if you printed it out ( or just count the 1/4" squares on the pic you'll see i labeled ~1 1/8 inches as 19mms - so the top holes are 7/16 or ~ 11mm so 18 or 19 + 5.5= 23.5 to 24.5 which will be the centerline distance) -
**I will make& post exact measurements / pics etc when redoing them next week**
- v. sorry if anyone has been drilling holes in the wrong places!!
here is the paper template of the new rear bracket exact as on my car at present - the rear calipers & pads and top of rotors align exactly from this template, i scanned the plywood template into photoshop, marked hole centers and then printed it out and it matches the actual template exactly!
[it's currently on the car in basic a36 steel at 1/4" thickness, while the other one is the twin of the one that failed at the track - i've been braking as heavily as i can ( while away from others!) every chance i get on way to / from work etc without further difficulty (got lazy - knew the new steel would get here at some point and didn't want to make another new but short lived bracket)]
the #s are the centerpoint to centerpoint distances of the bolt holes
the left side holes (as on pic posted above) are 122 mm apart (holes are 1/2")
& the right side (caliperside, 7/16" holes) are 89mm (3.5") apart
as indicated the 2 top holes are 137mms and 2 bottom holes are 216mms apart
will try to take some useful pics while making the 3/8" brackets (probably aug 4,5,6th) (will be busy before than getting a goat to sacrifice fri aug 1st during the eclipse!)
unfortunately won't be able to track test it for you until sept13 - the august date is on the weekend of my wife's B-day and she (selfishly!) doesn't want me to go... (of course if she reads this i'll be divorced and free to go!)
more later...
 07-29-2008, 07:01 PM
#27
well the stock front is 2.252" dia piston
area= (pi*r^2) =3.14159265 * 1.126 *1.126 = 3.983 sq inches
the 1.5" wilwoods=(1.77*2piston)= 3.54
the 1.62" = (2.09 * 2 ) = 4.18 sq inch
(only uses 2, not four pistons as they oppose each other)
(the brembo caliper has 4.12 sq in area)
[i'm a bit overboard with the 1.75 (4.81 sq in) but while it does take a bit more b pedal than stock they work excellent]
if i was redoing this i'd go with the 1.62" / i can't find my sheet but i remember calculating out the 6 piston wilwood and that was right near 4 sq inches also
i'll be posting better bracket info & pics after i redo mine early next week 8/5ish
(just fyi fastbrakes and onadimepbs both offer 4 pot front kits for $825-899 [but YOU can do it for under 650! ] )
] )
area= (pi*r^2) =3.14159265 * 1.126 *1.126 = 3.983 sq inches
the 1.5" wilwoods=(1.77*2piston)= 3.54
the 1.62" = (2.09 * 2 ) = 4.18 sq inch
(only uses 2, not four pistons as they oppose each other)
(the brembo caliper has 4.12 sq in area)
[i'm a bit overboard with the 1.75 (4.81 sq in) but while it does take a bit more b pedal than stock they work excellent]
if i was redoing this i'd go with the 1.62" / i can't find my sheet but i remember calculating out the 6 piston wilwood and that was right near 4 sq inches also
i'll be posting better bracket info & pics after i redo mine early next week 8/5ish
(just fyi fastbrakes and onadimepbs both offer 4 pot front kits for $825-899 [but YOU can do it for under 650!
] )
08-01-2008, 02:34 PM
#28
The long awaited sequel..
the front calipers redux
with better pictures
.............actual measurements
...........................& perfect results (as pertaining to caliper placement") )
)
the stars...
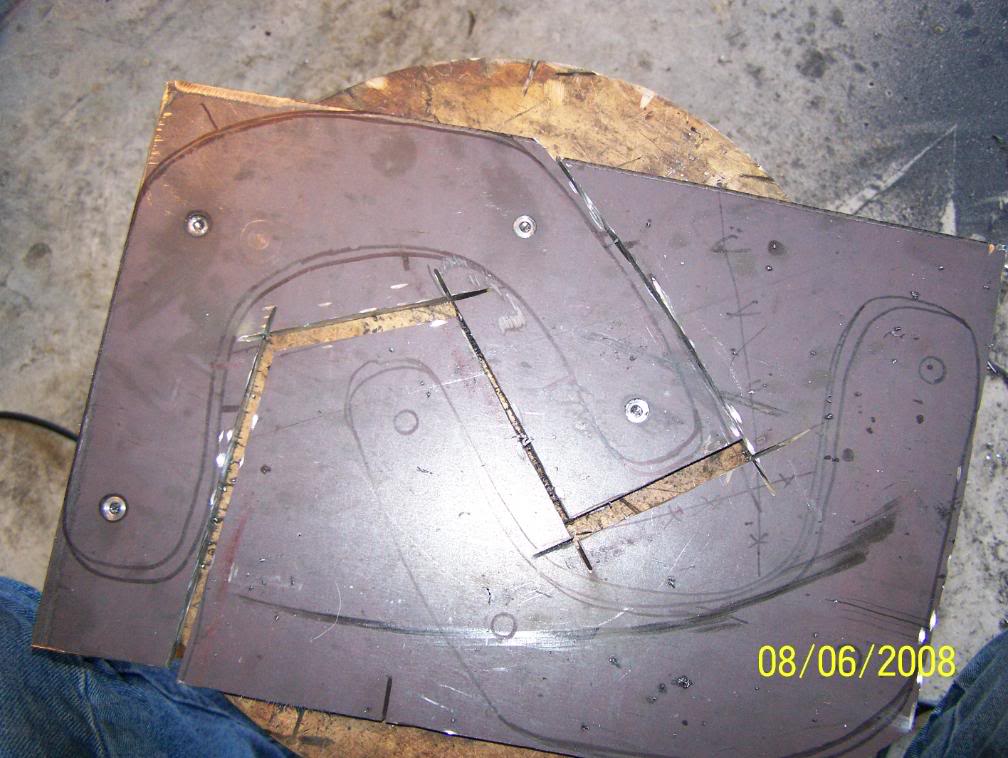
the newly arrived 4140 3/8" thick plate for redoing all brackets
thicker and a stronger alloy!
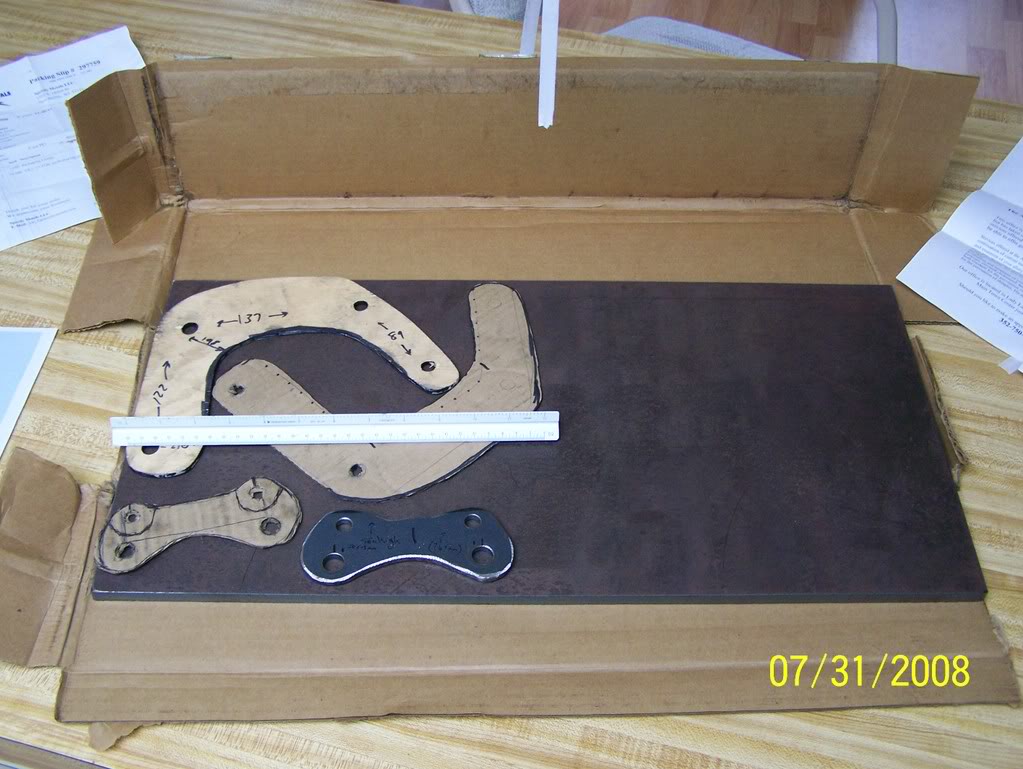
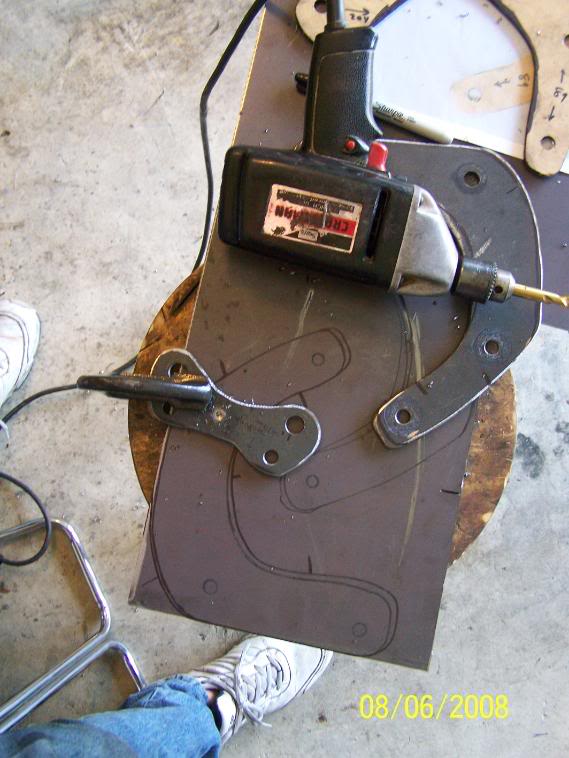
the printout for the front mounting bracket, exactly as i used to make these actual brackets
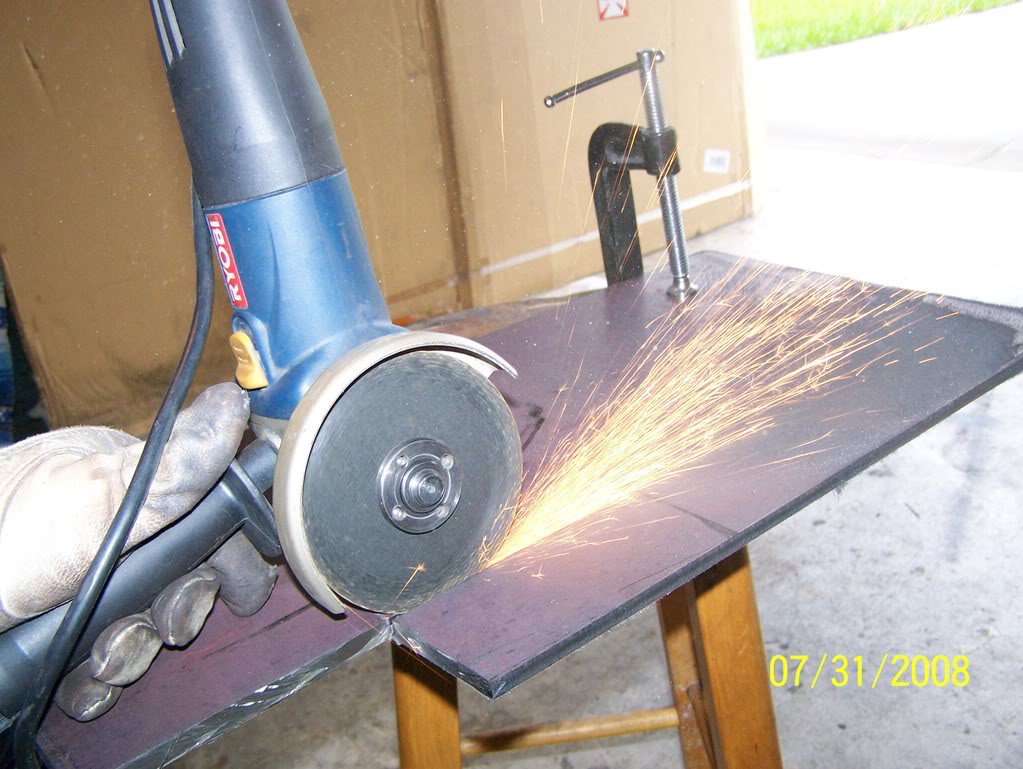
cutting out the blanks (pretty sparks ) (the big cardboard wall in the background is protecting the car)
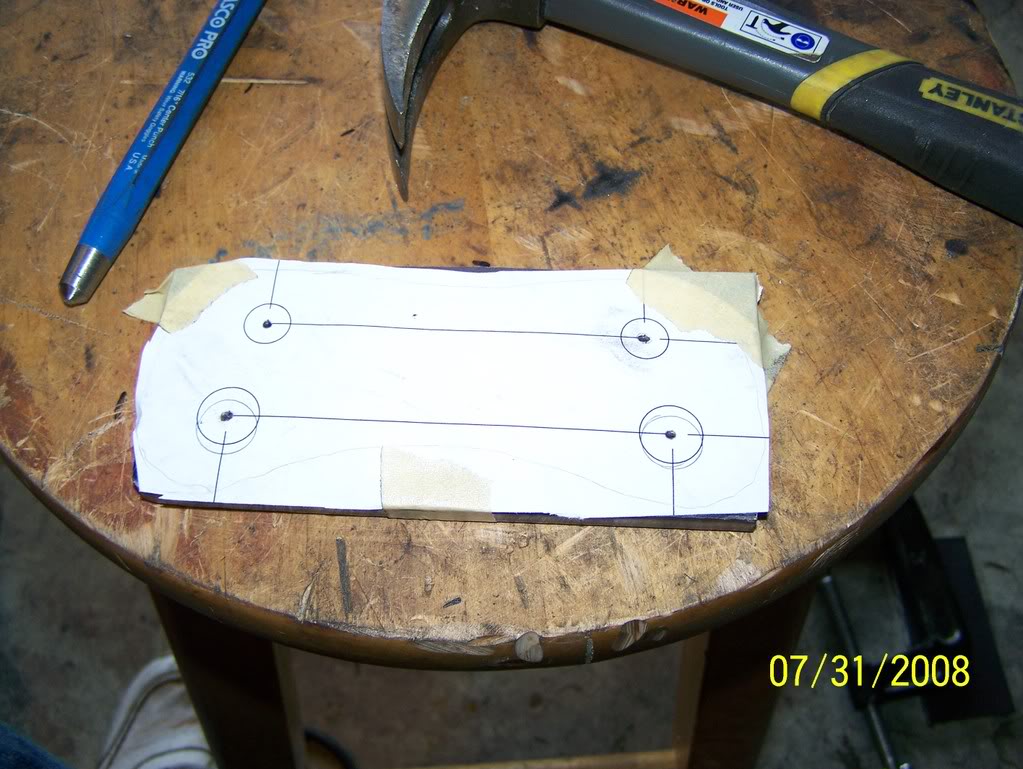
taped the measurement printout to the blank, used the metal punch to start the holes ** still need to be very careful to get the drilled hole started in the exact place, the 'harder' metal is a real biotch to werk with ( the bottom has some extra holes - i traced the current brackets onto this and it agreed with the ~2 mm that the pads stood above the rotors)
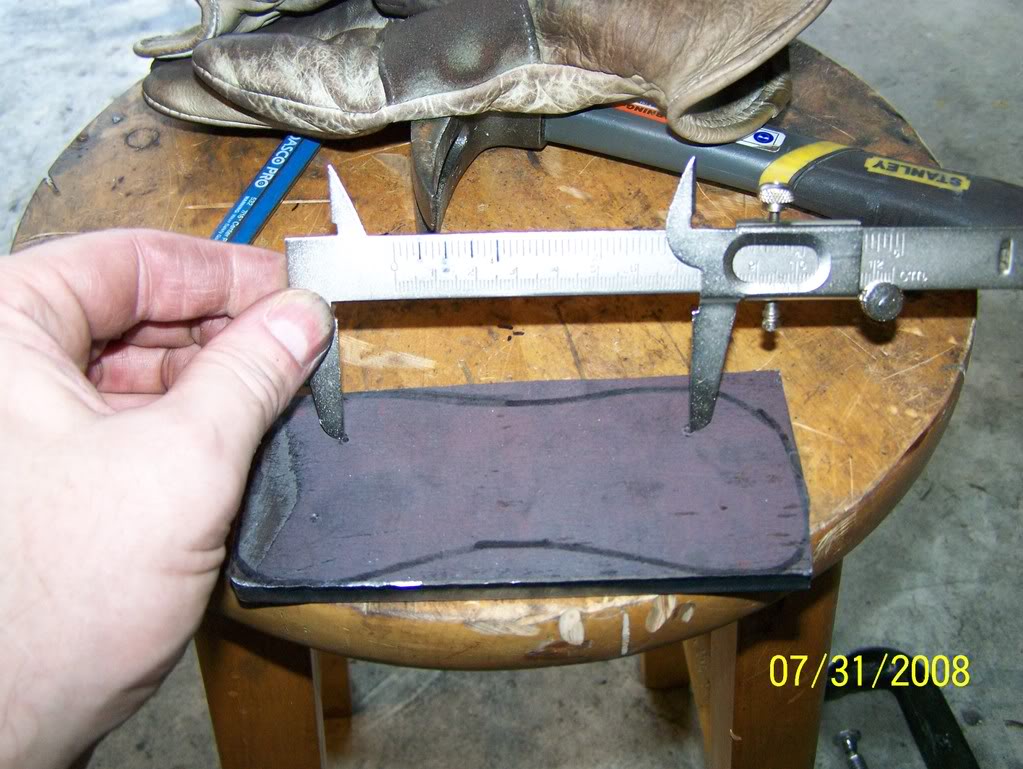
rechecking the measurements prior to drilling
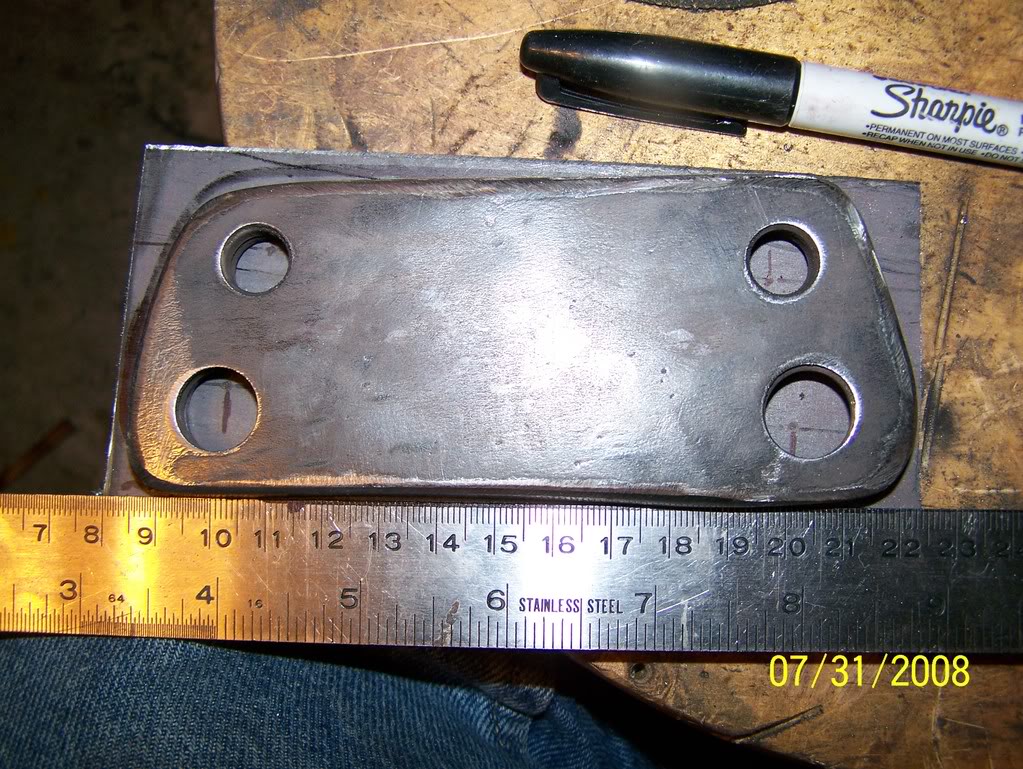
drilled the holes & starting to shape it (ruler for giving you scale from a photo)
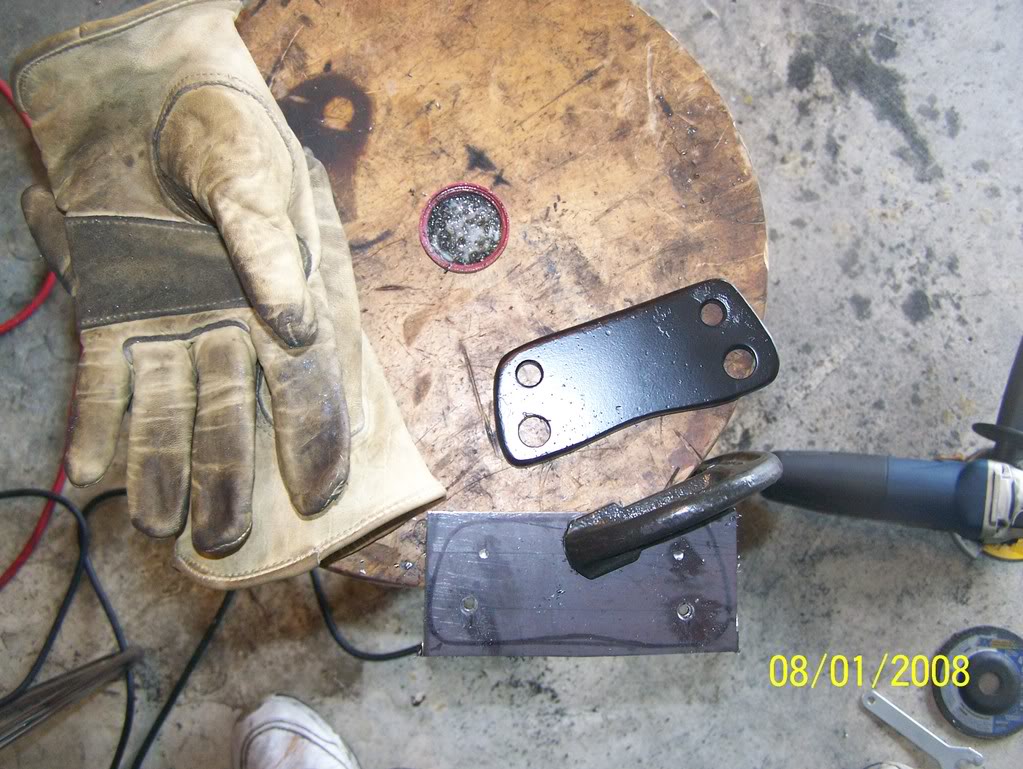
completed, hi-heat painted, first bracket, marking holes on second bracket, won't complete the holes until sure it fits correctly
(*spoiler warning* it did )
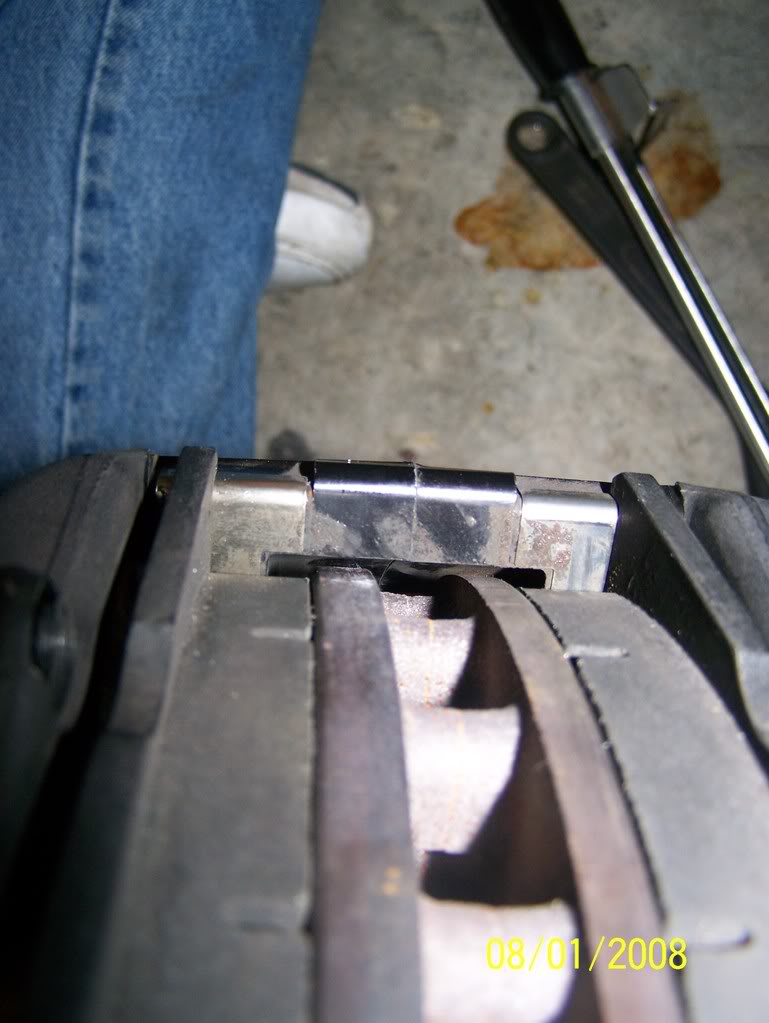
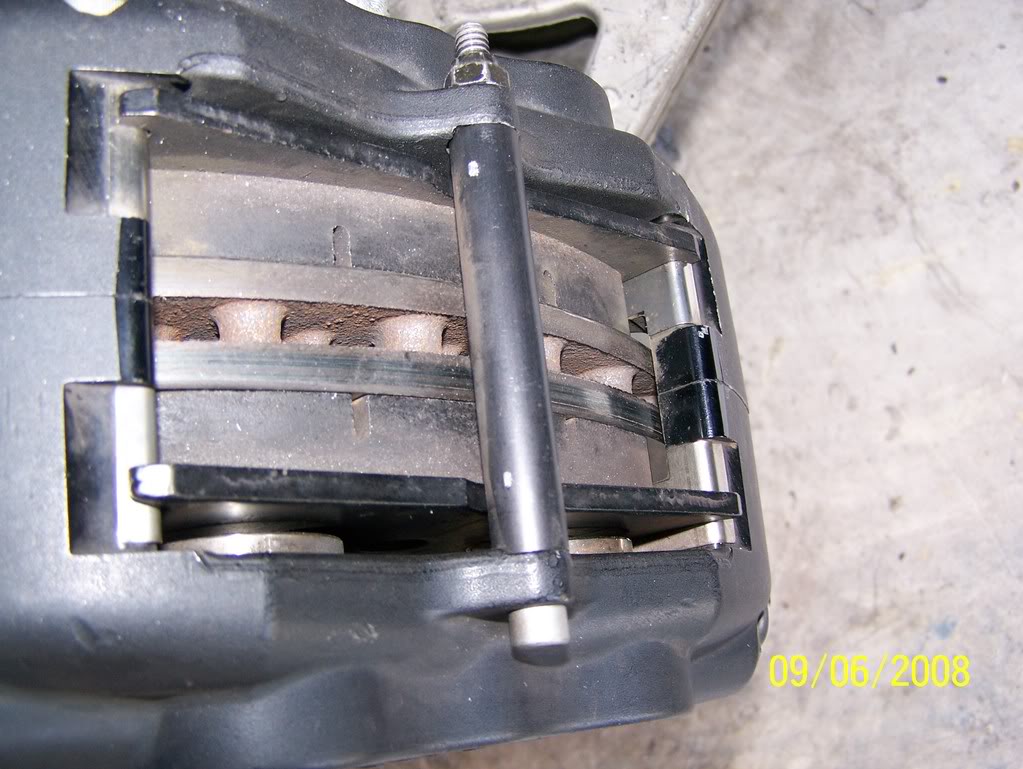
test fitting
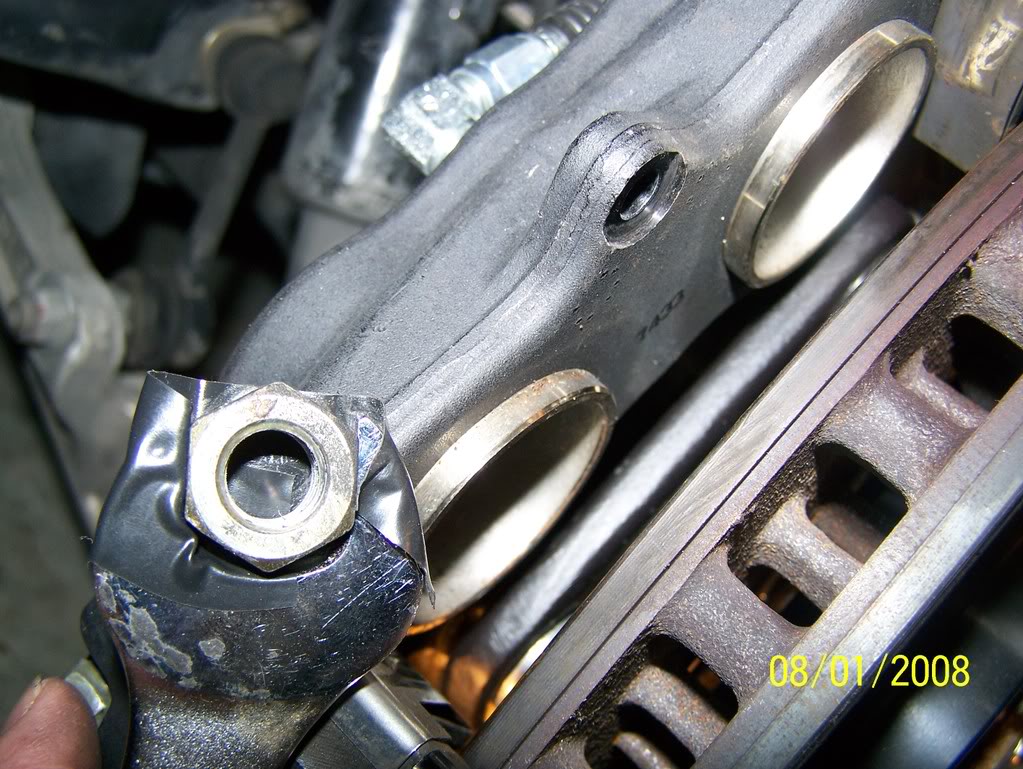
patent pending* securing a nut in the end of a wrench to reach down into the caliper (electrician's tape, i ran out of duct tape)
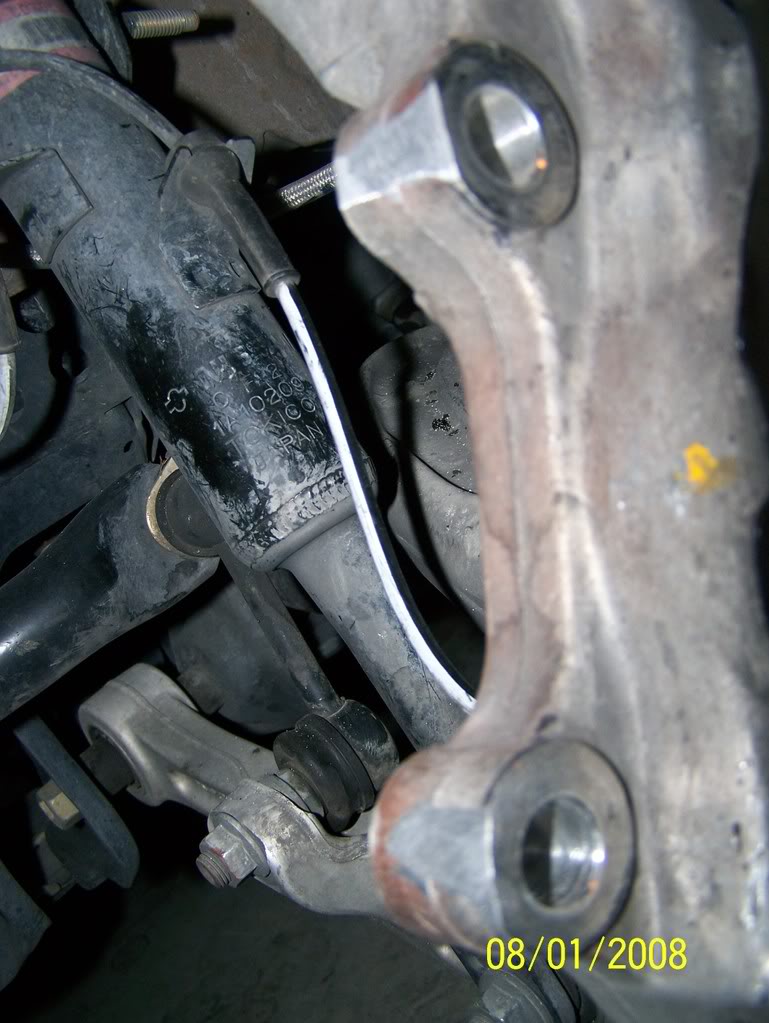
sanded a very small area off the bottom of the caliper mount & off the top of the outside of the car mounting points to ensure it didn't rub and misalign the caliper
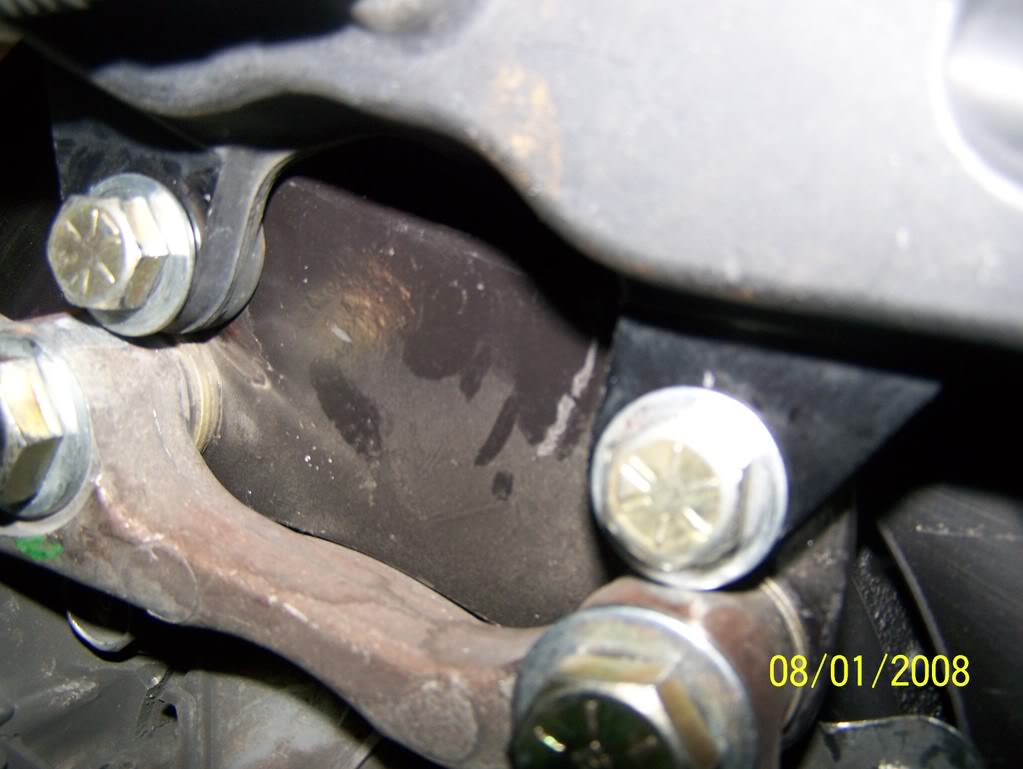
no rubbing, back of bracket after assembly (hi temp loctite / torqued)
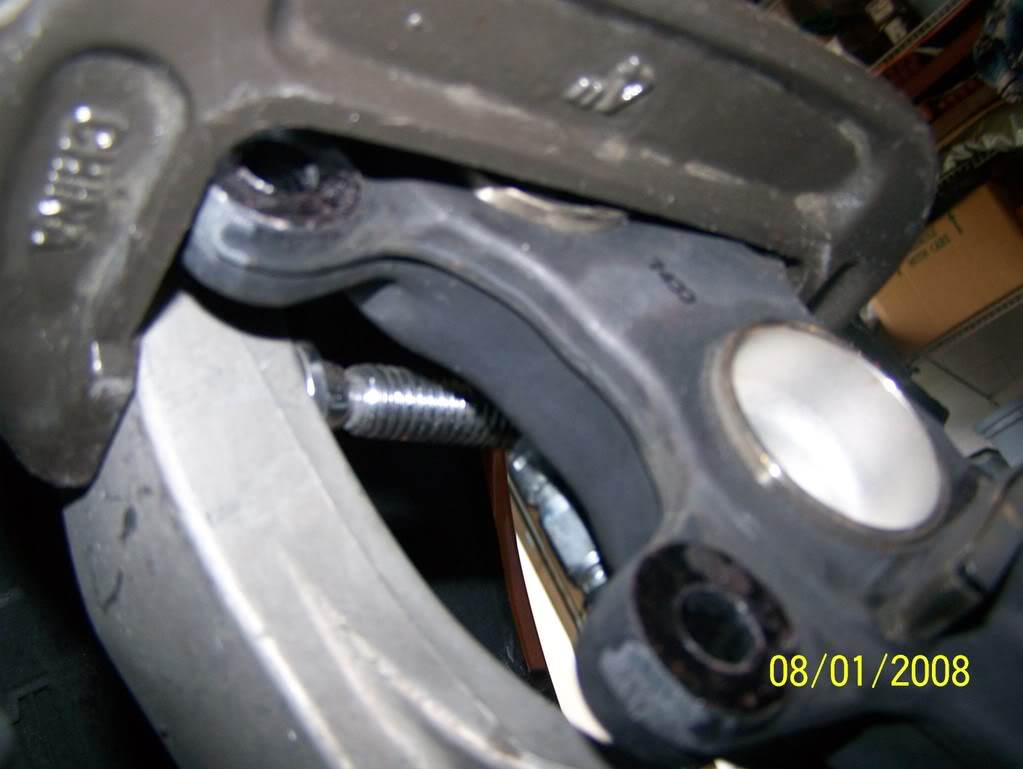
Success! pads and rotor all evenly aligned!
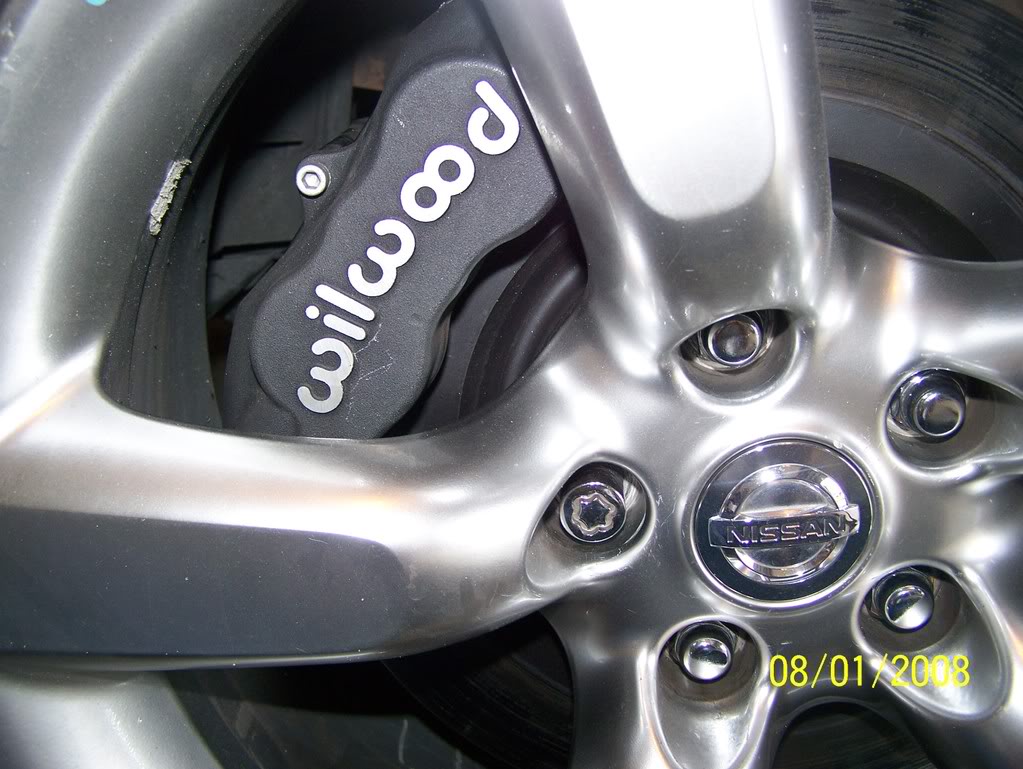
Ready to race!!! [or Ready to HPDE actually]
[All the unused pad area (was rusting) painted on the rotor (thanks to Stoponadime's eagle eye )]
)]
Next Week - rear bracket mount redux two.
the front calipers redux
with better pictures
.............actual measurements
...........................& perfect results (as pertaining to caliper placement
)the stars...
the newly arrived 4140 3/8" thick plate for redoing all brackets
thicker and a stronger alloy!
the printout for the front mounting bracket, exactly as i used to make these actual brackets
cutting out the blanks (pretty sparks
) (the big cardboard wall in the background is protecting the car)taped the measurement printout to the blank, used the metal punch to start the holes ** still need to be very careful to get the drilled hole started in the exact place, the 'harder' metal is a real biotch to werk with ( the bottom has some extra holes - i traced the current brackets onto this and it agreed with the ~2 mm that the pads stood above the rotors)
rechecking the measurements prior to drilling
drilled the holes & starting to shape it (ruler for giving you scale from a photo)
completed, hi-heat painted, first bracket, marking holes on second bracket, won't complete the holes until sure it fits correctly
(*spoiler warning* it did
)test fitting
patent pending* securing a nut in the end of a wrench to reach down into the caliper (electrician's tape, i ran out of duct tape)
sanded a very small area off the bottom of the caliper mount & off the top of the outside of the car mounting points to ensure it didn't rub and misalign the caliper
no rubbing, back of bracket after assembly (hi temp loctite / torqued)
Success! pads and rotor all evenly aligned!
Ready to race!!! [or Ready to HPDE actually]
[All the unused pad area (was rusting) painted on the rotor (thanks to Stoponadime's eagle eye
)]Next Week - rear bracket mount redux two.
Last edited by burntZ; 08-01-2008 at 05:42 PM.
09-06-2008, 06:21 AM
#29
More next month than next week but...
REAR CALIPERS REDUX PART 2:
featuring stronger steel
thicker steel
larger area
fancy welded in nuts
summing up the prior plot [and need for the redo!]--> had made the rear calipers mounting brackets from generic steel plate (like you buy at lowes) BUT in 'testing' at sebring bent a caliper mount so needed to add strenght to my design
i used the prior 'new improved' bracket as the template and used the holes on it as guides for marking the hole locations
came up with a new rig to start holes without drill bit 'wandering'
used an old scrap front bracket, predrilled and clamped to start the holes
Here i'm freeing the 2 rear brackets from their steel prison, all grinder - this metal laughs at pathetic 'steel' jigsaw blades...
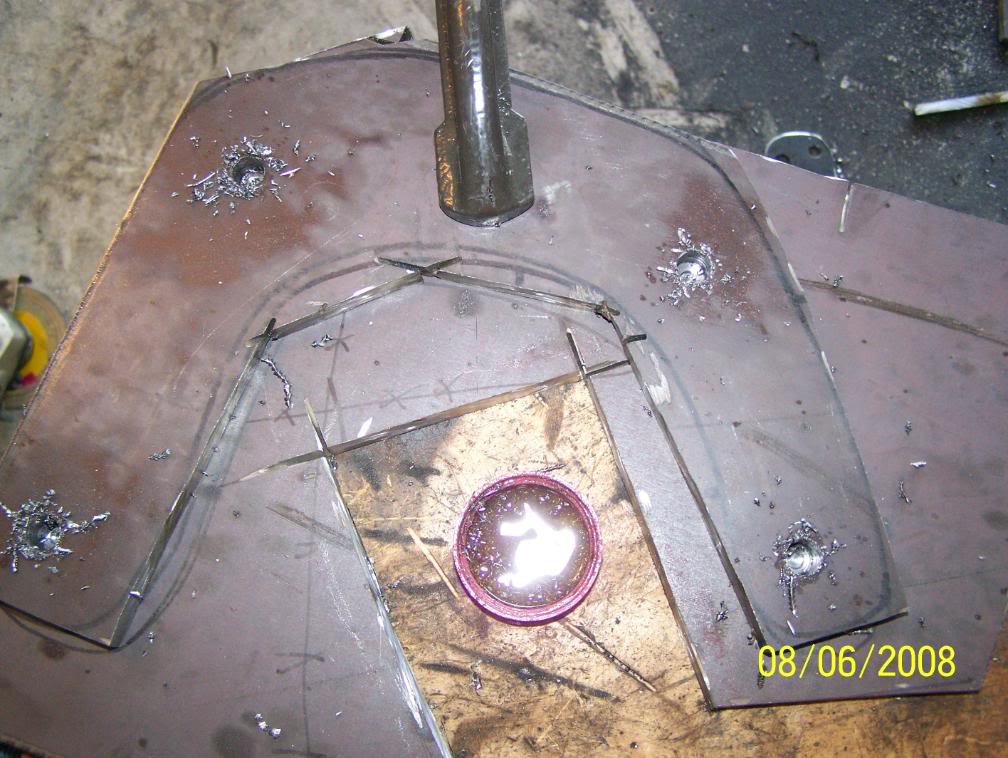
completed drilling out the holes on the top bracket and marking the next holes on the other bracket in one go
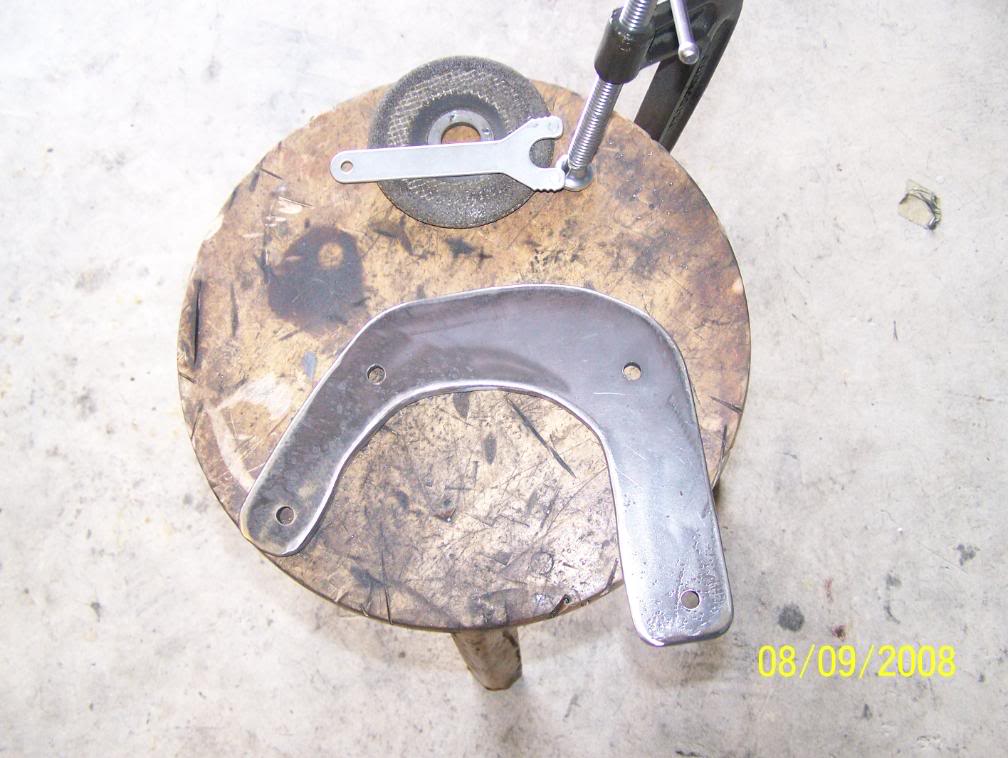
the newly shaped new bracket, only problem... it's thicker which moved the nut way too close to the rotor... took time off to rethink (and dodge hurricanes etc)

my epithany! (not the web browser) i just needed a bit more room so drilled out the holes, edged out the corners with a file and fit the nuts into the mount.
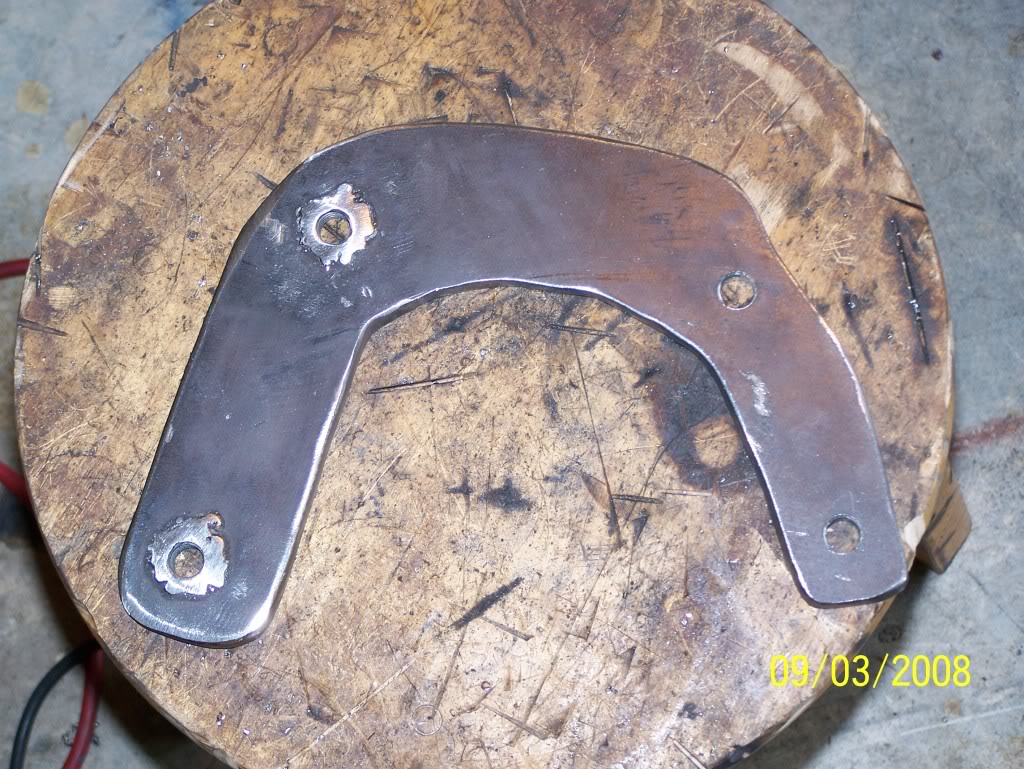
welded the nuts to the bracket, cleaned up a bit with the grinder
the final design, approximately same dimensions as the prior 1/4" steel one,
the paper is again the 4 sq to the inch so make sure it prints out that way to use it as a template
note the scalloped edge on the left side of the pic -to make sure your brake pads clear the bracket!
mounting 2nd one today, will add mounted pic then.
Have 'test' / track day @ sebring on 9/13! (if H. IKe doesn't blow it away)
So their ya go - front & rear BBK for ~$1400
& i don't have to buy new pads for sebring each time so that saved ~$200 also so in just ~6 more track days it will have paid for itself.
[next week, i build my own supercharger ]
]
REAR CALIPERS REDUX PART 2:
featuring stronger steel
thicker steel
larger area
fancy welded in nuts
summing up the prior plot [and need for the redo!]--> had made the rear calipers mounting brackets from generic steel plate (like you buy at lowes) BUT in 'testing' at sebring bent a caliper mount so needed to add strenght to my design
i used the prior 'new improved' bracket as the template and used the holes on it as guides for marking the hole locations
came up with a new rig to start holes without drill bit 'wandering'
used an old scrap front bracket, predrilled and clamped to start the holes
Here i'm freeing the 2 rear brackets from their steel prison, all grinder - this metal laughs at pathetic 'steel' jigsaw blades...
completed drilling out the holes on the top bracket and marking the next holes on the other bracket in one go
the newly shaped new bracket, only problem... it's thicker which moved the nut way too close to the rotor... took time off to rethink (and dodge hurricanes etc)
my epithany! (not the web browser) i just needed a bit more room so drilled out the holes, edged out the corners with a file and fit the nuts into the mount.
welded the nuts to the bracket, cleaned up a bit with the grinder
the final design, approximately same dimensions as the prior 1/4" steel one,
the paper is again the 4 sq to the inch so make sure it prints out that way to use it as a template
note the scalloped edge on the left side of the pic -to make sure your brake pads clear the bracket!
mounting 2nd one today, will add mounted pic then.
Have 'test' / track day @ sebring on 9/13! (if H. IKe doesn't blow it away)
So their ya go - front & rear BBK for ~$1400 & i don't have to buy new pads for sebring each time so that saved ~$200 also so in just ~6 more track days it will have paid for itself.
[next week, i build my own supercharger
]
 09-06-2008, 01:32 PM
#32
Finished final bracket installation today!
replaced the twin of the bracket that bent at sebring, it held up ~3k miles without incident
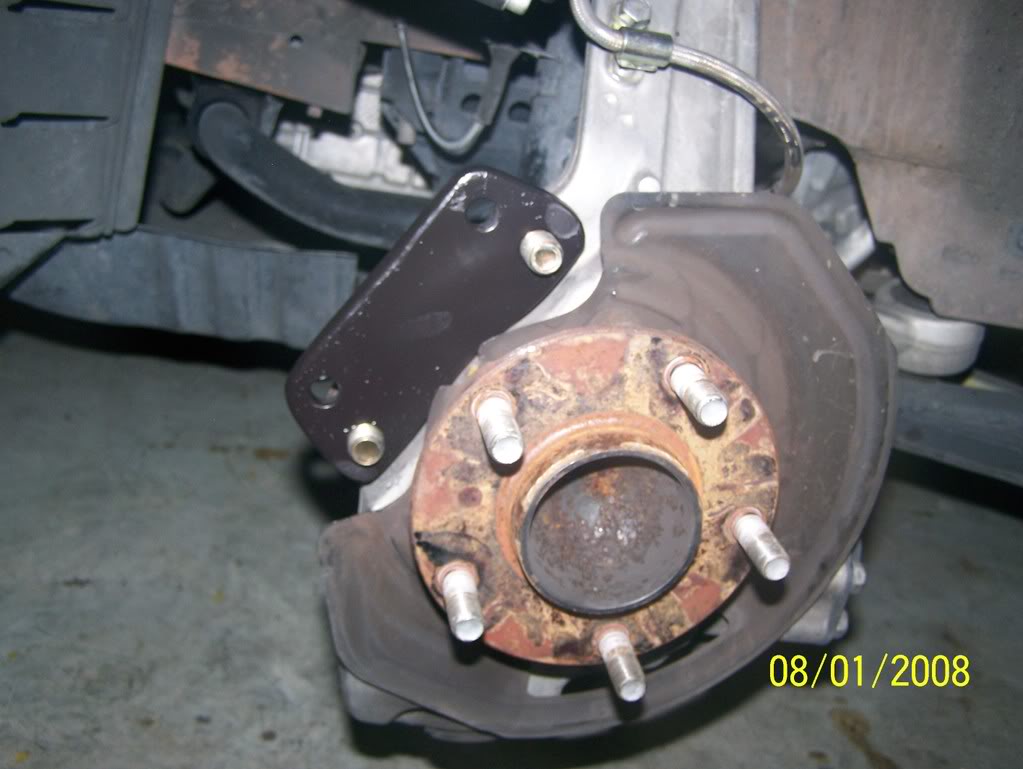
the new bracket attached to stock mounting points
caliper in its new location
top of pads and rotor all nicely aligned
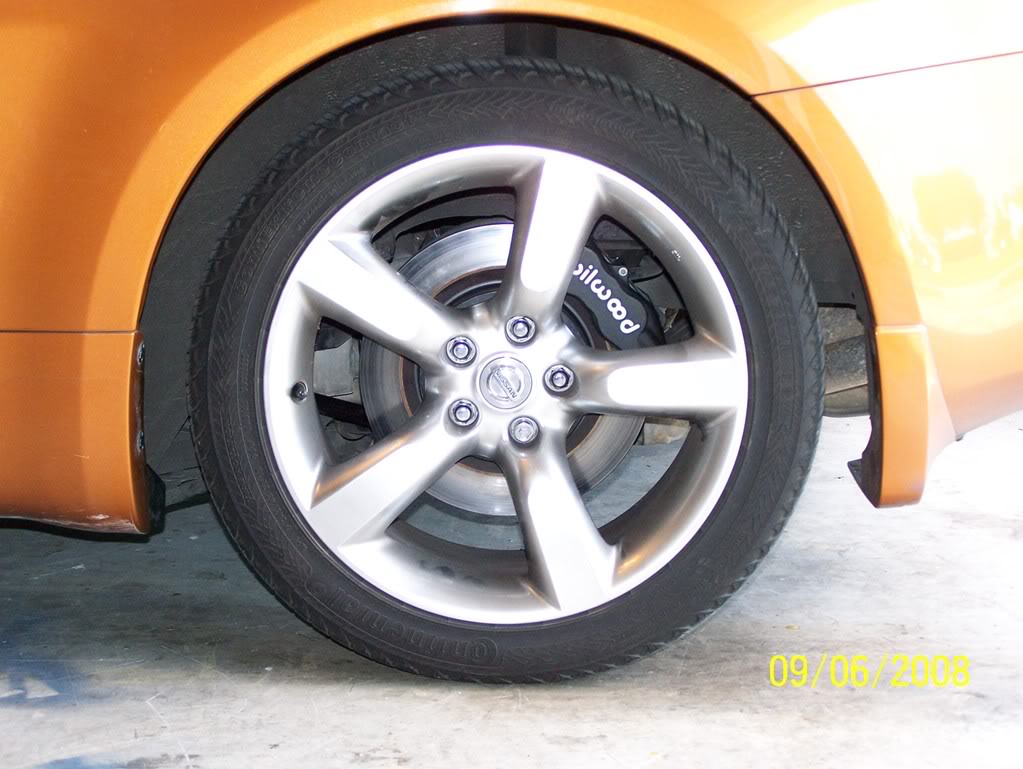
Ta Da!
don't have to play with any off this brake s*** again!
[well until friday to change to track pads / track tires!]
My name is Willow and i approve of this message.
replaced the twin of the bracket that bent at sebring, it held up ~3k miles without incident
the new bracket attached to stock mounting points
caliper in its new location
top of pads and rotor all nicely aligned
Ta Da!
don't have to play with any off this brake s*** again!
[well until friday to change to track pads / track tires!]
My name is Willow and i approve of this message.
09-16-2008, 07:06 AM
#33
Just had my track / 'test day at Sebring last saturday 9/13.
ran 80 laps (counting in / out laps) just under 300 miles full throttle track time
only started with ~40 cars so very clear track all day
[*for FL members looking for lots of track time*
i'm part of 'safemotorsports.com' a small club but after splitting the first hour into 2 groups we run open track all day - point by passing on straights only, i had ~4 hours on track just stopping for water breaks, twice i ran my 1 hour tape out in the camcorder (and haven't learned to change it yet while underway) PM me for club details (vipers vetts and ferraris oh my)]
No braking issues whatsoever, they worked awesome the whole day.
Braking as late and as heavy as i dared i could not get them to overheat!
started with a bit of a shudder under braking but i knew i had some pads with a little ledge worn in them after the caliper moved at the last test and it had worn a bit oddly - this improved quickly and was gone before lunch
rear wear < 2mm after ~450 track miles
front wear outer pads ~3mm even
front wear inner pads did the uneven wear thing 2-3mm at front of pad to 4-5 mm at rear of the pad - ordered a spare set of track pads and will try rotating the uneven ones to get even wear but then can change them at the track if needed
So see it can be done!!
Good luck to any other actual DIYers out there!!
[ and i retract my prior 'build my own supercharger next week' joke i just read the porsche928 pikes peak guy building his own supercharger setup thread and he's got some v impressive fab skills [makes me feel like a caveman banging rocks together, uh uh wheel uh ]]
ran 80 laps (counting in / out laps) just under 300 miles full throttle track time
only started with ~40 cars so very clear track all day
[*for FL members looking for lots of track time*
i'm part of 'safemotorsports.com' a small club but after splitting the first hour into 2 groups we run open track all day - point by passing on straights only, i had ~4 hours on track just stopping for water breaks, twice i ran my 1 hour tape out in the camcorder (and haven't learned to change it yet while underway) PM me for club details (vipers vetts and ferraris oh my)]
No braking issues whatsoever, they worked awesome the whole day.
Braking as late and as heavy as i dared i could not get them to overheat!
started with a bit of a shudder under braking but i knew i had some pads with a little ledge worn in them after the caliper moved at the last test and it had worn a bit oddly - this improved quickly and was gone before lunch
rear wear < 2mm after ~450 track miles
front wear outer pads ~3mm even
front wear inner pads did the uneven wear thing 2-3mm at front of pad to 4-5 mm at rear of the pad - ordered a spare set of track pads and will try rotating the uneven ones to get even wear but then can change them at the track if needed
So see it can be done!! Good luck to any other actual DIYers out there!!
[ and i retract my prior 'build my own supercharger next week' joke i just read the porsche928 pikes peak guy building his own supercharger setup thread and he's got some v impressive fab skills [makes me feel like a caveman banging rocks together, uh uh wheel uh
]]
09-16-2008, 11:11 AM
#36
Originally Posted by 07JimmyZ
very cool, might have to get you to fab some brackets for the rest of us.
And take all the DIY fun out of it???
sorry but there is no $ to be made in cutting these things out by hand with a grinder, i don't have the tools to make multiple copies and if i included a plasma cutter into the price no one would buy em...
in the looooong bbk thread there was someone who said they would make brackets - could try them with my DIY printouts - make a trial set to ensure perfect fitment, note there was some slight sanding mods along with the rotor guard cutting so it's not a straight bolt on (but nearly)
also props to those that pointed out that a pressure bleeder (diff thread) was the way to go for changing brake fluid, that was the easiest EVER!
09-16-2008, 12:08 PM
#38
Originally Posted by chopperman
Wow 300 miles in one track session thats pretty damn good. When I come home I plan on doing this... cant wait. Thanks for taking the effort to be the first one to research and actually proceed with the build.
[parts of sebring is very bouncy though so had to keep stopping to pee...]
[over 1650 miles / nearly 450 laps lifetime
- i probably need a new hobby] [with stock brakes (&good pads) could get ~50 laps / day, now 75+ easy!!]
Originally Posted by chopperman
how much would it cost to just bring it to a shop and give them the measurments and have them cut it on a machine or somthing. That would mean no mistakes and you know that the measurement will be exact..
if i had been smarter i'd have gotton the 6 pot arizonaz front set and done my own rear set
i also now see that the smaller pad on the dynalite series would have probably been enough - those wilwood class b track pad materials has so little wear in the rear that i might have over engineered that a bit - more importantly its probable that the smaller dynalite calipers can go in the stock location - a much simpler bracket to build.
09-21-2008, 01:30 PM
#39
Hey man,
Love the write up on your track brake setup. I just had a question. I've been trying to find a way to get better braking for autocross/road course racing events. I don't see the point in spending thousands though. My question is, this setup will fit stock 350z brembo rotors? I have aftermarket slotted non-brembo rotors already but I didn't figure that these calipers would fit it. Are there any Wilwoods that would fit stock, non-brembo size rotors that you know of or would these fit? Thanks and sorry if this is a stupid question.
Love the write up on your track brake setup. I just had a question. I've been trying to find a way to get better braking for autocross/road course racing events. I don't see the point in spending thousands though. My question is, this setup will fit stock 350z brembo rotors? I have aftermarket slotted non-brembo rotors already but I didn't figure that these calipers would fit it. Are there any Wilwoods that would fit stock, non-brembo size rotors that you know of or would these fit? Thanks and sorry if this is a stupid question.
(names changed to protect the innocent
 )
)That's exactly why i did this, was hard to justify 3K$+ on 'fun', i don't show the car or anything - i just like to abuse it at the track...
i had needed to replace the rotors anyway so i just went for the brembo sized rotors due to them being:
1 - larger diameter for slight torque increase
2- *heavier*, which in this one instance is a good thing, better heat absorption=better fade resistance
3- found em cheap
i do not think this would work for stock sized, it was difficult to get the calipers down to this [the brembo] size of rotor[overlapping parts=bad]
Originally Posted by ______
got a set of stoptech 355's up front, but plan on doing a rear bbk. if i buy the same rotors/calipers you have, can you machine me a set of brackets (or if you got extras laying around) and ill pay you for them. please let me know!
got a set of stoptech 355's up front, but plan on doing a rear bbk. if i buy the same rotors/calipers you have, can you machine me a set of brackets (or if you got extras laying around) and ill pay you for them. please let me know!
HI ____
Sorry but no - i made my set with a grinder, not the fastest of things to do, probably 20 hours to get another set perfect and i'd have to pull my car back apart to test them for exact fit - [now if you want to buy me a plasma cutter i could knock them out easy...]
it's just not economical to do for others (hence the DIY)
FWIW i'd check with any local machine shops, bring them the pattern have them do one in cheap steel and test fit then in the stronger thicker steel for the actual brackets
GoodLuck!
great, thanks alot! it really ran you under 1300 for the entire setup, front/rear?
hopefully the printouts will save a bunch of your time!
11-24-2008, 10:08 AM
#40
Originally Posted by -------
So how are the brakes holding up? Have you tracked them again recently? How many total miles do you have on it. Overall are you happy with the kit you put together?
just getting back to you, was on vaca up in CT.
Haven't been back to sebring - was supposed to be there 11/22 BUT sebring booked a skip barber driving school over our date and we lost out - spent the day redoing the wife's closet shelves etc which was not the same thing at all.
brakes have been great - almost 5k miles, rechecked the torques once and hi heat painted a front caliper since the black anodizing faded a bit at high temp (just did one to see if it would not fade & now will have to wait until next track day months away to see)
been contemplating the g37 sport rotors... 14 inch!
might order me a set of those monsters ~$330 for all four from infinitipartscenter.com and redo the brackets for 14 inch rotors.
would probably have to go 6 pot calipers for those and it should fit the rear calipers in the stock location getting rid of the rear monster bracket
four wheel 14" BBK for ~1400 DIY dollars would be a pretty good deal!!