
DIY G35 Sports Paddle Shifters???


Thread Starter
Registered User
Joined: Jan 2008
Posts: 12
Likes: 0
From: Boston, Ma
So since g35driver.com is down.. i seriously NEED the DIY for the sports paddle shifters.. WHAT BAD TIMING!!.. first the shifters were back ordered til 02/01.. and now that i actually HAVE IT.. i dont have the DIY instructions!!.. PLEASE HELP ME SOMEONE!!!!
Thread Starter
Registered User
Joined: Jan 2008
Posts: 12
Likes: 0
From: Boston, Ma
oh shoot. das wsup.. i pretty much need the instructions from a to z. did you have to buy any extra nuts or screws? if you can send the pics and like a caption with it, it would be GREATLY appreciated. if u got AIM, my screen name is "damnch1nk".. if not then u can email me @ chin3ez@gmail.com.. THANKS!! let me know if you gonna send it to me

Registered User
Joined: Feb 2008
Posts: 20
Likes: 0
From: G35driver.com
You are very lucky I sound this on my computer....
as posted on G35Driver:
Thanks to those who have started this project before me, Specifically Turbocad6 (for the original tut),
Viguera (original photos ands thread) and Jason at Riverside Infinity for acting so quickly and putting a kit
together for us.
I followed turbocad's instruction and it went very smoothly.
Tools I used:
- T-30 tamper-proof bit or wrench
- 10mm socket
- 19mm socket w/ extension
- Socket wrench for the above
- Phillip screwdriver
- 2 additional coarse thread #8 or #6 screws x 1" (match original on trim)
- a small,fine flat head screw driver
- two beers
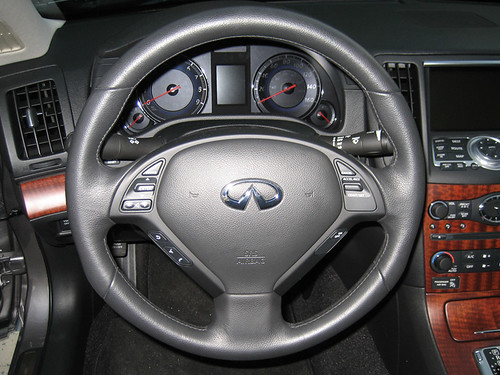
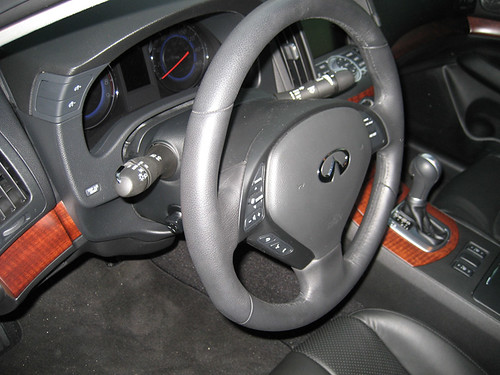
Here are some before pictures(just in case you're not familiar with you own car).

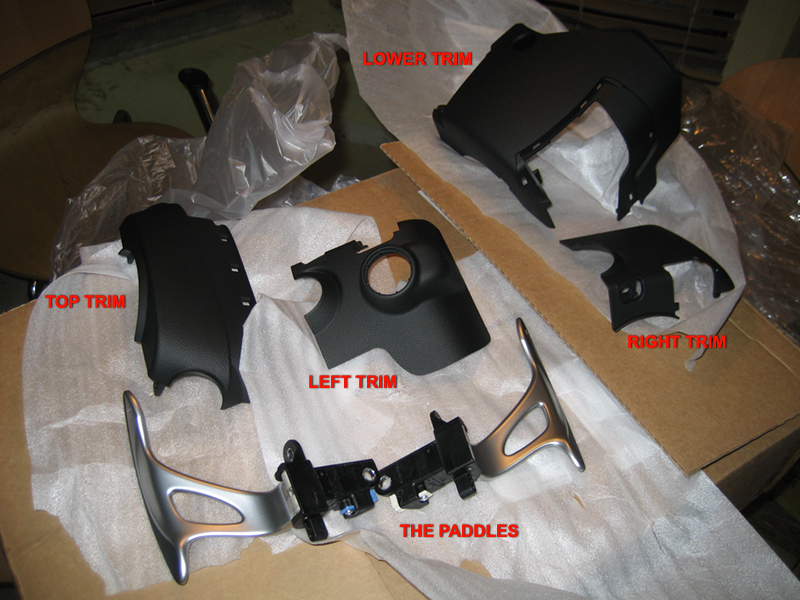
And here are the parts you'll need (sorry, will have to add part numbers later), but here is the hook-up on
the parts: http://g35driver.com/forums/showthread.php?p=2523343
Da Boys
Before you start, drink first beer. Then center your steering wheel and adjust it so that it is all the way
out and up. Then disconnect your battery!! <--- very important
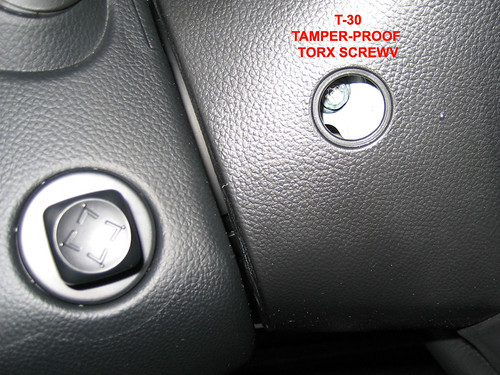
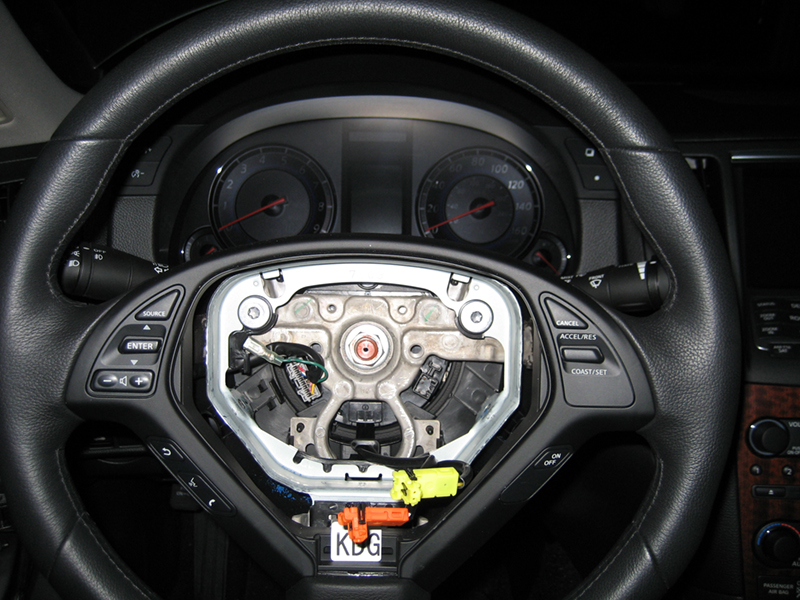
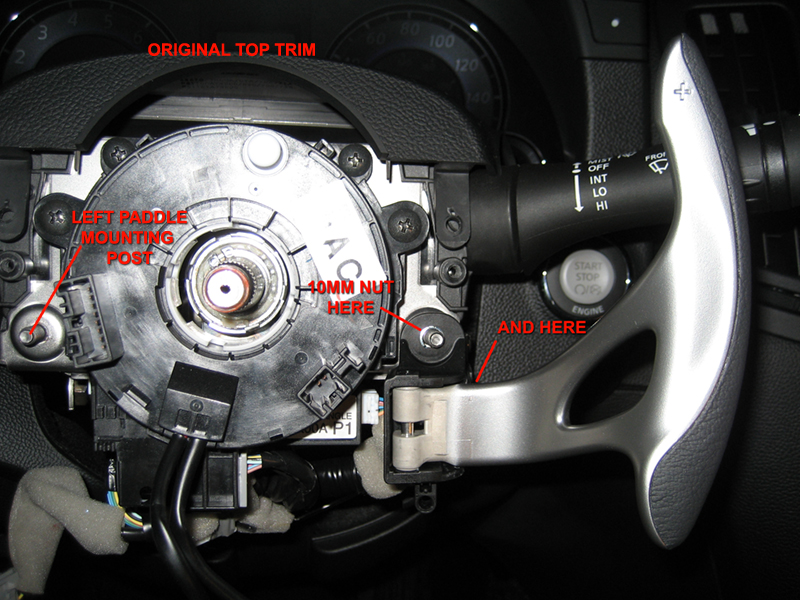
First you must take the Airbag assembly off of the steering wheel popping the little round covers off each
sides of the steering wheel then unscrew the tamper-resistant screw with the the T-30 Torx.
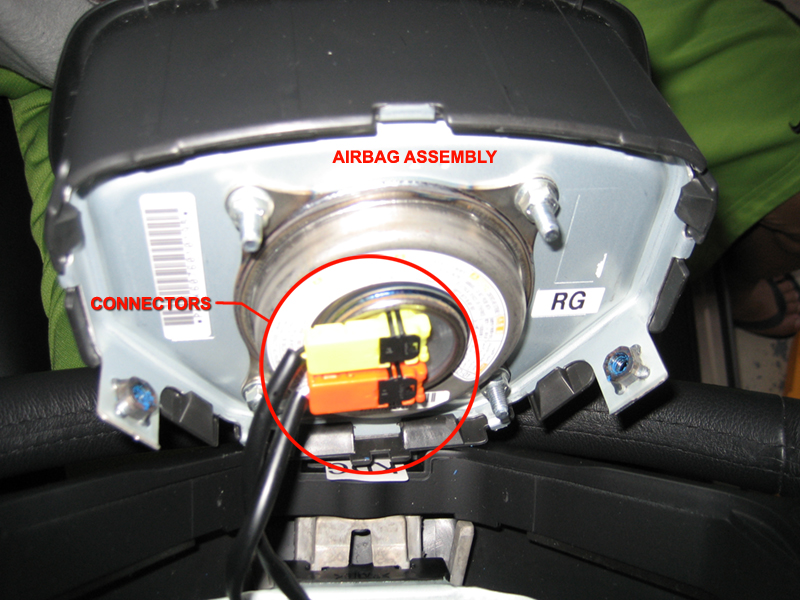
Once removed, gently slide the airbag assembly out of the steering wheel. Do not allow the assembly to hang
from it's plugs. Here's what it should look like once you have it out:
The airbag assembly plugs are yellow and orange. To remove them, I used a small screwdriver and pried up
partially as shown (I killed a good 15 mins trying to figue out how to do this).
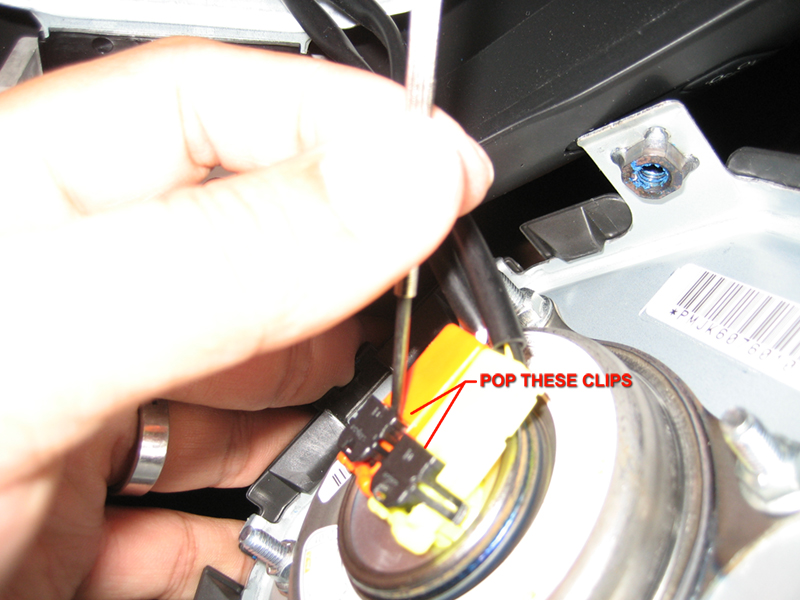
Once removed:
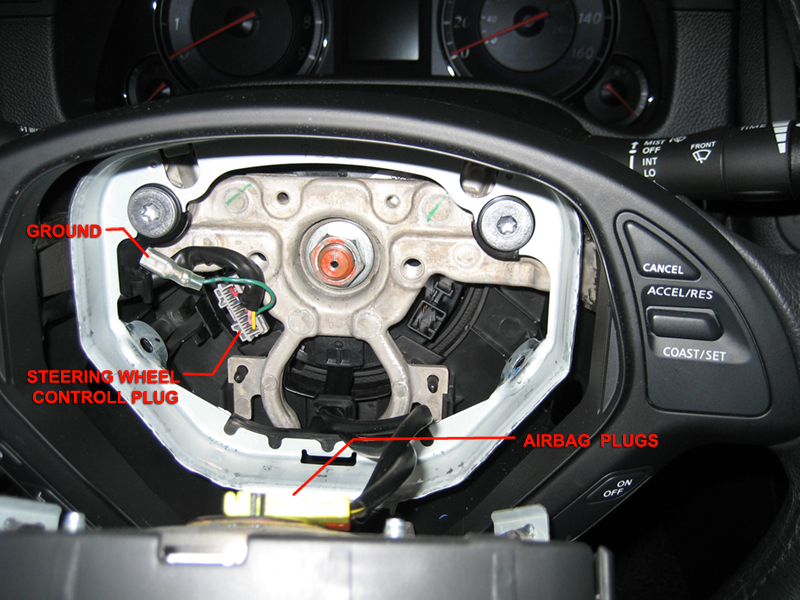
Next, remove the steering wheel control plug and ground connector. Using a 19mm socket and extension, remove
the steering wheel nut. Dislodge the the airbag plugs from the guide before you pull on the wheel. Grab the
wheel at 3 and 9 and pull (may have to pull the 9 once then the 3, it then should come straight out); mine
came out pretty easily. Once the wheel is off, remove the two screws holding the trim pieces (phillips
screwdriver).
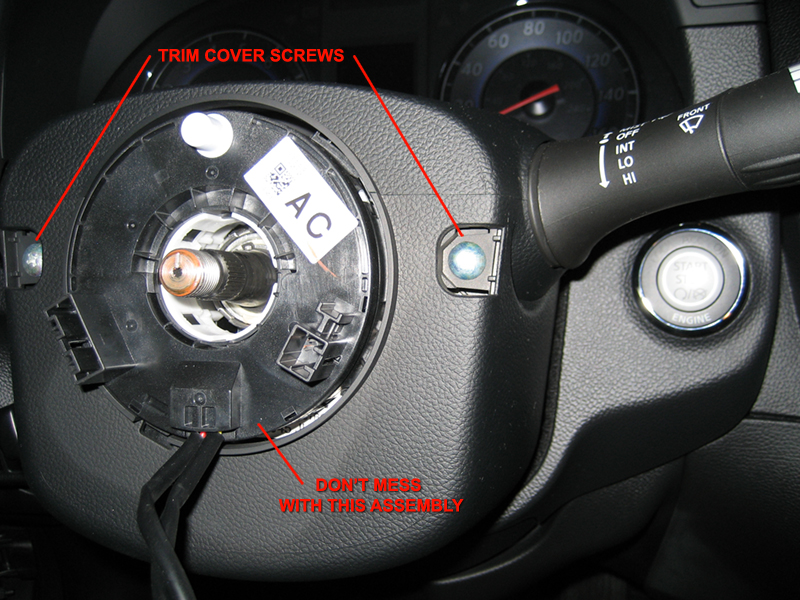
Unscrew one screw located off centered slightly to the right at the bottom of the lower trim to remove trim.
As you are removing the lower steering column trim piece, be aware that the power steering adjuster is
attached to the trim piece. Diconnect the plug, then push in the tab around the base and punch it out from
behind.
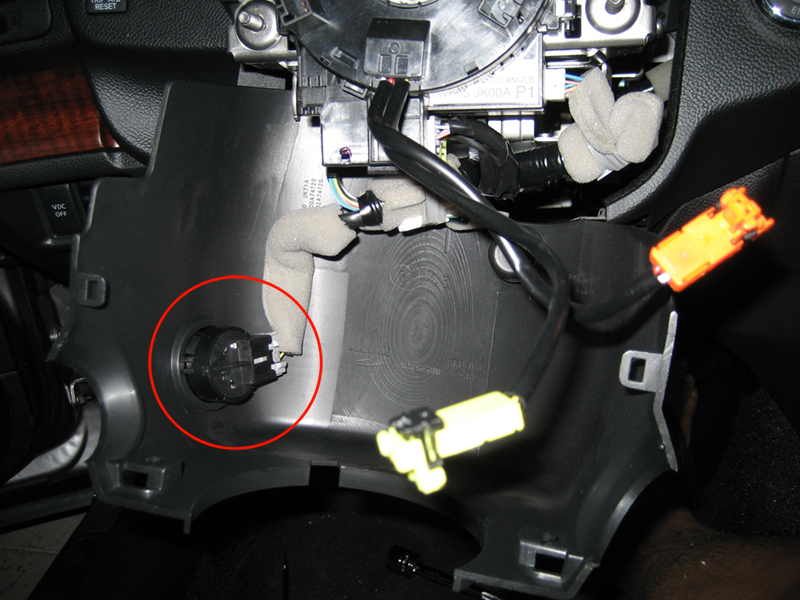
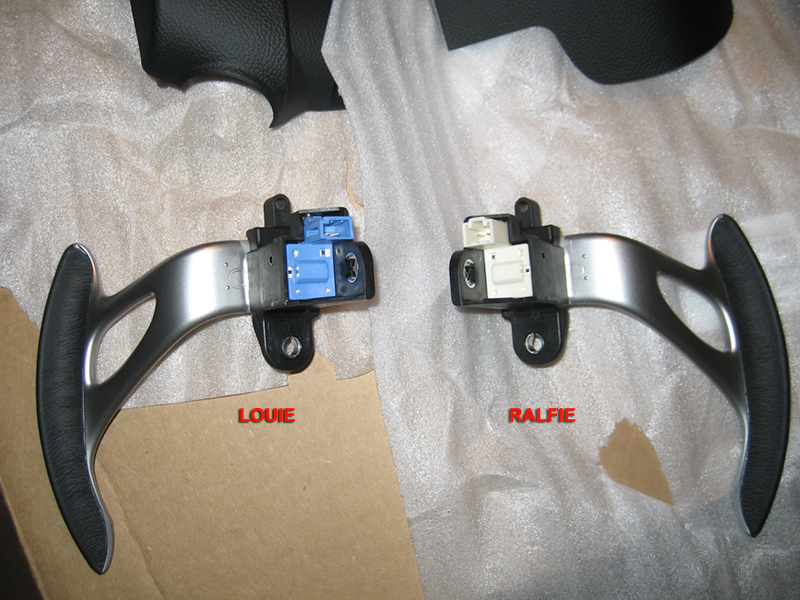
These are the pre-wired plugs the the paddles will hook up to, it is taped together with other wires; just cut
the tape to free it before mounting the paddles.
I worked on the right paddles first (not important). Plug the pre-wired plug to the paddle before you mount
them to the column. Attach the paddle to the column with the 10mm bolts provided with your kit. If not,
you'll need (2) 10mm bolts w/ 6mm threads per side.

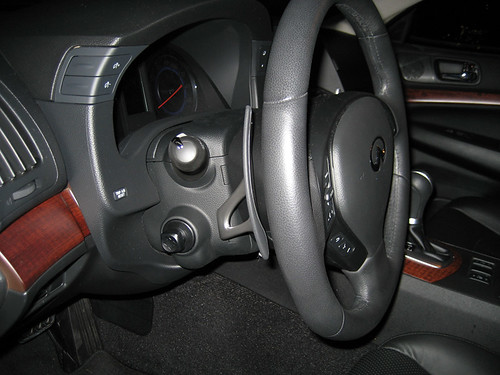
Nice no?
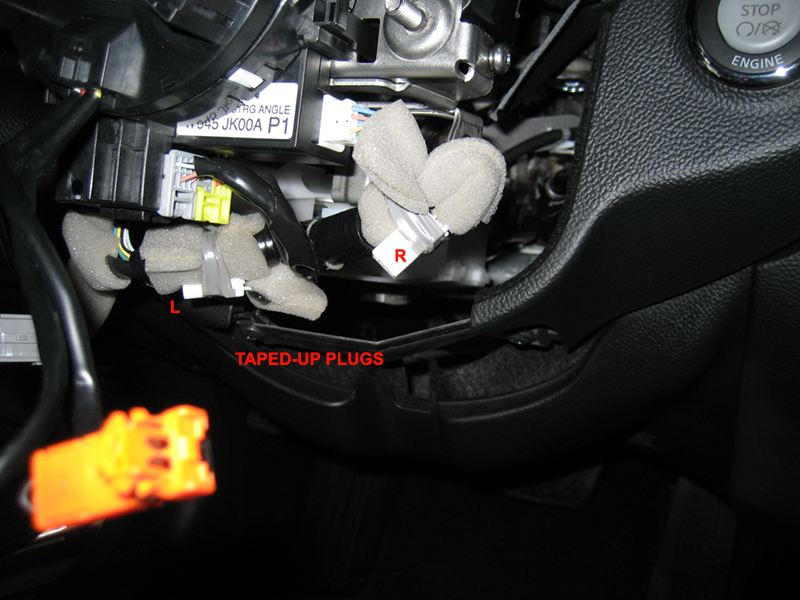
OK, reassembling the trim/housing in this order: First attach the lower trim piece and screwing it from the
bottom. Hint: as you assemble the left trim, it is easier to plug the power steering adjustment **** in before
you snap it back into the left trim piece (you'll have to route the plug through the hole first and don't
forget to re-align the notch). Assemble the right side making sure everything snapped into place. I used the
#6 (x1") coarse threaded screw to attach both side pieces to the column/paddles. Center the clockspring at the
of the column to the 12 oclock position and route the airbag plugs back through the steering wheel before you
before reinstalling steering wheel.

Align the marks on the steering wheel and bolt and retorque the center but to 25 lbs. Re-attach all the plugs
and slide the airbag back into place and re-attach with torx screws. If done properly, it should look like
this when done:

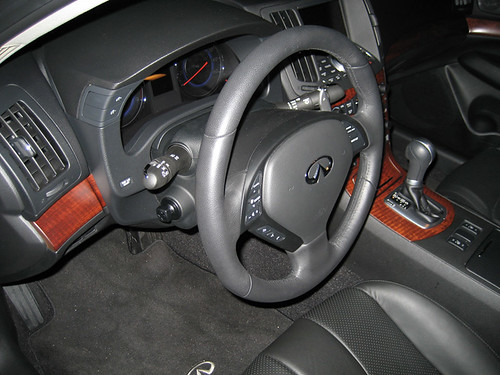
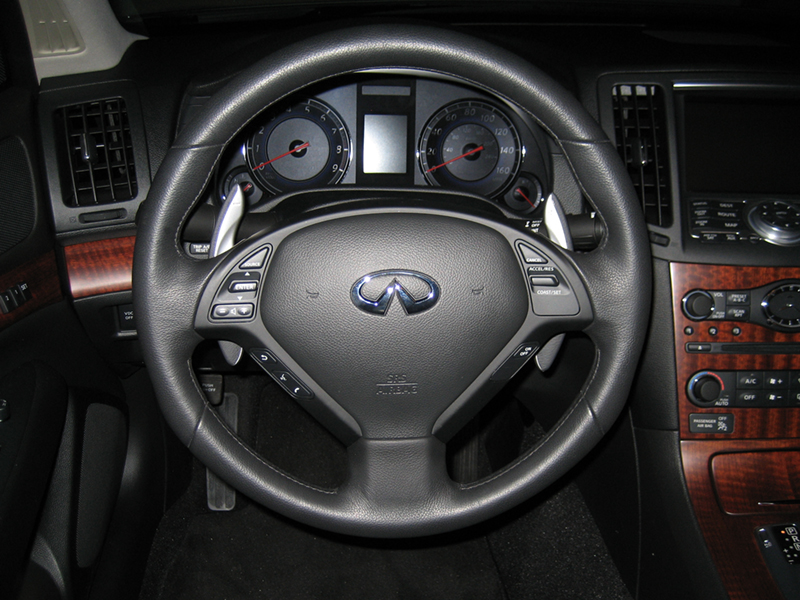
Lastly, go on a test drive and when you get, back drink second beer!
some words: I am not responsible for anything you do with the information I posted. I only documented my
proccess for educational purposes. I may have left out information but will have to recheck later since it is
very late. Please forgive my grammar, spelling, terminologies, and methodologies feel free to correct me. If
anyone reading this found a better or different proccess than what I posted, please post it so that it can
benefit everyone.
Good luck.
as posted on G35Driver:
Thanks to those who have started this project before me, Specifically Turbocad6 (for the original tut),
Viguera (original photos ands thread) and Jason at Riverside Infinity for acting so quickly and putting a kit
together for us.
I followed turbocad's instruction and it went very smoothly.
Tools I used:
- T-30 tamper-proof bit or wrench
- 10mm socket
- 19mm socket w/ extension
- Socket wrench for the above
- Phillip screwdriver
- 2 additional coarse thread #8 or #6 screws x 1" (match original on trim)
- a small,fine flat head screw driver
- two beers
Here are some before pictures(just in case you're not familiar with you own car).
And here are the parts you'll need (sorry, will have to add part numbers later), but here is the hook-up on
the parts: http://g35driver.com/forums/showthread.php?p=2523343
Da Boys
Before you start, drink first beer. Then center your steering wheel and adjust it so that it is all the way
out and up. Then disconnect your battery!! <--- very important
First you must take the Airbag assembly off of the steering wheel popping the little round covers off each
sides of the steering wheel then unscrew the tamper-resistant screw with the the T-30 Torx.
Once removed, gently slide the airbag assembly out of the steering wheel. Do not allow the assembly to hang
from it's plugs. Here's what it should look like once you have it out:
The airbag assembly plugs are yellow and orange. To remove them, I used a small screwdriver and pried up
partially as shown (I killed a good 15 mins trying to figue out how to do this).
Once removed:
Next, remove the steering wheel control plug and ground connector. Using a 19mm socket and extension, remove
the steering wheel nut. Dislodge the the airbag plugs from the guide before you pull on the wheel. Grab the
wheel at 3 and 9 and pull (may have to pull the 9 once then the 3, it then should come straight out); mine
came out pretty easily. Once the wheel is off, remove the two screws holding the trim pieces (phillips
screwdriver).
Unscrew one screw located off centered slightly to the right at the bottom of the lower trim to remove trim.
As you are removing the lower steering column trim piece, be aware that the power steering adjuster is
attached to the trim piece. Diconnect the plug, then push in the tab around the base and punch it out from
behind.
These are the pre-wired plugs the the paddles will hook up to, it is taped together with other wires; just cut
the tape to free it before mounting the paddles.
I worked on the right paddles first (not important). Plug the pre-wired plug to the paddle before you mount
them to the column. Attach the paddle to the column with the 10mm bolts provided with your kit. If not,
you'll need (2) 10mm bolts w/ 6mm threads per side.
Nice no?
OK, reassembling the trim/housing in this order: First attach the lower trim piece and screwing it from the
bottom. Hint: as you assemble the left trim, it is easier to plug the power steering adjustment **** in before
you snap it back into the left trim piece (you'll have to route the plug through the hole first and don't
forget to re-align the notch). Assemble the right side making sure everything snapped into place. I used the
#6 (x1") coarse threaded screw to attach both side pieces to the column/paddles. Center the clockspring at the
of the column to the 12 oclock position and route the airbag plugs back through the steering wheel before you
before reinstalling steering wheel.
Align the marks on the steering wheel and bolt and retorque the center but to 25 lbs. Re-attach all the plugs
and slide the airbag back into place and re-attach with torx screws. If done properly, it should look like
this when done:
Lastly, go on a test drive and when you get, back drink second beer!
some words: I am not responsible for anything you do with the information I posted. I only documented my
proccess for educational purposes. I may have left out information but will have to recheck later since it is
very late. Please forgive my grammar, spelling, terminologies, and methodologies feel free to correct me. If
anyone reading this found a better or different proccess than what I posted, please post it so that it can
benefit everyone.
Good luck.


Trending Topics

Thread Starter
Registered User
Joined: Jan 2008
Posts: 12
Likes: 0
From: Boston, Ma
Yo, was it really hard to unscrew the first bolts to the airbag assembly? I went out and bought the T30 Tamperproof bit....did you use a socket? Did you know what size?
I didnt want to use too much force to untorque those...
I didnt want to use too much force to untorque those...

Registered User
Joined: Oct 2007
Posts: 5
Likes: 0
From: So Cal
Yes. It was VERY hard to remove those T30 screws. In fact, I couldn't do it with the screwdriver attachment. I ended up using a wrench w/ extension socket and the T30 bit to get enough leverage to break those T30 screws loose.
The main bolt that holds the steering wheel in place is also on there pretty tight.
The main bolt that holds the steering wheel in place is also on there pretty tight.
Last edited by AlterZgo; Feb 3, 2008 at 06:25 PM.
Registered User
Joined: Oct 2007
Posts: 5
Likes: 0
From: So Cal
Yup. If felt like I was going to break something and, the reality is, when I was putting the right side bolt back in, it started to feel like it was stripping so I lubed it a bit and it went back in OK.
Registered User
Joined: Feb 2008
Posts: 20
Likes: 0
From: G35driver.com
yeah, I used a long 1/4" socket to get that off. Here's a tip, use the same socket w/o the wrench to put those bolts back by hand before retorquing them.
btw, the whole job took me about 1 hour in the dark without a guide while taking snaps for this tut. You should be able to do it in half the time with light and this guide.
btw, the whole job took me about 1 hour in the dark without a guide while taking snaps for this tut. You should be able to do it in half the time with light and this guide.


Thread Starter
Registered User
Joined: Jan 2008
Posts: 12
Likes: 0
From: Boston, Ma
u can stll get it for $200.00.. but when u go to parts at the dealer.. they will try to jack it up.. at first the dealer tried to sell me the parts for $280.00 i was like nah i got a guy from another dealer that can get it for me for $200.00.. then the dude was like fine.. i can drop it to $213.00.. i was still like nah i can get it for 200.. he was like fine the lowest i can go is $203.00 including tax.. i was like fine w/e. SO DONT GET PLAYED!!!

Registered User
Joined: Feb 2008
Posts: 20
Likes: 0
From: G35driver.com
the kit described is the oem sport paddles for 07+ sedans and maybe the 08 coupe. Will not work on earlier models w/o heavy modding. Some guys on driver are working on a kit for the earlier models.
