
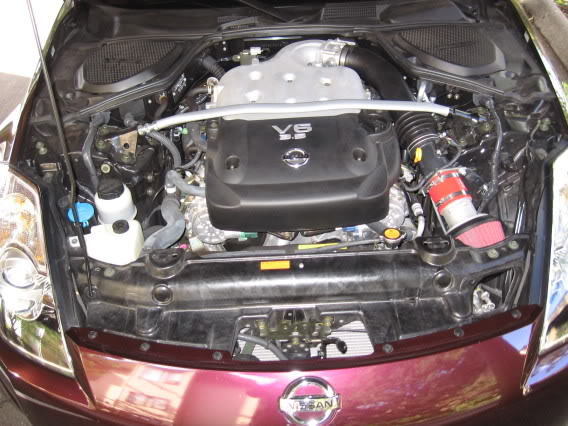
Apexi Power Intake DIY Install


Pros: Dry filter does not require oiling, Dyno proven better flow and filtration than Blitz, HKS, K&N filters, similar price as JWT Poopcharger, non-lemming engine bay at local Z meets
Cons: No carb sticker, have to admit to having purchased parts of ebay, no heat shield (neglible con, seems worthless to me)
Parts list:
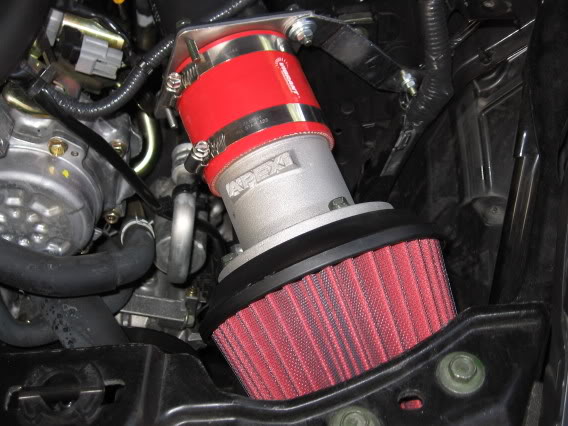
$75 - 75mm Apexi Universal Power Intake (Part #500-A026) - filter, gasket, adapater, screws
$25 - Ebay 350z intake kit - MAF adapter, mounting bracket, 2 hose clamps, screws. Toss the pipe, rubber hose, and china filter in a dusty corner of the garage.
$6 - Auto parts store - 3" segment of silicon hose
Tools needed:
Flat head screw driver
Phillips head screw driver
Socket set
Perhaps a few other things, can't remember, nothing you wouldn't find in a basic tool kit.
Car jack (jackstands not needed)
Instructions:
1. Remove stock intake box (helps to remove Z-tube first so you can access the screws easier)
2. Remove stock air dam (that little thing the front of your stock air box attached to). You're going to have to get a bit rough with it, its pretty flexible though, take care not to scratch anything (put shop rags around bumper and headlight).
3. Place jack under front driver's side jacking point, lift front of car so you can reach into the front wheel well (3-4 inches, tire should still be on the ground).
4. Mount bracket using existing hole between engine bay and wheel well.
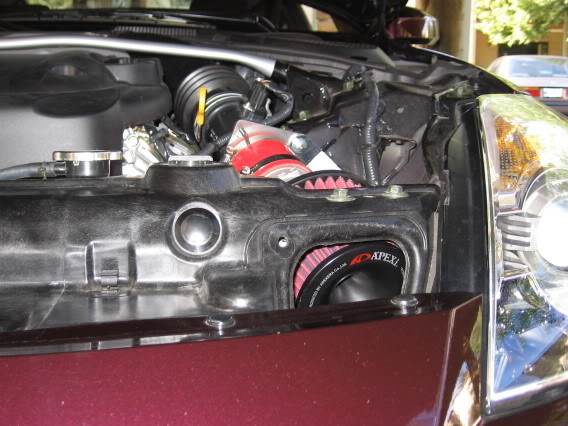
5. Assemble Apexi filter, gasket, adapter.
6. Assemble MAF pipe and MAF adapter
7. Connect Apexi adapter and MAF adapter with silicon hose
8. Mount complete filter and MAF assembly to bracket in location that doesn't rattle or scrape anything. It should have about 1/2 - 3/4 of an inch or clearance all the way around the filter.
9. Reconnect Z-tube. Bolt everything down. Lower front jack.
10. RESET ECU
All in all, I spent $106 and am happy with the results. No dyno to prove any gains north or south of a popcharger. Butt dyno seems to think mid-range and top end are just slightly peppier, quicker to rev. Nothing tremendous.
Cons: No carb sticker, have to admit to having purchased parts of ebay, no heat shield (neglible con, seems worthless to me)
Parts list:
$75 - 75mm Apexi Universal Power Intake (Part #500-A026) - filter, gasket, adapater, screws
$25 - Ebay 350z intake kit - MAF adapter, mounting bracket, 2 hose clamps, screws. Toss the pipe, rubber hose, and china filter in a dusty corner of the garage.
$6 - Auto parts store - 3" segment of silicon hose
Tools needed:
Flat head screw driver
Phillips head screw driver
Socket set
Perhaps a few other things, can't remember, nothing you wouldn't find in a basic tool kit.
Car jack (jackstands not needed)
Instructions:
1. Remove stock intake box (helps to remove Z-tube first so you can access the screws easier)
2. Remove stock air dam (that little thing the front of your stock air box attached to). You're going to have to get a bit rough with it, its pretty flexible though, take care not to scratch anything (put shop rags around bumper and headlight).
3. Place jack under front driver's side jacking point, lift front of car so you can reach into the front wheel well (3-4 inches, tire should still be on the ground).
4. Mount bracket using existing hole between engine bay and wheel well.
5. Assemble Apexi filter, gasket, adapter.
6. Assemble MAF pipe and MAF adapter
7. Connect Apexi adapter and MAF adapter with silicon hose
8. Mount complete filter and MAF assembly to bracket in location that doesn't rattle or scrape anything. It should have about 1/2 - 3/4 of an inch or clearance all the way around the filter.
9. Reconnect Z-tube. Bolt everything down. Lower front jack.
10. RESET ECU
All in all, I spent $106 and am happy with the results. No dyno to prove any gains north or south of a popcharger. Butt dyno seems to think mid-range and top end are just slightly peppier, quicker to rev. Nothing tremendous.


Thread
Thread Starter
Forum
Replies
Last Post