Step-by-step instructions for outside door handle replacement


 11-19-2013, 05:35 AM
#22
Registered User
iTrader: (1)
Join Date: May 2002
Location: Dallas, Tx
Posts: 1,460
Likes: 0
Received 0 Likes
on
0 Posts
Used this thread yesterday to replace my driver side handle. I used a magnetic tip screwdriver and, being double cautious also used a playing card (Uno)... rolled longways into a cylinder. I placed into the gromet holes over the bolt heads and stuck screwdriver through the cylinder.... worked like a charm. no dropped bolts in my door.
Thanks to all who contributed to this thread.
Thanks to all who contributed to this thread.
12-29-2013, 09:15 AM
#23
Registered User

Join Date: Jul 2009
Location: miami, fl
Posts: 1
Likes: 0
Received 0 Likes
on
0 Posts
Just wanted to say thank you to the originator of this thread and also to the gentleman who posted the pics.
They were perfect.
However, as with most car related work not shown on tv, things seldom go as planned. I realized this when I sat there trying to unscrew the top bolt for like a minute. From the sound inside the door, I could tell that whatever the screw was threaded into had separated from the door handle itself.
I pulled the top of the door handle away from the door and I could see the metal cylinder that the bolt threaded into just turn and turn as I turned the bolt with a screwdriver. The slot for the threaded cylinder or whatever it's called was cracked and open like some dried up plastic flower from car do it yourself hell.
The bottom bolt and its cylinder were similarly compromised. It would've been nice to just pull the bottom of the handle away like I'd done with the top, but unfortunately, the locking mechanism is screwed into the same place the bottom bolt is.
I had to pull the door handle (away from the door) until I had enough room to get a socket wrench in there to turn the bolt for the lock mechanism.
There's not really a good spot to slide a piece of cardboard in here, so just be careful if you have to do this.
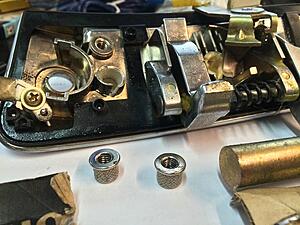
Once that bolt was out, the door handle slid out, crunching pieces to the driveway, and leaving the bolts and threaded cylinders behind.
I sprayed these bolts with some lubricant and used my pressure pliers to lock the threading channel in place while I unscrewed from the other end. Thank you for the cardboard catcher idea. Worked perfectly when the top bolt slid out of my screwdriver.
With the bolts out of the way, the new door handle went in just like in the instructions.
I've taken a picture of the broken door handle so you can see the end result of my war. The two little cylinders at the bottom are what the bolts threaded into.
They were perfect.
However, as with most car related work not shown on tv, things seldom go as planned. I realized this when I sat there trying to unscrew the top bolt for like a minute. From the sound inside the door, I could tell that whatever the screw was threaded into had separated from the door handle itself.
I pulled the top of the door handle away from the door and I could see the metal cylinder that the bolt threaded into just turn and turn as I turned the bolt with a screwdriver. The slot for the threaded cylinder or whatever it's called was cracked and open like some dried up plastic flower from car do it yourself hell.
The bottom bolt and its cylinder were similarly compromised. It would've been nice to just pull the bottom of the handle away like I'd done with the top, but unfortunately, the locking mechanism is screwed into the same place the bottom bolt is.
I had to pull the door handle (away from the door) until I had enough room to get a socket wrench in there to turn the bolt for the lock mechanism.
There's not really a good spot to slide a piece of cardboard in here, so just be careful if you have to do this.
Once that bolt was out, the door handle slid out, crunching pieces to the driveway, and leaving the bolts and threaded cylinders behind.
I sprayed these bolts with some lubricant and used my pressure pliers to lock the threading channel in place while I unscrewed from the other end. Thank you for the cardboard catcher idea. Worked perfectly when the top bolt slid out of my screwdriver.
With the bolts out of the way, the new door handle went in just like in the instructions.
I've taken a picture of the broken door handle so you can see the end result of my war. The two little cylinders at the bottom are what the bolts threaded into.
 01-08-2014, 10:29 AM
#24
Registered User

Join Date: Oct 2013
Location: Texas
Posts: 1
Likes: 0
Received 0 Likes
on
0 Posts
What exactly is the story with the part number for the handle replacement.
I need to replace both of the handles. Nissan and Nissanpartzone.com are telling me I need 80503-AR200 and 80503-AR201. Is there a different and cheaper (price) part I can use for a 2007 350z Enthusiast?
http://www.nissanpartszone.com/Page_...mponentsNo=805
I need to replace both of the handles. Nissan and Nissanpartzone.com are telling me I need 80503-AR200 and 80503-AR201. Is there a different and cheaper (price) part I can use for a 2007 350z Enthusiast?
http://www.nissanpartszone.com/Page_...mponentsNo=805
01-17-2014, 08:11 PM
#25
Registered User
iTrader: (4)

Join Date: Mar 2009
Location: Texas
Posts: 66
Likes: 0
Received 0 Likes
on
0 Posts
Sorry to bring up an old thread but this worked perfect for replacing my broken driver's side door handle on my 05 roadster. Thanks again to OP and the person who posted the pics couldn't have completed it without it. It took me 45 minutes going extra slow as to not have to replace bolts!
thanks again.
thanks again.
05-03-2014, 04:49 AM
#26
Registered User
iTrader: (1)

Join Date: May 2006
Location: aaaa
Posts: 477
Likes: 0
Received 0 Likes
on
0 Posts
Thank you all for this thread, you just saved me at least a couple of hundred bucks. Install went as described, hardest part was inserting the new handle but still took about 20 minutes tops to finish.
06-24-2014, 01:13 PM
#27
New Member

Join Date: Apr 2005
Location: BEHIND YOU!! BEHIND YOU!!!
Posts: 8,689
Received 203 Likes
on
150 Posts
Literally just happened to my '05. Dumbasses at Mr. Tire broke my driver's side handle, but I'll never be able to prove it. Luckily I found this thread and will try this as soon as my new parts arrive.
07-03-2014, 02:28 PM
#28
Registered User

Join Date: Jun 2014
Location: Prosper, TX
Posts: 2
Likes: 0
Received 0 Likes
on
0 Posts
Wow, that was SIMPLE. The hardest part was trying to find the bolt for the locking mechanism, which doesn't exist on the passenger side. Thanks for the quick replies, and thanks to the guy who did the DIY writeup.
Everybody wins on the internet!!
This is my mother-in-law's car, so I have re-gained Most Favored Son-in-Law status.
THANKS!
edit: If you have a convertible, it's a torx T27 to remove the 3 screws which secure the bracket that exists where the upper grommet would be.
Everybody wins on the internet!!
This is my mother-in-law's car, so I have re-gained Most Favored Son-in-Law status.
THANKS!
edit: If you have a convertible, it's a torx T27 to remove the 3 screws which secure the bracket that exists where the upper grommet would be.
Last edited by hbar; 07-03-2014 at 02:32 PM.
08-07-2014, 07:07 PM
#29
Registered User

Join Date: Aug 2014
Location: Memphis
Posts: 1
Likes: 0
Received 0 Likes
on
0 Posts
Any tips on replacing the driver's side handle on a 2005 Roadster? It looks a little different than the hard top. There appears to only be one grommet/hole. I wondered if I have to remove the guide pin? I tried, but one of the bolts stripped...oh boy. Any tips would be appreciated.
Oh, I just saw the last edit that mentioned removing the bracket on the roadster. Now I just have to figure out how to remove the stripped bolt.
Thanks,
Tony
Oh, I just saw the last edit that mentioned removing the bracket on the roadster. Now I just have to figure out how to remove the stripped bolt.
Thanks,
Tony
Last edited by Tony-Memphis; 08-07-2014 at 07:08 PM.
03-23-2015, 01:30 PM
#30
Registered User
iTrader: (2)

Join Date: Aug 2006
Location: fort worth tx
Posts: 533
Likes: 0
Received 0 Likes
on
0 Posts
Sorry for bumping this but I just replaced mine and accidently shut it before having the new handle fully in. Now I get it into the blue part (metal rod) and it wont open the door its just halfway open and it wont open from the inside either any advice?
 04-08-2015, 04:32 PM
#32
Registered User
iTrader: (18)

Join Date: Mar 2005
Location: NJ
Posts: 325
Likes: 0
Received 0 Likes
on
0 Posts
Thank you for this awesome write-up. Haven't been on in a while and just replaced my driver's side door handle bc not opening from outside. Works like a charm now. 15 min job. Like Mavtais said above, dealer was going to charge me $400+ for "actuator replacement" whereas it had absolutely nothing to do with the actuator. Very straightforward $70 DIY fix. 
 07-04-2015, 04:15 PM
#34

Just wanted to say thank you to the originator of this thread and also to the gentleman who posted the pics.
They were perfect.
However, as with most car related work not shown on tv, things seldom go as planned. I realized this when I sat there trying to unscrew the top bolt for like a minute. From the sound inside the door, I could tell that whatever the screw was threaded into had separated from the door handle itself.
I pulled the top of the door handle away from the door and I could see the metal cylinder that the bolt threaded into just turn and turn as I turned the bolt with a screwdriver. The slot for the threaded cylinder or whatever it's called was cracked and open like some dried up plastic flower from car do it yourself hell.
The bottom bolt and its cylinder were similarly compromised. It would've been nice to just pull the bottom of the handle away like I'd done with the top, but unfortunately, the locking mechanism is screwed into the same place the bottom bolt is.
I had to pull the door handle (away from the door) until I had enough room to get a socket wrench in there to turn the bolt for the lock mechanism.
There's not really a good spot to slide a piece of cardboard in here, so just be careful if you have to do this.
Once that bolt was out, the door handle slid out, crunching pieces to the driveway, and leaving the bolts and threaded cylinders behind.
I sprayed these bolts with some lubricant and used my pressure pliers to lock the threading channel in place while I unscrewed from the other end. Thank you for the cardboard catcher idea. Worked perfectly when the top bolt slid out of my screwdriver.
With the bolts out of the way, the new door handle went in just like in the instructions.
I've taken a picture of the broken door handle so you can see the end result of my war. The two little cylinders at the bottom are what the bolts threaded into.
04-28-2016, 01:04 PM
#35
350Z/370Z Tech Moderator
MY350Z.COM
MY350Z.COM


And someone appeared from the ether and said, "Mic, thou shalt bump this thread which should be a sticky."
======================
Many thanks to the contributors to this thread. Thanks to a pre-read of this, it took me a grand 12.67 minutes to swap out a wonked door handle.
Let me elaborate (what else, it's me tawkin'):
- 4 minutes to drive car out of garage into the light of day, pop the rubber plugs, gather up a socket/ratchet/screwdriver, apply a dab of earthquake glue to the tip, and cut a TP roll to size in case of earthquake glue failure.
- 5 minutes to remove the handle, lock, wire thingamabob, and reinstall the thingamabob and lock on new handle purchased from the interwebs somewhere.
- 3 minutes to reinstall, and shut the door to test.
- 30 seconds of abject terror when it didn't open from inside OR out and my mind raced to the 37 ways to get the damn thing open again.
- 10 seconds to realize the door was locked, click it, and open door.
And now, the rest of the afternoon to call myself a dork.
Seriously, thanks guys, even salty old dogs learn new tricks here.
Mic
05-27-2016, 09:40 AM
#36
Registered User

Join Date: Aug 2014
Location: Atlanta
Posts: 1
Likes: 0
Received 0 Likes
on
0 Posts
Thanks for the write-ups and subsequent clarifications. I did my passenger side today with maybe 5 minutes of actual work. The rest was just reading and re-reading. Drove to Z1, bought the part, and it's done deal! Thanks for making it so simple.
07-02-2017, 04:27 AM
#37
Registered User

I just replaced the drivers side handle took about 25 mins. Just took my time and followed the instructions in this post. I humbly thank the OP and all other posters.
Bobby
Bobby
07-02-2017, 10:43 AM
#38

On advice of local group member, I fished it out. One door done!
Last edited by blue08; 07-02-2017 at 01:21 PM.
08-05-2018, 10:20 AM
#39
New Member

Join Date: Apr 2018
Location: Las Vegas
Posts: 5
Likes: 0
Received 0 Likes
on
0 Posts
pic6: transfer the "metal wire" from the old handle to the new one (just hold white plastic bracket in place and spin the metal wire to release)
pic7: make sure the "metal wire" goes into the blue plastic first then fit the handle onto the door
* If you don't have a magnetic screwdriver but have a strong magnet and a metal phillips screwdriver, then you can create one yourself by taking the magnet and brushing it against the tip (~1") of the screwdriver. You can rotate the screwdriver to magnetize all around, but don't change the magnetic polarity or the direction of the brushing (no back and forth). Do this for a minute or two and you should be good.
09-18-2018, 10:39 AM
#40
Registered User

Join Date: May 2008
Location: Dunedin, FL, USA
Posts: 1
Likes: 0
Received 0 Likes
on
0 Posts
Sorry to bring up an old thread but this worked perfect for replacing my broken driver's side door handle on my 05 roadster. Thanks again to OP and the person who posted the pics couldn't have completed it without it. It took me 45 minutes going extra slow as to not have to replace bolts!
thanks again.
thanks again.
Last edited by zdoctor; 09-18-2018 at 10:41 AM.