
Pics of my Custom Fibre Glass Sub Box


Thread Starter
Registered User
Joined: Oct 2004
Posts: 65
Likes: 0
From: England
Originally Posted by rommel350z
I don't have the patience for that.

MDF front is now on. 24mm thick, 2x 12mm sheets laminated together, store was out of 18mm...

Almost ready for the carpet, until I had this mad idea to wrap it in carbon fiber

Done the first side, very hard to get resin perfectly smooth, with a brush anyway

Going to sand the resin down & see if I can get out all the slight imperfections, then spray it with a few coats of laquer.

Might end up covering it in carpet anyway after all this
 if I can't get the finish good enough. You don't learn if you don't try though
If I can pull it off though it might look quite
 in carbon


Thread Starter
Registered User
Joined: Oct 2004
Posts: 65
Likes: 0
From: England
No velcro at all, it's just a very snug push in fit, you have to 'wiggle' it in the last inch or so. The area on the box you cannot see, ie between the two flat faces, is covered in the same felt/carpet stuff as on the original box. This also protects the plastic on the strut brace from getting scuffed or marked if you need to slide it out to get to the spare or use all the boot, sorry, trunk space for a large load etc.
Internal volume is a bit over 1.75 cuft by the way
Internal volume is a bit over 1.75 cuft by the way
Thread Starter
Registered User
Joined: Oct 2004
Posts: 65
Likes: 0
From: England
Originally Posted by NYC_G35C
could you give some more specifics on how you did the carbon fiber wrap?
, it was quite a PITA to do TBH.I bought 1m x 2m of carbon fiber off a roll. For the small face of the box, ie pic #2 in post #22 I cut a piece out about 6" larger than the face. Next applied a layer of resin to the box small face & for a couple of inches or so down the sides, then placed the carbon onto the resin. Next you need to work around the edge pulling & stretching the carbon to curve nicely to fit, the cloth is easy to curve & shape as such, but as soon as it touches & sticks to the resin it is quite tricky to reposition neatly. There are no cuts at all in the carbon to get it to curve around the corners, as you would have to do with carpet. It curves quite nicely, but if you over stretch the weave of the cloth, you cannot get it back. Next apply a layer of resin with a brush to the carbon. Leave to almost set hard & run around the edge with a fresh knife blade to remove the excess carbon cloth. Slap on some more resin to build up quite a thickish layer or two of the stuff to give you some thickness to be able to sand flat as you won't get a perfect finish just with your brush & will have to sand. Let harden fully and sand sand sand with quite fine grade until the brush markes are gone and you have a smooth finish.
You could leave it like this, but the finish is quite dull looking, smooth and flat but not shiney. Next I sprayed on many layers of laquer from a spray can, lightly sanding with 1500 grit inbetween coats. Surface finish is quite good for a DIY project but if you desire perfection I'd say take it to you local bodyshop & get them to clearcoat it professionally.
The larger side was a BIG BIG PITA to do, had to cut the cloth here & there on the corners & as the resin is setting the carbon was starting to lift up here & there
 so you're looking round the box at lightning speed trying to dab it down flat again with your brush whilst it was trying to set in a lifted position. As you dabbed one bit down again it was starting to lift somewhere else, it was a nightmare as the resin goes from workable to jelly in like 30 secs or so. It set lifted here & there & I had to remove the odd bulge very carefully with a belt sander to get a bulge free surface to stick the carpet onto.
It all looked quite good in the end though once the carpet covered up the dodgy bits, but once in place in the car you can't see those areas anyway, I just know they are there & like to do a decent job, cos that's just me
If I did another 'carbon wrap' I'd try to attach the carbon with '3M Spraymount' spray on type glue instead of resin. This would enable you to reposition the cloth a bit & you would not be working against the clock before the resin sets etc. Once the carbon cloth is all stuck down nice & neat you would apply the resin on top & sand etc as before to get the final finish.
I've no idea if this would actualy work, I don't see why not though. Never had any help or experience doing this so I'm learning as I went along...
All in all not easy to do to say the least, unless you do this sort of thing for a living, in which case you are no doubt laughing your head off if you are reading this

Thread Starter
Registered User
Joined: Oct 2004
Posts: 65
Likes: 0
From: England
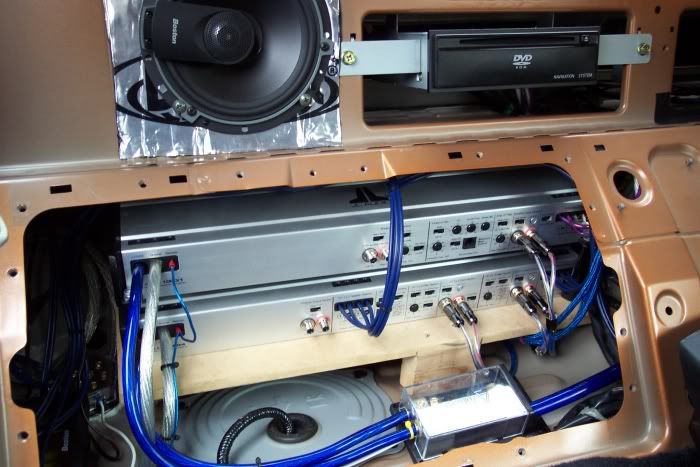
JL Audio 1000/1 & 450/4, a bit of a squeze getting them in there. 0 guage from the battery to fuse box, then 4 guage to each amp.
This is behind the drivers seat, where the Bose sub was originaly. Refitted the metal sub plate without the Bose sub in then refitted the black plastic sub cover. Amps are bolted down to the MDF & are spaced apart 1/2" or so to aid cooling.
This is behind the drivers seat, where the Bose sub was originaly. Refitted the metal sub plate without the Bose sub in then refitted the black plastic sub cover. Amps are bolted down to the MDF & are spaced apart 1/2" or so to aid cooling.

Thread
Thread Starter
Forum
Replies
Last Post
350Z_Al
Exterior & Interior
133
Oct 29, 2020 07:44 PM
ars88
Zs & Gs For Sale
18
Apr 4, 2016 07:52 AM
Boots patrol
Exterior
6
Nov 7, 2015 12:26 PM