
Pics of my Custom Fibre Glass Sub Box


Thread Starter
Registered User
Joined: Oct 2004
Posts: 65
Likes: 0
From: England
Thought I'd share some pics of the sub box I've just finished making.
Cheers to all you guys who posted pics of your home made or shop made installs, gave me some inspiration to get off my butt & have a go myself. This is the first thing I've ever made from fibre glass. It took a long time to make, longer than I thought it would, but I'm very happy with the end result
Took a mould of the strut bar first. 3-4 hours just to layer on all the masking tape. About 150 meters used.

Add on a 3/4" MDF front face. Chopped the rear face off as well so that is also 3/4" MDF.

Lots of filling & sanding later.

Spray it matt black.

Cover in black felt & add speaker wires.


Add 2x 10" subs & install.
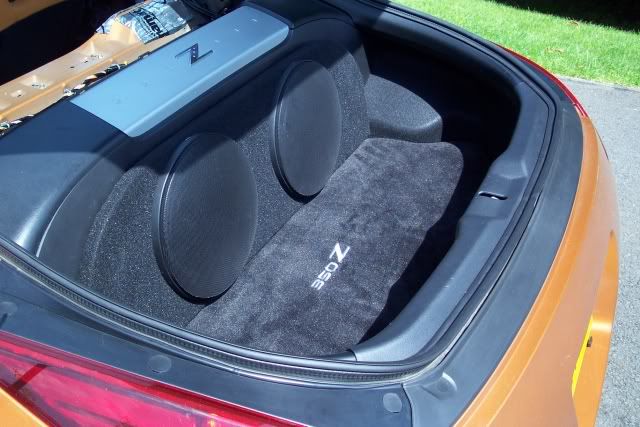
From the side. Quick release Lemo power connector used.

Without the grills. Running 2x Boston Acoustic 10.5lf's from a JL Audio 1000/1.
Sounds lovely, very 'musical', fast & accurate

Cheers to all you guys who posted pics of your home made or shop made installs, gave me some inspiration to get off my butt & have a go myself. This is the first thing I've ever made from fibre glass. It took a long time to make, longer than I thought it would, but I'm very happy with the end result
Took a mould of the strut bar first. 3-4 hours just to layer on all the masking tape. About 150 meters used.
Add on a 3/4" MDF front face. Chopped the rear face off as well so that is also 3/4" MDF.
Lots of filling & sanding later.
Spray it matt black.
Cover in black felt & add speaker wires.
Add 2x 10" subs & install.
From the side. Quick release Lemo power connector used.
Without the grills. Running 2x Boston Acoustic 10.5lf's from a JL Audio 1000/1.
Sounds lovely, very 'musical', fast & accurate

Good work! The time certainly does get away from you on this kind of project now doesn't it. Your sanding and thinking "how much are those boxes on ebay", but good for you sticking with it and getting it done. I am sure it sounds great.
Chris
Chris


Trending Topics
Thread Starter
Registered User
Joined: Oct 2004
Posts: 65
Likes: 0
From: England
Cheers guys 
I went through all the filling & sanding nightmare for a few reasons. I can be a bit of a perfectionist at times & just like to do a decent quality of work if I can. As I said, never done any fibre glass work before so just wanted to see what was involved in getting to a decent finish. I could have just covered the 'basic' box in carpet & saved days of work, but that's just not me.
Respect to all those that do this sort of thing for a living. Mucho time consuming work. Can see why custom shop work can cost so much now, the materials are not a lot of money, it's the time involved...
Also I have made a gel coat/fibre glass mould of the finished box, so I can make some more if anyone else wants one, so the surface finish had to be quite smooth for the mould.
I'm not on here to sell them to you guys, I'm in the UK. You allready have a decent choice on ready made sub boxes, Nazar etc, but here in England I could'nt find any ready made ones to buy, so decided to make my own & maybe make a few for other Z drivers here who like a bit of bass
GQ 350z, I was thinking of 2x12's, I could still get the BA 12.5lf's here (no 10's left anywhere, had to import these from the USA, still hard to get even then) but most people on here said 10's were the way to go, so I went with your advice BA 10's need only .5cuft of air space each where as 12's need about 1cuft each.
Do you mean Dynamat the inside of the box?
I went through all the filling & sanding nightmare for a few reasons. I can be a bit of a perfectionist at times & just like to do a decent quality of work if I can. As I said, never done any fibre glass work before so just wanted to see what was involved in getting to a decent finish. I could have just covered the 'basic' box in carpet & saved days of work, but that's just not me.
Respect to all those that do this sort of thing for a living. Mucho time consuming work. Can see why custom shop work can cost so much now, the materials are not a lot of money, it's the time involved...
Also I have made a gel coat/fibre glass mould of the finished box, so I can make some more if anyone else wants one, so the surface finish had to be quite smooth for the mould.
I'm not on here to sell them to you guys, I'm in the UK. You allready have a decent choice on ready made sub boxes, Nazar etc, but here in England I could'nt find any ready made ones to buy, so decided to make my own & maybe make a few for other Z drivers here who like a bit of bass
GQ 350z, I was thinking of 2x12's, I could still get the BA 12.5lf's here (no 10's left anywhere, had to import these from the USA, still hard to get even then) but most people on here said 10's were the way to go, so I went with your advice
BA 10's need only .5cuft of air space each where as 12's need about 1cuft each. Do you mean Dynamat the inside of the box?
Thread Starter
Registered User
Joined: Oct 2004
Posts: 65
Likes: 0
From: England
Originally Posted by 350Mark
Nice job!!! I wish i could do the same but don't have the time and patience...
Have looked at the pics of your car before from the link in your sig, stunning
That ICE install is jaw dropping quality, wish I could afford the same, but I don't have the money LOL.
Makes my home made box look rather basic LOL.
I didn't mean to take away from your install, much respect for doing it yourself. I know how laborious it is. I meant dynamat in the hatch area, under all the plastic panels.
ravi
ravi
Thread Starter
Registered User
Joined: Oct 2004
Posts: 65
Likes: 0
From: England
Originally Posted by GQ 350z
I didn't mean to take away from your install
ravi
ravi
I've Dynamat all under the spare wheel area etc & bits stuck on here & there as well. Car is still in a bit of a 'work in progress' sort of state, bit more dynamat to add, tidy up the cables, refit plastic panels etc.
I didn't want to refit all the plastic at once & maybe get loads of rattles & have to take it all off again or get any cable interference/noise & again have to reroute power wires/rca leads slightly, etc. I can try to cure any noises I get as I refit plastic bit by bit, should make it easier to work out what is causing the noise/rattle.
Not doing too badly for rattles so far, the door handles vibrate & make a noise at times LOL.
Thread Starter
Registered User
Joined: Oct 2004
Posts: 65
Likes: 0
From: England
Originally Posted by vo7848
Really nice job!! Got a question. How did you figure out the cu volume on the inside of the enclosure? Was it a guestimate?
When I have made another from the mold I've taken, I'll fill it with water from a measuring jug, then I'll know exactly what it is.
I can alter the internal volume to suit the Boston's if I like & maybe swop the original one for a correct volume 'copy'. Sounds nice as it is though so TBH will more than likely just stick with the original for myself & make a copy or two for other guys here in the UK if anybody would like one.
Out of interest guys, what sort of price would you expect to pay for a fiberglass custom box such as this in the USA???

No need for water, just use styrofoam peanuts. Box looks great, you certainly are a perfectionist!
In the past, I would use tin-foil instead of tape for the mold, just an idea for everyone out there.
In the past, I would use tin-foil instead of tape for the mold, just an idea for everyone out there.
Thread Starter
Registered User
Joined: Oct 2004
Posts: 65
Likes: 0
From: England
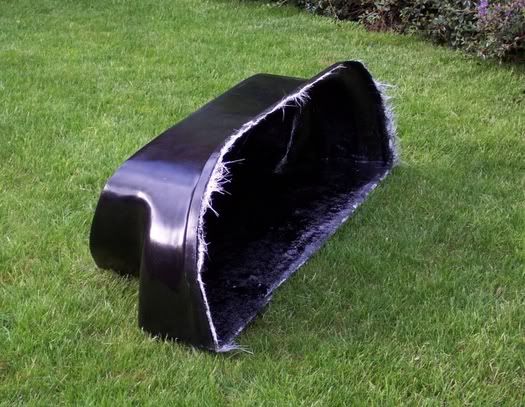
The first copy, just out of the mould

It came out quite well, I was rather relieved that it came out at all
Just need to bond on the 3/4" MDF face & add a few more layers of Fglass...
It came out quite well, I was rather relieved that it came out at all
Just need to bond on the 3/4" MDF face & add a few more layers of Fglass...
Registered User
Joined: Apr 2003
Posts: 629
Likes: 0
From: Maryland wide body country!!!
Originally Posted by orangeboy
Cheers guys
Also I have made a gel coat/fibre glass mould of the finished box, so I can make some more if anyone else wants one, so the surface finish had to be quite smooth for the mould.
Also I have made a gel coat/fibre glass mould of the finished box, so I can make some more if anyone else wants one, so the surface finish had to be quite smooth for the mould.
I would really appreciate it.
Thanks
Thread Starter
Registered User
Joined: Oct 2004
Posts: 65
Likes: 0
From: England
Gel coat is basicaly just thick resin, kind of nearly set jelly concistency. It doesn't run much so can be slapped on vertical faces etc and not all end up in a pile of goo on the floor, well not too much.
No pics, sorry.
I'm no expert but this is how I did it.
Get the surface finish as smooth as you can of what you want to copy. I finished off wet sanding with 1500 grit, it was smooooooth.
Place finished sub box on a work stand, MDF side with sub holes face down.
Rub all over with mould release wax, wait 15 mins, buff up wax, wait 30 mins or more to let wax 'harden'. Apply another layer of wax, buff up... Repeat this many times, 6 8 10. Each time the surface gets slightly smoother as it fills up the tiny (you can't see them) valleys & scratches etc with wax. Don't skimp on this, you'll regret it later when you can't get the sucker out of the mould
Next apply PVA mould release agent. This is like water. Add a dye to it to make it coloured so you can see where you have applied it. Dab it on with a sponge, very thinly, so it looks like it is dry straight away. If it looks wet keep dabbing it to spread it about so it looks dry. Wait a while, 30 mins or so. Add on another coating, still very thinly. Wait a few hours for it to dry completely.
Add hardener to gel coat resin & a pigment so you can see where it is easily, mine was yellow Slap it on with a brush, nice & thick. Wait 30 mins or so & apply another layer.
Let gel coat set & apply a layer of fiberglass with normal resin, can add in some pigment if you like, I did. Build up a few layers of Fglass as normal, 5 6 7 whatever.
Let cure totaly. If you're lucky you can pull the 'plug' out of the mould. This can be a PITA to get out, big time
That's about it really. Just takes lots of time up. Every slight bump, pin ***** sized hole or fine scratch line on the original is copied
No pics, sorry.
I'm no expert but this is how I did it.
Get the surface finish as smooth as you can of what you want to copy. I finished off wet sanding with 1500 grit, it was smooooooth.
Place finished sub box on a work stand, MDF side with sub holes face down.
Rub all over with mould release wax, wait 15 mins, buff up wax, wait 30 mins or more to let wax 'harden'. Apply another layer of wax, buff up... Repeat this many times, 6 8 10. Each time the surface gets slightly smoother as it fills up the tiny (you can't see them) valleys & scratches etc with wax. Don't skimp on this, you'll regret it later when you can't get the sucker out of the mould
Next apply PVA mould release agent. This is like water. Add a dye to it to make it coloured so you can see where you have applied it. Dab it on with a sponge, very thinly, so it looks like it is dry straight away. If it looks wet keep dabbing it to spread it about so it looks dry. Wait a while, 30 mins or so. Add on another coating, still very thinly. Wait a few hours for it to dry completely.
Add hardener to gel coat resin & a pigment so you can see where it is easily, mine was yellow
Slap it on with a brush, nice & thick. Wait 30 mins or so & apply another layer. Let gel coat set & apply a layer of fiberglass with normal resin, can add in some pigment if you like, I did. Build up a few layers of Fglass as normal, 5 6 7 whatever.
Let cure totaly. If you're lucky you can pull the 'plug' out of the mould. This can be a PITA to get out, big time
That's about it really. Just takes lots of time up. Every slight bump, pin ***** sized hole or fine scratch line on the original is copied
