
integrating lcd screen into cubby hole


Originally Posted by babyit11
this question may have been asked already, but i didn't see it.
do you guys know if i would be able to do this on my 2006 Z?
I would like to add a screen as well
do you guys know if i would be able to do this on my 2006 Z?
I would like to add a screen as well
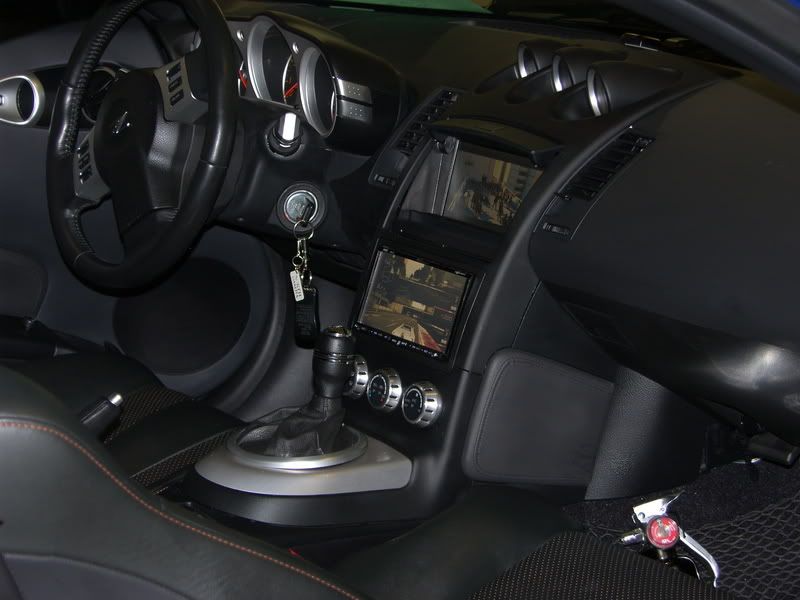
here some old pics with out the trim.
More pics along with my Z1 nav. (which Im still waiting for a dash kit)

Originally Posted by minispider
yes it can be done on an '06, did not buy anything just a little dremel and that was it.
[IMG] [/IMG]

[IMG]
[/IMG]Chris

Originally Posted by minispider
no, just a cut about 1/2 inch wide and the screen was slit underneath.
You do have to remove the plastic frame from around the screen, a little fiddleling with it in the cubbyand that's it, the cubby still intact in the back. The rubber mat just have to be cut, so what you see in the pic is just the front piece, a hole in the back for the rca video and power wires and that's it. The door still closes, I secured the monitor with a small plate under the cubby so if won't fall down. It looks perfect. and better yet no $ was spent
You do have to remove the plastic frame from around the screen, a little fiddleling with it in the cubbyand that's it, the cubby still intact in the back. The rubber mat just have to be cut, so what you see in the pic is just the front piece, a hole in the back for the rca video and power wires and that's it. The door still closes, I secured the monitor with a small plate under the cubby so if won't fall down. It looks perfect. and better yet no $ was spent
I knew this could be done I was just waiting to see it posted here,looks good
I think you should do a write-up and have the Mod's sticky it.
For now can you give a little more Info in detail as to where you cut the 1/2
inch slot ? I was told to cut it out at the top and slide the screen down to the rubber mat Im likeing your info much better.


I hate to tell you, but Courtesy has their parts marked wrong. NISSAN NEVER MADE A MOTORIZED DOOR FOR 2006! The door on courtesyparts is made for an 03-05 center console. That's why the alignment is horrible.
-Acree
-Acree

Registered User
Joined: Sep 2006
Posts: 82
Likes: 0
From: North Babylon, NY
Originally Posted by evobunny
for 06 just get Courtesy's 06 Motorized Nav Door. Will save you lots of trouble and look alot cleaner. no cutting needed. here a thread I started on my install. and here some pics.
here some old pics with out the trim.
More pics along with my Z1 nav. (which Im still waiting for a dash kit)
here some old pics with out the trim.
More pics along with my Z1 nav. (which Im still waiting for a dash kit)
sorry to sound stupid, but who is "Courtesy" i would like to get the oem nav door to make my install look like urs

Originally Posted by minispider
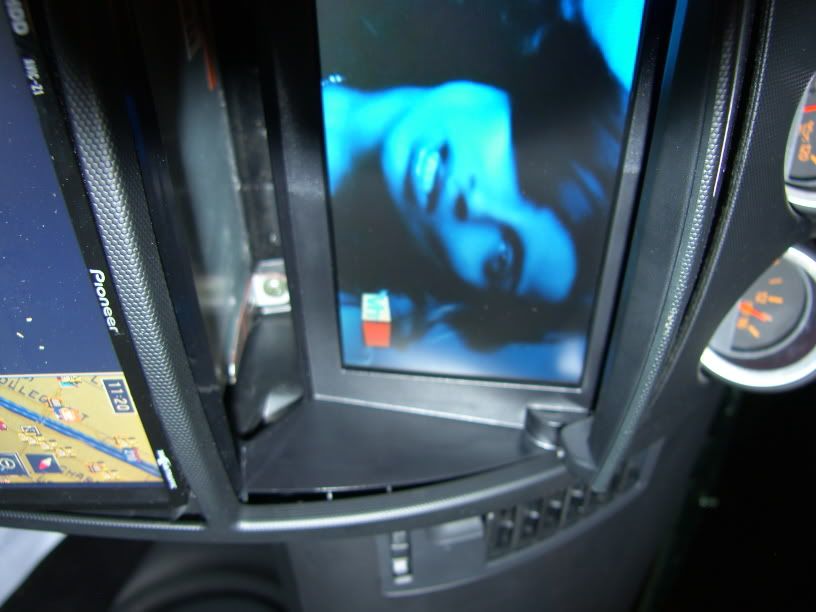
the screen is a farenheit, and yes is just a slit about 1/2" wide, the screen sits on the hinges (on top), also you need to dremel the inner upper cover edge so when you close it doesn't hit the top of the screen.
is that a 7" farenheit or 6.5"?
This is a really nice setup...definately what im looking for
Maybe this could become a HOW-TO write up?

Originally Posted by Acree
I hate to tell you, but Courtesy has their parts marked wrong. NISSAN NEVER MADE A MOTORIZED DOOR FOR 2006! The door on courtesyparts is made for an 03-05 center console. That's why the alignment is horrible.
-Acree
-Acree
Originally Posted by babyit11
sorry to sound stupid, but who is "Courtesy" i would like to get the oem nav door to make my install look like urs
Originally Posted by BPimpin007
is that a 7" farenheit or 6.5"?
This is a really nice setup...definately what im looking for
Maybe this could become a HOW-TO write up?
This is a really nice setup...definately what im looking for
Maybe this could become a HOW-TO write up?
to cover the aluminum edges (do this before final installation) of the screen, and trim the small rubber mat to cover the front and your done! time used doing this, 2 hours with the removing of the dash....happy dremmeling...
Originally Posted by minispider
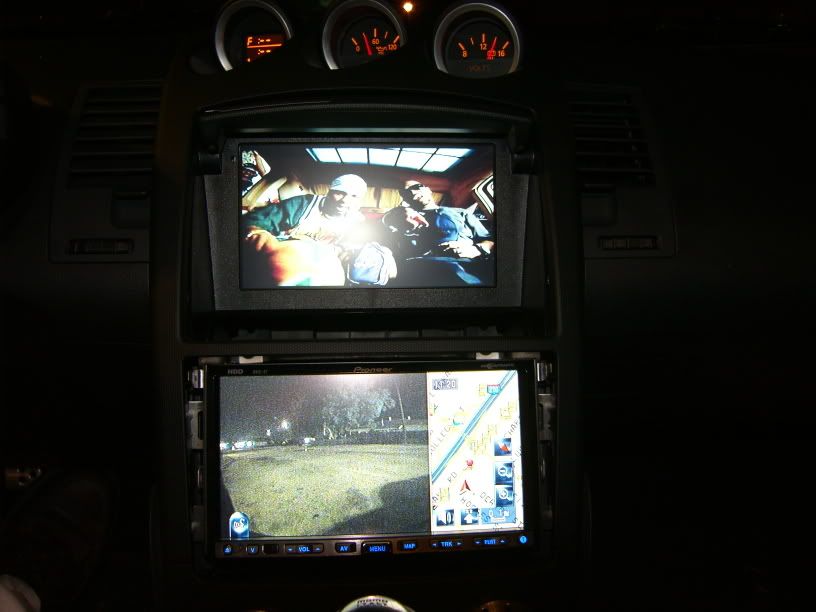
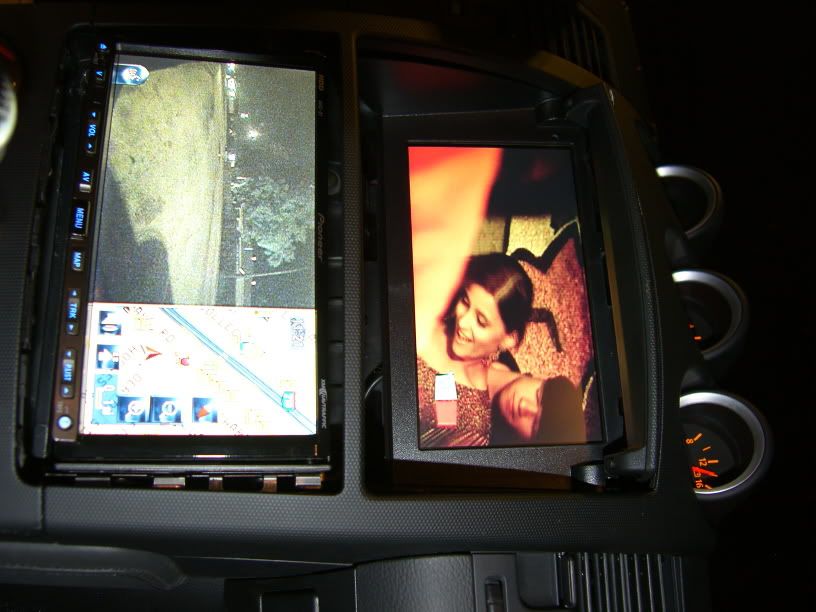
unfortunately I did not take pics of the work as I was going along, but I can tell you is a very simple mod. The only thing you have to do is take the screen apart to remove the plastic frame, is held by 4 little screws and the cut in the bottom is to allow the bottom of the screen ( about 1/8") to go inside and give you that clearence you need on the top. you can use duct tape to hold it at the bottom (place tape or glue small plate under the cubby so the screen does'n go down) the screen used is a farenheit 7". Also the inner inside cover (the flip cover) top lip must be dremmel about 1/2" to allow it to close and not hit the top of the screen. you won't see any cuts because of the angle when it opens, the screen is secured with a cable tie (the electronic panel)and attached to the outside of the cubby in the back so the screen won't fall during acceleration. Make sure you secure the electronic panel to the screen with velcro since the frame is no longer there to hold them together. The remote sensor must be bent back carefully to allow the screen to fit. Finally use pin stripe black tape
to cover the aluminum edges (do this before final installation) of the screen, and trim the small rubber mat to cover the front and your done! time used doing this, 2 hours with the removing of the dash....happy dremmeling...
to cover the aluminum edges (do this before final installation) of the screen, and trim the small rubber mat to cover the front and your done! time used doing this, 2 hours with the removing of the dash....happy dremmeling...
FYI:This works for the 06 Z but not for the 04/05 I tried doing mine almost
the same way , needless to say I did alot of dremmeling and hacking just
to fit my power acoustik 6.5 and the door with the inner skin removed
still will not close (hits the top of the screen) so I ordered the 03 cubby from performance nissan.
BTW I think this will work on the 04/05 Z if you use a 5.6 inch monitor.
Originally Posted by minispider
unfortunately I did not take pics of the work as I was going along, but I can tell you is a very simple mod. The only thing you have to do is take the screen apart to remove the plastic frame, is held by 4 little screws and the cut in the bottom is to allow the bottom of the screen ( about 1/8") to go inside and give you that clearence you need on the top. you can use duct tape to hold it at the bottom (place tape or glue small plate under the cubby so the screen does'n go down) the screen used is a farenheit 7". Also the inner inside cover (the flip cover) top lip must be dremmel about 1/2" to allow it to close and not hit the top of the screen. you won't see any cuts because of the angle when it opens, the screen is secured with a cable tie (the electronic panel)and attached to the outside of the cubby in the back so the screen won't fall during acceleration. Make sure you secure the electronic panel to the screen with velcro since the frame is no longer there to hold them together. The remote sensor must be bent back carefully to allow the screen to fit. Finally use pin stripe black tape
to cover the aluminum edges (do this before final installation) of the screen, and trim the small rubber mat to cover the front and your done! time used doing this, 2 hours with the removing of the dash....happy dremmeling...
to cover the aluminum edges (do this before final installation) of the screen, and trim the small rubber mat to cover the front and your done! time used doing this, 2 hours with the removing of the dash....happy dremmeling...
Very informative. Thank you very much. =)

Originally Posted by deluzrider
i also have an 06 where i wanna do this. where do i get these parts
Chris
Registered User
Joined: Sep 2006
Posts: 82
Likes: 0
From: North Babylon, NY
Originally Posted by evobunny
courtesy nissan. here is link to the site. http://www.courtesyparts.com/Merchan...de=68250-Z3306
WOW, Price:$279.96
i didn't think it would cost that much. i will head down to my local junk yards and see if they have this part
Originally Posted by babyit11
WOW, Price:$279.96
i didn't think it would cost that much. i will head down to my local junk yards and see if they have this part
i didn't think it would cost that much. i will head down to my local junk yards and see if they have this part
As for if that cubby that courtesy is selling is really for an 06, why don't you ask evobunny for some clear pics in the day time with the door closed and open. I am guessing from what I have seen there is a .5" gap at the bottom of the door when it is closed, there are gaps where the outer section meets up with the sides of the cubby and the front finisher does not fit properly right at the front.
Chris
Originally Posted by HyperSprite
And that my friend is why I said I liked the version where you just trim the stock cubby, essentially free and you don't have to figure out how to get the motor to operate.
As for if that cubby that courtesy is selling is really for an 06, why don't you ask evobunny for some clear pics in the day time with the door closed and open. I am guessing from what I have seen there is a .5" gap at the bottom of the door when it is closed, there are gaps where the outer section meets up with the sides of the cubby and the front finisher does not fit properly right at the front.
Chris

Registered User
Joined: Apr 2004
Posts: 9
Likes: 0
From: So. Cali
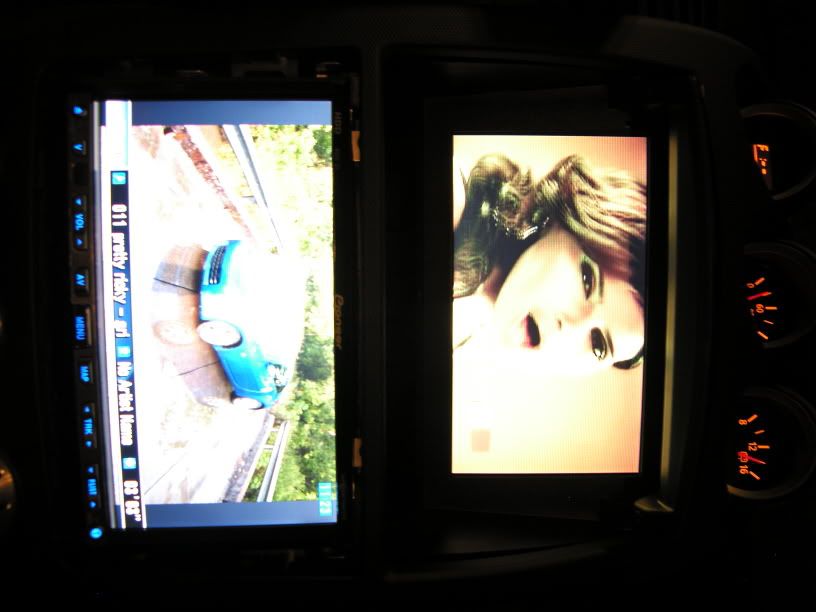
Originally Posted by minispider
yes it can be done on an '06, did not buy anything just a little dremel and that was it.
[IMG][/IMG]
[IMG]
[/IMG]Hey Minispider, what screen did you use for the bottom part where the stock stereo used to be(what do you call that anyways?? hehe). I'm planning to put a screen there but not sure what to get. and yours looked really good. thanks.
Alpine IVA-WA200...sharp unit and by the way Evobunny you can make your cover open and close with a simple toggle switch. no big deal. just a few connections and your done, it just won't close automaticly but is better than to have it opened at all times.