
sintaxeror's Valentine 1 and Laser Interceptor install log - tons of PICS/No 56k!


Thread Starter
Registered User
iTrader: (3)
Joined: Jun 2005
Posts: 670
Likes: 0
From: St. Petersburg, FL
Cheaper to buy a V1 directly from Valentine. You can save an additional $40 or so from their website price if you order a refurb, but it can be kind of tricky.. if you decide to buy one PM me and I'll fill you in on the details =)
Mine is a refurb.. so is the CD i used.
Mine is a refurb.. so is the CD i used.

The rear mount is not an original idea to me, as much as I would like to take credit 
There are a handful of other members here who have mounted it back there, and I PM'ed all of them to find out what they thought of it. Each one of them was happy with it, and reported no loss of performance.
That being said, now that I have driven around a couple of days with it, there is a trade off. I've lost a hair of sensitivity from the front sensor, and gained a bit more sensitivity in the rear. It's not that noticeable. I imagine it would be more noticeable if there was a LEO trying to radar people from an overpass.. which I have heard happens, but in my 12 years of driving I have never actually seen, and thus am less worried about that than having everyone who sees my car also see my $400 RD -- or have people start tailing me on the highway because they can see I am using a RD.
In the next update, I will take a straight on picture from the rear of the car with the hatch up.. you'll be able to see the V1 has a clear line of sight to the front of the car. No doubt laser detection will suffer, but laser detection in a radar detector is useless. They should call it ticket detection, because if it actually goes off and its not a false alarm, you are getting a ticket if you're speeding. That is why I am also installing the LI.
I'm looking forward to your next update. good job bro!

Thread Starter
Registered User
iTrader: (3)
Joined: Jun 2005
Posts: 670
Likes: 0
From: St. Petersburg, FL
I have to finish my LED reflectors (sorry no build log
before I can install the LI since I have to take the front bumper off anyways...The LI i bought is just the regular LI dual.
Thread Starter
Registered User
iTrader: (3)
Joined: Jun 2005
Posts: 670
Likes: 0
From: St. Petersburg, FL
Laziness be damned! I am back on this build... I wholeheartedly apologize to all of you who were expecting me to complete this build with the same fervor as the audio build.
I started on the LI head install this weekend.. got 45 pictures for you guys.
First things first, get the car jacked up and on stands.

Get the wheels off...

Take the wheel wells and front bumper off... This took forever as I had never done it before on this car.
For those of you who have looked down there, there would still be two black plastic "thingies" (Can't think of a better word because I don't know what they do) that are clipped to the aluminum bumper brace.. I took them off because I intend to install the LI heads where they go.

Began cutting the first bracket out of aluminum..

Cut..

Measuring for the second bracket.. (Also did this for the first, just forgot the camera)

Cut out the second.. (did the cuts using a hacksaw, if anyone is wondering... I figured it would be slower, but the cuts would be cleaner)

One of the clips that was holding the "thingies"...

Clipped for clearance..

Marked and drilled a guide hole...

Drilled a bigger hole..

Test fit of the clip..

Mirrored on the other bracket... also cut out some screw holes.

Clipped another clip..

The clips fit a little loosely so I decided to add another screw hole so that they will be sturdy when tightened down.

This is the method i used to make sure both brackets would be facing forward properly. I assumed the tow hook bracket was perpendicular to the car (which it appeared to be, or at least close enough for me), so I clamped the remaining aluminum piece to it...

And then clipped the brackets in and lined them up parallel. Marked the brace to be drilled.

For those of you who may be confused... The LI heads need to (A) face forward, (B) be level, and (C) be even.
(A) Used the brace-parallel method i outlined two pictures ago.
(B) I checked the brace before jacking up the car, and the ends are level with the floor.
(C) Using the factory holes and clips, I can ensure the brackets are in the same place on either side of the brace.
Drilled holes and screwed down..

View from the front..

Now both..

Decided to take a break... while i was walking I saw this little guy...

Test fit the bumper...

DOH! The brackets touch the plastic.. =(

Cut out two new pieces..

Using the old brackets as a template.. I drilled the new ones, only moved the holes over about 3/8".

Reinstalled..

Looks good!

Need to cut out part of the brackets to clear the wire coming out of the heads.. Drilled some holes...

Cut out a notch... (Dremel)

Test fit.. Looks good.

Notched the other one..

A few coats of Rustoleum flat black..

Installed brackets..

Installed heads... put tape over them to avoid scratches when reinstalling the bumper..

Remove all the plastic around the battery..

Ran one cable down the brace to meet the other one...

Zip tied the cables along with some stock wiring in the wheel well..

Pulled them up and through..

Remove kick panel..

Push the cables into the big grommet through the same hole i made for my audio cables (see my audio build log if you havent!)

Pulled through...

Replaced battery plastic..

Reinstalled bumper...

Reinstalled wheel wells, put wheels back on, lowered the car back down, and removed the masking tape...

Closeup of driver's side LI head..

Looks good to me so far! Will get to the wiring soon, also plan to get some video of the whole system in action =) Don't worry though, still more custom work to be done on the wiring because you know I can't leave well enough alone.
As always, please post comment! The more comments I get, the more motivated I am to keep going =)
I started on the LI head install this weekend.. got 45 pictures for you guys.
First things first, get the car jacked up and on stands.
Get the wheels off...
Take the wheel wells and front bumper off... This took forever as I had never done it before on this car.
For those of you who have looked down there, there would still be two black plastic "thingies" (Can't think of a better word because I don't know what they do) that are clipped to the aluminum bumper brace.. I took them off because I intend to install the LI heads where they go.
Began cutting the first bracket out of aluminum..
Cut..
Measuring for the second bracket.. (Also did this for the first, just forgot the camera)
Cut out the second.. (did the cuts using a hacksaw, if anyone is wondering... I figured it would be slower, but the cuts would be cleaner)
One of the clips that was holding the "thingies"...
Clipped for clearance..
Marked and drilled a guide hole...
Drilled a bigger hole..
Test fit of the clip..
Mirrored on the other bracket... also cut out some screw holes.
Clipped another clip..
The clips fit a little loosely so I decided to add another screw hole so that they will be sturdy when tightened down.
This is the method i used to make sure both brackets would be facing forward properly. I assumed the tow hook bracket was perpendicular to the car (which it appeared to be, or at least close enough for me), so I clamped the remaining aluminum piece to it...
And then clipped the brackets in and lined them up parallel. Marked the brace to be drilled.
For those of you who may be confused... The LI heads need to (A) face forward, (B) be level, and (C) be even.
(A) Used the brace-parallel method i outlined two pictures ago.
(B) I checked the brace before jacking up the car, and the ends are level with the floor.
(C) Using the factory holes and clips, I can ensure the brackets are in the same place on either side of the brace.
Drilled holes and screwed down..
View from the front..
Now both..
Decided to take a break... while i was walking I saw this little guy...
Test fit the bumper...
DOH! The brackets touch the plastic.. =(
Cut out two new pieces..
Using the old brackets as a template.. I drilled the new ones, only moved the holes over about 3/8".
Reinstalled..
Looks good!
Need to cut out part of the brackets to clear the wire coming out of the heads.. Drilled some holes...
Cut out a notch... (Dremel)
Test fit.. Looks good.
Notched the other one..
A few coats of Rustoleum flat black..
Installed brackets..
Installed heads... put tape over them to avoid scratches when reinstalling the bumper..
Remove all the plastic around the battery..
Ran one cable down the brace to meet the other one...
Zip tied the cables along with some stock wiring in the wheel well..
Pulled them up and through..
Remove kick panel..
Push the cables into the big grommet through the same hole i made for my audio cables (see my audio build log if you havent!)
Pulled through...
Replaced battery plastic..
Reinstalled bumper...
Reinstalled wheel wells, put wheels back on, lowered the car back down, and removed the masking tape...
Closeup of driver's side LI head..
Looks good to me so far! Will get to the wiring soon, also plan to get some video of the whole system in action =) Don't worry though, still more custom work to be done on the wiring because you know I can't leave well enough alone.
As always, please post comment! The more comments I get, the more motivated I am to keep going =)

Thread Starter
Registered User
iTrader: (3)
Joined: Jun 2005
Posts: 670
Likes: 0
From: St. Petersburg, FL
The installation continues!
Time to get the brains of the LI wired in...
First, remove the shift **** and pop off the trim..

Pop out the blank plate..
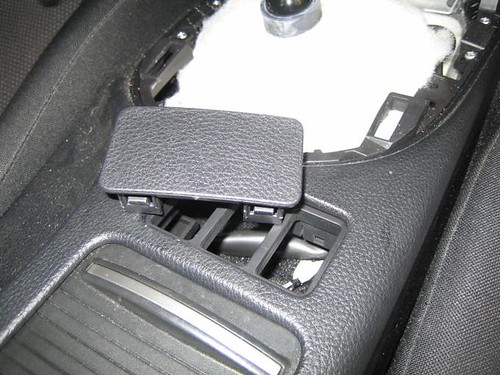
The brains of the operation..

Fits just right in there..

Test fit.. looks good..

Some T-Taps... These are the best IMO taps because they also include a quick disconnect...

Here is the cigarette lighter connector that I already tapped for the V1.

Zoomed out view so you can see where the wire is..

Tapped..again.

Snake the wires to the console...

Snake the power wires on the LI harness to under the passenger dash..

Out the other end..

A little 3M double sided tape to mount the box..

Stuck down..

Run the power switch wires to the blank...

Now, what to do with you...

Some masking tape to protect against slips..

Clamped down and marked for holes...

Drilled a guide hole..

I'm a baaaaaaaaaaaaaaaaaaad man..

Hole.

LI Supplied switch fits nicely.

Other side..

I decided just to tap the same ground I used for the V1..

Another look..

You're grounded!

crimp the connectors to the LI Harness..

Connect them up and give it a quick test... looks like its working. Also a sexy female robot voice greeted me with a "Welcome."

Had to grind a notch out of the center consol plastic to clear the switch..

Fits nicely now..

Reinstalled all the plastic and shifter..

Wiring all connected..

And tucked into bed..

Well, that's that! I haven't decided if I want to use the LED pod I made out of PVC earlier in this thread... the plan was to make bright flashing LED alert to tell me the LI is actively jamming (since it naturally wants to voice alert and I like my music loud... and hate wiring things to my radio mute).. But right now it seems okay. So this thread may or may not be over.. =)
Questions? Comments?
Time to get the brains of the LI wired in...
First, remove the shift **** and pop off the trim..
Pop out the blank plate..
The brains of the operation..
Fits just right in there..
Test fit.. looks good..
Some T-Taps... These are the best IMO taps because they also include a quick disconnect...
Here is the cigarette lighter connector that I already tapped for the V1.
Zoomed out view so you can see where the wire is..
Tapped..again.
Snake the wires to the console...
Snake the power wires on the LI harness to under the passenger dash..
Out the other end..
A little 3M double sided tape to mount the box..
Stuck down..
Run the power switch wires to the blank...
Now, what to do with you...
Some masking tape to protect against slips..
Clamped down and marked for holes...
Drilled a guide hole..
I'm a baaaaaaaaaaaaaaaaaaad man..
Hole.
LI Supplied switch fits nicely.
Other side..
I decided just to tap the same ground I used for the V1..
Another look..
You're grounded!
crimp the connectors to the LI Harness..
Connect them up and give it a quick test... looks like its working. Also a sexy female robot voice greeted me with a "Welcome."
Had to grind a notch out of the center consol plastic to clear the switch..
Fits nicely now..
Reinstalled all the plastic and shifter..
Wiring all connected..
And tucked into bed..
Well, that's that! I haven't decided if I want to use the LED pod I made out of PVC earlier in this thread... the plan was to make bright flashing LED alert to tell me the LI is actively jamming (since it naturally wants to voice alert and I like my music loud... and hate wiring things to my radio mute).. But right now it seems okay. So this thread may or may not be over.. =)
Questions? Comments?
Thread Starter
Registered User
iTrader: (3)
Joined: Jun 2005
Posts: 670
Likes: 0
From: St. Petersburg, FL
Decided to leave you guys a quick note here in case anyone tried to do a similar install..
I was looking at the heads and they didnt seem to be pointed perfectly forward..
I took the bumper back off and rigged up a bar to both of them to check to see if they were aligned with each other. The passenger side was perfect, but the Drivers side was a few degrees off. Probably wouldn't affect performance but I wanted it to be perfect so I realigned the drivers side head.
So, if you do try this.. you probably don't want to go with the eyeball method like I did the first time around.
The good news is, now that I knew how to take everything off, it only took me 3 hours start to finish to remove everything and redrill holes/adjust, then put everything back together.

 great job

Your concealed display mounting is amazing. I'm tempted although I'm not sure I want more wires in my cubby. I've already got my iPod integration in there. However, you now have me rethinking my ghetto install.

The good is that the display is high enough that it can't be seen from outside the car. Another plus is that it the aluminum bracket is Velcro'd to the windshield and the display is then velcro'd to the bracket. Easy to remove.
The good is that the display is high enough that it can't be seen from outside the car. Another plus is that it the aluminum bracket is Velcro'd to the windshield and the display is then velcro'd to the bracket. Easy to remove.
Thread Starter
Registered User
iTrader: (3)
Joined: Jun 2005
Posts: 670
Likes: 0
From: St. Petersburg, FL
The wires are inside the lid and then go over and behind the cubby... you can't see them and they are not inside the cubby at all.

Registered User
Joined: Nov 2006
Posts: 3
Likes: 0
From: Boston, MA
Not sure I'd cut in to a cubby like you did, way too scary, I like my V1 display in the rear view mirror but each to their own!


Thread Starter
Registered User
iTrader: (3)
Joined: Jun 2005
Posts: 670
Likes: 0
From: St. Petersburg, FL


I just wanted to say thank you for the detailed and very well written DIY. Ive been studying this set up/thread for days, insuring that I do not fail.
Only thing I want to add it that for my year 2006, the cig. lighter (positive wire) is red and green. Im assuming this varies in diff. years?
I too have the V1, and I ordered the 23mm adjustable country joy Z mount. Thanks again for the thread, my hats off to you sir
Only thing I want to add it that for my year 2006, the cig. lighter (positive wire) is red and green. Im assuming this varies in diff. years?
I too have the V1, and I ordered the 23mm adjustable country joy Z mount. Thanks again for the thread, my hats off to you sir
Last edited by ImWeeZzel; May 30, 2011 at 04:11 PM.