Make a line/aux in for your 2003 Bose headunit – step by step guide
 11-10-2008, 01:47 PM
#121
Registered User

Join Date: Sep 2008
Location: Fort Collins
Posts: 539
Likes: 0
Received 0 Likes
on
0 Posts
Given the BOSE unit has a dealer replacement cost of $2400 USD, in my '04 and a refurbished unit is about $650 USD, I'd just pull the unit before I did this mod, and sell it. It lacks adjustment in output, it just doens't sound that great.
Buy the replacement double-din center console, drop in Infinity Kappa speakers, or get the adapter for 2 ohm OEM speakers, put in a nice HU.
For people out of warranty I would not be surprised if you could sell the existing unit for almost $500 USD, buy the $200 center double DIN which is very well done, includes A/C controls for either '03-'04 or the updated '05 forward style. Apply the rest toward a kickass HU pre-wired for iPod, SAT, and/or for those w/o NAV, drop in a double DIN unit with NAV.
After you've done this "mod" (hack) the BOSE unit has zero resale value, and when it dies (a frequent problem now after 4-5 years nothing to do with this mod), then you have to either suck up the price of new unit, or go the replacement console route as suggested above.
Just pointing out "con" side of the pros/cons of wiring up an AUX input in this manner.
 This is a great thread for those people who want a quick and easy install so they can use their MP3 players. I'll bet for most of the people replying here the Bose works and has acceptable capabilities. Mine plays CDs, tunes into radio frequencies just fine and sounds perfect for my needs. I'm gonna do this mod myself as soon as I get the chance. If the Bose dies, it dies, but I'm certainly not going to spend several hundred dollars for the ICE setup you recommend.
Great thread btw guys

 11-30-2008, 04:40 AM
#122
Registered User

Join Date: Nov 2008
Location: ITALY
Posts: 4
Likes: 0
Received 0 Likes
on
0 Posts
I got everything working correctly plus the srping and arm mod, so now no cassette is needed in the slot.
As per the tape error issue, I confirm that pressing eject before turning the ignition on does resolve the problem.
Thank you who posted and refined the post!
:-)
PS: the mod works on Italian spec head units, which as far as I know are Euro/UK spec. In other words, you UK and French blokes can try it out.
Last edited by alessandro+; 11-30-2008 at 11:23 PM.
 12-29-2008, 06:39 AM
#124
Registered User
iTrader: (3)

Join Date: Mar 2008
Location: London UK
Posts: 133
Likes: 0
Received 0 Likes
on
0 Posts
[IMG]http://i89.photobucket.com/albums/k226/Wolf823/350z/Bose%20Aux/Bose5.jpg[\IMG]
Couple of questions. You state you solders this in 3 points. Obviously I can see the red is soldered to R-CH but is the clear soldered to both the A-GND and L-CH.
Secondly would this work with a phono to 3mm Jack option for a slightly cleaner install.
Many thanks
Dan
Couple of questions. You state you solders this in 3 points. Obviously I can see the red is soldered to R-CH but is the clear soldered to both the A-GND and L-CH.
Secondly would this work with a phono to 3mm Jack option for a slightly cleaner install.
Many thanks
Dan

 07-01-2009, 06:03 AM
#127
Registered User

Join Date: May 2009
Location: London
Posts: 1
Likes: 0
Received 0 Likes
on
0 Posts
*Bump*
I'm going to attempt this during the next few weeks (UK Z - it's my only choice!). To the people who've already done it - where did you route the cable after the installation? Any pics of some clean installs for this?
I'm going to attempt this during the next few weeks (UK Z - it's my only choice!). To the people who've already done it - where did you route the cable after the installation? Any pics of some clean installs for this?
 09-11-2009, 09:07 AM
#129
Registered User

Join Date: Aug 2009
Location: Texas
Posts: 1
Likes: 0
Received 0 Likes
on
0 Posts
Hey i got everything hooked up lines are clean cut, but for the tape error issue mine seems not to be helped by the pressing of the eject button. It tries to read side 1 switches to side 2 then says tape error. I can hear the music come through while it plays so i know its wired and i def broke the connection lines. Any suggestions, thanks
10-30-2009, 09:09 AM
#130
Registered User

Join Date: Sep 2009
Location: UK
Posts: 5
Likes: 0
Received 0 Likes
on
0 Posts
Just added an aux-in to my 2004 UK head unit with help from this guide and thought I'd share my slightly easier and reversible method.
As someone else pointed out there are 3 larger solder points for L, R, and Ground in the top-right of this picture:
____________________________________________________________ ___V____V____V
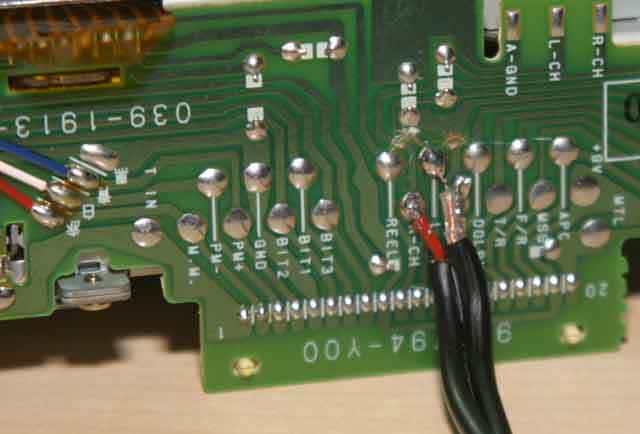
So I tried connecting up my cable up here and didn't break the PCB tracks. The result? It works perfectly!
There's no electrical components between the suggested soldering points and these, and there's actually a hole in the bottom of the head unit right next to them. You might be able to connect your cable through this hole without opening up the head unit, although you would need to support the cable somehow. I routed the cable as per the original guide.
I'm using a cheap cassette adaptor to fool the mechanism, but I've removed the head/cable and greased the internal gears so it runs very quiet. Before I removed the head I got a tiny amount of hiss from the cassette audio circuit, but only at very high volume with no music playing. Another way around this would be to just turn on Dolby. This won't affect the sound of the line-in because the Dolby chip is upstream on the cassette unit.
So if anybody is worried about cutting the PCB tracks you don't need to, and if you're soldering skills are not so hot you can solder the wires in an easier position. You can add an aux-in without sacrificing tape playback at all and I hope this encourages more people to do it
As someone else pointed out there are 3 larger solder points for L, R, and Ground in the top-right of this picture:
____________________________________________________________ ___V____V____V
So I tried connecting up my cable up here and didn't break the PCB tracks. The result? It works perfectly!
There's no electrical components between the suggested soldering points and these, and there's actually a hole in the bottom of the head unit right next to them. You might be able to connect your cable through this hole without opening up the head unit, although you would need to support the cable somehow. I routed the cable as per the original guide.
I'm using a cheap cassette adaptor to fool the mechanism, but I've removed the head/cable and greased the internal gears so it runs very quiet. Before I removed the head I got a tiny amount of hiss from the cassette audio circuit, but only at very high volume with no music playing. Another way around this would be to just turn on Dolby. This won't affect the sound of the line-in because the Dolby chip is upstream on the cassette unit.
So if anybody is worried about cutting the PCB tracks you don't need to, and if you're soldering skills are not so hot you can solder the wires in an easier position. You can add an aux-in without sacrificing tape playback at all and I hope this encourages more people to do it
Last edited by lhassall; 11-08-2009 at 11:00 AM.


 02-26-2010, 12:06 AM
#135
Registered User
Join Date: Sep 2009
Location: UK
Posts: 5
Likes: 0
Received 0 Likes
on
0 Posts
See my post above... You don't need to.
I guess the original poster was worried about noise from the tape circuit but as long as there's no tape in (or no head in the cassette adaptor) you won't hear it. Even if you did get a small amount of hiss you could just turn Dolby on.
I guess the original poster was worried about noise from the tape circuit but as long as there's no tape in (or no head in the cassette adaptor) you won't hear it. Even if you did get a small amount of hiss you could just turn Dolby on.
02-26-2010, 11:02 AM
#137
Registered User
Join Date: Sep 2009
Location: UK
Posts: 5
Likes: 0
Received 0 Likes
on
0 Posts
Must be your routing of the cable or poor connection on the ground wire. Are you sure you haven't connected the Ground and Left wires the wrong way around? Or maybe damaged the insulation between them?


