
Eibach Springs Installed with PICS and instruction, G35 Coupe


Im finally done installing my springs. It was very easy removing the shock/spring assemble. I didnt need to compress it. The hardest part was putting the shocks and aftermarket springs together. If a girl can do it anyone else can do it and yes power tools are great.

nice write up very easy job! I would suggest to anyone in the future to let the top strut bolt sit in kroil or a lubricant to help with loosening the nut on each strut. Its between the 3 nuts under the hood beneath the strut tower bar. That was the hardest part one sat in fluid and it released right away the other was a pain in the ***.
TIP:
There are 2 ways to remove the spring from the shock you can either use a wrench to clamp the cylinder at the top of the strut Then while using a crows foot wrench remove the nut. I found this to be a little difficult especially if you dont have a crows foot wrench which not all people own. So the other way of doing this is to use a 17mm socket for the top marked in red and then pull the boot down marked in blue and you should see a metal clamp/bracket that you can hold with a pliers/clamp. Pinch that down so it dosent spin when you turn the top nut and it should come off fairly easy. Power tools are a plus!
There are 2 ways to remove the spring from the shock you can either use a wrench to clamp the cylinder at the top of the strut Then while using a crows foot wrench remove the nut. I found this to be a little difficult especially if you dont have a crows foot wrench which not all people own. So the other way of doing this is to use a 17mm socket for the top marked in red and then pull the boot down marked in blue and you should see a metal clamp/bracket that you can hold with a pliers/clamp. Pinch that down so it dosent spin when you turn the top nut and it should come off fairly easy. Power tools are a plus!


After putting the springs back on I can't get the top nut tightened to 40 ft lbs without the center rod spinning even if I clamp down the metal bracket at the top. Is there anyway I can get it torqued down properly? I would like to torque to the specs that are recommended in the manual.

Last edited by koolzero; Dec 5, 2008 at 11:22 AM.
After putting the springs back on I can't get the top nut tightened to 40 ft lbs without the center rod spinning even if I clamp down the metal bracket at the top. Is there anyway I can get it torqued down properly? I would like to torque to the specs that are recommended in the manual.
http://www.sears.com/shc/s/p_10153_1...sName=Wrenches

I know this is an old thread, but does anyone has pics to help during the installation? I read the instruction, but I'm lost without the pics. Any help will be appreciated.

Thanks all! Great write up & Info!
Saved me mucho time with my cobb springs/sways! (no spring compressor needed)
now i am waiting for FedEx to deliver my Konis today so will be REDOING a bunch of the work
i definitely could have thought the timing thru a bit better and done it all at once!
Saved me mucho time with my cobb springs/sways! (no spring compressor needed)
now i am waiting for FedEx to deliver my Konis today so will be REDOING a bunch of the work
i definitely could have thought the timing thru a bit better and done it all at once!
Here are some front and rear spring / shock pics. Tried to center on the bolts needing removing for each piece.
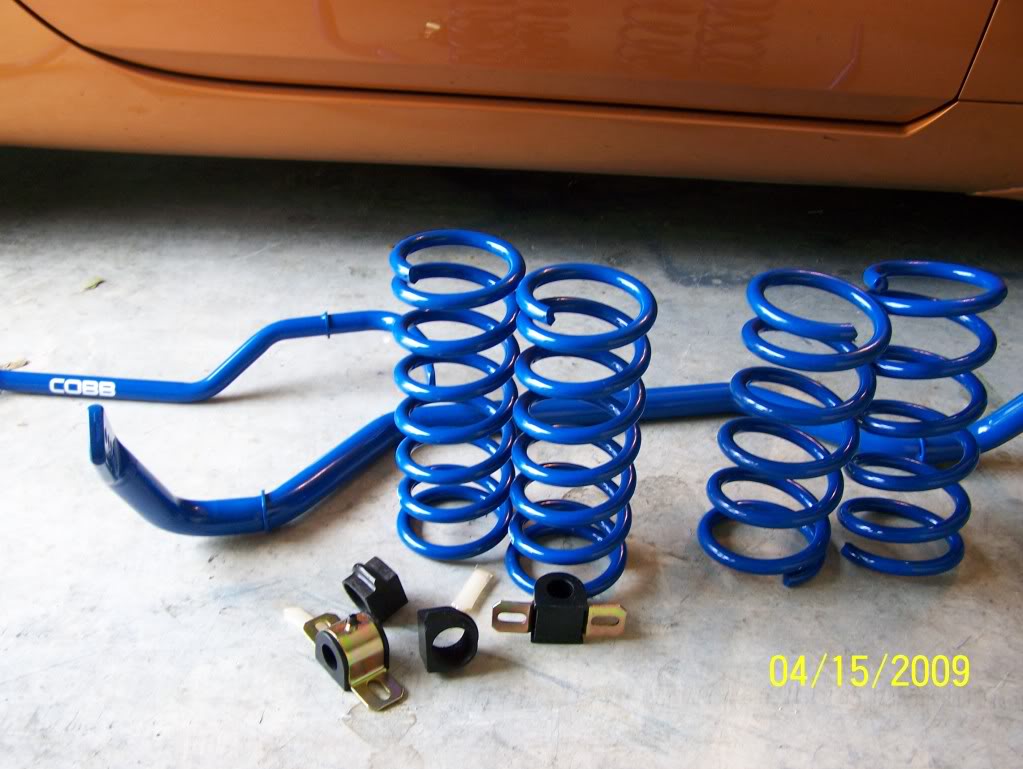
My new cobb suspension bits.
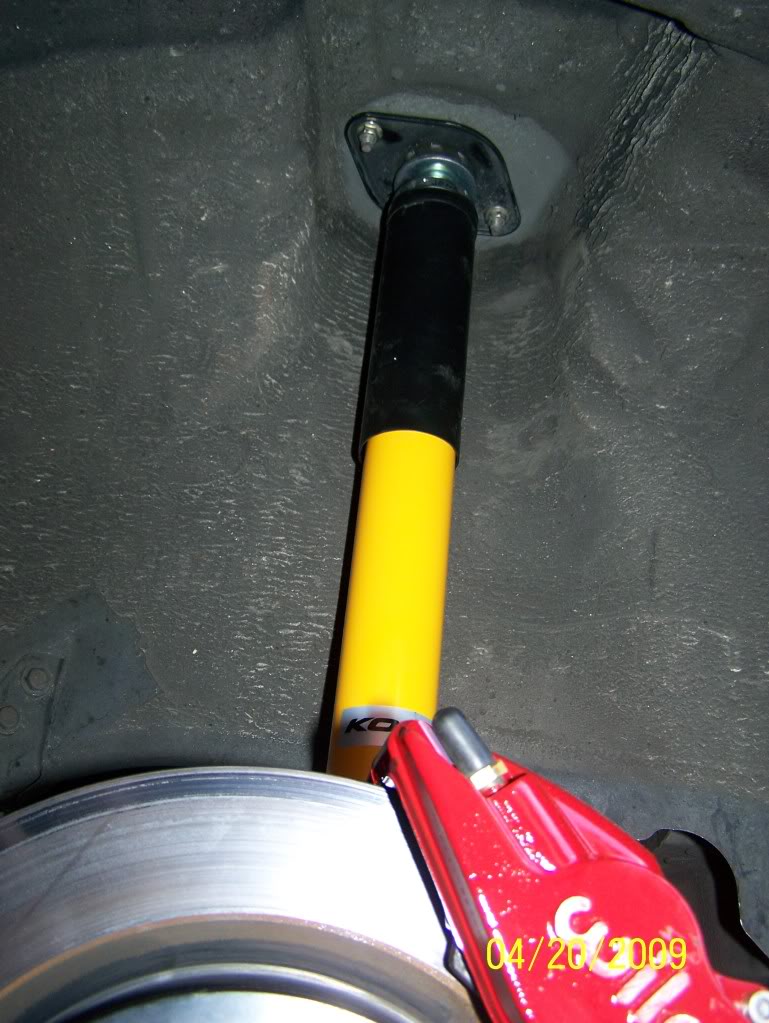
the upper front shock / spring mount - i loosened the center bolt in the car before taking the 3 retaining nuts off - no compresser, just used a 17mm wrench and vice grips on the center tab to keep shock from rotating
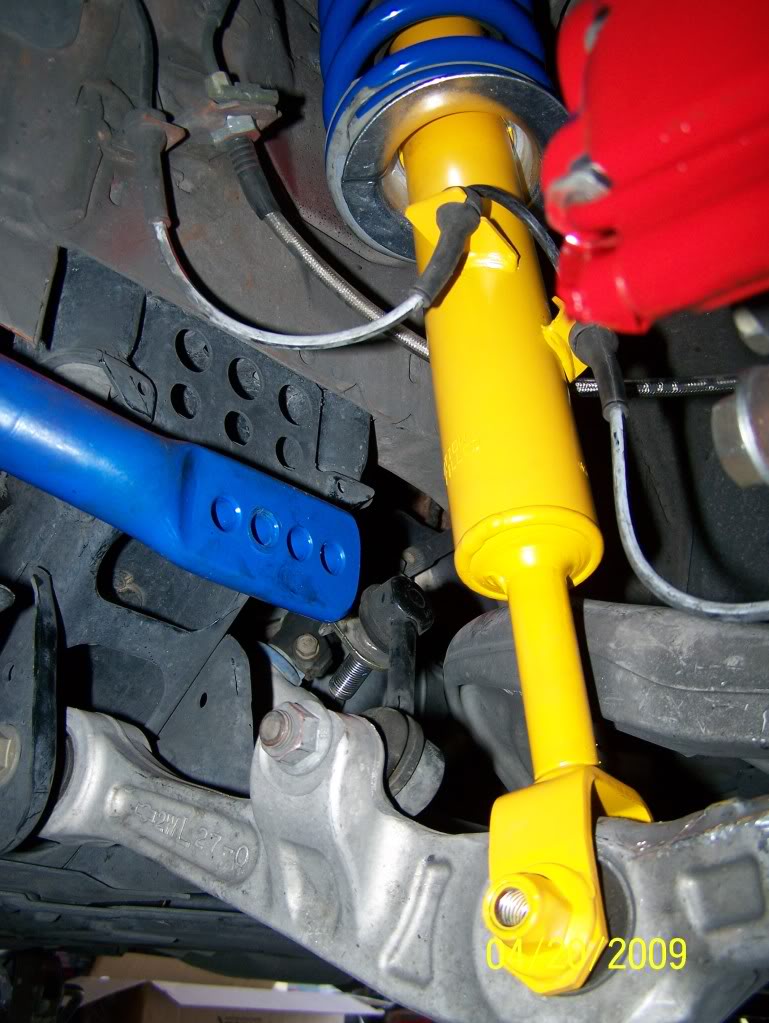
front lower shock bolt - note the sway bar disconected in back - used a breaker bar to wedge the suspension lower until lower part of shock slide off - the smaller springs are much easier going back in!
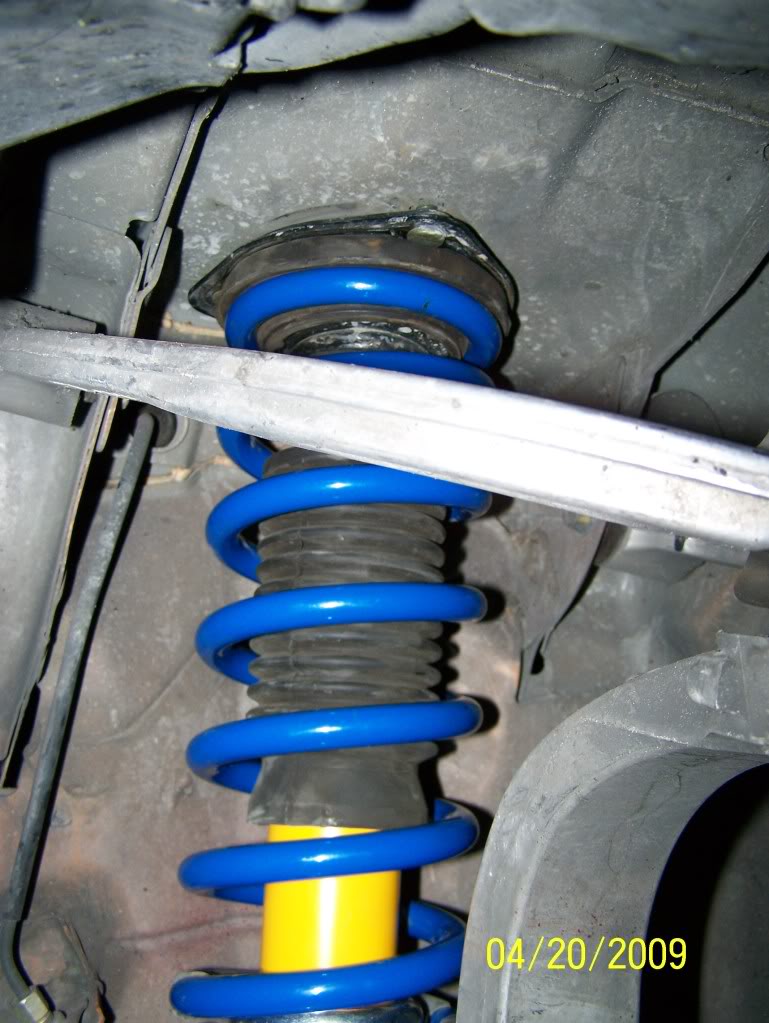
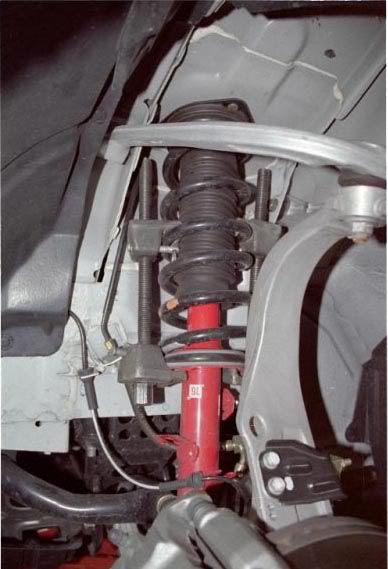
upper rear shock mount
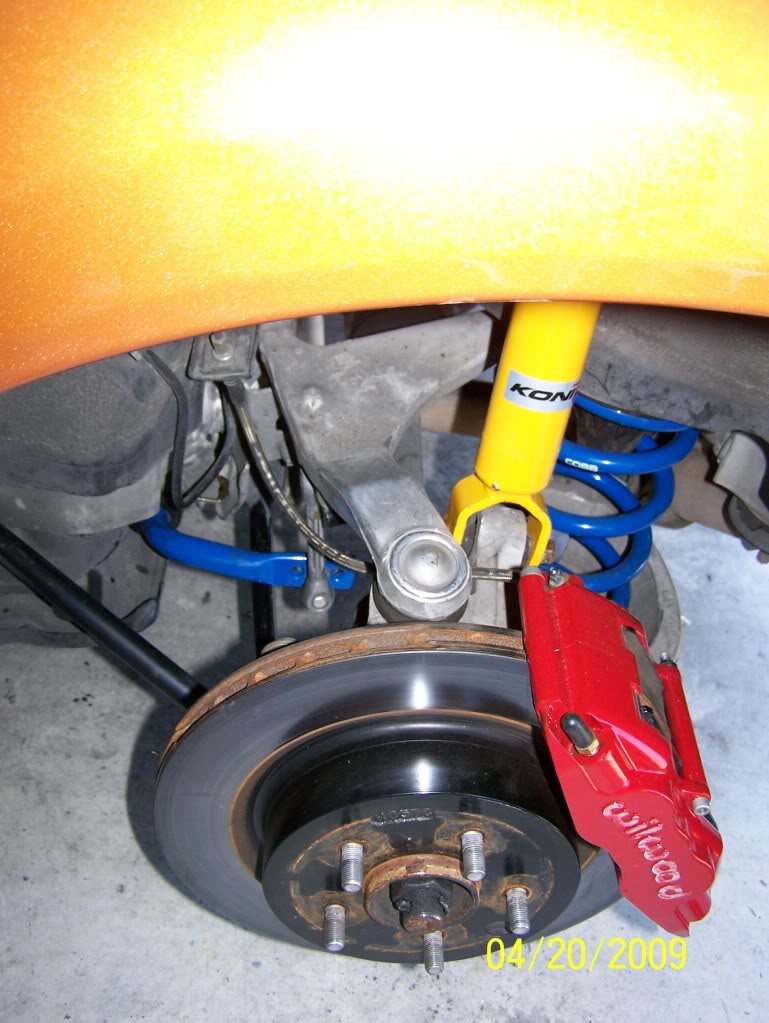
rear shock mount with spring bucket in the background
no need to remove shock bolt to just change springs - just pull the bolt at the front of the spring bucket and it drops right down.
Just re-adding pics to a great writeup!
[Don't get confused by where my rear caliper is! - this is the driver side rear - making your own BBK is a different DIY thread]
Good Luck!
My new cobb suspension bits.
the upper front shock / spring mount - i loosened the center bolt in the car before taking the 3 retaining nuts off - no compresser, just used a 17mm wrench and vice grips on the center tab to keep shock from rotating
front lower shock bolt - note the sway bar disconected in back - used a breaker bar to wedge the suspension lower until lower part of shock slide off - the smaller springs are much easier going back in!
upper rear shock mount
rear shock mount with spring bucket in the background
no need to remove shock bolt to just change springs - just pull the bolt at the front of the spring bucket and it drops right down.
Just re-adding pics to a great writeup!
[Don't get confused by where my rear caliper is! - this is the driver side rear - making your own BBK is a different DIY thread]
Good Luck!

I found all the Pics that were supposed to go with this article and put them in place, hope it helps!
Just finished my install of Eibach Pro-Kit springs on my Coupe. I did it one tire at a time. Torque spec on tire lugnuts: 80ft/lb.
The following is a post copied from Gsedan35 over in FreshAlloy. He installed springs and struts from a 350Z. I only installed Eibach springs on my Coupe. It is edited to be specific to the coupe.
"I did this to help anyone wanting to do this themselves. If any moderator would like to edit this in anyway to improve it and place it in the FAQ section, to right ahead.
This is how "I" did it. You can do your own thing where it makes sense to do so.
Tools needed:
factory jack
floor jack
1/2" ratchet (3/8")
misc 1/2" extensions (3/8")
17mm socket
12mm socket
19mm socket
17mm box end wrench
power tool is VERY helpful in removing front strut from spring
torque wrench (if you are as paranoid as I am)
spring compressor
Rear suspension
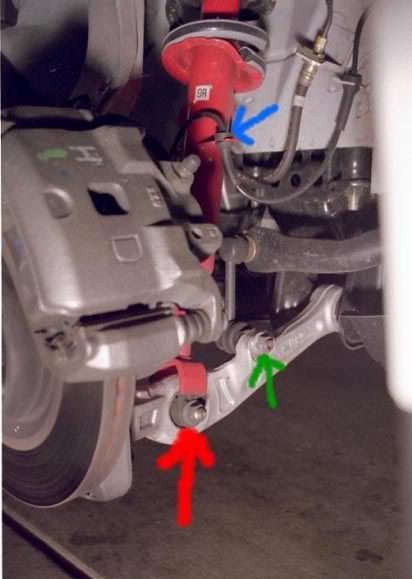
Jack up car using factory jack. Remove wheel and tire. Now place floor jack below the rear lower link that the coil spring is located in and use the jack to hold the spring in place, raising it up a 1/8" or so. Refer to the picture I have provided and remove the nut and bolt to the rear lower link (blue arrow). Remove bolt from bottom of strut mount (red arrow). Picture is from above looking down.
Vinh's NOTE: There is NO need to remove the bolt depicted in red if you are only installing springs.
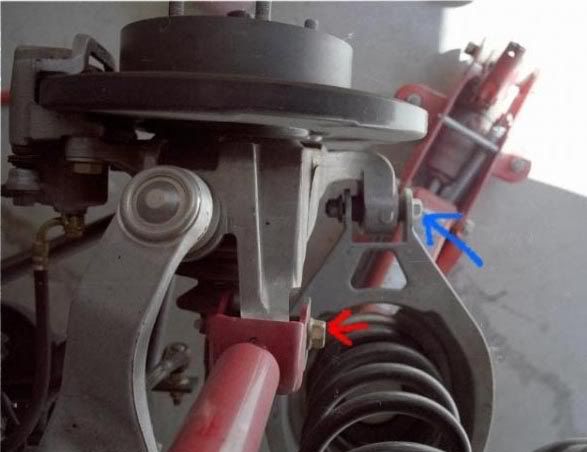
Work out bolt, it will come out without damaging the threads. Now slowly lower the rear lower link, watch the floor jack to see when this suspension part stops going down, make sure the floor jack keeps on touching it.
To get the coil spring out. Loosen the nut in the green arrow, NOT the bolt. The bolt is fixed. It does NOT need to be removed. Once it is loose, you should be able to lower the floor jack and remove the rear spring.
Install in reverse order. HINT #1: Use your floor jack to raise parts up to match up various bolt holes. Repeat process on other side of rear suspension. Hint #2: Compared to the OEM spring, the upper part of the new spring is not flush. Hint #3: Just ensure the spring is properly seated in the bottom of the suspension member. Hint #4: You WILL NEED to bang things around because everything fits snugly, ie. the rear lower link connection to the "wheel?" Hint #5: Here are the torque specs for the bolts involved:
1) Bolt depicted in blue: 48-59 ft/lb
2) Bolt depicted in green: 48-59 ft/lb
3) ONLY for those removing the strut, bolt in red: 74-88 ft/lb
FRONT:
Unbolt the 3 12mm upper strut mount bolts from under the hood, set them aside as to NOT misplace them.
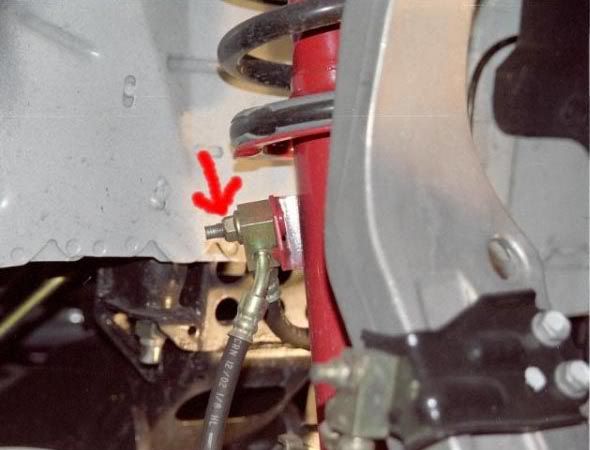
Unbolt the 12mm bolt holding the brake line on the strut, set nut aside and pull brake line off the strut. Look at pic with red arrow for brake line location.
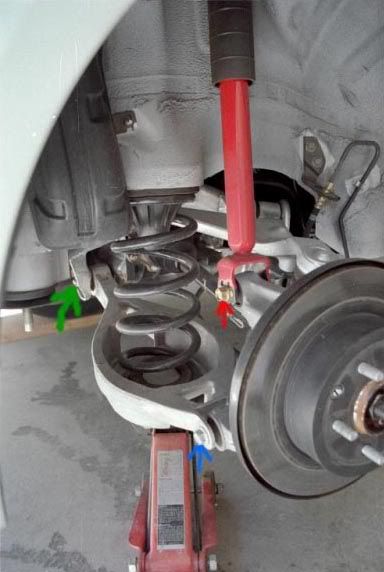
Remove the speed sensor line from the strut in the 2 places it attaches to the strut via compression fittings (just pull)(blue arrow) Remove the nut and bolt from the bottom of the strut(red arrow) It will come out, but will be difficult. Use floor jack to line things up. Remove the bolt holding the swaybar end link to the suspension arm(green arrow) NOTE: The bolt for the end link will NOT come out yet, DO NOT TRY!
Now you get to use the spring compressor. Your goal will be to compress enough of the spring so that you can remove the sway bar end link bolt (hard work, need to bang it out). Once your able to do that you should have enough clearance to be able to remove the whole spring/strut/spring compressor assembly. NOTE BE CAREFUL, watch out for the speed sensor line, DO NOT tear it appart. Trying to make space to remove this assembly is gonna give you a headache. Keep perservering. I've seen people put the factory jack between their fender and the upper link to create more space. I did this and slightly dented the inside of the fender (not noticeable because the fender lining covers it up.
If only installing springs, you'll need to remove the center bolt located on the strut/spring assembly. This is wear having a power tool helps. I didn't try removing the bold with hand tools. BE CAREFUL. This is where the spring can shoot out.
Install your new springs ensuring everything sits properly. There are grooves in the rubber upper seat that should match up with the spring. Ensure everything is lined up. Push down on the mounting insulator and install the center bolt. Tighten as much as possible. You should tighten this bolt later after the assembly is installed and the car is lowered.
Install everything back in the reverse order. Again, putting back this assembly is also a pain in the butt. The springs may be shorter than OEM, but still a pain.
HINT #1: Be Patient. Removing and installing the spring/strut assembly is difficult. HINT #2: The gray plastic thing (bump stops?) stays on the OEM spring. The Eibachs do not need these. HINT #3: Again, use your factory jack to line up parts with bolts. HINT #4: Torque Spec for bolts:
1)3 12 mm upper strut mount bolts: 26-30 ft/lb
2)12 mm bolt for nrake line: Can't find, but probably 10 ft/lb
3)Bolt from bottom of strut (Pic 4 red arrow): 52-62 ft/lb
4)Bolt connect sway bar end link to suspension arm (Pic 4 green arrow): 59-70 ft/lb
5)Center bolt of strut/spring assembly: 40-47 ft/lb
I hope this helps someone as much as Gsedan35's original instructions helped me. His pictures are what made it easier. Sorry I couldn't take any pics other than the one Gsedan35 provided.
I worked with a friend and it took us about 7 hours to do the job. The most difficult part was getting the strut/spring assembly out. Other diffcult parts was figuring out how to remove the bolts indicated by #3 and #4. After doing the first one, you'll know what needs to be done and the second one should be easier. It took us almost 4 hours to remove the strut/spring assembly This IS NOT a project you want to take on ONLY if you want to save money. Only start this project if you get satisfaction out of working on your own car. As you can see, the time to money saved ratio is high.
Like others have reported, the ride feels stock. Appearance is dramatic. Looks amazing. I don't know if it's just me, but the springs surprisingly dropped my car lower than I was expecting. I like it better. Can't imagine what it is going to look like after it settles. Negative camber is definitely noticeable. I will get it aligned after the SoCal meet.
As far as lighting,
PIAA Extreme White Wedge 19172: Good match to HID. Some of the pics make it look blue, but it looks good to me. Well worth the $11
Sylvania 9003ST: Still looks yellow compared to HID, but less yellow compared to stock. Not worth the $43.00. But nice to be different.
PICTURES TO BE POSTED AT A LATER DATE
Wow, long post.
6MT Coupe, DG/G, Prem
The following is a post copied from Gsedan35 over in FreshAlloy. He installed springs and struts from a 350Z. I only installed Eibach springs on my Coupe. It is edited to be specific to the coupe.
"I did this to help anyone wanting to do this themselves. If any moderator would like to edit this in anyway to improve it and place it in the FAQ section, to right ahead.
This is how "I" did it. You can do your own thing where it makes sense to do so.
Tools needed:
factory jack
floor jack
1/2" ratchet (3/8")
misc 1/2" extensions (3/8")
17mm socket
12mm socket
19mm socket
17mm box end wrench
power tool is VERY helpful in removing front strut from spring
torque wrench (if you are as paranoid as I am)
spring compressor
Rear suspension
Jack up car using factory jack. Remove wheel and tire. Now place floor jack below the rear lower link that the coil spring is located in and use the jack to hold the spring in place, raising it up a 1/8" or so. Refer to the picture I have provided and remove the nut and bolt to the rear lower link (blue arrow). Remove bolt from bottom of strut mount (red arrow). Picture is from above looking down.
Vinh's NOTE: There is NO need to remove the bolt depicted in red if you are only installing springs.
Work out bolt, it will come out without damaging the threads. Now slowly lower the rear lower link, watch the floor jack to see when this suspension part stops going down, make sure the floor jack keeps on touching it.
To get the coil spring out. Loosen the nut in the green arrow, NOT the bolt. The bolt is fixed. It does NOT need to be removed. Once it is loose, you should be able to lower the floor jack and remove the rear spring.
Install in reverse order. HINT #1: Use your floor jack to raise parts up to match up various bolt holes. Repeat process on other side of rear suspension. Hint #2: Compared to the OEM spring, the upper part of the new spring is not flush. Hint #3: Just ensure the spring is properly seated in the bottom of the suspension member. Hint #4: You WILL NEED to bang things around because everything fits snugly, ie. the rear lower link connection to the "wheel?" Hint #5: Here are the torque specs for the bolts involved:
1) Bolt depicted in blue: 48-59 ft/lb
2) Bolt depicted in green: 48-59 ft/lb
3) ONLY for those removing the strut, bolt in red: 74-88 ft/lb
FRONT:
Unbolt the 3 12mm upper strut mount bolts from under the hood, set them aside as to NOT misplace them.
Unbolt the 12mm bolt holding the brake line on the strut, set nut aside and pull brake line off the strut. Look at pic with red arrow for brake line location.
Remove the speed sensor line from the strut in the 2 places it attaches to the strut via compression fittings (just pull)(blue arrow) Remove the nut and bolt from the bottom of the strut(red arrow) It will come out, but will be difficult. Use floor jack to line things up. Remove the bolt holding the swaybar end link to the suspension arm(green arrow) NOTE: The bolt for the end link will NOT come out yet, DO NOT TRY!
Now you get to use the spring compressor. Your goal will be to compress enough of the spring so that you can remove the sway bar end link bolt (hard work, need to bang it out). Once your able to do that you should have enough clearance to be able to remove the whole spring/strut/spring compressor assembly. NOTE BE CAREFUL, watch out for the speed sensor line, DO NOT tear it appart. Trying to make space to remove this assembly is gonna give you a headache. Keep perservering. I've seen people put the factory jack between their fender and the upper link to create more space. I did this and slightly dented the inside of the fender (not noticeable because the fender lining covers it up.
If only installing springs, you'll need to remove the center bolt located on the strut/spring assembly. This is wear having a power tool helps. I didn't try removing the bold with hand tools. BE CAREFUL. This is where the spring can shoot out.
Install your new springs ensuring everything sits properly. There are grooves in the rubber upper seat that should match up with the spring. Ensure everything is lined up. Push down on the mounting insulator and install the center bolt. Tighten as much as possible. You should tighten this bolt later after the assembly is installed and the car is lowered.
Install everything back in the reverse order. Again, putting back this assembly is also a pain in the butt. The springs may be shorter than OEM, but still a pain.
HINT #1: Be Patient. Removing and installing the spring/strut assembly is difficult. HINT #2: The gray plastic thing (bump stops?) stays on the OEM spring. The Eibachs do not need these. HINT #3: Again, use your factory jack to line up parts with bolts. HINT #4: Torque Spec for bolts:
1)3 12 mm upper strut mount bolts: 26-30 ft/lb
2)12 mm bolt for nrake line: Can't find, but probably 10 ft/lb
3)Bolt from bottom of strut (Pic 4 red arrow): 52-62 ft/lb
4)Bolt connect sway bar end link to suspension arm (Pic 4 green arrow): 59-70 ft/lb
5)Center bolt of strut/spring assembly: 40-47 ft/lb
I hope this helps someone as much as Gsedan35's original instructions helped me. His pictures are what made it easier. Sorry I couldn't take any pics other than the one Gsedan35 provided.
I worked with a friend and it took us about 7 hours to do the job. The most difficult part was getting the strut/spring assembly out. Other diffcult parts was figuring out how to remove the bolts indicated by #3 and #4. After doing the first one, you'll know what needs to be done and the second one should be easier. It took us almost 4 hours to remove the strut/spring assembly
This IS NOT a project you want to take on ONLY if you want to save money. Only start this project if you get satisfaction out of working on your own car. As you can see, the time to money saved ratio is high.Like others have reported, the ride feels stock. Appearance is dramatic. Looks amazing. I don't know if it's just me, but the springs surprisingly dropped my car lower than I was expecting. I like it better. Can't imagine what it is going to look like after it settles. Negative camber is definitely noticeable. I will get it aligned after the SoCal meet.
As far as lighting,
PIAA Extreme White Wedge 19172: Good match to HID. Some of the pics make it look blue, but it looks good to me. Well worth the $11
Sylvania 9003ST: Still looks yellow compared to HID, but less yellow compared to stock. Not worth the $43.00. But nice to be different.
PICTURES TO BE POSTED AT A LATER DATE
Wow, long post.
6MT Coupe, DG/G, Prem
thanks for scouring those pics, they definitely helped. Getting those strut assemblies off was a ***** though. actually, a lot of things in this process were bitches. Lots of stuck nuts and bolts.