
DIY - ARP Wheel Studs


Pixs to come. Please Pardon my grammar and spelling. I realize there are other ways to do this process. Perform this DIY at your own risk.
Tools:
Universal Ball Joint Separator (KD 3916) Sears # 00996404000

1/2 Ratcheting Drive
5/8" Socket
22 mm Socket
ARP Studs 100-7716 * 4 packs (They will say Subaru WRX/STi, but also fits 350z)

Front:
1) Jack up car and put jack stands on jack points identified in https://my350z.com/forum/8293361-post1.html
2) Remove Rims.
3) Remove Brake Caliper w/ 22mm Socket. There are two bolts on the backside of the caliper. Torque Specs on these things are 113 lb-ft so use the 1/2" drive and pipe.
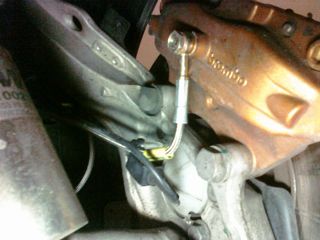
4) Remove Brake Caliper from Rotor. The caliper will simply slide off the rotor. Be cautious of the brake line. Don't use a screw driver or anything to pry in between, you may score the surface of the rotor or scratch those sweet baby Brembos.

5) Tie up the Brake Caliper to upper A arm or anything else up high to keep it from hanging. Place rotor somewhere face hat down to keep the surface of the rotor's face safe from grease/oil.

6) Give the wheel bearing a quick spin. There should be a slight resistance. If the wheel bearing spins freely, you'll need to buy a new wheel bearing and right now would be a good idea to replace it.
https://my350z.com/forum/brakes-and-...nt-how-to.html (start at step 6)
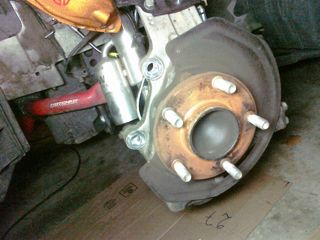
7a) Time to use the ball joint remover! Place the ball joint remover's pivot pin on the TOP hole to create the largest opening. Place the ball joint remover over the studs and hand tight the compression bolt. Use the 5/8" socket and start cranking down. The stud will come out after a handful of cranks. Once the stud is loose, rotate the hub until about 11am. There is a slight notch in the dust shield to allow the stud to come out.


7b) Repeat 7a until all studs are out

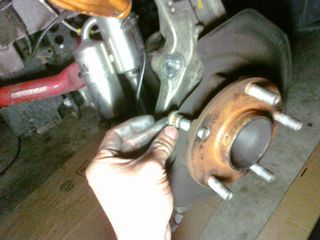
8) Time to press in the arp studs. Get one arp stud and insert it into the hub through the notch in the dust shield. Use an open ended wheel lug nut and secure the stud into place.

9) Place the ball joint remover's pivot pin on the BOTTOM hole to create the smallest opening. Place the ball joint remover in the reverse orientation. You are now pressing the back of the stud through the hub.

10a) HINT! MAKE SURE YOU HAVE THE BALL JOINT REMOVER LINED UP PROPERLY. The more centered on the back of the wheel stud the easier your life will be. There is a sweet spot on the back of that stud that will help you press it in evenly. The point of the open ended wheel lug nut is to keep the stud centered.

10a-1) Don't worry if the stud goes in sideways, just back the ball joint remover up and try again. Don't need to press the arp stud out again. Just press the other side in. IF THE STUD GOES IN SIDWAYS, BACK OUT THE LUG NUT!
10b) Ensure the back side of the stud is completely flush with the hub.
10c) LEVERAGE is key. Notice where the ball joint remover is sitting on the hub and the direction of the 1/2" drive. (no pix, but once you start, you'll know what I mean)
11) Repeat until you got all 5 of them in.
12) Time to put the caliper and rotor back! Slide the rotor back onto the hub but do not slide it flush onto the hub. You will need to slide the caliper back onto the rotor. Slide the caliper back onto the rotor. This may require some muscle. Be cautious of your fingers as they are holding the caliper. You do not want any grease to come in contact with the brake pads.
13) PUT ANTI-SEIZE on the caliper bolts! Align the caliper and hub holes to HAND tight the brake bolts holding the caliper to the rotor. The caliper's metal is soft, the last thing you want to do is mess up the threading on it. Once you finish hand tightening the bolts, torque them down to 113 ft-lbs.
Done

Tools:
Universal Ball Joint Separator (KD 3916) Sears # 00996404000
1/2 Ratcheting Drive
5/8" Socket
22 mm Socket
ARP Studs 100-7716 * 4 packs (They will say Subaru WRX/STi, but also fits 350z)
Front:
1) Jack up car and put jack stands on jack points identified in https://my350z.com/forum/8293361-post1.html
2) Remove Rims.
3) Remove Brake Caliper w/ 22mm Socket. There are two bolts on the backside of the caliper. Torque Specs on these things are 113 lb-ft so use the 1/2" drive and pipe.
4) Remove Brake Caliper from Rotor. The caliper will simply slide off the rotor. Be cautious of the brake line. Don't use a screw driver or anything to pry in between, you may score the surface of the rotor or scratch those sweet baby Brembos.
5) Tie up the Brake Caliper to upper A arm or anything else up high to keep it from hanging. Place rotor somewhere face hat down to keep the surface of the rotor's face safe from grease/oil.
6) Give the wheel bearing a quick spin. There should be a slight resistance. If the wheel bearing spins freely, you'll need to buy a new wheel bearing and right now would be a good idea to replace it.
https://my350z.com/forum/brakes-and-...nt-how-to.html (start at step 6)
7a) Time to use the ball joint remover! Place the ball joint remover's pivot pin on the TOP hole to create the largest opening. Place the ball joint remover over the studs and hand tight the compression bolt. Use the 5/8" socket and start cranking down. The stud will come out after a handful of cranks. Once the stud is loose, rotate the hub until about 11am. There is a slight notch in the dust shield to allow the stud to come out.
7b) Repeat 7a until all studs are out
8) Time to press in the arp studs. Get one arp stud and insert it into the hub through the notch in the dust shield. Use an open ended wheel lug nut and secure the stud into place.
9) Place the ball joint remover's pivot pin on the BOTTOM hole to create the smallest opening. Place the ball joint remover in the reverse orientation. You are now pressing the back of the stud through the hub.
10a) HINT! MAKE SURE YOU HAVE THE BALL JOINT REMOVER LINED UP PROPERLY. The more centered on the back of the wheel stud the easier your life will be. There is a sweet spot on the back of that stud that will help you press it in evenly. The point of the open ended wheel lug nut is to keep the stud centered.
10a-1) Don't worry if the stud goes in sideways, just back the ball joint remover up and try again. Don't need to press the arp stud out again. Just press the other side in. IF THE STUD GOES IN SIDWAYS, BACK OUT THE LUG NUT!
10b) Ensure the back side of the stud is completely flush with the hub.
10c) LEVERAGE is key. Notice where the ball joint remover is sitting on the hub and the direction of the 1/2" drive. (no pix, but once you start, you'll know what I mean)
11) Repeat until you got all 5 of them in.
12) Time to put the caliper and rotor back! Slide the rotor back onto the hub but do not slide it flush onto the hub. You will need to slide the caliper back onto the rotor. Slide the caliper back onto the rotor. This may require some muscle. Be cautious of your fingers as they are holding the caliper. You do not want any grease to come in contact with the brake pads.
13) PUT ANTI-SEIZE on the caliper bolts! Align the caliper and hub holes to HAND tight the brake bolts holding the caliper to the rotor. The caliper's metal is soft, the last thing you want to do is mess up the threading on it. Once you finish hand tightening the bolts, torque them down to 113 ft-lbs.
Done
Last edited by vtchang; Apr 1, 2011 at 07:13 AM. Reason: Pictures!


Trending Topics
http://www.youtube.com/watch?v=vnwf2JWcgg8


I'll be installing my ARP studs next weekend, so I'm so thankful for this thread, and dead-on details. BTW, for anyone looking for the ARP studs at a pretty decent price, I got mine through VR-Speed in Michigan for about $124 shipped.
http://www.vr-speed.com/arp-subaru-w...-100-7716.html
http://www.vr-speed.com/arp-subaru-w...-100-7716.html


Just bought that tool. It obviously works for the stock studs. It doesn't work for removing ARP studs though; they are too long. Any suggestions? (apart from using a hammer, which I don't want to do!)

btw alot of tire shops will run into a messed up stud and replace it without telling the owner. guess how they get the old stud out.


