
DIY - Serpentine belt replacement for HR's


Registered User
Joined: Jan 2008
Posts: 222
Likes: 0
From: Maine
My Serpentine belt broke and came off last Thursday. Car has 26K miles on it.
Nissan Dealership called me Friday and said the belt tensioner broke, and that they didn't have the tensioner or the belt in stock and they should have the car ready today.
Apparently my warranty covers the tensioner, but it doesn't cover the belt because it was "consequential damage" so I have to pay some $68 for the belt replacement, but nothing for the tensioner replacement.
I guess I should be happy the tensioner is covered, but the belt broke because the tensioner was defective but maybe I'm just being picky.
I'm glad I didn't lose the belt and my power steering while driving through one of the three roundabouts I go through on my way home.

New Member

Joined: Jun 2010
Posts: 427
Likes: 1
From: Austin TX
will the Stillen pullies and belt be of help ? ?
http://www.stillen.com/product.asp?i...SAN&model=350Z
http://www.stillen.com/product.asp?i...SAN&model=350Z

Registered User
Joined: Oct 2010
Posts: 1
Likes: 0
From: Dallas
THANKS! That's a great instruction set. I used that for my G35. And all from the top, no need to get on the floor. Awesome.
My FX35 was similar but no auto-tensioner and you had to do it from the bottom. Its still only a 15 minute job. Don't get caught paying the dealer $170.
My FX35 was similar but no auto-tensioner and you had to do it from the bottom. Its still only a 15 minute job. Don't get caught paying the dealer $170.

Registered User
Joined: Mar 2006
Posts: 28
Likes: 0
From: sacramento, ca
speaking on behalf of my brother-in-law, his tensioner pulley assembly(not the pulley, the main mounting sleeve that is near the engine face) is cracked at the 11 o'clock position (viewed from front). We have to replace the whole assembly which sucks big time....

Registered User
Joined: Feb 2011
Posts: 1
Likes: 0
From: Goose Creek, SC
I just wanted to reply and say "Thank you". This thread was awesome and the pics were most helpful. It took me 25 minutes for serpentine belt and A/C compressor belt. Thanks again.

I just changed the original belt on my '08 with 42K miles, and I was surprised at how good it still looked. No wear along the edges and no cracks at all on the ribbed side. I replaced it with a Gates belt.
FWIW, my breaker bar must be a little thicker than the OP's, and I wasn't able to fit it into the tensioner. But, I found that I could remove the two plastic fasteners which hold the top of the radiator in place, and that got me the extra clearance I needed.
Finally, if you've never worked with a serp belt before, the new ones are very stiff and can be difficult to work with. Get the belt seated on all the pulleys with raised edges first, and slip it over the idler pulley last.
Thanks to the OP for starting this thread, as I may not have replaced my belt otherwise.


Registered User
Joined: Jan 2012
Posts: 2
Likes: 0
From: BAY AREA
Great write up!
I tried to follow it but noticed my auto tensioner doesn't match up with the one in your image. I can't pull it back far enough to lock it! Is my tensioner bad? Is there a way to adjust it so i can pull it back far enough to lock it and swap in my belt?? Or do i need to buy a new tensioner. If so, how hard is that thing to replace???
I tried to follow it but noticed my auto tensioner doesn't match up with the one in your image. I can't pull it back far enough to lock it! Is my tensioner bad? Is there a way to adjust it so i can pull it back far enough to lock it and swap in my belt?? Or do i need to buy a new tensioner. If so, how hard is that thing to replace???


Registered User
Joined: May 2012
Posts: 22
Likes: 0
From: Norfolk, Va
i'm confused, is the serpentine belt the same as an alternator belt that is shown here in the DIY? https://my350z.com/forum/engine-driv...very-easy.html
wondering if i should do this myself or let the dealer do it. i'm afraid dealer is going to blame me if something ever happens and blame it on me not "taking it to a professional mechanics", therefore we're not going to warranty you.
wondering if i should do this myself or let the dealer do it. i'm afraid dealer is going to blame me if something ever happens and blame it on me not "taking it to a professional mechanics", therefore we're not going to warranty you.
This guide is for '07 - '08 motors only.


Registered User
Joined: Feb 2010
Posts: 125
Likes: 0
From: Southern California
Just replaced my Serpentine belt and it was very easy. Here is a quick DIY for you guys...
1. Serpentine belt from your favorite parts store. Got mine at Carquest part #K070810 for $38.31.
2. 10mm socket or wrench
3. 1/2" breaker bar
4. 6mm Hex wrench
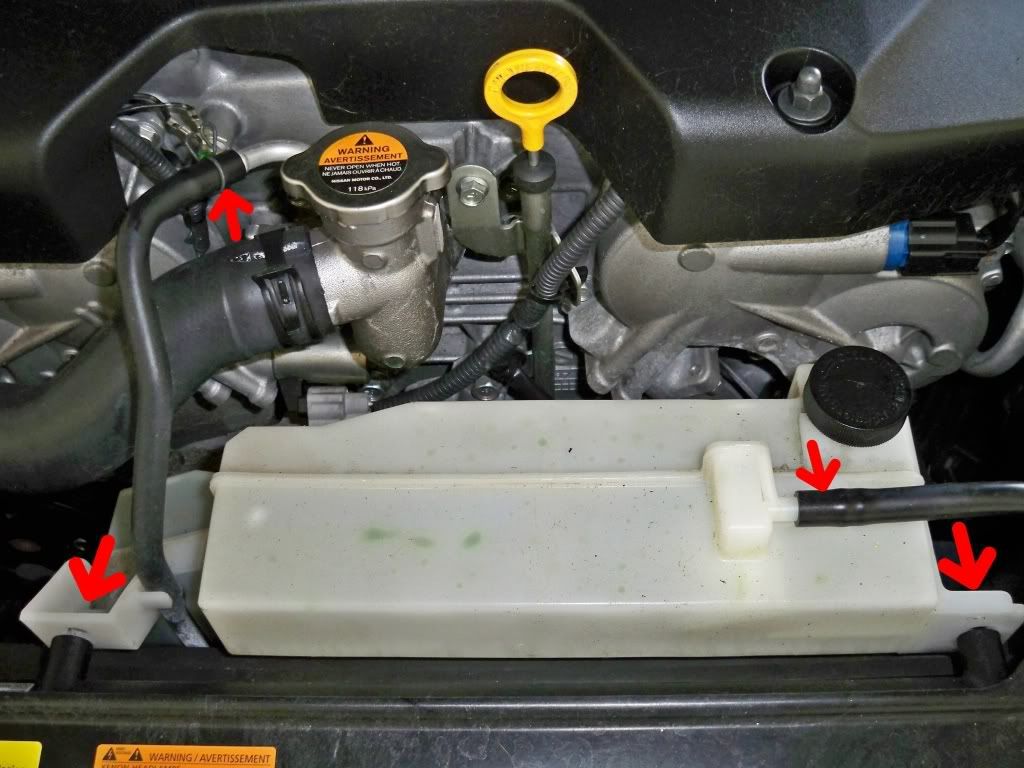
Step 1 - Remove the coolant overflow tank by removing the two 10mm bolts and unplugging the tubes as shown. Pull straight up and out. Comes out VERY easy and place on ground making sure it doesn't tip over or spill.
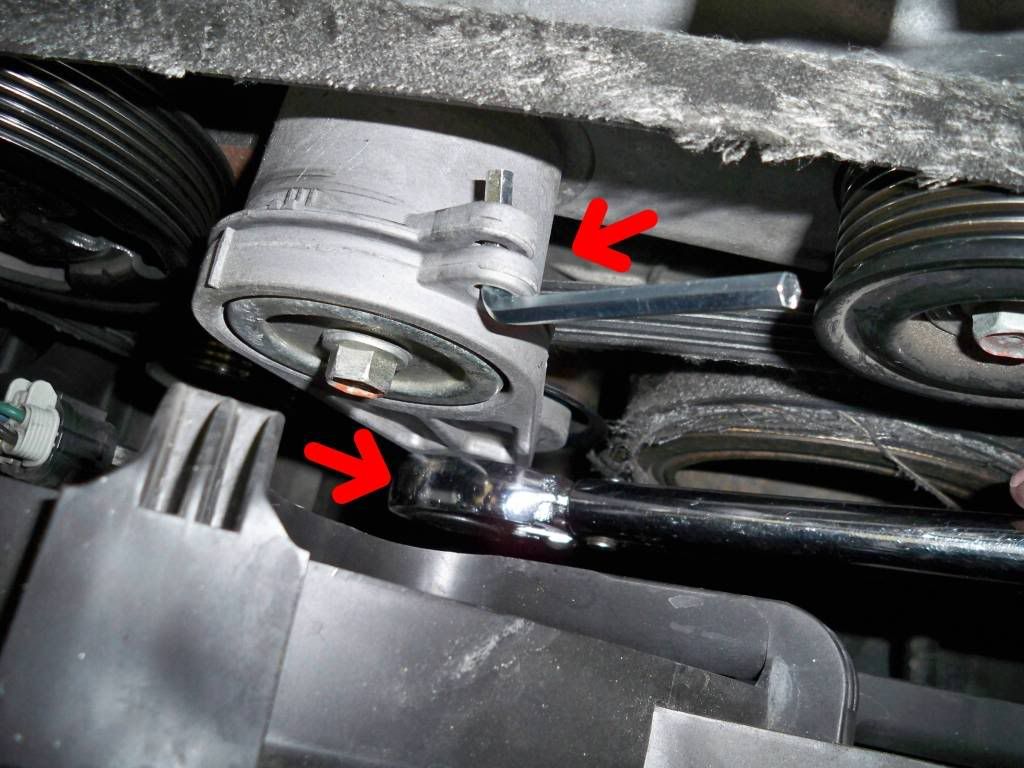
Step 2 - Place 1/2" breaker bar into slot in auto tensioner pulley
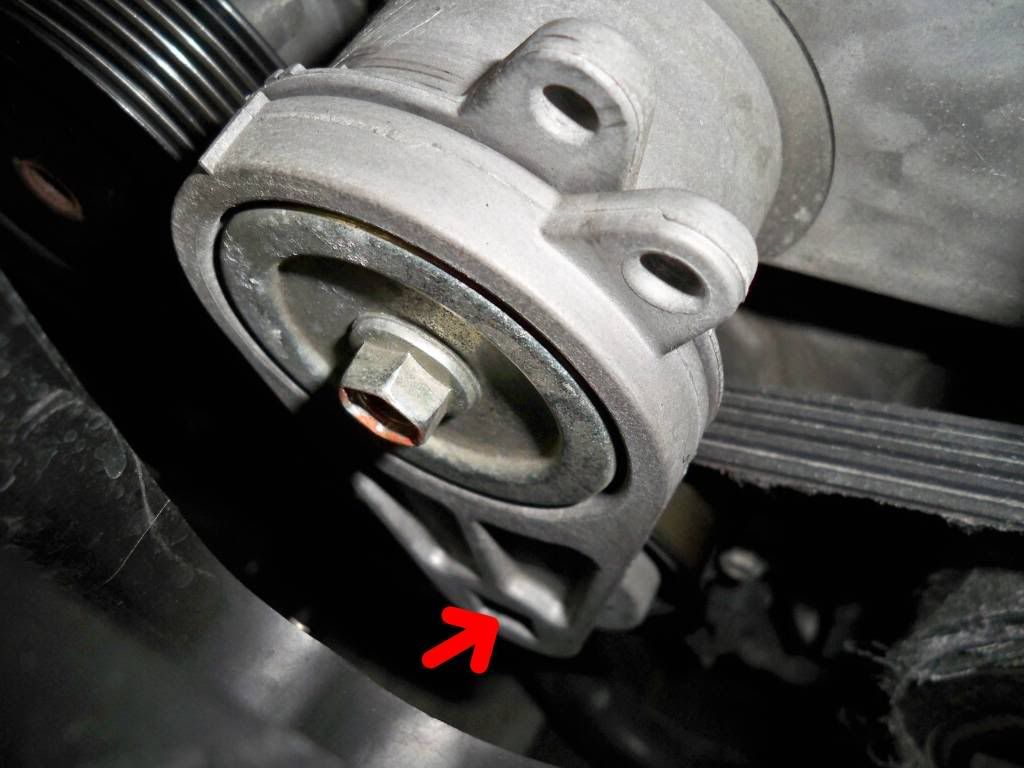
Step 3 - Rotate counter clockwise and stick the hex wrench through the holding boss to lock the auto-tensioner pulley arm.
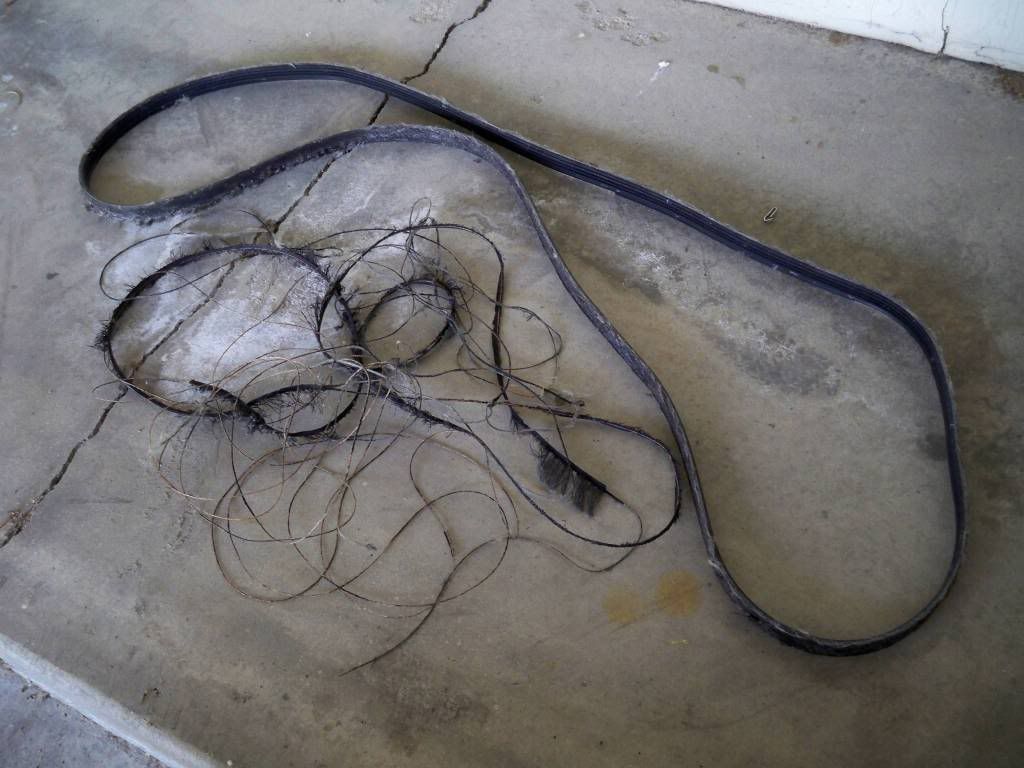
Step 4 - Remove old belt
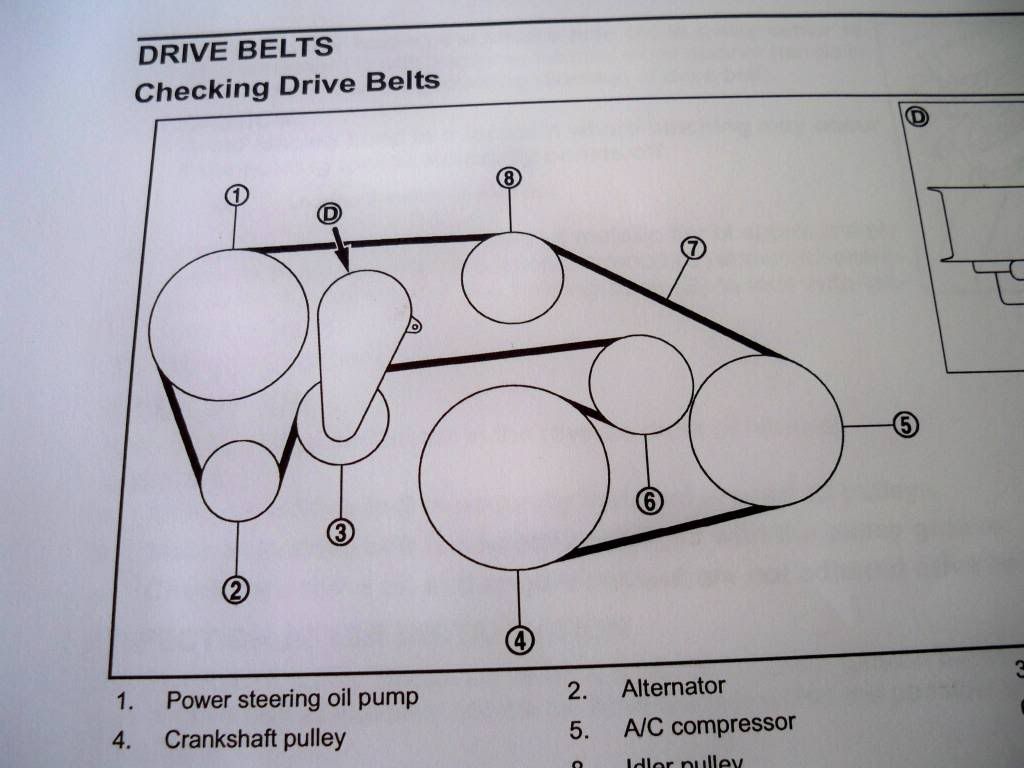
Step 5 - Install new belt as picture shows and make sure all groves on belt match up with all pulleys
Step 6 - Insert breaker bar and remove hex wrench to apply tension to belt and make sure everything is aligned and tight.
Step 7 - Install overflow tank and you are all done.
The whole process takes about 15 minutes. No need to jack up the car or remove anything under the car. Quick and easy DIY maintenance.
1. Serpentine belt from your favorite parts store. Got mine at Carquest part #K070810 for $38.31.
2. 10mm socket or wrench
3. 1/2" breaker bar
4. 6mm Hex wrench
Step 1 - Remove the coolant overflow tank by removing the two 10mm bolts and unplugging the tubes as shown. Pull straight up and out. Comes out VERY easy and place on ground making sure it doesn't tip over or spill.
Step 2 - Place 1/2" breaker bar into slot in auto tensioner pulley
Step 3 - Rotate counter clockwise and stick the hex wrench through the holding boss to lock the auto-tensioner pulley arm.
Step 4 - Remove old belt
Step 5 - Install new belt as picture shows and make sure all groves on belt match up with all pulleys
Step 6 - Insert breaker bar and remove hex wrench to apply tension to belt and make sure everything is aligned and tight.
Step 7 - Install overflow tank and you are all done.
The whole process takes about 15 minutes. No need to jack up the car or remove anything under the car. Quick and easy DIY maintenance.
Registered User
Joined: Feb 2010
Posts: 125
Likes: 0
From: Southern California
Anyone know? I'm at work for the night but would like to know asap so I can take it off correctly tomorrow morning.
Edit: I figured it out. No you don't have to loosen that screw in case anyone ever wonders if they do as well. I just used a bigger 1/2" ratchet and a pipe at the end and was able to rotate the tensioner. I turned the black upper radiator securing points and unlocked and removed them, then I had just enough room to push the radiator back a little and fit the bigger ratchet.
Edit: I figured it out. No you don't have to loosen that screw in case anyone ever wonders if they do as well. I just used a bigger 1/2" ratchet and a pipe at the end and was able to rotate the tensioner. I turned the black upper radiator securing points and unlocked and removed them, then I had just enough room to push the radiator back a little and fit the bigger ratchet.
Last edited by sickZ31/Z33; Jul 30, 2014 at 01:12 AM.


Registered User
Joined: Sep 2014
Posts: 1
Likes: 0
From: Norfolk, England
THANK YOU TURTLEBOY ,
I put my 350Z in to Nissan for a check up and to replace belt at the same time. They failed to do the check up and decided to try and get me to OK the replacement of the belt, the actuator and power steering module! The quote back to me was �589.00p. The said the actuator was seized and the power steering module was worn out.
I did some investigating and found you DIY fitting instruction and a whole bunch of other useful stuff.
I bought the belt for �36.00p from Nissan (I think I was had on this price). Cut a long story short, I followed your instructions in their car park with a small complement of tools. I borrowed the torque wrench from one of their friendly mechanics, while charging the battery with their power (the least they could do).
Started the car and let it idle for a few mins and then just drove off took it easy so the belt could settle then did all the tightening off when I got home. Power steering work flawlessly the whole way home.
Thus you saved me a bill of �500.00p+ and all the faffing about with having no car.
Thank you again
Giz
Ps to fix a seized actuator - use the basic jack from another car (the one which has a screw bolt to open) , insert the nodules in between the underside of the jack top and above the jack base. Wind the actuator till it moves and nearly closes. Get some thick oil / wd40 and apply to the actuator. Repeat the process till the actuator springs away from the jack (look out for this, it move fast for first 5cm). When done put it back in, its ready. Took me 10 mins more.
I put my 350Z in to Nissan for a check up and to replace belt at the same time. They failed to do the check up and decided to try and get me to OK the replacement of the belt, the actuator and power steering module! The quote back to me was �589.00p. The said the actuator was seized and the power steering module was worn out.
I did some investigating and found you DIY fitting instruction and a whole bunch of other useful stuff.
I bought the belt for �36.00p from Nissan (I think I was had on this price). Cut a long story short, I followed your instructions in their car park with a small complement of tools. I borrowed the torque wrench from one of their friendly mechanics, while charging the battery with their power (the least they could do).
Started the car and let it idle for a few mins and then just drove off
took it easy so the belt could settle then did all the tightening off when I got home. Power steering work flawlessly the whole way home.Thus you saved me a bill of �500.00p+ and all the faffing about with having no car.
Thank you again
Giz
Ps to fix a seized actuator - use the basic jack from another car (the one which has a screw bolt to open) , insert the nodules in between the underside of the jack top and above the jack base. Wind the actuator till it moves and nearly closes. Get some thick oil / wd40 and apply to the actuator. Repeat the process till the actuator springs away from the jack (look out for this, it move fast for first 5cm). When done put it back in, its ready. Took me 10 mins more.
Last edited by Changiz Gaskin; Sep 12, 2014 at 09:51 AM.