When you click on links to various merchants on this site and make a purchase, this can result in this site earning a commission. Affiliate programs and affiliations include, but are not limited to, the eBay Partner Network.
Welp...Finally got around to building my (affordable) dream car. I'm originally a gm guy but I've found a soft spot for the imports over the years! Used to have a Camaro and Trans Am and loved the power out of those cars but the sloppy chassis and handling got pretty old....The 350Z is just so much better of a car except could use an upgrade in power....so obviously there is no better choice than the almighty LS1!
So far....got everything taken apart and awaiting on the final parts this week!
I went with the Fueled Racing kit and so far all the parts seem to be of excellent quality and the guys over there have excellent customer service!
I'm going with the good old 5.7 LS1 and T56. I will be keeping track of all the costs of the build including old parts sold. I want to give people a real idea of what a build like this costs because I've been wanting to do this for years but held back because I was afraid of the cost and couldn't find a straight answer on what I was getting myself into.
I chose the FR kit because it seems to be engineered much better than Sikky. The motor sits lower and farther back which gives a lower center of gravity and better weight distribution. Many other little things as well such as the motor mounts are designed better and I can use a stock GTO shifter without any modification. Give FR a call and they can explain all the benefits better than I can.
Finally got a few updates for you guys! Oil pan came in and now I can actually start putting this thing together!
Got more pics coming but having a hard time getting them off my phone because it broke...but as of right now motor and trans are fully bolted in the car as well as headers and driveshaft. I have to say though, this project has been a nightmare as far as fitment issues and any possible thing that could go wrong has!
Got more pics coming but having a hard time getting them off my phone because it broke...but as of right now motor and trans are fully bolted in the car as well as headers and driveshaft. I have to say though, this project has been a nightmare as far as fitment issues and any possible thing that could go wrong has!
Care to explain the fitment issues? Is it related to the FR kit or other reasons?
I'm assuming that has to do with the fact that I have no idea what i'm doing lol. Also probably has to do with some minor differences with my car compared to others. I guess the body can flex over time and things of that nature according to FR. Mainly the fitment problems I have had were getting the headers in, mostly the drivers side. Tried to do it the way FR told me and another ls swaper said but still wouldn't work so I had to do all of the above and my own way. Fits perfectly fine now. The other issue is that my bell housing was hitting the trans tunnel and the trans mount would barely line up. Got it to clear the tunnel and line up with the mount a little bit better but its still very close. Next issue that will be coming is that my rack power steering lines sit directly in front of where the oil filter lines are supposed to connect to the pan. Haven't tackled this yet but will be today. Could just be a matter of them getting bent when putting the motor in and bending them back and out of the way.
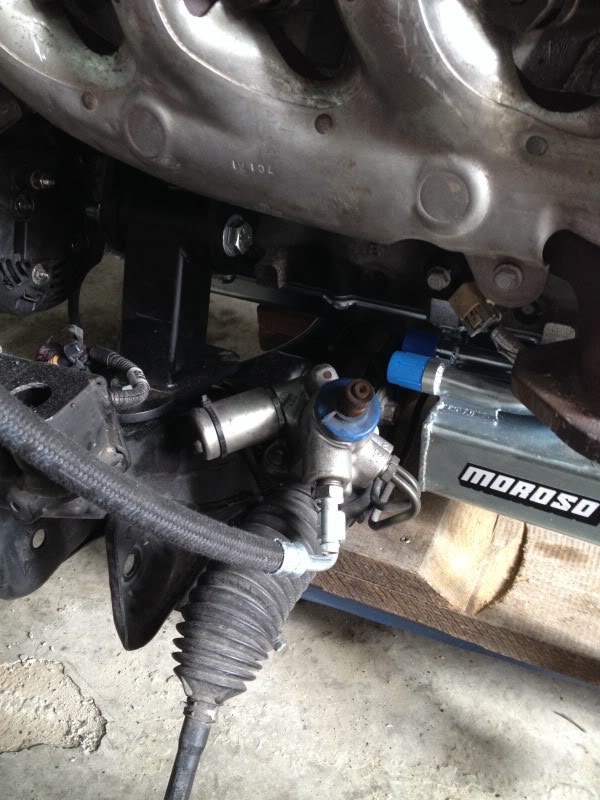
You should have no issues with the PS lines and the oil filter lines, here is how mine looked. This is the motor bolted to the subframe (subframe out of the car)
For me it was so much easier dropping the subframe then lifting it back into the car. There was simply no way I could figure out how to get the motor in from the top without doing some serious damage to the steering rack hard lines.
^^^^Strange.... my steering rack and lines look completely different than yours. I'll have to post a pic of what they looked like before and after I messed with them. I've got the oil and power steering lines set up now hopefully everything works as it should.
Got my power steering situation figured out but man was it a *****...This is what I had to figure out.
Spent all afternoon trying to rebend the power steering lines by hand for the most part and screw them back into their original holes to fit over the oil lines. And this is what I came up with....
Then I needed to drill holes in the frame to mount the oil filter housing.
I was able to hook up the rest of the power steering lines to the pump without too much trouble however the length of the pressure line to the pump just barely made it.
And finally the finished product with the pump oil lines and alternator fully installed! I will however have to move the oil filter housing back an inch or two because it hits the radiator fans when trying to install them.
As of right now I have most of the front end put back together and am currently trying to figure out a solution to running a throttle cable and hooking up the clutch line to the master cylinder which does not reach. Really unsure of where to run the throttle cable through the firewall to make things work properly so if anyone has any suggestions on the subject i'd love to hear them!