
started aps st install


you didnt have to remove the front half of the car, but kudos for you.
ive got an awesome external wastegate setup you should buy to get rid of that crappy internal setup.
good luck. pm me with any questions you might have.
ive got an awesome external wastegate setup you should buy to get rid of that crappy internal setup.
good luck. pm me with any questions you might have.


Originally Posted by sugarspunZ
i see boost drop in your future.
The isntall is straight forward. Make sure you follow the directions to a "T". Ensure proper preload on the actuator, an extra 1/2 turn doesn't hurt
Take your time on wrapping all the lines and wiring running up the bell housing. Do as the directions say and "adjust" the exhaust manifolds properly and test fit the turbo to ensure proper clearances. You will want to pay attention to shaping the heatshields around the turbo area. Clearances are tight and if you are lazy in shaping them, you could get some rattling from that area
Pics I took during the install:


Trending Topics
Some pics from my install
Those were the days...
Day 1 completed – able to complete thru Step 37 of the disassembly before wimping out for the night.
Coaxing her in:


The infamous K-tubular frame (Step 11):

Removing the 10mm studs from the manifold [used a 7.5mm socket with no worries] (Step 12):

Draining:

Removing flexible clutch line (Step 16):

Undoing the power steering lines (Step 18):

Those were the days...
Day 1 completed – able to complete thru Step 37 of the disassembly before wimping out for the night.
Coaxing her in:
The infamous K-tubular frame (Step 11):
Removing the 10mm studs from the manifold [used a 7.5mm socket with no worries] (Step 12):
Draining:
Removing flexible clutch line (Step 16):
Undoing the power steering lines (Step 18):


Removing the plastic Tee (Step 33):

Bending the AC line towards the timing cover (which doesn’t look right to me…?) (Step 34):

Removing the 3/8” BSP tapered drain plug (17mm socket on a 3/8” ratchet with 6 inch extension – dead on) (Step 36):

Done for the night (removed items per Step 37):

So far – so good. Turbo via UPS tomorrow AM – good times. Will tackle the fuel pump first thing, then lay everything out… blah blah blah. I found out that you shouldn’t remove the rubber hose & spring clamp that feeds into the lower portion of the oil-filter unit – come to find out that has coolant in it, and lots of it. Tastes sweet tho…
I’m concerned about Step 34 – it seems that bending the line to within 6mm of the timing cover REALLY interferes with that coolant line (circled in photo above) – did I do something wrong or will this work out a little later? I thought about bending the coolant lead coming from the block, but eh…. Thought I would await some feedback from some folks.
If anyone is interested – I now have test pipes and a PopCharger for sale.. LOL
Oh - lemme be the first to tell you, too, that doing that epoxy garage floor coating is PIMP! Fluids wipe up without ANY concern - cleans up well and easy on your back when sliding around under a Z. Great investment for ~$100
Mmmmmmmmmmmmmm… Dreams of U P S……..


Seems I've run into my first engineering obstacle. Part 131 doesn't quite line up with the bell housing (no worries, I think to myself, because Step 5 addresses this).

However, if you can see in the second photo (below), the stud needed to release the exhaust manifold is blocked by the water line installed moments earlier - which means one has to completely undo the serpentine belt, remove the AC compressor, and undo that water line just for that nut.
Blah - I'm dropping the turbo bracket off tomorrow to get 3/8" taken out of bracket to have the holes align correctly. My suggestion would be that the turbocharger-fitting step should preceed the water line installation just in case someone has to release the exhaust manifold.
EDIT: adjusting the exhaust manifold movement would allow the bracket to shift forward/backward.. problem is, I need this to shift left/right. Ah - no worries, machine shop will resolve this problem, I guess...

I agree that Step 2 should preceed Step 1 so you don't have to mess with that water line any more than ynecessary. And talk about CLOSE FIT with the turbo against that frame rail.. perhaps 4 or 5 mm at best ?! Hope that's right.. LOL
Oh - and exhaust manifolds suck - I don't envy the guys that change theirs out. Arms are all scratched up.
Thanks George for the quick reply. I'm calling it a night, and I work a 14hr shift tomorrow, so I'm done until 8:30PM tomorrow nite.


However, if you can see in the second photo (below), the stud needed to release the exhaust manifold is blocked by the water line installed moments earlier - which means one has to completely undo the serpentine belt, remove the AC compressor, and undo that water line just for that nut.
Blah - I'm dropping the turbo bracket off tomorrow to get 3/8" taken out of bracket to have the holes align correctly. My suggestion would be that the turbocharger-fitting step should preceed the water line installation just in case someone has to release the exhaust manifold.
EDIT: adjusting the exhaust manifold movement would allow the bracket to shift forward/backward.. problem is, I need this to shift left/right. Ah - no worries, machine shop will resolve this problem, I guess...
I agree that Step 2 should preceed Step 1 so you don't have to mess with that water line any more than ynecessary. And talk about CLOSE FIT with the turbo against that frame rail.. perhaps 4 or 5 mm at best ?! Hope that's right.. LOL
Oh - and exhaust manifolds suck - I don't envy the guys that change theirs out. Arms are all scratched up.
Thanks George for the quick reply. I'm calling it a night, and I work a 14hr shift tomorrow, so I'm done until 8:30PM tomorrow nite.
4:00AM - methinks it's time to get a little shut eye for the night. Had a bit of a rain delay (funny considering where I live) - my entire street and part of my garage became flooded. Nothing says good times like trying to install the crossover pipe on your back laying in water...
Oh - and clutch fluid in an open finger wound is painful. Tremedously!
Currently on Step 13 Turbocharger Oil Pickup Somethingrather....
Pics:
I found that if you mash the heat shield around that tricky (and lemme tell you it's a major MF'r) bolt on the 4-bolt flange, you can get to it just a little bit easier:

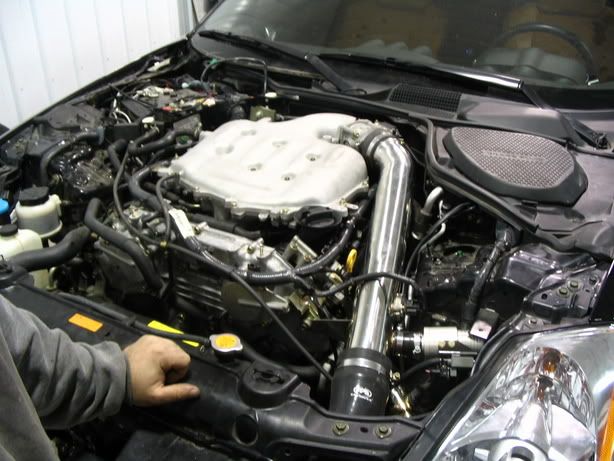
My intake isn't straight like Desi's... odd... but it works (I know - missing a clamp. I broke it; off to Home Depot tomorrow AM):

This flex-duct is a tight fit; rubs lightly against the lower control arm - is that going to be a long-term issue?

The dreaded cross-over pipe, which took me 4 seconds to slide over the top Lady luck on my side, I guess. Oh, and beware of those heat shields, the frayed edges poke big holes in your fingers. That wiring loom mess, by the way, is a PITA. I still dont understand why you have to loop the loom over the top of the bell housing to get to the reverse light switch...

Oh - and clutch fluid in an open finger wound is painful. Tremedously!
Currently on Step 13 Turbocharger Oil Pickup Somethingrather....
Pics:
I found that if you mash the heat shield around that tricky (and lemme tell you it's a major MF'r) bolt on the 4-bolt flange, you can get to it just a little bit easier:
My intake isn't straight like Desi's... odd... but it works (I know - missing a clamp. I broke it; off to Home Depot tomorrow AM):
This flex-duct is a tight fit; rubs lightly against the lower control arm - is that going to be a long-term issue?
The dreaded cross-over pipe, which took me 4 seconds to slide over the top
Lady luck on my side, I guess. Oh, and beware of those heat shields, the frayed edges poke big holes in your fingers. That wiring loom mess, by the way, is a PITA. I still dont understand why you have to loop the loom over the top of the bell housing to get to the reverse light switch...
Quick shot of the lower intake:

Fitting the Tee (Step 12 TFA-08 / Water routing):

And - where I left off.... upper oil inlet is installed, both water inlets, mounted and Permatex'd... If something doesn't look right, please tell me now.. LOL!

Fitting the Tee (Step 12 TFA-08 / Water routing):
And - where I left off.... upper oil inlet is installed, both water inlets, mounted and Permatex'd... If something doesn't look right, please tell me now.. LOL!
Well – up to the point where I can put in the fuel injectors and manifold; haven’t rec’d the APS manifold yet (UPS AGAIN fails to deliver on time) so hopefully tomorrow. Tho, Thursday and Fri I work 12hr shifts, but I have Sat and Sun off. I really think this thing will be roadbound by Saturday evening.
And for those of you who think you can hammer this out in a weekend – forget it. I’ve logged 28 hours so far, and looks like I have another 8 or so to go (I hope).
My arms are so scratched, bruised and bloodied that I look like a heroin addict or some sh*t. I’m embellishing a bit, of course, but… it’ll kindof be nice to take the next two days off from grunge work and go to my day job.
OK – to the photos:
I was a little unsure of how to sneak this oil supply hose to from the oil pan to the scavenge pump. Took me about 20 mins but I seem to have found the ideal path and hopefully these pictures will help the next guy.
Having said that, I would change the directions a bit. There is a nipple installed in the oil pan (top/RHS) and then you put the pan on. Then you are to sneak the hose thru an connect the 45� angle to that nipple. Once you find the right path it’s really not that terrible. BUT – if I were to do it over again I would have installed the hose on the nipple BEFORE installing the pan, and sneak the hose thru at the same time. Trying to get these fluid connections on in tight spaces is taxing on the patience.
And if my neighbor’s dogs don’t stop barking there will be some blunt force trauma to the head stuff going on in a second…
The intercooler was kindof fun, because it’s really the first visible part you see and give you a sense of accomplishment and hope. Installing it came with some concern, though, with regards to the mounting brackets on either side. When I attached the brackets to the core support, the intercooler didn’t line up. My suggestion is to back of the bolts from BOTH bumper rail extensions (using 10 and 12mm sockets (and 14mm for the intercooler bolts)), then set the bolts thru the brackets into the intercooler, secure the intercooler to the brackets first, then tighten up the bumper rail extensions. Kudos to APS for the clearances on this intercooler and aluminum impact bar. There’s about 3mm of space there – perfect fit :thumbsup:


The compression tube running from the turbo to the intercooler is a ***** to get in…. LOL! I ended up raising the motor to get the room I need. Once in, however, you’ll find yet another perfectly fitting piece. :thumbsup:


So – time to grab a shower, Quiznos, and chill out for the nite. Will try to resume work again tomorrow nite if UPS comes thru, otherwise it won’t be until Saturday when I continue. Soooooooooooooooo close…..
The compression tube running from the turbo to the intercooler is a ***** to get in…. LOL! I ended up raising the motor to get the room I need. Once in, however, you’ll find yet another perfectly fitting piece. :thumbsup:
So – time to grab a shower, Quiznos, and chill out for the nite. Will try to resume work again tomorrow nite if UPS comes thru, otherwise it won’t be until Saturday when I continue. Soooooooooooooooo close…..
That's about all the pics I have. I'm sure there are others avail on request - took about 300 pics alltogether..
My 44 hours of misadventure can be found here: http://www.350zmotoring.com/forums/s...ad.php?t=30892
My 44 hours of misadventure can be found here: http://www.350zmotoring.com/forums/s...ad.php?t=30892
Originally Posted by kostat26
is the stock clutch line fine cause im missing the one that comes with the kit
Alternatively, if you have a hose/tube mfgtr in your town, then one could be made for ~$50 or so.
You can order SS lines from aftermarket resources, but they aren't as long as APS', and are kindof a PITA to install. Ask me how I know...