
new interior mod!


Thread Starter
Registered User
Joined: Jan 2007
Posts: 397
Likes: 0
From: naperville, il
thanks for all the positive feedback guys. i'll deffinately do a write up a little later today with more pics of the LED and some detailed instructions so stay posted. im at work right now so i dont have time but probably like 5 or 6 tonight i'll post it up 


Thread Starter
Registered User
Joined: Jan 2007
Posts: 397
Likes: 0
From: naperville, il
alright guys here's the write up on how to do this mod. it's very easy and someone with very limited knowlege of electrical systems can do it (i suck with electrical stuff and i finished this in about 20 minutes).
1. find an LED that's the right color for you. i chose red because i love red in a black interior and it compliments the orange of the guages. all you need is a basic LED light that has a wire for a power source and a wire for a ground. you can find them at about any car parts store, i got mine at pep boys, the important thing is that it's a small LED that wont stick out like a soar thumb in your headliner and that it has a a power source wire and a ground wire on it like the one at this site
http://www.urban-neon-car-lights.com...tor-p-286.html
2. look at any instructions that came with the LED to see if it says what size hole your going to need to drill, mine said a 7/32 hole. if it doesnt say just look at your drill bits and try and find one that's slightly smaller than the base of the LED bulb.
3. decide where you want the LED to shine the light in your interior and drill your hole directly above that location in the headliner. i wanted mine to shine directly down on the shifter and a little bit on the AC ***** so i drilled my hole a little in front of the sunglasses holder. the headlinerr will frey a little bit when you drill into it but dont worry the led will hide it and the fraying will not spread. here's the location of mine...
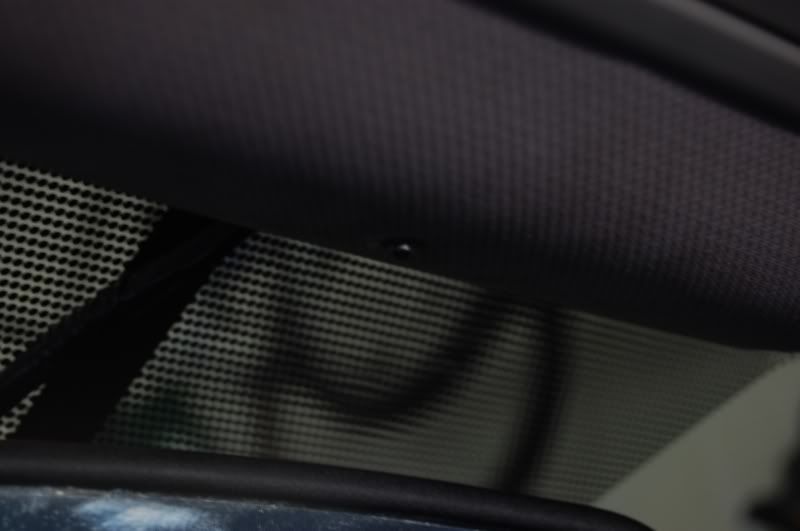
4. once your hole is drilled you need to thread the 2 LED wires into the hole.
5. this next step will vary depending on what model z you have. i'll explain the process for those of you with the power/ auto dimming rear view mirror because that's what i have and it's the easiest way to do it.
if you look at the front of your headliner right by the base of the rear view mirror, you'll see that there's a little hole with the wires for the power mirror coming out and running into the back of the rear view mirror (if you dont know what wires im talking about you can referance the pic i posted in step 3). you need to pull the wires that you fed into the hole for the LED out through the same hole.
6. at this point you can press your LED bulb into the hole that you drilled in your headliner. everything should be intact and cleaned up aside from the power source and ground wires from the LED that are now hanging out of the hole where the power mirror wires come out.
7. now for the electrical part..... your power mirror wires have a black plastic sleeve around them, you need to take it off by carefully cutting it away (make sure you dont snip all of the power mirror wires inside of it when you do this).
8. once the sleeve is removed you should see that there are three wires that run into your mirror, there's a solid black wire, a black wire with an orange stripe, and a black wire with a red stripe. go ahead and snip the solid black wire far enough up that you will be able to reconnect it later with an electrical connector. go ahead and also snip the black wire with the RED stripe also leaving enough room to connect it later with an electrical connector.
9. strip some of the rubber covering off the ends of the black and black w/ red stripe wires exposing about 1/4" of the copper wire inside them. this is done most easily with a wire stripper but can also be done with a razor blade.
10. test your LED by holding the end of the power source wire(will probably be red) to the end of the black with red stripe wire, and the ground wire (probably black) to the solid black wire. your LED should light up when this is done. if it doesnt light up, make sure the ends of the wires are making solid contact because connecting all of them completes a full circuit. once it's established that the LED works, cut the LED wires to the desired lenght because you'll probably have quite a bit of unneeded wire.
11. once your LED lights up you can be sure that the LED is functioning properly. you'll now need 2 electrical connector sleeves like the ones found on this website (they're basic electrical parts found at hardware and auto stores, i just dont have a pic to post of them). note: the one im refering to is the blue one in the front.
http://www.virginiawind.com/tips/ima..._repair_04.jpg
12. insert the ends of the solid black LED wire and the solid black mirror wire into one end of the electrical connector. insert the other end of the solid black mirror wire into the other end of the electical connector and crimp the center of the connector to connect the wires together...... you're essentially just reconnecting the solid black mirror wire but now you've spliced the LED wire into it.
13. repeat the same process as step 12 but this time with the black with RED stripe mirror wire and the RED LED wire. once this is done your LED will turn on when you turn your key to the on position. if it doesnt, check you connections again and make sure they're secure.
14. either use shrink wrap or electrical tape to neatly wrap all of the wires together for a clean install look.
NOTE: for those that dont have a power/auto dimming mirror, you can still use this same process but you'll have to run your LED wires either to the dome light or to another power source in the car.
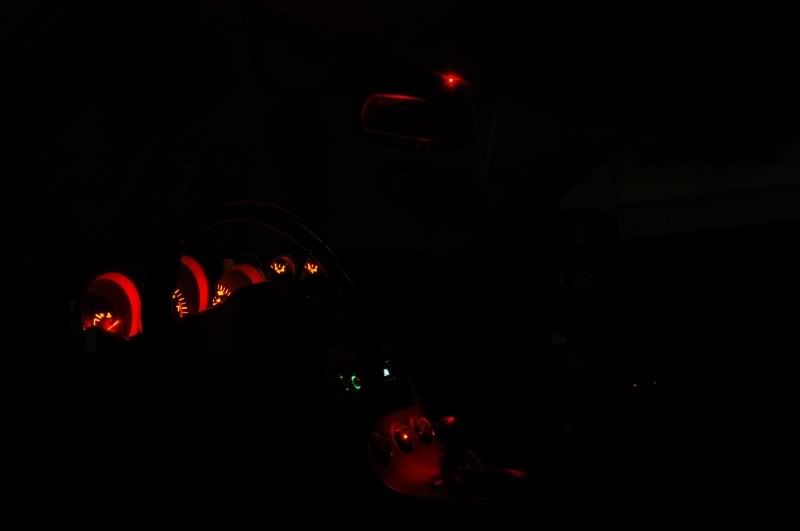
THAT'S IT!!! it's that easy, if you want the LED run to a switch you can easily do this but you will need to find a mounting place for the switch and run the wires to that location. personally, the switch i thought was unnecesary because you cant tell that the LED is on during the day and obviously you can see it at night which is when you want to be able to see it. the light will be bright enough that you can easily see it shining on your center console but not so bright that it bothers you and if you mount it in the same place that i did, you can see the LED but it's not annoying or intrusive. let me know if you gys have any questions...oh and here's another pic where you can see the LED, but remember, just like the other shots, i had a 30 second shutter speed so the LED appears brighter than it actually is. it also appears in the pic that the led would cause a glare in the rear view mirror but it doesnt at all. it's probably about half as bright as it appears in the pic
if my explanations are unclear and more pics are necesary, let me know, it's a fairly straight forward process so it shouldnt be hard to follow
1. find an LED that's the right color for you. i chose red because i love red in a black interior and it compliments the orange of the guages. all you need is a basic LED light that has a wire for a power source and a wire for a ground. you can find them at about any car parts store, i got mine at pep boys, the important thing is that it's a small LED that wont stick out like a soar thumb in your headliner and that it has a a power source wire and a ground wire on it like the one at this site
http://www.urban-neon-car-lights.com...tor-p-286.html
2. look at any instructions that came with the LED to see if it says what size hole your going to need to drill, mine said a 7/32 hole. if it doesnt say just look at your drill bits and try and find one that's slightly smaller than the base of the LED bulb.
3. decide where you want the LED to shine the light in your interior and drill your hole directly above that location in the headliner. i wanted mine to shine directly down on the shifter and a little bit on the AC ***** so i drilled my hole a little in front of the sunglasses holder. the headlinerr will frey a little bit when you drill into it but dont worry the led will hide it and the fraying will not spread. here's the location of mine...
4. once your hole is drilled you need to thread the 2 LED wires into the hole.
5. this next step will vary depending on what model z you have. i'll explain the process for those of you with the power/ auto dimming rear view mirror because that's what i have and it's the easiest way to do it.
if you look at the front of your headliner right by the base of the rear view mirror, you'll see that there's a little hole with the wires for the power mirror coming out and running into the back of the rear view mirror (if you dont know what wires im talking about you can referance the pic i posted in step 3). you need to pull the wires that you fed into the hole for the LED out through the same hole.
6. at this point you can press your LED bulb into the hole that you drilled in your headliner. everything should be intact and cleaned up aside from the power source and ground wires from the LED that are now hanging out of the hole where the power mirror wires come out.
7. now for the electrical part..... your power mirror wires have a black plastic sleeve around them, you need to take it off by carefully cutting it away (make sure you dont snip all of the power mirror wires inside of it when you do this).
8. once the sleeve is removed you should see that there are three wires that run into your mirror, there's a solid black wire, a black wire with an orange stripe, and a black wire with a red stripe. go ahead and snip the solid black wire far enough up that you will be able to reconnect it later with an electrical connector. go ahead and also snip the black wire with the RED stripe also leaving enough room to connect it later with an electrical connector.
9. strip some of the rubber covering off the ends of the black and black w/ red stripe wires exposing about 1/4" of the copper wire inside them. this is done most easily with a wire stripper but can also be done with a razor blade.
10. test your LED by holding the end of the power source wire(will probably be red) to the end of the black with red stripe wire, and the ground wire (probably black) to the solid black wire. your LED should light up when this is done. if it doesnt light up, make sure the ends of the wires are making solid contact because connecting all of them completes a full circuit. once it's established that the LED works, cut the LED wires to the desired lenght because you'll probably have quite a bit of unneeded wire.
11. once your LED lights up you can be sure that the LED is functioning properly. you'll now need 2 electrical connector sleeves like the ones found on this website (they're basic electrical parts found at hardware and auto stores, i just dont have a pic to post of them). note: the one im refering to is the blue one in the front.
http://www.virginiawind.com/tips/ima..._repair_04.jpg
12. insert the ends of the solid black LED wire and the solid black mirror wire into one end of the electrical connector. insert the other end of the solid black mirror wire into the other end of the electical connector and crimp the center of the connector to connect the wires together...... you're essentially just reconnecting the solid black mirror wire but now you've spliced the LED wire into it.
13. repeat the same process as step 12 but this time with the black with RED stripe mirror wire and the RED LED wire. once this is done your LED will turn on when you turn your key to the on position. if it doesnt, check you connections again and make sure they're secure.
14. either use shrink wrap or electrical tape to neatly wrap all of the wires together for a clean install look.
NOTE: for those that dont have a power/auto dimming mirror, you can still use this same process but you'll have to run your LED wires either to the dome light or to another power source in the car.
THAT'S IT!!! it's that easy, if you want the LED run to a switch you can easily do this but you will need to find a mounting place for the switch and run the wires to that location. personally, the switch i thought was unnecesary because you cant tell that the LED is on during the day and obviously you can see it at night which is when you want to be able to see it. the light will be bright enough that you can easily see it shining on your center console but not so bright that it bothers you and if you mount it in the same place that i did, you can see the LED but it's not annoying or intrusive. let me know if you gys have any questions...oh and here's another pic where you can see the LED, but remember, just like the other shots, i had a 30 second shutter speed so the LED appears brighter than it actually is. it also appears in the pic that the led would cause a glare in the rear view mirror but it doesnt at all. it's probably about half as bright as it appears in the pic
if my explanations are unclear and more pics are necesary, let me know, it's a fairly straight forward process so it shouldnt be hard to follow
Last edited by FALLEN1z; Jun 26, 2007 at 04:01 PM.

Registered User
Joined: May 2003
Posts: 1,095
Likes: 0
From: Cherry Hill, NJ
Wow looks great, my bmw had this, only problem with what you did is you can see the LED. If there was some way to hide it behind the rearview mirror or under it, it might look better. Looks great though, nice work.
Thread Starter
Registered User
Joined: Jan 2007
Posts: 397
Likes: 0
From: naperville, il
Originally Posted by bobS
Wow looks great, my bmw had this, only problem with what you did is you can see the LED. If there was some way to hide it behind the rearview mirror or under it, it might look better. Looks great though, nice work.

Originally Posted by drift_projekt_Z
i beat you to the punch lol. i had mine done a while ago. although i like yours better. its cleaner...i got 3, mounted in front of the glasses holder. here it is..

that blue is borderline tacky, IMO

Thread
Thread Starter
Forum
Replies
Last Post
Tochigi_236
Feedback & Suggestions for Our Forum
8
Sep 27, 2015 03:40 PM