
2008 Door Panel Removal / Front Speaker Install


Thread Starter
Registered User
Joined: May 2008
Posts: 38
Likes: 0
From: Lone Pine, California
Hello folks, I decided to put my new front speakers in today!
I found some pretty good write-ups for the 03-05's, but far less on the 06+. So, once I got done with the driver's side, I decided I'd take some pics during the passenger side and post a little step-by-step guide.
(This is on a 2008, which I believe is the same as the 2007 and probably very similar to the 2006).
First things first, here is the door!

The main difference between the driver and passenger side doors is the handle. So we'll start by taking that off.
First, use a flat edge to pry up the top part of the brushed aluminum cover plate:

It pops right out, as you can see:

With that cover out of the way, remove to two screws holding the handle to the door (these are 10mm):


With the screws removed, the handle will pull out from the door:

Now that the handle's out of the way, we remove the panel that holds the buttons.
It has clips all the way around - I started at the rear, went around one side to the front, then it lifted out pretty easily:


Now we can pull that panel out and disconnect the electronic door lock plug (you can press the pin with your finger or use a screwdriver):


Ok, now with that piece out of the way, we can remove the screws underneath it.
(Now I only had one screw in my passenger door, but there were two in my driver's door... I do see the spot where the extra screw should go on the passenger side (red arrow) but mine was missing...?)

Ok, with all those screws out, it's on to the door handle:

If we pull up the door handle, we can see the plastic panel just underneath it:

Now, to make life easier, I stuck a screwdriver (gently) under the handle to keep it open so I could keep my hands free:

Now, use a flat edge to pry that little plastic panel out from underneath the handle:


Now we need to remove the screw that's back inside there (it's near the top, a ways back in there - careful not to drop it down inside the door!). You can remove it with a screwdriver or a 10mm socket):

And here are the current parts you should have (you may have one more screw than I do ):
):

Now we can start pulling the door panel off. You can just pull, or you can use a screwdriver to get it started. There are pop fasteners all along the bottom and side edges.

Once all the fasteners are popped, lift up on the door panel to clear the lip so the panel will clear the door. The top edge of the door panel is hooked onto the top of the door where the window goes down. You can kind of see it in the picture:

Now on the inside of the door panel, there's a gray electrical clip you need to unclip (and for some reason, the release was on the bottom side on the passenger side, but was facing toward me on the driver's side):


Next we can remove the door lock and door handle cables. I just pulled them out with a pair of pliers:


Once those are disconnected, you can go ahead and remove the door panel completely (put it somewhere where it won't get scratched - I chose the (open) trunk).
Here is what we're left with:

Now, let's get at that lovely speaker... Firstly, pull the plug out of the top of it:


Now remove the three screws holding the speaker bracket in place and pull the whole thing out (I got it started with a screwdriver - it was stuck on there pretty well):


Ok, now we have the speaker out!
Since the new speakers are too wide to fit inside without hitting the window when it's rolled down, we need about a 1" spacer - or, we can just use the stock speaker bracket! The stock speaker is sort of... attached, to its bracket, so we're going to have to cut it up. This means your stock speaker will be essentially destroyed and unusable.
Onward and upward - here is the back of the stock speaker setup:

Now for some cutting (Dremel works great, but use whatever you like best)
Also, don't cut the "legs" that stick out, as they are used for mounting back to the door:


I used a screwdriver to break and remove the white electrical clip where the wires used to go, so I could then run my own wires through it later - this is optional, you can drill new holes in the bracket if you would like.


Now I went back and cleaned up my first cutting - you'll want to make sure there's room for your new speaker to fit safely - beyond that, it's personal preference.

Here is the new (Infinity Reference 6022) speaker next to the stock (construction paper from WalMart) speaker:

You should go ahead and attach a foot or so of wire to the speakers (it's easy to cut off extra later, while it's hard to add in more).
Also, remember which color/pattern you are using for positive and negative!
Now, this was the most difficult part for me - screwing the new speaker securely into the stock mounting bracket. This will vary depending on the size and spacing of your new speaker's mounting holes and such, so I won't go into much detail.
Basically, I set the speaker in place where all four screws would make it, pre-drilled some holes, and put the screws in. It was MUCH faster the second time, as I already knew what would work and what wouldn't!
Also, take note that the top of the speaker should go toward the hole where the electrical clip used to be (or still is if you left it).
Anyway, here is the finished product:

Here is the hole on top (the speaker is slightly off-center, as that's the only way all 4 screws would fit):

And with the wires running through it:

Now, back to the car!
Mount your new speaker back to the door (best if your window is down, to make sure your speaker won't hit the glass).

Before the next step, disconnect the negative terminal of your battery! It's generally a bad idea to cut any wires while there is power, even if it's just speakers!
Now, go ahead and cut the red and blue wires off of the plastic connector that used to go into the top of the old speaker. Also cut your new speaker wires to a decent length for you to work with, but not so much that it will get in the way when putting the door back together:

Now go ahead and connect the wires together however you see fit (red positive, blue negative). I spliced, crimped, and taped them, since that was what I had available:

Go ahead and reconnect your battery, start your car up and have a listen, make sure things sound OK.
And, that's it! All you have to do is follow the directions in reverse to put the door back together:
Connect the door lock/handle cables (test that they work at this point)
Connect the gray clip on the back side of the panel.
Hook the door panel at the top of the door, make sure all the snaps are lined up and push them all back into place.
Put the screw and small panel back in place behind the door handle.
Put the screws (or screw?) back into place under where the power lock panel goes.
Re-connect the power door lock clip and pop that panel back into place.
Put the handle back in place, screw in the two screws, and pop the brushed aluminum cover back into place.
Here we can see our new speaker peeking out at the world...

And with the speaker cover back in place - all done!

I found some pretty good write-ups for the 03-05's, but far less on the 06+. So, once I got done with the driver's side, I decided I'd take some pics during the passenger side and post a little step-by-step guide.
(This is on a 2008, which I believe is the same as the 2007 and probably very similar to the 2006).
First things first, here is the door!
The main difference between the driver and passenger side doors is the handle. So we'll start by taking that off.
First, use a flat edge to pry up the top part of the brushed aluminum cover plate:
It pops right out, as you can see:
With that cover out of the way, remove to two screws holding the handle to the door (these are 10mm):
With the screws removed, the handle will pull out from the door:
Now that the handle's out of the way, we remove the panel that holds the buttons.
It has clips all the way around - I started at the rear, went around one side to the front, then it lifted out pretty easily:
Now we can pull that panel out and disconnect the electronic door lock plug (you can press the pin with your finger or use a screwdriver):
Ok, now with that piece out of the way, we can remove the screws underneath it.
(Now I only had one screw in my passenger door, but there were two in my driver's door... I do see the spot where the extra screw should go on the passenger side (red arrow) but mine was missing...?)
Ok, with all those screws out, it's on to the door handle:
If we pull up the door handle, we can see the plastic panel just underneath it:
Now, to make life easier, I stuck a screwdriver (gently) under the handle to keep it open so I could keep my hands free:
Now, use a flat edge to pry that little plastic panel out from underneath the handle:
Now we need to remove the screw that's back inside there (it's near the top, a ways back in there - careful not to drop it down inside the door!). You can remove it with a screwdriver or a 10mm socket):
And here are the current parts you should have (you may have one more screw than I do
):Now we can start pulling the door panel off. You can just pull, or you can use a screwdriver to get it started. There are pop fasteners all along the bottom and side edges.
Once all the fasteners are popped, lift up on the door panel to clear the lip so the panel will clear the door. The top edge of the door panel is hooked onto the top of the door where the window goes down. You can kind of see it in the picture:
Now on the inside of the door panel, there's a gray electrical clip you need to unclip (and for some reason, the release was on the bottom side on the passenger side, but was facing toward me on the driver's side):
Next we can remove the door lock and door handle cables. I just pulled them out with a pair of pliers:
Once those are disconnected, you can go ahead and remove the door panel completely (put it somewhere where it won't get scratched - I chose the (open) trunk).
Here is what we're left with:
Now, let's get at that lovely speaker... Firstly, pull the plug out of the top of it:
Now remove the three screws holding the speaker bracket in place and pull the whole thing out (I got it started with a screwdriver - it was stuck on there pretty well):
Ok, now we have the speaker out!
Since the new speakers are too wide to fit inside without hitting the window when it's rolled down, we need about a 1" spacer - or, we can just use the stock speaker bracket! The stock speaker is sort of... attached, to its bracket, so we're going to have to cut it up. This means your stock speaker will be essentially destroyed and unusable.
Onward and upward - here is the back of the stock speaker setup:
Now for some cutting (Dremel works great, but use whatever you like best)
Also, don't cut the "legs" that stick out, as they are used for mounting back to the door:
I used a screwdriver to break and remove the white electrical clip where the wires used to go, so I could then run my own wires through it later - this is optional, you can drill new holes in the bracket if you would like.
Now I went back and cleaned up my first cutting - you'll want to make sure there's room for your new speaker to fit safely - beyond that, it's personal preference.
Here is the new (Infinity Reference 6022) speaker next to the stock (construction paper from WalMart) speaker:
You should go ahead and attach a foot or so of wire to the speakers (it's easy to cut off extra later, while it's hard to add in more).
Also, remember which color/pattern you are using for positive and negative!
Now, this was the most difficult part for me - screwing the new speaker securely into the stock mounting bracket. This will vary depending on the size and spacing of your new speaker's mounting holes and such, so I won't go into much detail.
Basically, I set the speaker in place where all four screws would make it, pre-drilled some holes, and put the screws in. It was MUCH faster the second time, as I already knew what would work and what wouldn't!
Also, take note that the top of the speaker should go toward the hole where the electrical clip used to be (or still is if you left it).
Anyway, here is the finished product:
Here is the hole on top (the speaker is slightly off-center, as that's the only way all 4 screws would fit):
And with the wires running through it:
Now, back to the car!
Mount your new speaker back to the door (best if your window is down, to make sure your speaker won't hit the glass).
Before the next step, disconnect the negative terminal of your battery! It's generally a bad idea to cut any wires while there is power, even if it's just speakers!
Now, go ahead and cut the red and blue wires off of the plastic connector that used to go into the top of the old speaker. Also cut your new speaker wires to a decent length for you to work with, but not so much that it will get in the way when putting the door back together:
Now go ahead and connect the wires together however you see fit (red positive, blue negative). I spliced, crimped, and taped them, since that was what I had available:
Go ahead and reconnect your battery, start your car up and have a listen, make sure things sound OK.
And, that's it! All you have to do is follow the directions in reverse to put the door back together:
Connect the door lock/handle cables (test that they work at this point)
Connect the gray clip on the back side of the panel.
Hook the door panel at the top of the door, make sure all the snaps are lined up and push them all back into place.
Put the screw and small panel back in place behind the door handle.
Put the screws (or screw?) back into place under where the power lock panel goes.
Re-connect the power door lock clip and pop that panel back into place.
Put the handle back in place, screw in the two screws, and pop the brushed aluminum cover back into place.
Here we can see our new speaker peeking out at the world...
And with the speaker cover back in place - all done!
Last edited by arumndark; Dec 28, 2008 at 07:04 PM.


Trending Topics


Thanks a bunch for this write up  i will probably go ahead and change my speakers as well. They are Ok speakers but not as good as speakers i have in x5. Now heres the question. IF i have a stock headunit, will i need to change the deck to get these to work, or they can be powered from the stock amp and get better sound then the stocks?
What kind of setup are you running so i know what i will need for this quick mod THanks agian!
i will probably go ahead and change my speakers as well. They are Ok speakers but not as good as speakers i have in x5. Now heres the question. IF i have a stock headunit, will i need to change the deck to get these to work, or they can be powered from the stock amp and get better sound then the stocks?What kind of setup are you running so i know what i will need for this quick mod
THanks agian!
Okay, here's the funny thing... I hadn't seen this write up, but I bought the exact same speakers and went through all the hassle of figuring out how to get the door panel off only to find out the speaker adapters that came with the speakers wouldn't work at all. I ended up putting everything back together and was trying to figure out how to send them back without losing money.
Dude, thank you soooo much for doing this write up cause now I know how to put em in!!! You rock!!!!
tomorrow I hit it again!! And I will be victorious!!!
Dude, thank you soooo much for doing this write up cause now I know how to put em in!!! You rock!!!!
tomorrow I hit it again!! And I will be victorious!!!

Nice job.
Looks allot easier than my infinity install. I didn�t want to sacrifice my stock speakers so I made mdf brackets.
How does the infinity clear with the stock housing? Mine has less than a finger between the glass and magnet and even less between the grill and tweedier.


Looks allot easier than my infinity install. I didn�t want to sacrifice my stock speakers so I made mdf brackets.
How does the infinity clear with the stock housing? Mine has less than a finger between the glass and magnet and even less between the grill and tweedier.
Installing the speakers using Arumndark's write up, the speakers go on TOP of the stock bracket which pushes the speaker even closer to the door and speaker grill. The Infinity's have a large magnet, but they don't interfere with the glass. The one I got was the low profile version 6022si, but I didn't notice it was any slimmer?
The speakers DO improve the sound. I'm thinking of buying another pair for the backs.
The speakers DO improve the sound. I'm thinking of buying another pair for the backs.

Nice!!
I got the exact same speakers, and I am trying to finish the FatMat and speakers in the back B4 i go to the fronts!
Your write up is going to help me out so much, and since we got the exact same speakers all i have to do is follow your lead!!
Cheers and a great step by step!
Kevin
I got the exact same speakers, and I am trying to finish the FatMat and speakers in the back B4 i go to the fronts!
Your write up is going to help me out so much, and since we got the exact same speakers all i have to do is follow your lead!!
Cheers and a great step by step!
Kevin

Registered User
Joined: Sep 2008
Posts: 480
Likes: 0
From: Keystone Heights, Fl
I just wanted to say great write up. It helped me out a lot. I do want to add something though that may help out others or just give them another option when installing their new speakers.
I installed some Pioneer 3ways into the factory speaker bracket like you. Instead of cutting out the connector though I soldered some wires with spade connectors onto it. That way I could just plug the spades onto the new speaker and plug the factory harness into it. It saved me from cutting up my cars harness and if I ever want to put another type of speaker in its as easy as unplugging the spade connectors from the speaker.

I installed some Pioneer 3ways into the factory speaker bracket like you. Instead of cutting out the connector though I soldered some wires with spade connectors onto it. That way I could just plug the spades onto the new speaker and plug the factory harness into it. It saved me from cutting up my cars harness and if I ever want to put another type of speaker in its as easy as unplugging the spade connectors from the speaker.


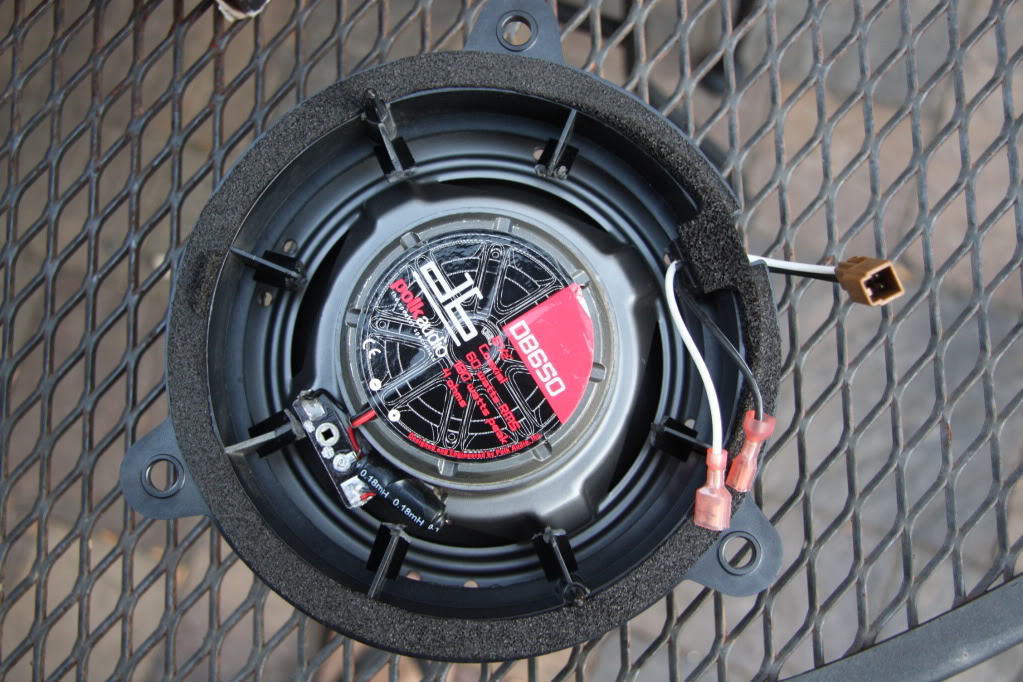
man, i think the g has different brackets, i heard of a lot of guys doing the same but couldn't find a write up on the g35driver forums, i just took mine apart, and my polk 650 is too big for the oem bracket, the polk doesnt sit in the bracket, it sits on top, and if i screw straight down there is no meat for the screw to go in, the only way i can see for it to work is if it screw it in diagonal but there barely is like half a inch of plastic for it to drill in to,
do you have anytips?
looks like i may have to do some mdf =[
do you have anytips?
looks like i may have to do some mdf =[
Last edited by boostedforlife; Jul 28, 2009 at 07:52 PM.