
DIY: GT Spec Fender Braces Install


Here's somewhat of a DIY for installing the GT Spec fender braces that I wrote up for another thread and thought others could get some use out of it. I completed the install on Saturday (11/01/08), and it is a bit more involved than I thought it would be. Sorry for the squares that look like they were drawn by a 4 year old, Photobucket apparently doesn't have a square tool. 
Install took roughly 6 hours.
My estimations of this project:
Degree of Difficulty - 6/10
Frustration involved with putting bolts in - 8/10
Tools Required:
On to the work required and pictures:
1.) Start off by jacking the car up. Get it up on jack stands. If your car isn't lowered, you may not have to do this if you can complete step 2 without your car lifted.
2.) Remove the under diffuser. If you change your own oil, this surely doesn't need a picture.
3.) Remove the 4 clips on the front bumper, under the hood. Use a flathead screwdriver or something similar. Duh.
4.) Remove the 10 MM bolts holding the front bumper on each side. I believe there is two on each side.
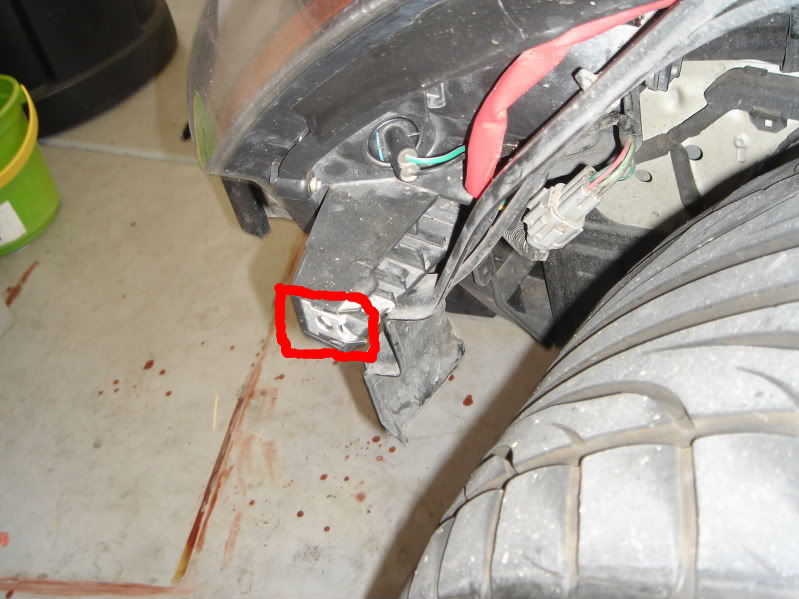
You should now be able to remove the front bumper.
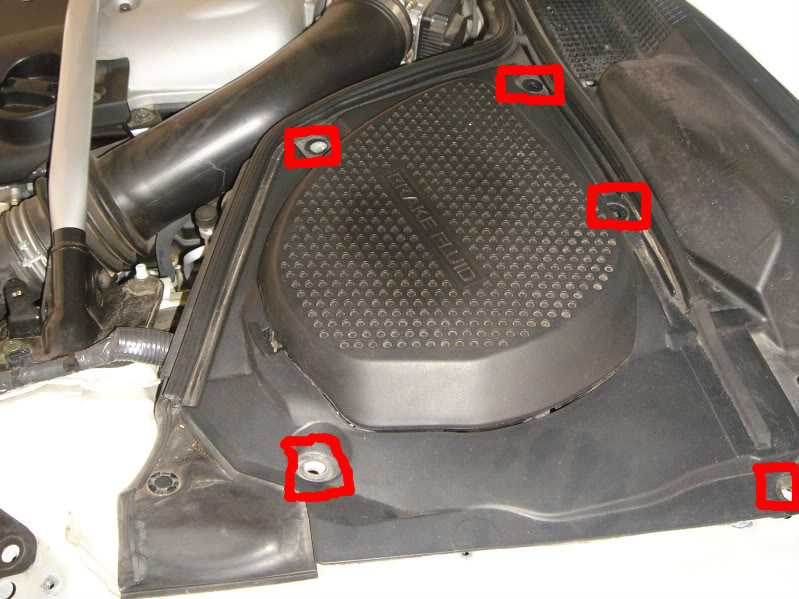
5.) Remove the brake fluid and battery covers by removing all of the plastic clips with a flathead screwdriver or something similar.
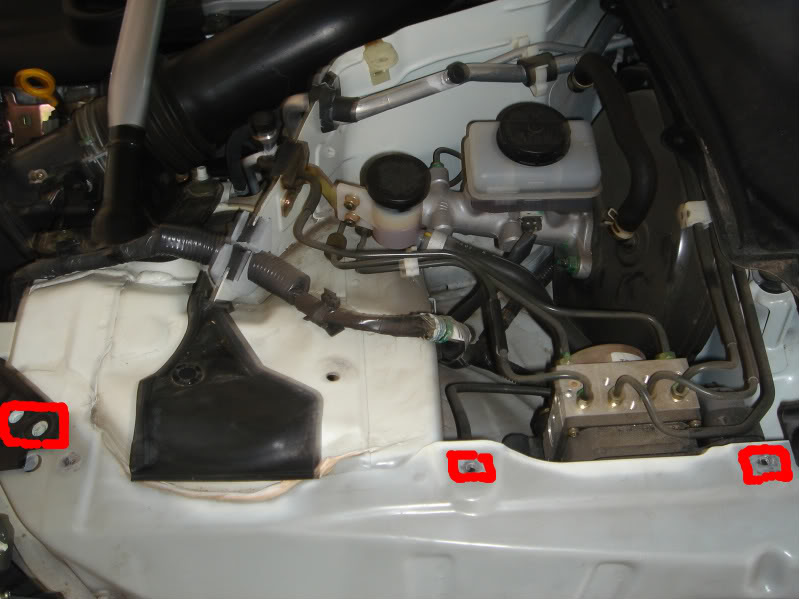
6.) Remove the bolts that hold the fender in place with a 10 MM socket, and a 12 MM socket on the 2 bolts that hold both the fender and headlight in place.
7.) Pop the door open, and use a 10 MM wrench to take off the bolt holding the fender in place.
8.) Get below the car and remove 6 (I believe) 10 MM bolts holding the rocker panel/side skirts in place.
9.) Remove the screws on each side of the rocker panels using a phillips screwdriver.
10.) CAREFULLY pull on the rocker panel outwards to pop out the clips that hold the rocker panel in place. Try to keep your hands as close as possible to the next clip and gently pull. I managed to remove all of them and not break any.
  I started in the back and popped out 2, then moved to the front and worked my way back. I think there is a total of maybe 6 or 7 on each side.
11.) Once you have removed the rocker panels, you can clearly see the last 2 bolts holding the fender in place. Remove these with a 10 MM socket.
12.) At this point, you should have a bare, torn down car with no fluid/battery covers, front bumper, fenders, or rocker panels. If you still have one or more of the above, you missed a step. This is where things get a bit more interesting. Loosen and remove the 4 bolts that hold the door, YES, THE DOOR, in place. This is where your friend and bribery beer comes into play.
  You will need your friend to hold the door in place, lifting upwards and applying a gentle but constant inwards force on the door, trying to keep it in place.

13.) As soon as you have the bolts out and your friend is griping about holding the door in place, quickly swap the GT Spec fender braces in and use the included (cheap *** bolts! ) in place. I managed to break one of the supplied GT Spec supplied bolts when I was torquing it at maybe around 45-50 foot pounds during a later step. I used one of the factory door bolts in its place and it seemed to do the job just fine. Once you have the 4 12 MM bolts in place and torqued down, test your work by opening and closing the door. If the door doesn't close properly, you will need to loosen the 4 bolts, have your friend work HARDER on lifting the door, again bribe with the promise of more beer, and re-torque the 12 MM bolts back down. Test again and repeat as necessary. My passenger side was factory perfect, and the driver side took a couple of adjustments to get it to close perfectly. Don't skimp on this part, you don't want to close your door for the following years and not have it be perfect and have to completely tear the car down again just to adjust the door. It's a pain in the ***, just do it right the first time.
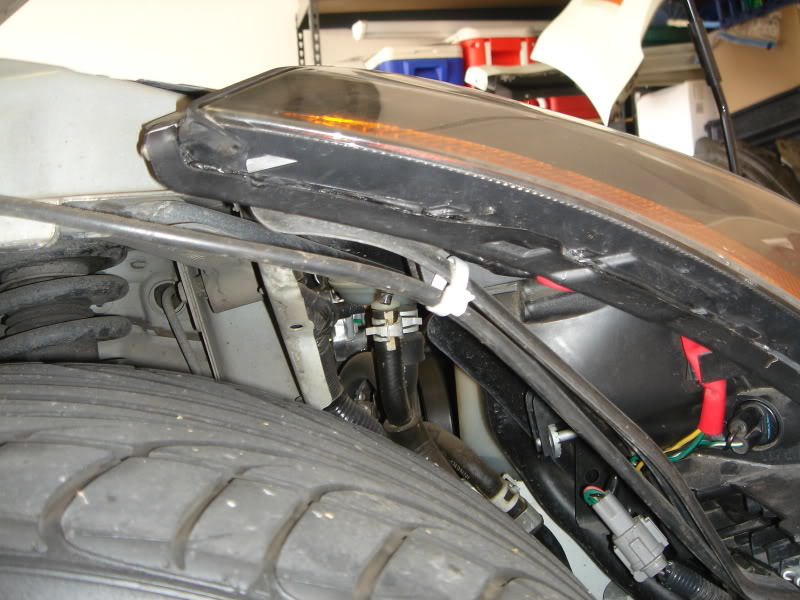
14.) Installing the braces will require that you break a clip on each side that holds hoses in place. On the passenger side I zip tied the hoses so they wouldn't fall into contact with the tire. The driver side was fine.
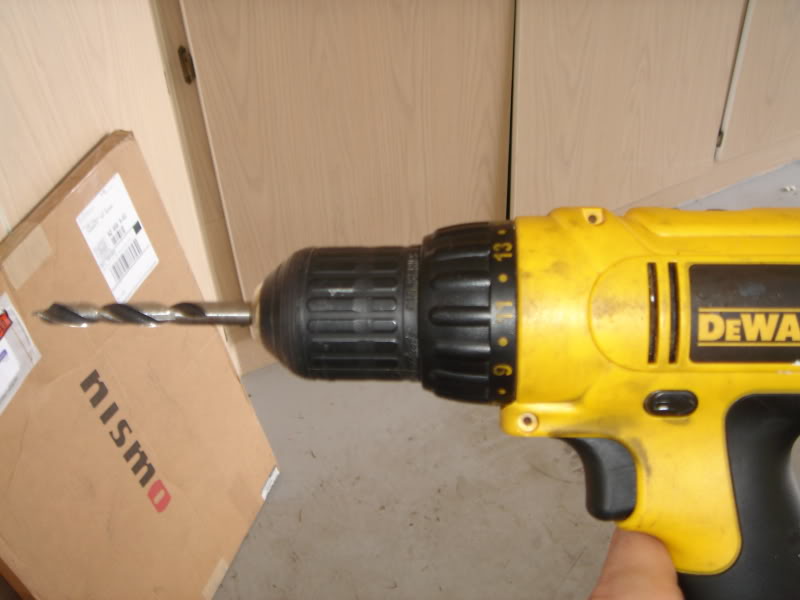
15.) Break out the drill!!!
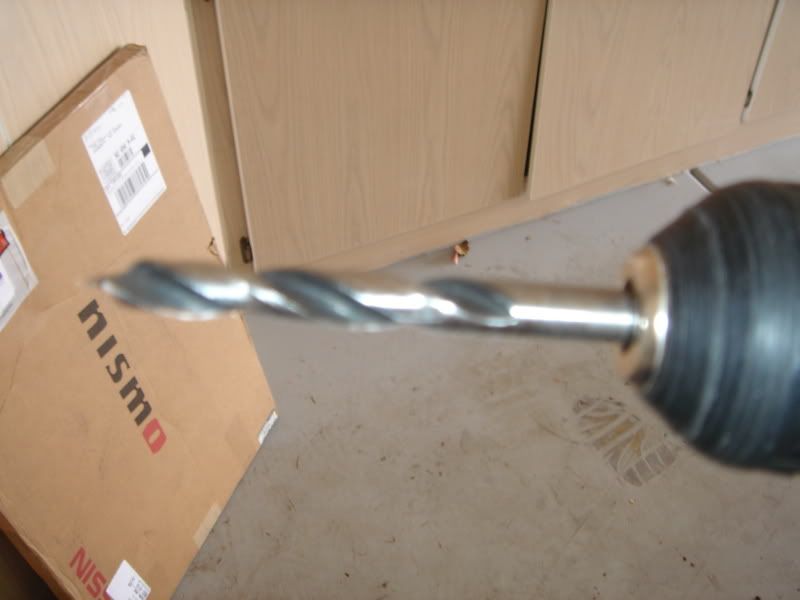
This is what was left of my bit.
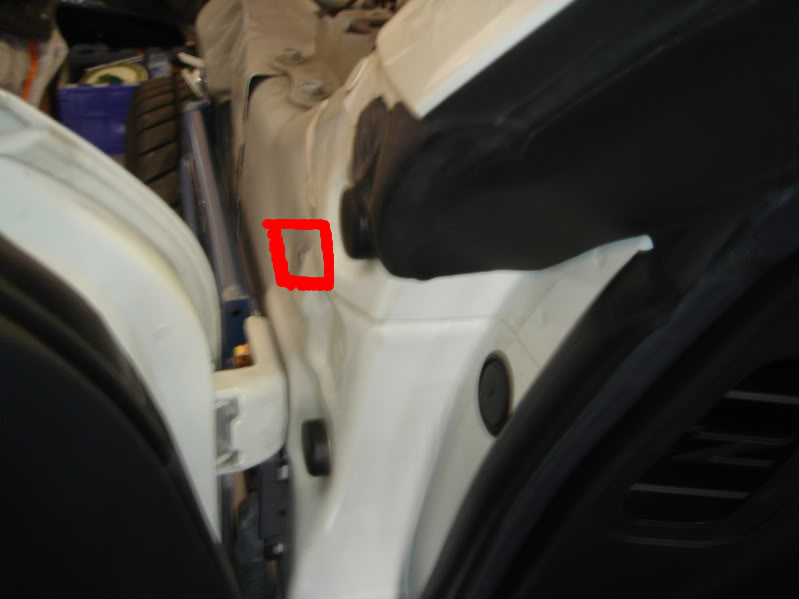
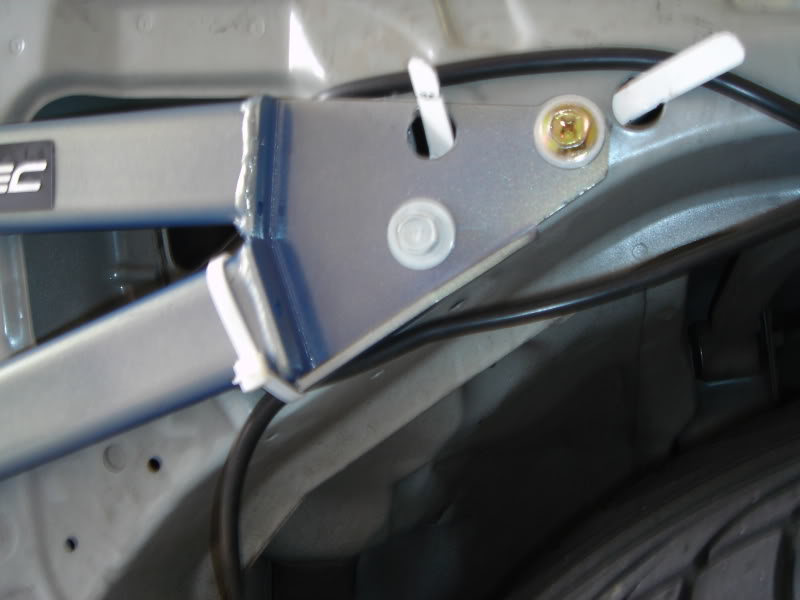
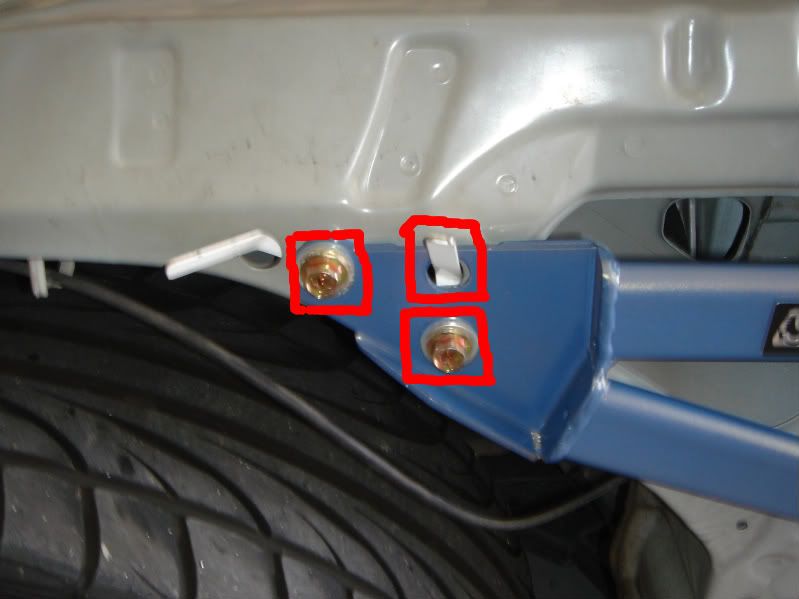
16.) I didn't know I was going to be doing this step when I purchased these braces, however you need to drill through the unibody at 2 locations on each side, and you need to widen the holes on the top right box shown below. I don't believe there is anything inside the unibody chassis as all the lines are run outside of it. Drill away until your heart is content.

If it doesn't, you missed a step... or you don't own a PPW.
18.) Reinstall the body panels in reverse order, duh. Steps 11 through 1.
Hopefully this is helpful. If you don't feel comfortable drilling into your chassis this may not be the mod for you. After I had the braces installed, I took a quick spin around the neighborhood, mostly obeying posted speed limits. My car is still torn down, waiting for some parts, so I really haven't had a good opportunity to test these at highway speeds and mountain runs, but I will say that car felt more solid with these installed. Since all of the body panels are still removed, please let me know if you need pictures of anything else. I will update the thread once I have had more time with them and can give a better assessment. If you're like me, you'll enjoy tearing the car down as you get to know the car better with each piece you uninstall. This definitely wasn't the first time I've taken the front bumper off, but it was the first time I've taken off the fenders and side skirts. The Z looks pretty funny rolling down the road in torn down status...but thats what being a car guy is all about.
Install took roughly 6 hours.
My estimations of this project:
Degree of Difficulty - 6/10
Frustration involved with putting bolts in - 8/10
Tools Required:
- Flathead Screwdriver
- Phillips Screwdriver
- Drill
- Nice bits
- Rachet
- 10 MM socket
- 12 MM socket
- 10 MM wrench
- Jack
- Friend
- Beer (I guess optional
 )
) - Sack of *****

On to the work required and pictures:
1.) Start off by jacking the car up. Get it up on jack stands. If your car isn't lowered, you may not have to do this if you can complete step 2 without your car lifted.
2.) Remove the under diffuser. If you change your own oil, this surely doesn't need a picture.
3.) Remove the 4 clips on the front bumper, under the hood. Use a flathead screwdriver or something similar. Duh.
4.) Remove the 10 MM bolts holding the front bumper on each side. I believe there is two on each side.
You should now be able to remove the front bumper.
5.) Remove the brake fluid and battery covers by removing all of the plastic clips with a flathead screwdriver or something similar.
6.) Remove the bolts that hold the fender in place with a 10 MM socket, and a 12 MM socket on the 2 bolts that hold both the fender and headlight in place.
7.) Pop the door open, and use a 10 MM wrench to take off the bolt holding the fender in place.
8.) Get below the car and remove 6 (I believe) 10 MM bolts holding the rocker panel/side skirts in place.
9.) Remove the screws on each side of the rocker panels using a phillips screwdriver.
10.)
CAREFULLY pull on the rocker panel outwards to pop out the clips that hold the rocker panel in place. Try to keep your hands as close as possible to the next clip and gently pull. I managed to remove all of them and not break any. I started in the back and popped out 2, then moved to the front and worked my way back. I think there is a total of maybe 6 or 7 on each side.11.) Once you have removed the rocker panels, you can clearly see the last 2 bolts holding the fender in place. Remove these with a 10 MM socket.
12.) At this point, you should have a bare, torn down car with no fluid/battery covers, front bumper, fenders, or rocker panels. If you still have one or more of the above, you missed a step.
This is where things get a bit more interesting. Loosen and remove the 4 bolts that hold the door, YES, THE DOOR, in place. This is where your friend and bribery beer comes into play. You will need your friend to hold the door in place, lifting upwards and applying a gentle but constant inwards force on the door, trying to keep it in place.13.) As soon as you have the bolts out and your friend is griping about holding the door in place, quickly swap the GT Spec fender braces in and use the included (cheap *** bolts!
) in place. I managed to break one of the supplied GT Spec supplied bolts when I was torquing it at maybe around 45-50 foot pounds during a later step. I used one of the factory door bolts in its place and it seemed to do the job just fine. Once you have the 4 12 MM bolts in place and torqued down, test your work by opening and closing the door. If the door doesn't close properly, you will need to loosen the 4 bolts, have your friend work HARDER on lifting the door, again bribe with the promise of more beer, and re-torque the 12 MM bolts back down. Test again and repeat as necessary. My passenger side was factory perfect, and the driver side took a couple of adjustments to get it to close perfectly. Don't skimp on this part, you don't want to close your door for the following years and not have it be perfect and have to completely tear the car down again just to adjust the door. It's a pain in the ***, just do it right the first time.14.) Installing the braces will require that you break a clip on each side that holds hoses in place. On the passenger side I zip tied the hoses so they wouldn't fall into contact with the tire. The driver side was fine.
15.) Break out the drill!!!
This is what was left of my bit.
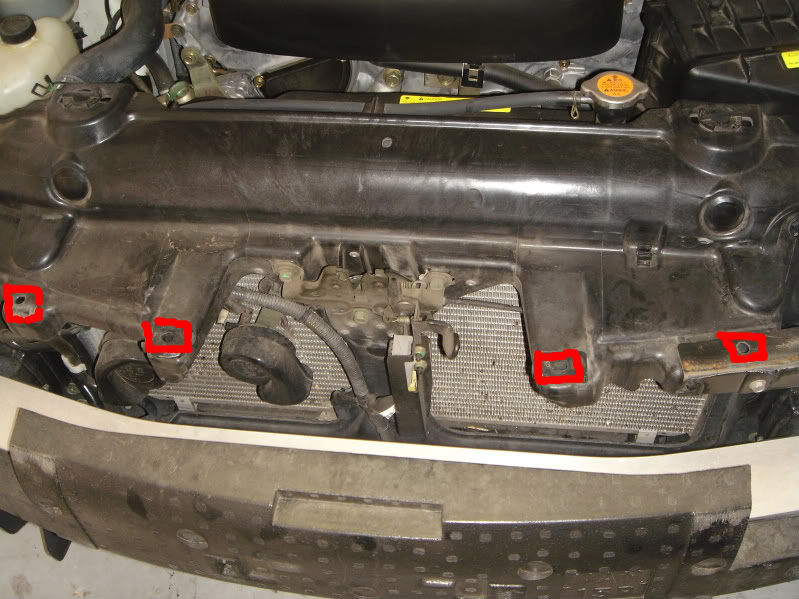
16.) I didn't know I was going to be doing this step when I purchased these braces, however you need to drill through the unibody at 2 locations on each side, and you need to widen the holes on the top right box shown below. I don't believe there is anything inside the unibody chassis as all the lines are run outside of it. Drill away until your heart is content.
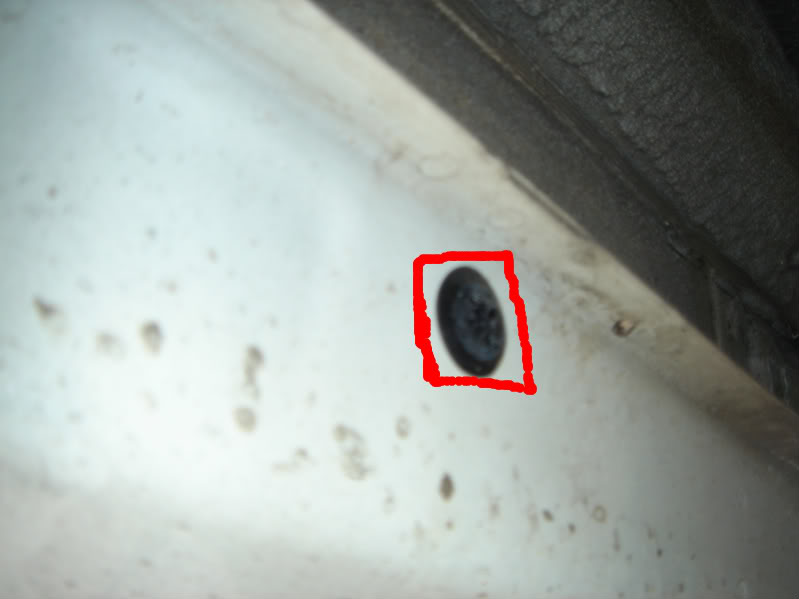
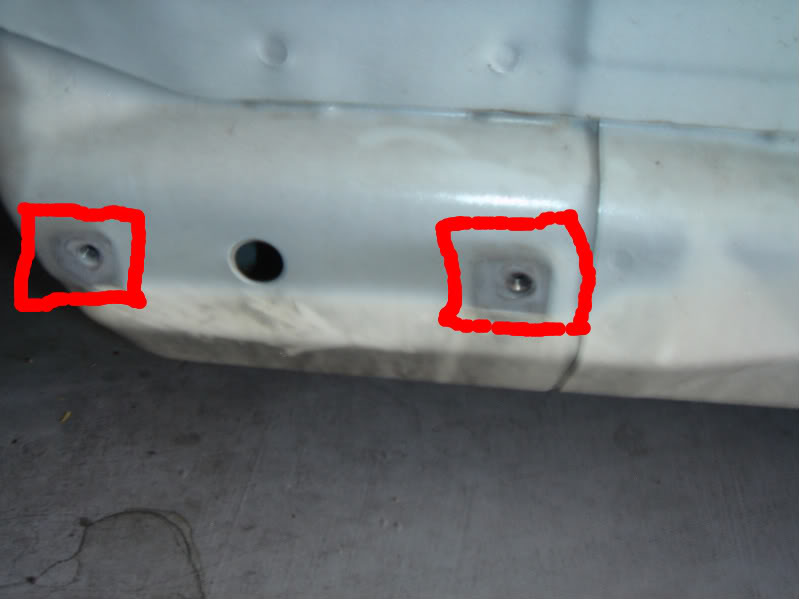
This step took the majority of the time, so I'll try to expand on exactly what was required. If you look at what is supplied, they include 4 nuts with metal brackets connected. When I was first looking at these, I had no clue why they were like that. Once you have completed step 13, you will definitely understand why they are designed the way they are. To drill through the chassis, I started with a smaller bit to get a pilot hole in place for the large bit that is shown in step 15. The bottom right red square has a preexisting hole (that of course doesn't line up to the GT Spec brace hole (") ), which can make it sort of a pain to drill the hole that you need to get the bolt through. I have a Dewalt drill (shown in step 15) and luckily I had 2 batteries. I probably swapped batteries 10-15 times, at least, during the course of drilling these holes. An air compressor would have been AWWWESOME during this step. If you have one, I envy you. Lock your garage.
), which can make it sort of a pain to drill the hole that you need to get the bolt through. I have a Dewalt drill (shown in step 15) and luckily I had 2 batteries. I probably swapped batteries 10-15 times, at least, during the course of drilling these holes. An air compressor would have been AWWWESOME during this step. If you have one, I envy you. Lock your garage.  You will basically have to drill, try to fit the bolt and nut, fail, then drill out more of the chassis, test fit, again...again...and unfortunately again.
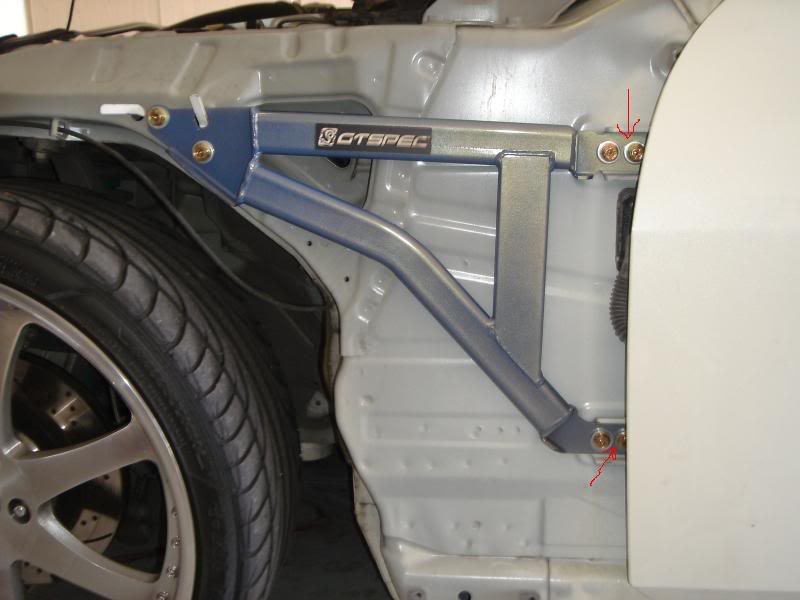
  You use the nut with attached angled bracket to go through the factory holes in the unibody on the far left (no red square), and top right. As you do that, you try to line it up to the bolt you are putting through the holes you drilled on the top left red square and bottom right. This was a very frustrating process, if you have a better drill or bits, it may be easier, I really don't know. It was just a lot of going back, drilling more and more metal out of the unibody chassis, and trying the bolt and nuts again. This is the step where I broke one of the supplied GT Spec bolts. Best of luck, don't forget the beer!
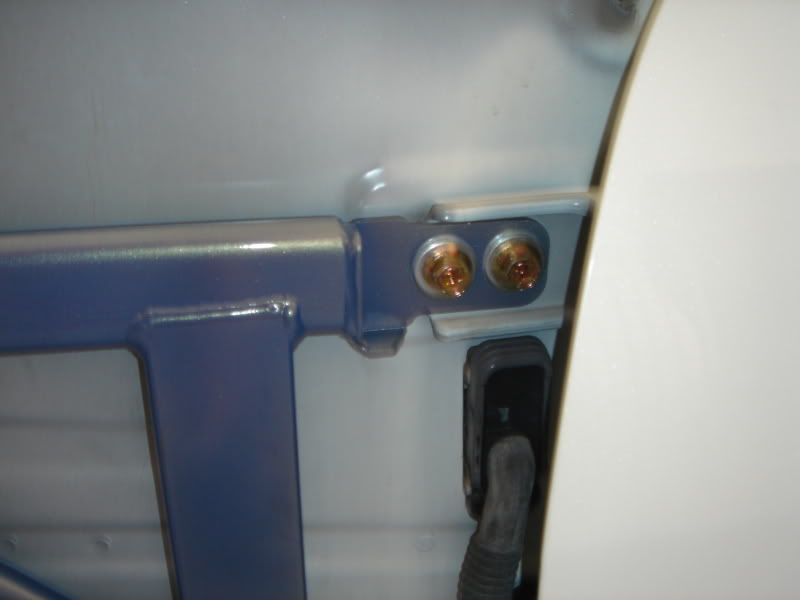
17.) Once you have completed step 16, your car should look like this:), which can make it sort of a pain to drill the hole that you need to get the bolt through. I have a Dewalt drill (shown in step 15) and luckily I had 2 batteries. I probably swapped batteries 10-15 times, at least, during the course of drilling these holes. An air compressor would have been AWWWESOME during this step. If you have one, I envy you. Lock your garage. You will basically have to drill, try to fit the bolt and nut, fail, then drill out more of the chassis, test fit, again...again...and unfortunately again. You use the nut with attached angled bracket to go through the factory holes in the unibody on the far left (no red square), and top right. As you do that, you try to line it up to the bolt you are putting through the holes you drilled on the top left red square and bottom right. This was a very frustrating process, if you have a better drill or bits, it may be easier, I really don't know. It was just a lot of going back, drilling more and more metal out of the unibody chassis, and trying the bolt and nuts again. This is the step where I broke one of the supplied GT Spec bolts. Best of luck, don't forget the beer! If it doesn't, you missed a step...
or you don't own a PPW. 18.) Reinstall the body panels in reverse order, duh. Steps 11 through 1.
Hopefully this is helpful. If you don't feel comfortable drilling into your chassis this may not be the mod for you. After I had the braces installed, I took a quick spin around the neighborhood, mostly obeying posted speed limits.
My car is still torn down, waiting for some parts, so I really haven't had a good opportunity to test these at highway speeds and mountain runs, but I will say that car felt more solid with these installed. Since all of the body panels are still removed, please let me know if you need pictures of anything else. I will update the thread once I have had more time with them and can give a better assessment. If you're like me, you'll enjoy tearing the car down as you get to know the car better with each piece you uninstall. This definitely wasn't the first time I've taken the front bumper off, but it was the first time I've taken off the fenders and side skirts. The Z looks pretty funny rolling down the road in torn down status...but thats what being a car guy is all about.


awesome write up........thanks...
subscribing to know how it feels...handles...etc..
anyone in the DFW area with these? or ordering these?? I would like to check them out before buying......just thought i would try...
-J
subscribing to know how it feels...handles...etc..
anyone in the DFW area with these? or ordering these?? I would like to check them out before buying......just thought i would try...
-J
No problem! It had been over a day... I've spent a good deal of time on here searching but I was starting to think this was old news or something. LOL
Hopefully I'll be able to provide you with an update regarding how the car handles after installing these in a week or so. The car did feel a lot more solid, but then again you can only tell so much driving around without a front bumper, diffuser, wheel liners, fenders, and side skirts. Just seemed a good deal more rigid...
For the time being I left my car torn down, if you guys want any additional pictures now is the time to request them! I was thinking I was going to take a picture of where each clip is on the side skirts. It would be possible to remove the fenders without taking the entire side skirt off (if you're OEM), but you'd have to pry the side skirt back quite a bit to be able to fit a socket in there, I didn't want to risk jacking up the paint or distorting the side skirt to install these.
Hopefully I'll be able to provide you with an update regarding how the car handles after installing these in a week or so. The car did feel a lot more solid, but then again you can only tell so much driving around without a front bumper, diffuser, wheel liners, fenders, and side skirts.
Just seemed a good deal more rigid... For the time being I left my car torn down, if you guys want any additional pictures now is the time to request them! I was thinking I was going to take a picture of where each clip is on the side skirts. It would be possible to remove the fenders without taking the entire side skirt off (if you're OEM), but you'd have to pry the side skirt back quite a bit to be able to fit a socket in there, I didn't want to risk jacking up the paint or distorting the side skirt to install these.

Registered User
Joined: Jun 2007
Posts: 239
Likes: 0
From: F/I
Good write up!
I did mine a few month ago and it did a great difference
But beware!!! the bolts are high headed and in my case they shaved of the paint on door front edge so I had to swap the provided bolts (have repainted the entire car since then).
those bolts
I did mine a few month ago and it did a great difference
But beware!!! the bolts are high headed and in my case they shaved of the paint on door front edge
so I had to swap the provided bolts (have repainted the entire car since then).those bolts
Trending Topics

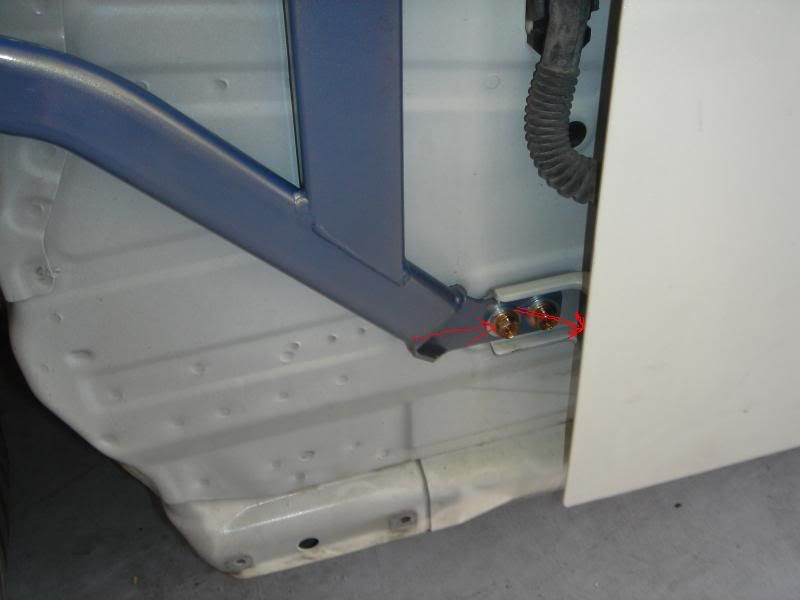
This pic gives a little bit of a better angle to show what I'm talking about:
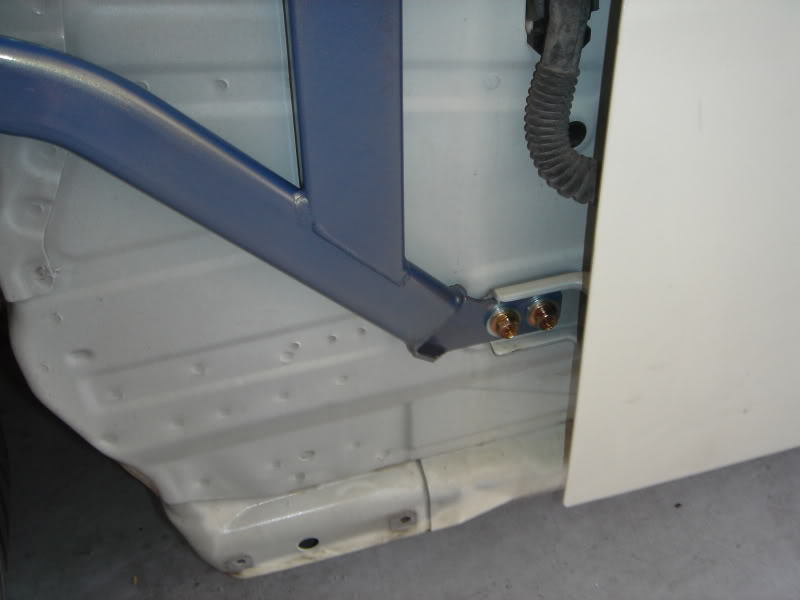
Just be careful with you're using the ratchet, it was definitely a close fit. I can take a better picture with the socket to show how close of a fit it was if needed, just make sure you're using the right tools for the job.
Last edited by Done Deal DR; Nov 12, 2008 at 01:03 PM.

Registered User
Joined: Jun 2007
Posts: 239
Likes: 0
From: F/I

Maybe some one else have an issue with some other bolt, but I guess not the upper ones. And again there's a really good write up you have done

^ I did mine after I had installed my Stillen sway bars and the rest of GTSPEC braces (got them all) and I did'nt think there was gona be any big difference, but it rellay was. It got much better steearing response and holds the line far better! I love those braces
edit: forgot the pic
Last edited by 350zzzgunnar; Nov 13, 2008 at 12:15 PM. Reason: forgot the pic
Mine did, but just on drivers side and the bottom one, not the upper one, mine misstake, sorry. And the paint shaved off where the right arrow is.
Maybe some one else have an issue with some other bolt, but I guess not the upper ones. And again there's a really good write up you have done
^ I did mine after I had installed my Stillen sway bars and the rest of GTSPEC braces (got them all) and I did'nt think there was gona be any big difference, but it rellay was. It got much better steearing response and holds the line far better! I love those braces
edit: forgot the pic
The only thing that should have come into contact with the door was your socket. I put mine in my hand and then torqued down with a socket. I guess the key is just having a very short socket.
I haven't done this mod yet, but from the looks of the pics, i think a "Go-through" socket set would be perfect for the tight area in question.
The go through ratchet shown in this harbor freight link is even curved so that is a nice feature too.
but most importantly this type of go-through ratchet has a set of go through sockets with the same size hex on them, SO you dont have the added HEIGHT of a typical 3/8 drive square.
should fit in there no problem!
http://www.harborfreight.com/cpi/cta...emnumber=93150
HARBOR FREIGHT:
ITEM 93150-5VGA
$29.99
-J

I agree (although it feels like I very rarely have the RIGHT tools)! This job really hardly required anything, easy install and definitely worth it from a handling perspective. I hate my coilovers so I'm trying to do what I can to hold me over until I can afford to upgrade.
Just noticed your mod tag, congrats man!
Just noticed your mod tag, congrats man!

The car is feeling good! I can still only really describe it as "feeling more solid", but for the price I'd definitely recommend these fender braces. I'm going to be installing the front and rear tie bars, hopefully this weekend, so we'll see if that improves it even more.