
Faceplate to hide my Avic D3 using the OEM stereo...

Thread Starter
Registered User
iTrader: (1)
Joined: May 2008
Posts: 1,174
Likes: 1
From: Toronto, Ontario (Woodbridge)
I saw in another thread a guy who took his Bose stereo apart, glued in the buttons and used it to hide his aftermarket radio from prying eyes...
I have an Avic D3 and would hate to have some punk try and steal my stereo only to smash out my glass and butcher my dash board up and still not get it out. So here is my solution. Any questions feel free to ask. Text is above the picture it relates to.
Obviously anybody really well versed in 350Zs will not be fooled as the radio sticks out more than OEM. I am only trying to fool the punk who's looking for a radio to steel cause he doesn't have a job. This was the best way I could come up with. If anybody else does this and improves on this, please post it up for everybody else.
Its just press fit which is why the bottom lip is kept. The lip on the bottom presses in between the OEM plastic and the Metra install kit. That's all that is needed to hold it on there firmly. There is some give on the metra surround kit so it slides in easily and firmly and hold there quite nicely. Just a light press at the bottom it sorta clicks in and is stuck there.
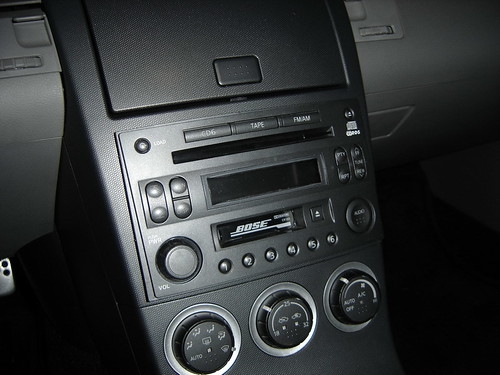
Original bose radio. Take the face plate off, it just pops off.
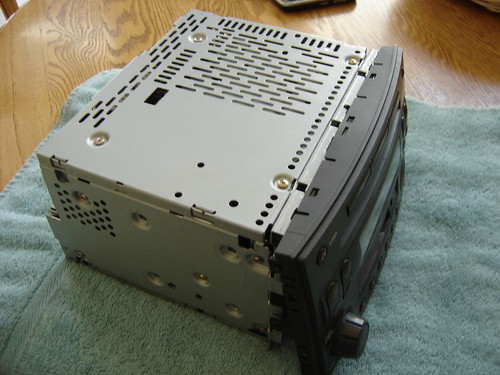
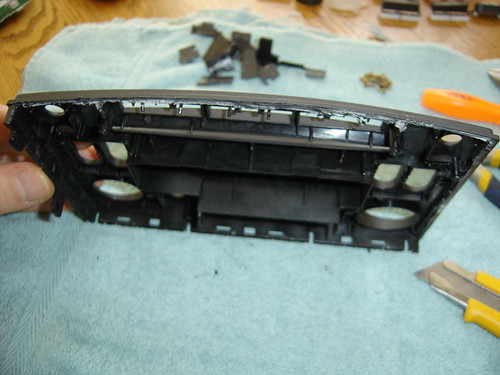
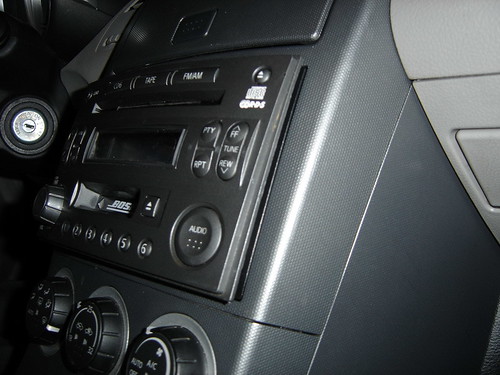
Here it is popped off.
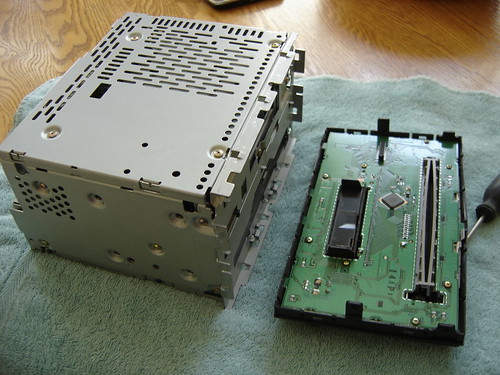
Remove the screws and take the circuit board off.

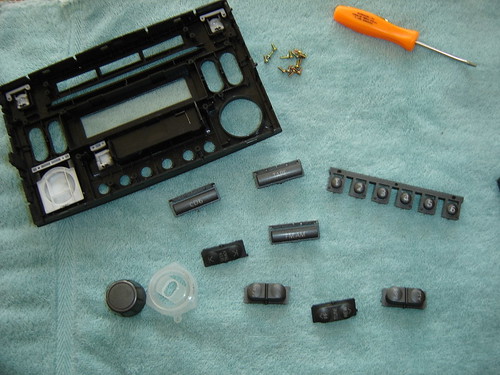
Pull out the white plastic piece that holds the buttons in and pop out all the buttons.
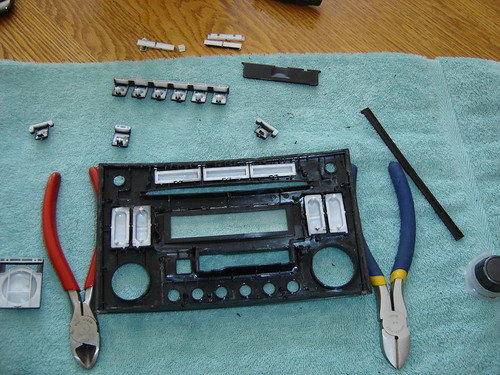
I used side cutters and pliers. I cut the lip around in sections and the pliers to bend it back and forth to break it off. I also used a knife and ran it around the outside to create a state point for the plastic lip to break off the outside. Do not break off the lip from the bottom, just the sides and top.
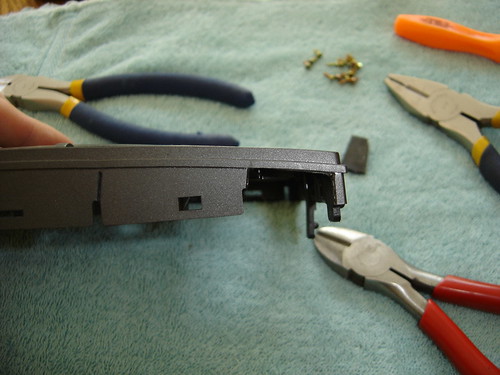
Here you can see the sides and top cut off.
Now start cutting out all the plastic in the middle right down to the tape player opening. This is what will allow it to stay flush(ish) to your dash. The tape slot had a two tier plastic surround on it. I broke away the taller one and left the short piece as you see in this pic. After it was all broken away I used my dremel to smooth out the rough edges so it wouldn't accidentally scratch my Avic D3.

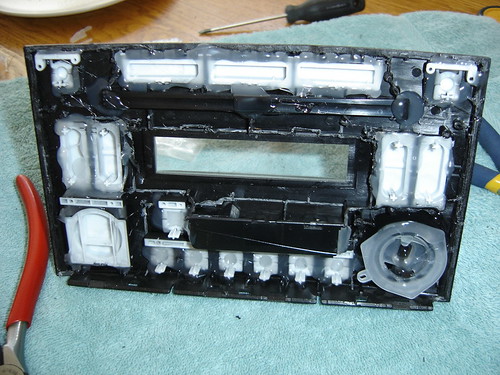
I cut away a lot of plastic to get it really flat.

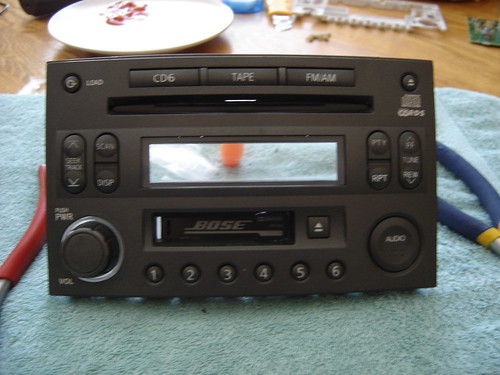
Front of the face plate looks totally normal, except no buttons

As you can see all the plastic is cut away except for the lower part of the tape slot and the lip on the bottom. The flatter this is, the better it will sit in your car. You don't need to go crazier than this however.

I propped up the face using the two sets of side cutters so the buttons would drop in and not sit on the towel while I hot glued them into position. Put all the buttons back in now except the volume ****, it's last. Make sure you put the buttons back in the correct spots. Some of them are angled so they follow the curve of the face plate, get it wrong and they will look funny. You will need to trim a few of the buttons to make them flat. I had to cut away some plastic on the top three.
Warm up the glue gun baby! If you don't own one, buy one they rock.

Blob the glue all over the backs of the buttons. The glue is too thick to run out the front so don't worry about how much you put on. Once it dries they are stuck in there.

OK now the volume **** last. There was a clear plastic thing around the volume **** originally. You will need to first glue the volume **** into the clear surround then the whole unit into the hole as you see on the bottom right of this pic. I also guled on the Tape and CD slot covers.
Here is how the front should look now with everything glued in.
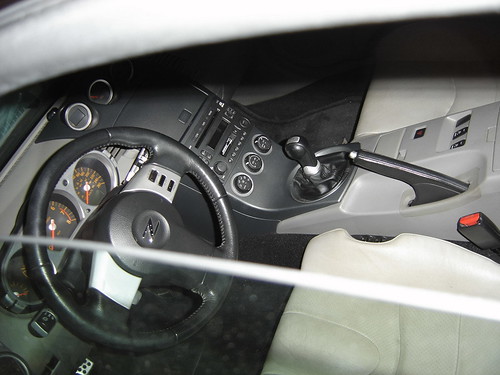
Ok here is the final product:
BEFORE:

AFTER:
SIDE: You can see from this extreme angle that its not perfectly flat but anybody casually looking inside will never see this.
OUTSIDE:
I have an Avic D3 and would hate to have some punk try and steal my stereo only to smash out my glass and butcher my dash board up and still not get it out. So here is my solution. Any questions feel free to ask. Text is above the picture it relates to.
Obviously anybody really well versed in 350Zs will not be fooled as the radio sticks out more than OEM. I am only trying to fool the punk who's looking for a radio to steel cause he doesn't have a job. This was the best way I could come up with. If anybody else does this and improves on this, please post it up for everybody else.
Its just press fit which is why the bottom lip is kept. The lip on the bottom presses in between the OEM plastic and the Metra install kit. That's all that is needed to hold it on there firmly. There is some give on the metra surround kit so it slides in easily and firmly and hold there quite nicely. Just a light press at the bottom it sorta clicks in and is stuck there.
Original bose radio. Take the face plate off, it just pops off.
Here it is popped off.
Remove the screws and take the circuit board off.
Pull out the white plastic piece that holds the buttons in and pop out all the buttons.
I used side cutters and pliers. I cut the lip around in sections and the pliers to bend it back and forth to break it off. I also used a knife and ran it around the outside to create a state point for the plastic lip to break off the outside. Do not break off the lip from the bottom, just the sides and top.
Here you can see the sides and top cut off.
Now start cutting out all the plastic in the middle right down to the tape player opening. This is what will allow it to stay flush(ish) to your dash. The tape slot had a two tier plastic surround on it. I broke away the taller one and left the short piece as you see in this pic. After it was all broken away I used my dremel to smooth out the rough edges so it wouldn't accidentally scratch my Avic D3.
I cut away a lot of plastic to get it really flat.
Front of the face plate looks totally normal, except no buttons
As you can see all the plastic is cut away except for the lower part of the tape slot and the lip on the bottom. The flatter this is, the better it will sit in your car. You don't need to go crazier than this however.
I propped up the face using the two sets of side cutters so the buttons would drop in and not sit on the towel while I hot glued them into position. Put all the buttons back in now except the volume ****, it's last. Make sure you put the buttons back in the correct spots. Some of them are angled so they follow the curve of the face plate, get it wrong and they will look funny. You will need to trim a few of the buttons to make them flat. I had to cut away some plastic on the top three.
Warm up the glue gun baby! If you don't own one, buy one they rock.
Blob the glue all over the backs of the buttons. The glue is too thick to run out the front so don't worry about how much you put on. Once it dries they are stuck in there.
OK now the volume **** last. There was a clear plastic thing around the volume **** originally. You will need to first glue the volume **** into the clear surround then the whole unit into the hole as you see on the bottom right of this pic. I also guled on the Tape and CD slot covers.
Here is how the front should look now with everything glued in.
Ok here is the final product:
BEFORE:
AFTER:
SIDE: You can see from this extreme angle that its not perfectly flat but anybody casually looking inside will never see this.
OUTSIDE:
Last edited by 350z-Jim; Mar 14, 2009 at 08:11 AM.


Thread Starter
Registered User
iTrader: (1)
Joined: May 2008
Posts: 1,174
Likes: 1
From: Toronto, Ontario (Woodbridge)
Haha. Honestly its really easy, that step by step will guide you. It was just a few screws and breaking apart the plastic on the back. It took me about 2 hours start to finish, though I could do it in an hour now after having done it once.
Last edited by 350z-Jim; Mar 14, 2009 at 08:58 AM.

Me too!
I'm thinking of cutting the stereo brackets to recess the HU so the faceplace completely recesses. I used a Dremel and got a little out of control at times, causing a few gouges. HU pops out a little so I can grab the faceplate.
I also put washer between the HU brackets and the center console so the Metra kit recesses slightly.
How is your held on? I put magnets in the Metra frame and in the faceplate.
Last edited by TreeFiddyZee; Mar 14, 2009 at 09:47 AM.
Trending Topics

Thread Starter
Registered User
iTrader: (1)
Joined: May 2008
Posts: 1,174
Likes: 1
From: Toronto, Ontario (Woodbridge)
Me too!
I'm thinking of cutting the stereo brackets to recess the HU so the faceplace completely recesses. I used a Dremel and got a little out of control at times, causing a few gouges. HU pops out a little so I can grab the faceplate.
I also put washer between the HU brackets and the center console so the Metra kit recesses slightly.
How is your held on? I put magnets in the Metra frame and in the faceplate.[/IMG]
That lip squeezes between the center console and the metra kit and snugly holds it sitting right there.


Thread Starter
Registered User
iTrader: (1)
Joined: May 2008
Posts: 1,174
Likes: 1
From: Toronto, Ontario (Woodbridge)
That must be your girlfriend in your avatar then if she's Canadian. That's pretty standard issue for how Canadian women look. You should see my wife... 
I just have the bose system never changed out the sub. Why dont you mount ur sub in the OE sub location and not worry about it?
I just have the bose system never changed out the sub. Why dont you mount ur sub in the OE sub location and not worry about it?
Last edited by 350z-Jim; Mar 14, 2009 at 12:14 PM.


Registered User
Joined: Jan 2009
Posts: 350
Likes: 0
From: New Orleans
Someone was asking about where to put the faceplate when it isnt in use (covering the aftermarket unit). You can stick it behind the passenger seat in the little netting back there, or even just slide it behind the seat. It should be slim enough to fit.
As I am typing this, I realize that will only work with the roadster, which I have. In the case of a coupe, just stick it in the back somewhere? Or get a few sitcky magnets, and stick it on one of the back panels in the back area.
As I am typing this, I realize that will only work with the roadster, which I have. In the case of a coupe, just stick it in the back somewhere? Or get a few sitcky magnets, and stick it on one of the back panels in the back area.
I've still got my whole unit intact so I can easily put back to stock.

Thread Starter
Registered User
iTrader: (1)
Joined: May 2008
Posts: 1,174
Likes: 1
From: Toronto, Ontario (Woodbridge)
The radios are on ebay and in the market place all the time, buy one and butcher it up. I think just shipping the face plate would be a good idea, much cheaper and thats all you really need. I have seen radios on ebay super cheap. I was just going to throw mine out since it was dropping the right channel all the time (which is why I put in the Avic) but decided to have fun butchering it instead.
Here is one for $9.99 (cd player not working)
http://cgi.ebay.com/ebaymotors/NISSA...fAudioQ5fVideo
That would be perfect for somebody.
Here is one for $9.99 (cd player not working)
http://cgi.ebay.com/ebaymotors/NISSA...fAudioQ5fVideo
That would be perfect for somebody.
Last edited by 350z-Jim; Mar 16, 2009 at 04:32 AM.