
Audio Installation - Full BOSE replacement


Hey guys,
A few weeks back, after much deliberation and research, I decided to squeeze the trigger on something I've wanted to do since my teenage days behind the wheel of an '87 Chevy Celebrity. I decided that I was going to build myself a full-blown car stereo system. No more swapping out head units, no more throwing whatever random pair of 2-ways I picked up on sale at Best Buy into the doors, but an honest to god, down to the guts, new stereo system. Personal aspirations for audio heaven aside, the Z's practically begging for it. The BOSE system is just... criminally negligent. (More on that later.)
I had a few specific goals for what will be the first true audio installation I've ever done:
-) I'm nearly finished building a PC for the car. I wanted the system I installed to compliment it, not compete or overlap capabilities, IE: The car stereo would drive the sound, the Bluetooth phone & A2DP, and music CD's.
-) The head unit I picked needed to have front and rear USB ports, a 3.5mm aux jack, Bluetooth w/ A2DP, some sort of EQ, and simplistic execution. Enter the JVC Arsenal KD-A925BT, with a Burr-Brown DAC and the ability to pair two Bluetooth devices at once. Done.
-) The Z is what it is, a purpose bred sports car. That said, being able to have a conversation at 65+ on I-5 should still be feasible, so sound dampening material was going into the car. A lot of it.
-) I wanted good, tight, punch-you-in-the-heart bass, but wasn't interested in boominess.
I realized that all of the forum cruising, the reviews read, and ratings compared in the world weren't going to suffice for hearing it for myself, so I set out to build something expandable for when later on down the road, I'd know which directions to take. For simplicity's sake I bought myself a 600w 5-channel amplifier, knowing full well that although it would do the job well enough, I would still only be pushing about half the rated RMS to the corners and perhaps two thirds to the subwoofer. I know that eventually I'll be investigating separate amps with more appropriate power curves. In the meantime though, I think I've aimed for the middle of the road, and if luck is on my side, that's where I'll land.
So without further ado, the parts:
(Head unit not pictured)

Head unit: JVC Arsenal KD-A925BT
Front stage: Alpine SPR-60C
Rear stage: Alpine SRS-600
Subwoofer: JL Audio 10w3v3-4
Amplifier: Rockford Fosgate R600-5
Enclosure: 10" stealth box from Zenclosures
Wiring: Cadence Wk42 for power, Monoprice's oxygen free 12ga for sound
Sound dampening: Fatmat & Dynamat
And miscellaneous parts from the 'shack, hardware stores, etc...
I just started laying the Fatmat last night, and I can already tell that this is going to take a while.
More of my car than I've ever seen before.

Gutted! There was an undeniable degree of pleasure taken from pulling the BOSE components out.

My car pile.

Clean and ready for sticking!

Good lord, this stuff takes forever!

***Update 08/20***
Nine hours later, and my trunk looks like a trendy baked potato


***Update 09/05***
Alrighty, back from Las Vegas (ever been? GO!) with a three day weekend ahead of me. I spent the first day finishing Deus Ex (41 hours!!), and spent the next day and a half doing the rest of the passenger side. For those who've had their asses whipped by the labor intensive, multi-angle, multi-cut, multi-shape, multi-hole-avoiding nightmare that was the trunk, if you're feeling your motivation slip, soldier onward. The cabin area is nothing but big flat spaces, and more often that not I was laying down long full-width strips of fatmat. Easy as pie. Almost felt like I knew what I was doing for a few minutes.


No real point in this picture other than to prove that if my forum reading, zero experience, peel-and-stickin' self can do it, so can you. Side note: before replacing the carpet I made sure to run a good sized length of 12ga wire for the passenger speaker. It's long enough to route through the factory harness and back to wherever the amp might finally end up, and then some for good measure.

***Update 09/11***
Alright, big weekend. I finished the Fatmat installation. 100 square feet now reside in my car! I skipped the pics of the driver's side, because it's the exact same as the passenger side, it's just got a steering wheel in the way. Lots of fun to have that thing jammed up your backside, trust me...
Today's task was wiring! I pulled the passenger seat back out and resolved to leave things disassembled until the project was done. I was getting way too burnt on reassembling the car for Monday morning's commute, and opted to just borrow one instead. Pics below of the front speaker wiring, but I also ran the rears, the power, the ground, the remote, and reassembled the trunk. I'll snap some pics of the power run, 'cause that's another thing I've found lacking in the posts regarding audio installs: how/where the hell do you do it?


The car pile is no more!

*** Update 9/18 ***
Done! I skipped taking pics of a whole bunch of fitting, sanding, fitting, sanding, more fitting, more sanding, and then finally painting the door pods. Not much to say there. Get them, figure them out, get 'em mounted. I could've taken pictures of the mounting process, but suffice to say that there were clamps, drills, nuts, and bolts involved. As always, go slow and take your time.


The subwoofer and amp rack were largely the same. Fit, mount, drill, route cables, splice cables, connect cables, say a prayer, and reconnect the battery. Blam, done.


I'm not a fan of how the door pods turned out. They're in dire need of sanding, and my attention to detail lapsed. The paint doesn't match the interior at all either, so something will need to be done about them at some point. For now though, I'm taking a good long break from mucking around with the insidey parts of my car. I think I've sunk an honest 50-60 hours into this project, 30 alone of which were spent on Fatmat, and I just can't muster any enthusiasm for pulling the pods back off.
On the bright side, the system sounds effing amazing. Clarity and detail has reached a new benchmark, and the volume can reach potentially hazardous levels. After dialing in the gain levels on everything, I cranked Links 2, 3, 4 to just shy of distortion and couldn't remotely hear the sound of my own gleeful cackling. Sound-wise, totally and completely satisfied. I do know that I'll be spending the next few weeks chasing down vibrations (gotta go find that metal plate on the passenger side that zakmartin was talking about!) and getting things dialed in to the way I like them. The hatch definitely needs some dampening, and I'll start thinking about the ceiling too. The bass is tricky... I get it set just right for one particular style of music, and then the odd track comes on and the booming just gets outright oppressive. Thump me good, but rattling my entire body for three and a half minutes gets old fast. Too much fun, though! Thanks to zakmartin for all of the tips and support!
Next up: Alarm system & tinting!
A few weeks back, after much deliberation and research, I decided to squeeze the trigger on something I've wanted to do since my teenage days behind the wheel of an '87 Chevy Celebrity. I decided that I was going to build myself a full-blown car stereo system. No more swapping out head units, no more throwing whatever random pair of 2-ways I picked up on sale at Best Buy into the doors, but an honest to god, down to the guts, new stereo system. Personal aspirations for audio heaven aside, the Z's practically begging for it. The BOSE system is just... criminally negligent. (More on that later.)
I had a few specific goals for what will be the first true audio installation I've ever done:
-) I'm nearly finished building a PC for the car. I wanted the system I installed to compliment it, not compete or overlap capabilities, IE: The car stereo would drive the sound, the Bluetooth phone & A2DP, and music CD's.
-) The head unit I picked needed to have front and rear USB ports, a 3.5mm aux jack, Bluetooth w/ A2DP, some sort of EQ, and simplistic execution. Enter the JVC Arsenal KD-A925BT, with a Burr-Brown DAC and the ability to pair two Bluetooth devices at once. Done.
-) The Z is what it is, a purpose bred sports car. That said, being able to have a conversation at 65+ on I-5 should still be feasible, so sound dampening material was going into the car. A lot of it.
-) I wanted good, tight, punch-you-in-the-heart bass, but wasn't interested in boominess.
I realized that all of the forum cruising, the reviews read, and ratings compared in the world weren't going to suffice for hearing it for myself, so I set out to build something expandable for when later on down the road, I'd know which directions to take. For simplicity's sake I bought myself a 600w 5-channel amplifier, knowing full well that although it would do the job well enough, I would still only be pushing about half the rated RMS to the corners and perhaps two thirds to the subwoofer. I know that eventually I'll be investigating separate amps with more appropriate power curves. In the meantime though, I think I've aimed for the middle of the road, and if luck is on my side, that's where I'll land.
So without further ado, the parts:
(Head unit not pictured)
Head unit: JVC Arsenal KD-A925BT
Front stage: Alpine SPR-60C
Rear stage: Alpine SRS-600
Subwoofer: JL Audio 10w3v3-4
Amplifier: Rockford Fosgate R600-5
Enclosure: 10" stealth box from Zenclosures
Wiring: Cadence Wk42 for power, Monoprice's oxygen free 12ga for sound
Sound dampening: Fatmat & Dynamat
And miscellaneous parts from the 'shack, hardware stores, etc...
I just started laying the Fatmat last night, and I can already tell that this is going to take a while.
More of my car than I've ever seen before.
Gutted! There was an undeniable degree of pleasure taken from pulling the BOSE components out.
My car pile.
Clean and ready for sticking!
Good lord, this stuff takes forever!
***Update 08/20***
Nine hours later, and my trunk looks like a trendy baked potato
***Update 09/05***
Alrighty, back from Las Vegas (ever been? GO!) with a three day weekend ahead of me. I spent the first day finishing Deus Ex (41 hours!!), and spent the next day and a half doing the rest of the passenger side. For those who've had their asses whipped by the labor intensive, multi-angle, multi-cut, multi-shape, multi-hole-avoiding nightmare that was the trunk, if you're feeling your motivation slip, soldier onward. The cabin area is nothing but big flat spaces, and more often that not I was laying down long full-width strips of fatmat. Easy as pie. Almost felt like I knew what I was doing for a few minutes.
No real point in this picture other than to prove that if my forum reading, zero experience, peel-and-stickin' self can do it, so can you. Side note: before replacing the carpet I made sure to run a good sized length of 12ga wire for the passenger speaker. It's long enough to route through the factory harness and back to wherever the amp might finally end up, and then some for good measure.
***Update 09/11***
Alright, big weekend. I finished the Fatmat installation. 100 square feet now reside in my car! I skipped the pics of the driver's side, because it's the exact same as the passenger side, it's just got a steering wheel in the way. Lots of fun to have that thing jammed up your backside, trust me...
Today's task was wiring! I pulled the passenger seat back out and resolved to leave things disassembled until the project was done. I was getting way too burnt on reassembling the car for Monday morning's commute, and opted to just borrow one instead. Pics below of the front speaker wiring, but I also ran the rears, the power, the ground, the remote, and reassembled the trunk. I'll snap some pics of the power run, 'cause that's another thing I've found lacking in the posts regarding audio installs: how/where the hell do you do it?
The car pile is no more!
*** Update 9/18 ***
Done! I skipped taking pics of a whole bunch of fitting, sanding, fitting, sanding, more fitting, more sanding, and then finally painting the door pods. Not much to say there. Get them, figure them out, get 'em mounted. I could've taken pictures of the mounting process, but suffice to say that there were clamps, drills, nuts, and bolts involved. As always, go slow and take your time.
The subwoofer and amp rack were largely the same. Fit, mount, drill, route cables, splice cables, connect cables, say a prayer, and reconnect the battery. Blam, done.
I'm not a fan of how the door pods turned out. They're in dire need of sanding, and my attention to detail lapsed. The paint doesn't match the interior at all either, so something will need to be done about them at some point. For now though, I'm taking a good long break from mucking around with the insidey parts of my car. I think I've sunk an honest 50-60 hours into this project, 30 alone of which were spent on Fatmat, and I just can't muster any enthusiasm for pulling the pods back off.
On the bright side, the system sounds effing amazing. Clarity and detail has reached a new benchmark, and the volume can reach potentially hazardous levels. After dialing in the gain levels on everything, I cranked Links 2, 3, 4 to just shy of distortion and couldn't remotely hear the sound of my own gleeful cackling. Sound-wise, totally and completely satisfied. I do know that I'll be spending the next few weeks chasing down vibrations (gotta go find that metal plate on the passenger side that zakmartin was talking about!) and getting things dialed in to the way I like them. The hatch definitely needs some dampening, and I'll start thinking about the ceiling too. The bass is tricky... I get it set just right for one particular style of music, and then the odd track comes on and the booming just gets outright oppressive. Thump me good, but rattling my entire body for three and a half minutes gets old fast. Too much fun, though! Thanks to zakmartin for all of the tips and support!
Next up: Alarm system & tinting!
Last edited by jjaujou; Sep 18, 2011 at 11:54 PM.
I just wanted to take this moment to do like so many others have before me, and condemn the Bose system in the 350Z. For those willing to pull some panels and spend a couple of bucks to witness the dawning of a new age in the audio performance of their Z, I submit the following:
This:

Plus a new head unit. That's it.
So here's the story.
About two weeks ago I got excited about the multiple Amazon packages with labels like Alpine and JL Audio that were headed my way and decided that a little prep work ahead of time would be worth its weight in gold when the funsies arrived, so I stripped the *** end of the car bare. There's a pile of car in my living room, it's ridiculous. Fast forward a week, and I'm getting fidgety again. I found the JVC deck at Car Toys for a good price, surprisingly enough. Apparently decks are one of the few things that they make no money on, hence the uncharacteristically sane toll on my wallet. I decided to install said deck into the car, knowing full well I'd be back behind the panels again soon enough, but really just wanting to play with something new. The thought of streaming music over Bluetooth and ditching the tape adapter was enticing. I installed the deck with wiring harness and DIN kits from Metra, yanked the BOSE amplifier out of the trunk, clipped it, and ran bypasses back to the only remaining speakers in the car, the fronts. I turned they key, and ooh, lights! Neato colors! I loaded a CD, something I hadn't done in at least two years since the BOSE deck steadfastly refused to play a disc without skipping like a preschooler who found the sugar, and waited.
To say that the heavens parted and delivered audio to my ears upon golden rays of light might be stretching the truth a bit. It might have been upon rainbows spewing from the mouth of a unicorn. I can't be sure, because I was so overcome by the rapturous honey emanating from the pitiful stock BOSE front speakers that sensory memory for my sight and smell are hazy. I remember tasting purple. Did I have a stroke? Maybe I had a stroke. Blue October gave me a stroke.
I haven't bothered reinstalling the rears and splicing them in. The more studious among you might realize that should the average Joe or Jane attempt this fix for themselves, they would in the process disable the signals being sent to the subwoofer amp. You won't miss it. The richness of the mids and the shocking amounts of bass coming from the fronts alone simply dwarf the pitiful performance ever displayed by the subwoofer. Scout's honor. You won't miss the sub.
Have a schematic.
This:
Plus a new head unit. That's it.
So here's the story.
About two weeks ago I got excited about the multiple Amazon packages with labels like Alpine and JL Audio that were headed my way and decided that a little prep work ahead of time would be worth its weight in gold when the funsies arrived, so I stripped the *** end of the car bare. There's a pile of car in my living room, it's ridiculous. Fast forward a week, and I'm getting fidgety again. I found the JVC deck at Car Toys for a good price, surprisingly enough. Apparently decks are one of the few things that they make no money on, hence the uncharacteristically sane toll on my wallet. I decided to install said deck into the car, knowing full well I'd be back behind the panels again soon enough, but really just wanting to play with something new. The thought of streaming music over Bluetooth and ditching the tape adapter was enticing. I installed the deck with wiring harness and DIN kits from Metra, yanked the BOSE amplifier out of the trunk, clipped it, and ran bypasses back to the only remaining speakers in the car, the fronts. I turned they key, and ooh, lights! Neato colors! I loaded a CD, something I hadn't done in at least two years since the BOSE deck steadfastly refused to play a disc without skipping like a preschooler who found the sugar, and waited.
To say that the heavens parted and delivered audio to my ears upon golden rays of light might be stretching the truth a bit. It might have been upon rainbows spewing from the mouth of a unicorn. I can't be sure, because I was so overcome by the rapturous honey emanating from the pitiful stock BOSE front speakers that sensory memory for my sight and smell are hazy. I remember tasting purple. Did I have a stroke? Maybe I had a stroke. Blue October gave me a stroke.
I haven't bothered reinstalling the rears and splicing them in. The more studious among you might realize that should the average Joe or Jane attempt this fix for themselves, they would in the process disable the signals being sent to the subwoofer amp. You won't miss it. The richness of the mids and the shocking amounts of bass coming from the fronts alone simply dwarf the pitiful performance ever displayed by the subwoofer. Scout's honor. You won't miss the sub.
Have a schematic.
Last edited by jjaujou; Jan 10, 2014 at 12:37 PM.
** Wiring the front speakers through the door **
Alright, so I know that this topic has been covered in a few posts already, but I wanted to share a few tips I figured out today. These are pics of the driver's side door, which at first glance looked like it was going to be a nightmare compared to the passenger side just because of space constraints, but in reality it went just as quickly.
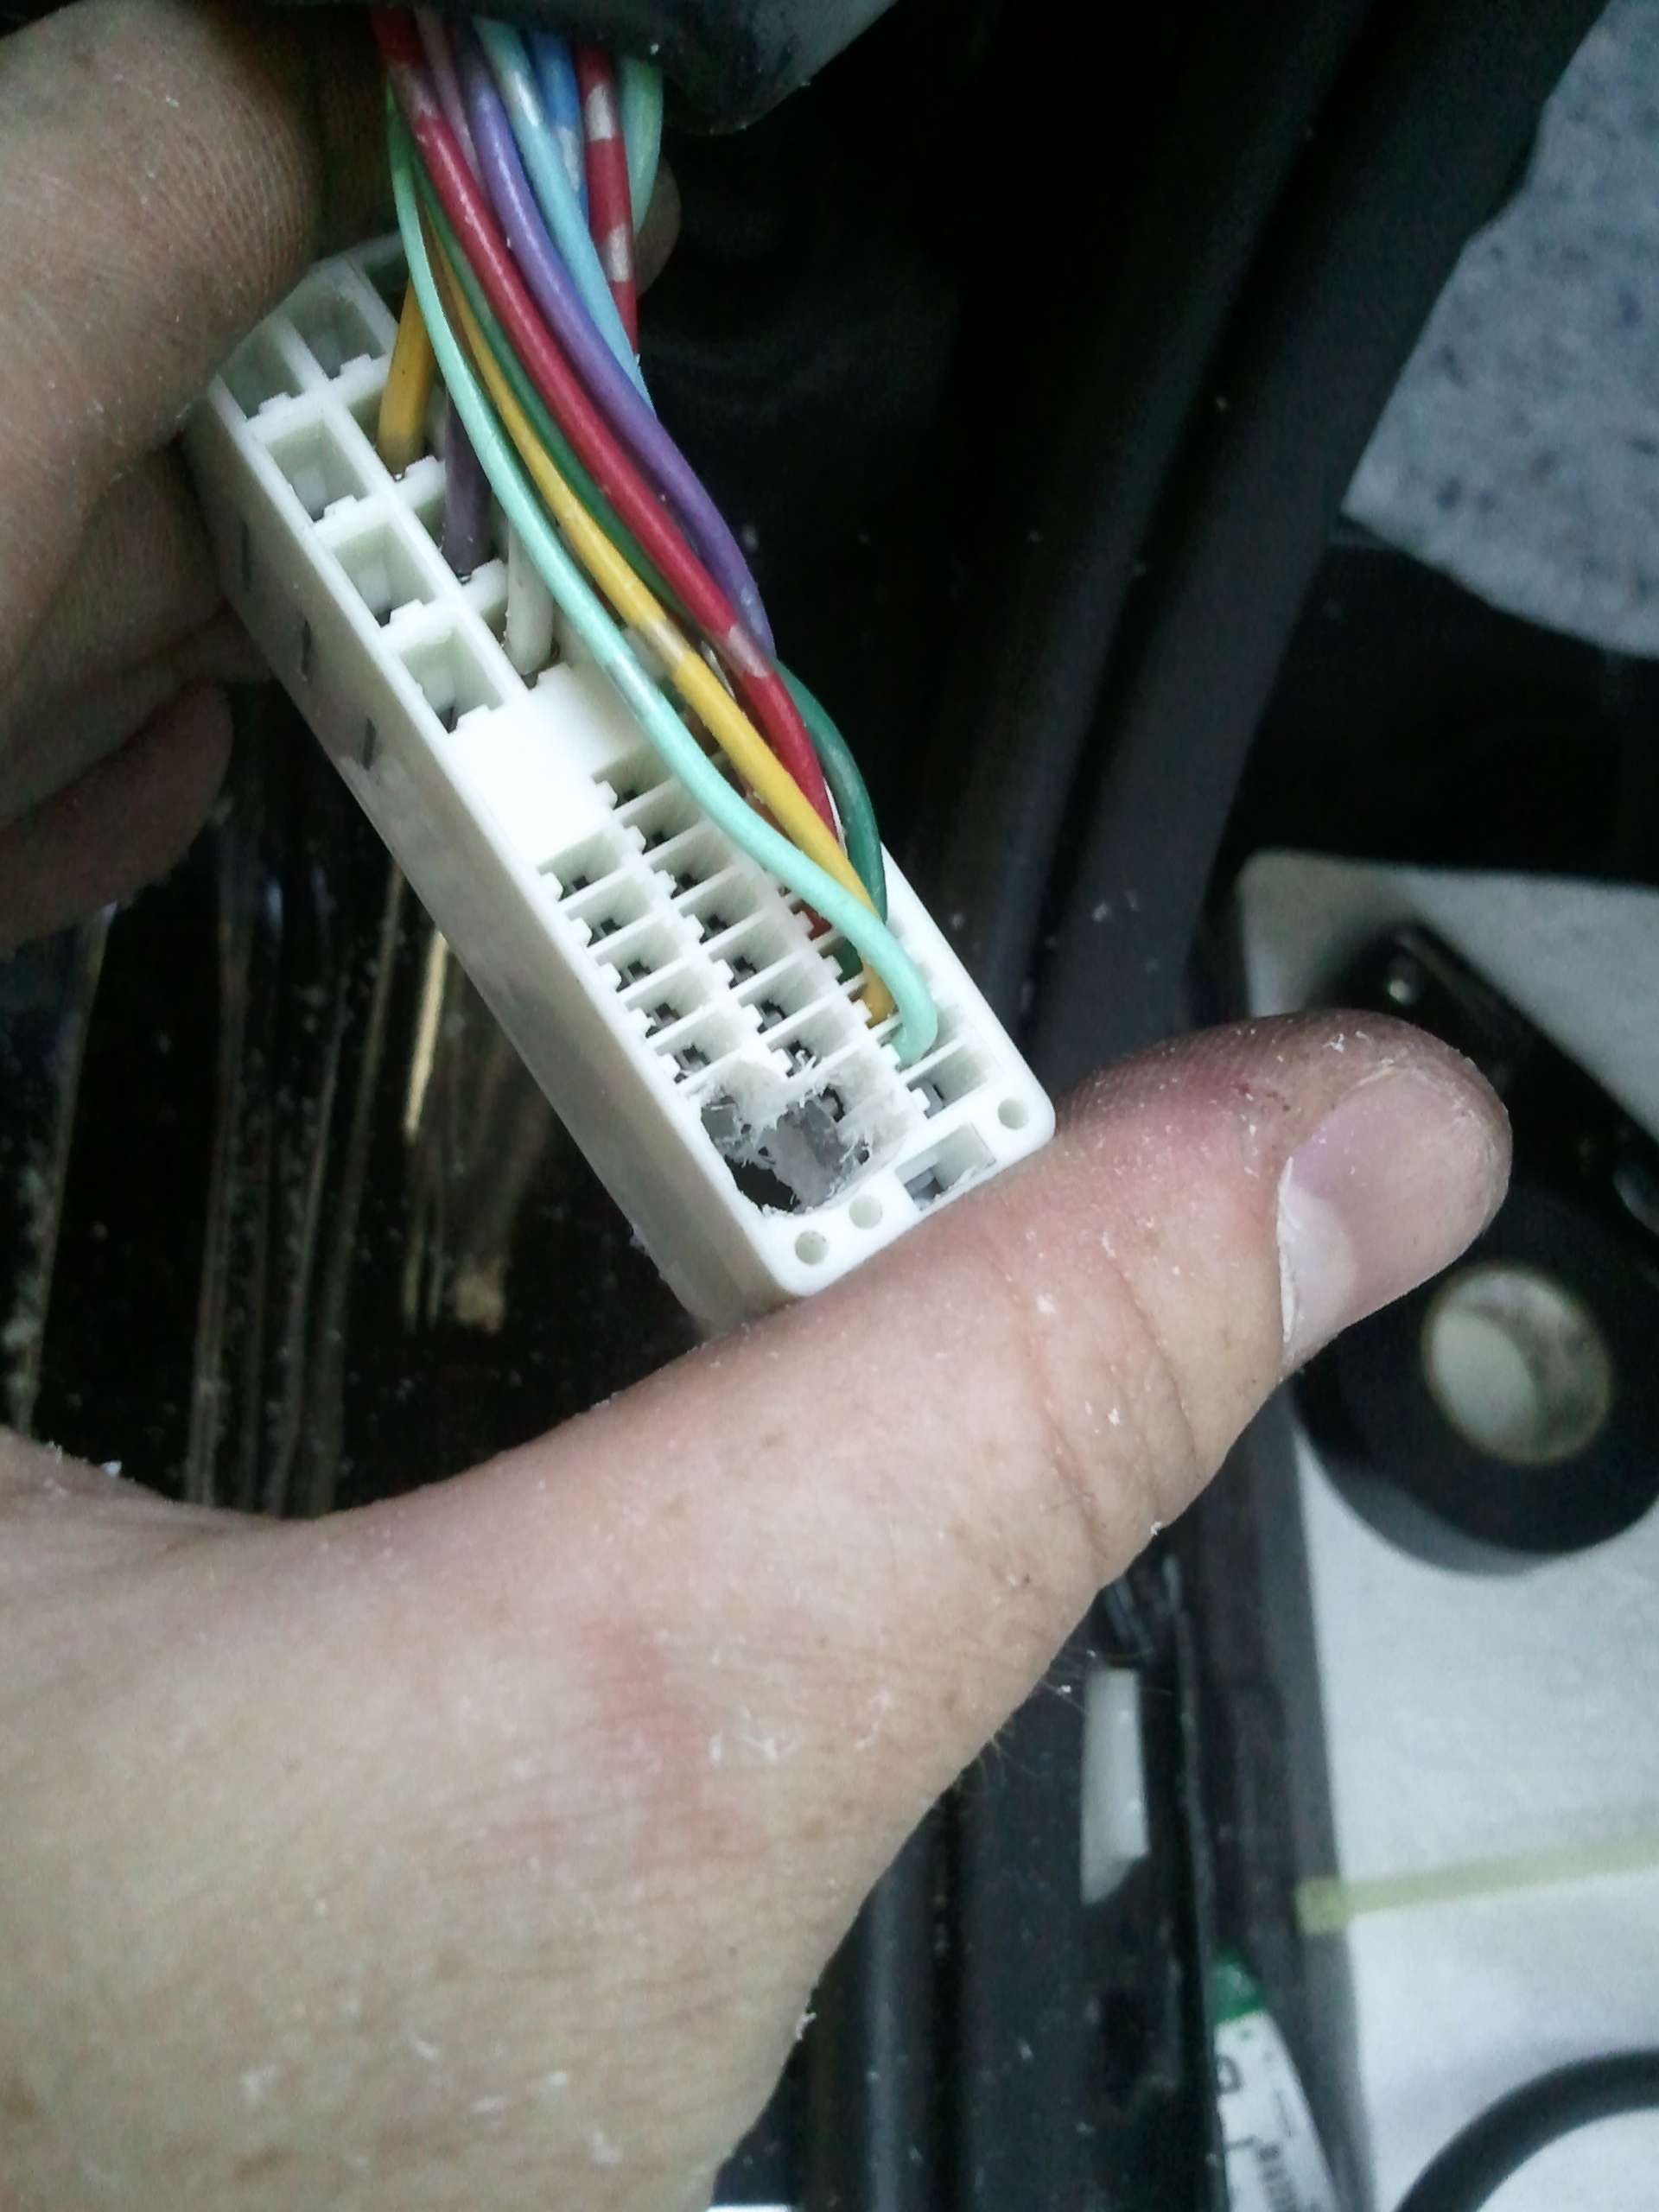
Observe. The wily and elusive harness connector in its natural habitat.

Use a screwdriver to get the latch started.


Open? Not so! The latch travels all the way to the bottom. My fingertips wish I'd figured that out sooner.

A screwdriver might help you get the plug wiggled out. It's a deep connector, be warned. It also helps to close the door slightly!

Pay attention here when removing/replacing the interior side of the connector: The metal clip goes on the bottom.


Time to disassemble this bad boy. Don't want to drill blindly into the connector, do we?
Note the pronged release tab at the bottom. Pinch that to free the clasp so it swivels freely, allowing you to line up the tab/slot on the rocker pivot and remove the clasp.

Take a screwdriver and push in that tab to release the top of the clip.


Here we go, exposed and with the rubber sheath folded back.


Meet your new best friend, Excalib..err, a Dremel tool + snake attachment + cutter bit. Plug pwnage.
Others have had success with soldering irons, exacto knives, etc.. The key here is to go. freaking. slow. Check, recheck, and check again.
The plugs only mate together one way, so pay attention to the "L" shape center post in relation to the pin orientation, and make your cuts.


Alright, so assuming you aren't shedding tears on the hunk of plastic that used to make your windows work, it's time to thread the wire. Start logically, through the back of the interior plug and out of the car. Reconnect the interior piece to the doorjamb, thread some slack wire through, etc.
Here's my solution to running the wire through the rubber sheath. Long zip tie + electrical tape. The zip tie threads effortlessly through the rubber sheath, so run it through, tape your wire to the end, and pull it back. Bam, done in five minutes. Pull it all back together, slowly, carefully, making sure you don't have twists in your cable where the two connectors meet. Done.

It goes pretty smoothly, just take your time and think it through. Get used to the view, too.

Alright, so I know that this topic has been covered in a few posts already, but I wanted to share a few tips I figured out today. These are pics of the driver's side door, which at first glance looked like it was going to be a nightmare compared to the passenger side just because of space constraints, but in reality it went just as quickly.
Observe. The wily and elusive harness connector in its natural habitat.
Use a screwdriver to get the latch started.
Open? Not so! The latch travels all the way to the bottom. My fingertips wish I'd figured that out sooner.
A screwdriver might help you get the plug wiggled out. It's a deep connector, be warned. It also helps to close the door slightly!
Pay attention here when removing/replacing the interior side of the connector: The metal clip goes on the bottom.
Time to disassemble this bad boy. Don't want to drill blindly into the connector, do we?
Note the pronged release tab at the bottom. Pinch that to free the clasp so it swivels freely, allowing you to line up the tab/slot on the rocker pivot and remove the clasp.
Take a screwdriver and push in that tab to release the top of the clip.
Here we go, exposed and with the rubber sheath folded back.
Meet your new best friend, Excalib..err, a Dremel tool + snake attachment + cutter bit. Plug pwnage.
Others have had success with soldering irons, exacto knives, etc.. The key here is to go. freaking. slow. Check, recheck, and check again.
The plugs only mate together one way, so pay attention to the "L" shape center post in relation to the pin orientation, and make your cuts.
Alright, so assuming you aren't shedding tears on the hunk of plastic that used to make your windows work, it's time to thread the wire. Start logically, through the back of the interior plug and out of the car. Reconnect the interior piece to the doorjamb, thread some slack wire through, etc.
Here's my solution to running the wire through the rubber sheath. Long zip tie + electrical tape. The zip tie threads effortlessly through the rubber sheath, so run it through, tape your wire to the end, and pull it back. Bam, done in five minutes. Pull it all back together, slowly, carefully, making sure you don't have twists in your cable where the two connectors meet. Done.
It goes pretty smoothly, just take your time and think it through. Get used to the view, too.
Last edited by jjaujou; Sep 11, 2011 at 09:05 PM.
*** Tweeter Pod ***
My Alpine SPR-60C's came with gigantic tweeters, and the stock door panels required some modification to get them mounted. I took some cues from this awesome guide. Read on!
Here's what the back of your tweeter panel looks like. Pull the two outside screws to remove the tweeter.

I used a hole saw sized to fit the Alpine tweeter on the drill press, and made my cut.

Finished the removal and cleaned up the interior pieces with the trusty Dremel.

Ready for the tweeter pod.


Pod'd! I had to enlarge the hole ever so slightly. A couple fast passes with the sanding bit on super low rpm was perfect, and the pod slipped right in. Some model cement sealed it up.

I hit it with a couple coats of satin black Krylon, installed the tweeter, and mounted it back in the car. Barely fit!! I was afraid I might break the tweeter when I put the main door panel back in. It definitely took some coaxing, but I finally got it. Voila!


My Alpine SPR-60C's came with gigantic tweeters, and the stock door panels required some modification to get them mounted. I took some cues from this awesome guide. Read on!
Here's what the back of your tweeter panel looks like. Pull the two outside screws to remove the tweeter.
I used a hole saw sized to fit the Alpine tweeter on the drill press, and made my cut.
Finished the removal and cleaned up the interior pieces with the trusty Dremel.
Ready for the tweeter pod.
Pod'd! I had to enlarge the hole ever so slightly. A couple fast passes with the sanding bit on super low rpm was perfect, and the pod slipped right in. Some model cement sealed it up.
I hit it with a couple coats of satin black Krylon, installed the tweeter, and mounted it back in the car. Barely fit!! I was afraid I might break the tweeter when I put the main door panel back in. It definitely took some coaxing, but I finally got it. Voila!
Last edited by jjaujou; Sep 19, 2011 at 05:31 PM.


Trending Topics


New Member
Joined: Feb 2009
Posts: 2,821
Likes: 512
From: Seattle, WA
Hey OP, if you need any pointers, I've done the same thing you're doing about 3 or 4 times now (I live in Seattle in the Seward Park neighborhood. Grew up in Kirkland). Just PM me or whatever if you need help or want to swap notes. I know a lot of techniques through trial and error that can help turn a 3 hour job into a 1 hour job and would be happy to help.
Hey OP, if you need any pointers, I've done the same thing you're doing about 3 or 4 times now (I live in Seattle in the Seward Park neighborhood. Grew up in Kirkland). Just PM me or whatever if you need help or want to swap notes. I know a lot of techniques through trial and error that can help turn a 3 hour job into a 1 hour job and would be happy to help.
Can't believe what an unholy time sink this stuff is to work with.
New Member
Joined: Feb 2009
Posts: 2,821
Likes: 512
From: Seattle, WA
Dude, thanks for the offer! I'll almost definitely ping you when I finish laying the Fatmat for some wiring advice on the amp. I did the passenger side door the other day, but haven't had time to get back to it yet. Still have the driver side door, the floors, and behind the seats left to do.
Can't believe what an unholy time sink this stuff is to work with.
Can't believe what an unholy time sink this stuff is to work with.
My hands were bloody messes by the time I got everything done on my stereo install. How are yours holding up?
I put some Dynamat on the black panels in my doors this weekend and WOW, it makes the sound quality on the speakers a LOT better and the cabin is noticeably quieter. I also tightened the rear view mirrors down and added some threadlock to the bolts since the mirror on my driver's side was about ready to fall off. You've got to love the Cheap Charlie shortcuts Nissan took on these cars. Still, they are nice to look at.
where do you guys normally install the Dynamat stuff on? I did my Bose speakers swap a while back and now the system sounds really good but the exhaust drone in-cabin is driving me crazy..
any help would be greatly appreciated!
any help would be greatly appreciated!
Ahhh, the trick to running speaker wire through the molex connectors on the door is to use a straight Dremel cutting bit and knock out a couple of empty holes on the ajoining male and female couplings of the molex plug. Then liberally spray the wire(s) you want to pass through the rubber sleeves and the drilled molex connector with silicone spray and shove everything through using a pair of forceps. Takes about 5 minutes if you do it that way.
My hands were bloody messes by the time I got everything done on my stereo install. How are yours holding up?
I put some Dynamat on the black panels in my doors this weekend and WOW, it makes the sound quality on the speakers a LOT better and the cabin is noticeably quieter. I also tightened the rear view mirrors down and added some threadlock to the bolts since the mirror on my driver's side was about ready to fall off. You've got to love the Cheap Charlie shortcuts Nissan took on these cars. Still, they are nice to look at.

I've taken my doors apart enough times now that I think I'll replace the plastic grommets on the interior panel that the bolts screw into. They're getting stripped to the point of rattling. Still sorting out how I'm mounting the tweeters. I've already drilled out one of the tweeter panels, so I'm committed, at least. One other thing, I abandoned mounting the comps inside the door, and ordered unfinished pods from wickedcas about a week ago. Any idea how long it takes them to fulfill their orders?
Last edited by jjaujou; Aug 31, 2011 at 08:31 AM.
New Member
Joined: Feb 2009
Posts: 2,821
Likes: 512
From: Seattle, WA
I've taken my doors apart enough times now that I think I'll replace the plastic grommets on the interior panel that the bolts screw into. They're getting stripped to the point of rattling. Still sorting out how I'm mounting the tweeters. I've already drilled out one of the tweeter panels, so I'm committed, at least. One other thing, I abandoned mounting the comps inside the door, and ordered unfinished pods from wickedcas about a week ago. Any idea how long it takes them to fulfill their orders?
RE: the tweeters, I drilled out the factory speaker locations and carved out a little bit from the inside to get everything in tight. I also put some Dynamat in the trim just to provide a good solid surface for the sound to bounce off of. Don't screw up with the drilling; those trim pieces are ridiculously expensive.
The MDF speaker spacers (door pods) are good. Just be sure to coat them with some paint before you install them (I used a can or two of Krylon black spray paint). They are in an area that can be exposed to water, so the paint's a no-brainer. I bought my spacers from Zenclosures, so I can't speak for WickedCAS, though I haven't heard anything bad about them.
The FatMat looks good. My only suggestion (if you haven't done so already) is to do a double-covering on the insides of the rear wheel wells (including the inside of the glovebox areas.) It does a really good job of quieting the ride down.
Last edited by zakmartin; Sep 1, 2011 at 03:45 PM.


Registered User
Joined: Jul 2011
Posts: 37
Likes: 0
From: Auckland, New Zealand
I will be keeping a good eye on this thread. I am about to start this process myself, gutting all of the Bose gear out of my car, and installing a full new system. I am currently in the process of clearing crap from my garage so that I have a big enough work space.
I will try your suggestion of amping the stock fronts and ditching the sub and rears just for the hell of it while I wait on shiny new stuff to arrive.
Please keep pictures and tips coming!
I will try your suggestion of amping the stock fronts and ditching the sub and rears just for the hell of it while I wait on shiny new stuff to arrive.
Please keep pictures and tips coming!

Sub'd... I'm going to work around a Pioneer AVIC Z2. I'm stuck having to use a custom box behind the driver's seat because I'm going to have a cage in the car and I can't have a box in the trunk when I go tracking.
I will be keeping a good eye on this thread. I am about to start this process myself, gutting all of the Bose gear out of my car, and installing a full new system. I am currently in the process of clearing crap from my garage so that I have a big enough work space.
I will try your suggestion of amping the stock fronts and ditching the sub and rears just for the hell of it while I wait on shiny new stuff to arrive.
Please keep pictures and tips coming!
I will try your suggestion of amping the stock fronts and ditching the sub and rears just for the hell of it while I wait on shiny new stuff to arrive.
Please keep pictures and tips coming!
Bear in mind though, if you bypass the Bose amp you'll need an aftermarket head unit to drive the speakers. I doubt that the stock HU is putting out more than 5 RMS per channel.

I replaced both the grommets some time ago. I ended up purchasing a set of rectangular grommets that were the same width as the square openings but longer on either end. I Dremeled out about 2mm on each side to keep the screw hole centered, popped them in and they work like a charm. The design flaw with the square grommets was that they would spin with the screw when tightened down and would become useless. The rectangular grommets take care of that and they'll never be a problem again. Also, be sure to put in a rubber gasket between the door and the top of the grommet to keep it from rattling.
RE: the tweeters, I drilled out the factory speaker locations and carved out a little bit from the inside to get everything in tight. I also put some Dynamat in the trim just to provide a good solid surface for the sound to bounce off of. Don't screw up with the drilling; those trim pieces are ridiculously expensive.
The MDF speaker spacers (door pods) are good. Just be sure to coat them with some paint before you install them (I used a can or two of Krylon black spray paint). They are in an area that can be exposed to water, so the paint's a no-brainer. I bought my spacers from Zenclosures, so I can't speak for WickedCAS, though I haven't heard anything bad about them.
The FatMat looks good. My only suggestion (if you haven't done so already) is to do a double-covering on the insides of the rear wheel wells (including the inside of the glovebox areas.) It does a really good job of quieting the ride down.
Still haven't touched the tweeter pod that I drilled out yet, I think I'll order some replacement grommets before I dig back into the door panel and finish them.
I'm pretty sure that I'll be pulling it all back apart at least a couple more times, there's always something that gets forgotten. I know for sure that I'll need to pull the passenger side stuff at least once more to run the coax from the head unit back to the amplifier. I figured I'd want to run that stuff on the passenger side, since the electrical's going to be running down the driver's side.
Although.. now that I'm thinking about it, I could probably get away with running everything down the top of the transmission tunnel, and save myself the trouble of pulling the seat again and running under carpet. I just want to do whatever's necessary to keep power and sound signal separated.
Thoughts?
New Member
Joined: Feb 2009
Posts: 2,821
Likes: 512
From: Seattle, WA
I know for sure that I'll need to pull the passenger side stuff at least once more to run the coax from the head unit back to the amplifier. I figured I'd want to run that stuff on the passenger side, since the electrical's going to be running down the driver's side.
Although.. now that I'm thinking about it, I could probably get away with running everything down the top of the transmission tunnel, and save myself the trouble of pulling the seat again and running under carpet. I just want to do whatever's necessary to keep power and sound signal separated.
Thoughts?
Personally, I think the stereo sounds like ***** without the rear speakers. I know that's not a popular opinion, but I've tried it with and without them, and you get so much more presence with them installed, that it's almost a no-brainer. They don't need to be uber-expensive rears, but they shouldn't be garbage either. Like I said before:
Fronts: JL C5-650 components
Rears JL C2-650 coaxials
Sub: JL 10W3V3-4
etc. etc.
 Just keep at it. These projects take forever. I was going to install my rear-camera next weekend, but I got a Check Engine Light on Saturday and it turns out I need a new Catalytic Converter (covered under warranty, thank Christ.) The new CC goes in on Saturday. I'm hoping it'll improve my current 13mpg headache.