
350z Sound Quality Build Thread


Thread Starter
New Member
Joined: Jan 2010
Posts: 196
Likes: 7
From: San Diego
I've been wanting to do this for a while so here goes. I gathered the components for this project so now I can go ahead and prepare things correctly. These kinds of forums and threads are basically my roadmap to this hobby so hopefully this helps someone out. I didn't keep a build log on my last install so I thought this time I would include one.
This is what I have ready to go:
Head Unit:
Pioneer DEH-P880PRS
Drivers:
Seas Lotus Reference 165/1 Midrange
Seas Lotus Reference RT25A Tweeters
Image Dynamics IDMAX 12" D4 V3 Sub
Amps:
Zapco 350.2 100x2 - Tweeter
MB Quart RAA2400 200x2 - Mid
Elemental Design Nine.1 - 900x1 - Sub
Prefab Materials:
Zenclosure 12" Sub Box w/ spacer
Wicked Car Audio door pods
Other Materials:
Mass Loaded Vinyl barrier material
RAAMAT BXT2 - 40sqft
RAAMAUDIO Ensolite
Vinyl wrap material
Wiring components
I'm waiting on some materials to arrive. Once they do I'll get to it.
I'm not an expert - I'm a hobbyist at best. One of the top lessons I've learned is to know my skillset. I know I can't fiberglass to save my life. I'm a shoddy woodworker too. That's why I bought custom prefabricated parts. Another lesson I've learned is to plan this correctly and do it right the first time. It will be the difference between a fun project and a big headache.
I haven't used this equipment for a while, so first things first: Have to test it. I really like that P880PRS - it has a three way crossover and time alignment along with a 5v line output - really a solid SQ unit even after all these years.

Thread Starter
New Member
Joined: Jan 2010
Posts: 196
Likes: 7
From: San Diego
http://www.mobilesq.com/products/get...=1&productid=1
http://www.seas.no/index.php?option=...251&Itemid=236
http://www.seas.no/index.php?option=...250&Itemid=235
They don't make the RT25A tweeter anymore, it was replaced by a fabric dome RT27F. I think the aluminum dome is where it's at though.
Right out of the gate there's an issue so I'm going to need to figure it out. The head unit won't turn on - probably a pico fuse or something. All the amps and drivers work. I didn't bench test them, I'm just listening for a strong signal. Once I level match I'll know if they're giving me full output.


Thread Starter
New Member
Joined: Jan 2010
Posts: 196
Likes: 7
From: San Diego
It was not the pico fuse. The power supply is probably shot. I took a DMM to the harness and it's all good. I looked at the service manual and besides the harness it doesn't look like there's a serviceable fuse inside besides the pico for the RCA which is unrelated here. I don't want to deal with the diagnosis process right now so I'm shelfing it. I just ordered a DEH-80PRS for $254.64 shipped here:
On that note, I'm be keeping a running balance of the cost of this install and I'll total it up at the end. I'll try to provide links to where I buy supplies and for what price.
I'd also like to give credit where credit is due. If (when) I learn something along the way by searching I'll link where I saw it.
A few updates on some preemptive problem solving:
I tested the fitment of the outer mounting and grill assembly for the Seas mids to the Wicked CAS door pods. The mids are 7.125" and the pods are 6.95". The rings are too big. This means I cannot recess the speakers into the pods. I can either set a spacer in and build up the sides with more fiberglass to route out a new hole or simply bond a spacer in there and use that as the mounting flange (which would offer more structural support than the current fiberglass alone). I'll decide soon.
Recessed ring:
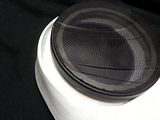
Ring centered - this is how far I'd have to grind it out and why I'd have to add material.
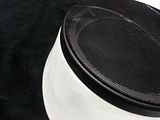
Ring centered on pod - it sits nice and flush on top so filling the recession with a mounting ring would be a solution
I was checking out how you all are configuring the connection at the battery terminal. I kind of like what is going on here - it looks like he attached the stock fuse and terminal assembly to an aftermarket top post terminal:
https://my350z.com/forum/attachments...ier-clamps.jpg
I pulled the old Fusion sub out. Yep, Fry's Electronics special - I think this was their house brand. Please do not stone me, it came with the car. This sub seems to play one band. It might as well spit out the same tone at different volumes.
Can you see the brand?
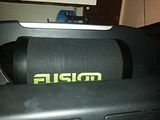
Green means it's nuclear powered.
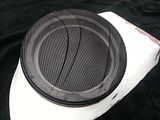
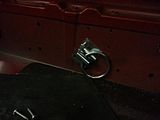
The old owners drilled into the metal and mounted these rings with a locking strap. This is what held the old sub down. It was effective and easy to remove.
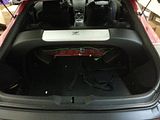
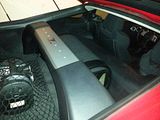
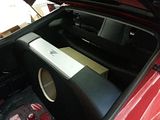
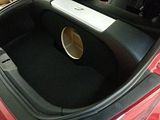
Now I am fitting the Zenclosure. I've never installed one of these so I wanted to see exactly how this is done. It went in so smoothly. Now I can see how much room I have for amps. Not much. I definitely cannot fit all three amps in the spare tire area. One will have to go behind the seat for which I will need to rig an amp rack out of metal brackets and wood. This can be put off until the wire is actually run.
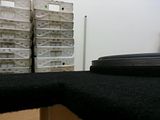
I wanted to see just for fun if everyone's measurements were correct and I needed that spacer I ordered. Sure enough - just ever so slightly off. Glad I got it.
No Spacer

Spacer
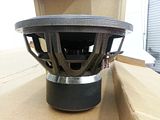
I love this sub. In my opinion for the money it can't be beat. I'm not a basshead but in sq competitions getting to 135 db gets you all the points for that part of the scoring. I was able to hit 132+ with this same setup - single IDMAX in a sealed box. On the other side it's extraordinarily musical. It can hit very precise notes that you'd hear out of more sensitive subs. It's really great to listen to and the build quality is top notch. This is a V3 from before ID went out of business.
There are a few bits that still need to be ordered. I want to wait until all the wire gets here before I gut the interior. If I don't, I'll have to wait to put the interior back together because the wire goes down after the sound treatment. Once they get here I'll start.
On that note, I'm be keeping a running balance of the cost of this install and I'll total it up at the end. I'll try to provide links to where I buy supplies and for what price.
I'd also like to give credit where credit is due. If (when) I learn something along the way by searching I'll link where I saw it.
A few updates on some preemptive problem solving:
I tested the fitment of the outer mounting and grill assembly for the Seas mids to the Wicked CAS door pods. The mids are 7.125" and the pods are 6.95". The rings are too big. This means I cannot recess the speakers into the pods. I can either set a spacer in and build up the sides with more fiberglass to route out a new hole or simply bond a spacer in there and use that as the mounting flange (which would offer more structural support than the current fiberglass alone). I'll decide soon.
Recessed ring:

Ring centered - this is how far I'd have to grind it out and why I'd have to add material.

Ring centered on pod - it sits nice and flush on top so filling the recession with a mounting ring would be a solution

I was checking out how you all are configuring the connection at the battery terminal. I kind of like what is going on here - it looks like he attached the stock fuse and terminal assembly to an aftermarket top post terminal:
https://my350z.com/forum/attachments...ier-clamps.jpg
I pulled the old Fusion sub out. Yep, Fry's Electronics special - I think this was their house brand. Please do not stone me, it came with the car. This sub seems to play one band. It might as well spit out the same tone at different volumes.
Can you see the brand?

Green means it's nuclear powered.

The old owners drilled into the metal and mounted these rings with a locking strap. This is what held the old sub down. It was effective and easy to remove.


Now I am fitting the Zenclosure. I've never installed one of these so I wanted to see exactly how this is done. It went in so smoothly. Now I can see how much room I have for amps. Not much. I definitely cannot fit all three amps in the spare tire area. One will have to go behind the seat for which I will need to rig an amp rack out of metal brackets and wood. This can be put off until the wire is actually run.


I wanted to see just for fun if everyone's measurements were correct and I needed that spacer I ordered. Sure enough - just ever so slightly off. Glad I got it.
No Spacer
Spacer
I love this sub. In my opinion for the money it can't be beat. I'm not a basshead but in sq competitions getting to 135 db gets you all the points for that part of the scoring. I was able to hit 132+ with this same setup - single IDMAX in a sealed box. On the other side it's extraordinarily musical. It can hit very precise notes that you'd hear out of more sensitive subs. It's really great to listen to and the build quality is top notch. This is a V3 from before ID went out of business.

There are a few bits that still need to be ordered. I want to wait until all the wire gets here before I gut the interior. If I don't, I'll have to wait to put the interior back together because the wire goes down after the sound treatment. Once they get here I'll start.
Last edited by BlueSQ; Mar 5, 2014 at 01:06 AM. Reason: Img

I would opt for kick panel with the mids , and tweets molded into the base of A pillar
rather than the door pods
if hatch space is mandatory that box is decent , if not I would FOR SURE use a custom ported enclosure
but doing it your way will be nice
rather than the door pods
if hatch space is mandatory that box is decent , if not I would FOR SURE use a custom ported enclosure
but doing it your way will be nice
Trending Topics

Thread Starter
New Member
Joined: Jan 2010
Posts: 196
Likes: 7
From: San Diego
Building up the barrier
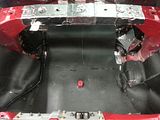
All MVL is 1 lb per sqft and backed with an ensolite decoupler. Most of this is done using the techniques shown at www.sounddeadenershowdown.com

All MVL is 1 lb per sqft and backed with an ensolite decoupler. Most of this is done using the techniques shown at www.sounddeadenershowdown.com


Thread
Thread Starter
Forum
Replies
Last Post
tm9293
North East Marketplace
13
Oct 17, 2015 09:14 PM
hardkicks
Zs & Gs For Sale
0
Sep 20, 2015 12:28 PM