
Install Guide:Bose, Kenwood DNX7100, PAC ROEM-NIS2, 03 cubby painted, cubby monitor


Disclaimer: I am by no means an expert. In fact this is my first NAV install and only my fifth radio install. I am just sharing my experience and am not responsible if you mess something up.
First of all I want to say it took weeks to prepare for this install and hours of research and reading. I’m writing this in attempt to try to save people that are in my shoes some time. There probably are shortcuts that could have been taken and everything would have still worked but I didn’t want to cut any corners.
Alright, so I decided to get a Kenwood DNX7100 and figure since my center console would already be out I might as well do the screen in the cubby mod as well. And since I am really picky I wanted to paint the 03 cubby(grayish and will not match) to match the rest of my dash.
Here we go, this is what I bought:
For Head Unit installation
For Cubby Screen installation
Other things I picked up:
Section A
Skip to Section C if you don’t want to paint your cubby door.
Skip to Section B if you are not going to do a cubby install.
I did this first because I wanted to give the paint time to dry.
Get your 03 cubby and unlatch the piece circled. This prevents the door from retracting when trying to take it apart.

Slide the door all the way down to expose the pin. Use a small screw driver to push it out. Be careful not to lose it. This releases the door from the retracting mechanism.

Pull back on this piece to pop it off the track.

First prep it by cleaning it of all oils and dust. I used a toothbrush with some soap & water. Than wiped down with rubbing alcohol and a rag. Tape it off and put it on top of a box.
I let it sit to dry and started on my head unit install. We’ll come back to this later
Go to section B while you wait.
Section B
Skip to Section C if you are not doing a head unit install
How to solder your wires together:
1. Strip wires
2. Dip in liquid flux
3. Put heat shrink tube on
4. Cross wires at the middle and twist them together(see picture)
5. Hold solder on the soldering iron, the solder should stay on the iron if it is hot enough.
6. Rub the solder on the iron over the wires back and forth. The solder should flow through and around the wires with the help of the flux.
7. Pull your heat shrink tube down and run a lighter back and forth under it to get it to shrink.
Now just match up the colors. I had 4 wires left over from the PAC ROEM-NIS2 and 3 wires left over from the wires from my Kenwood harness.

Here is a close up of my left over wires. I believe you need the mute for Bluetooth but I didnt get that.

Disconnect the battery.
Now lets take the center console out. Pull back and up at the same time.

Pop that cable off. A little screw driver may help.

Turn it to the side and unscrew the 2 screws.

Unscrew the 4 screws at the bottom. I put the white cable inside of the tape deck some it wouldnt be in my way.

This part was really hard for me. You have to pull that white box out as much as you can and disconnect everything from the back of it. Push in the middle of each one and pull off. A small screw driver may help.

Open up your cubby and lift up the mat to reveal 2 screws. Unscrew them.

That piece than comes up.

Get a long screw driver and unscrew the 2 screws in the back.

Pull back a little bit just until it pops loose.

Disconnect.

Now you should be able to pull it back.

Disconnect everything and take it inside. You may have to straighten it back up and lift up to get the metal brackets that hold the radio to come out.

Unscrew the screws to remove the radio from the center console (2 on each side).

Unscrew to remove the radio brackets from the radio (4 on each side). You will reuse the radio brackets.

**OPTIONAL**
Widen the holes so that your unit will sit further back.
I really sucked at this and am sure most people could do a better job. This will allow the radio to go back a little further otherwise it will stick out about a quarter inch. Also if you don’t do this the bottom rear screw will not align. I started with small hole than widen it.

Get your Metra dash kit. You will only need the big frame and the two side spacers. Cut the middle bar of the frame. Line up your spacers and attach the radio brackets.

Go to Section C if you are installing the cubby screen too. Otherwise skip to Section D.
Section C
Unscrew the 4 screws to take off your old cubby.

Grab your 03 cubby and unscrew the metal bracket.

It’s a perfect fit. I put the 2 screws that I took off in the previous step back on to apply some pressure to the sides of the monitor to prevent it from moving.
NOTE: A lot of people drill a little hole to allow the remote to work but I did not because I wanted to keep it smooth. I have to hold the remote really close to the screen to turn it on but its no big deal.

Go to section D if you did not paint your cubby door.
You door should be dried now. Pop it back on track, put the pin back in(this is a little tricky) and be sure to lift A over B when sliding the door back.

Latch A back on to B

Screw everything back into the center console.
Section D
Now we are ready to put the center console back into the car.

Use your manual to make sure everything that is needed plugged up to your head unit. Plug your PAC ROEM-NIS2 up to your car. As you can see it is a very tight fit. I used a lot of zip ties on the wires to save a lot of needed space(sorry no picture of that ).
).

Skip to the next step if you did not install cubby screen. I ran my power and video wires through this hole and than hooked them up from the back.

Don’t forget about your GPS antenna. I put the wires for my GPS antenna behind the cubby.

I had 4 grounds. I grounded my PAC ROEM-NIS2 & cubby monitor to the left one and my Kenwood DNX7100 & the PRK SW(long green one) to the right.

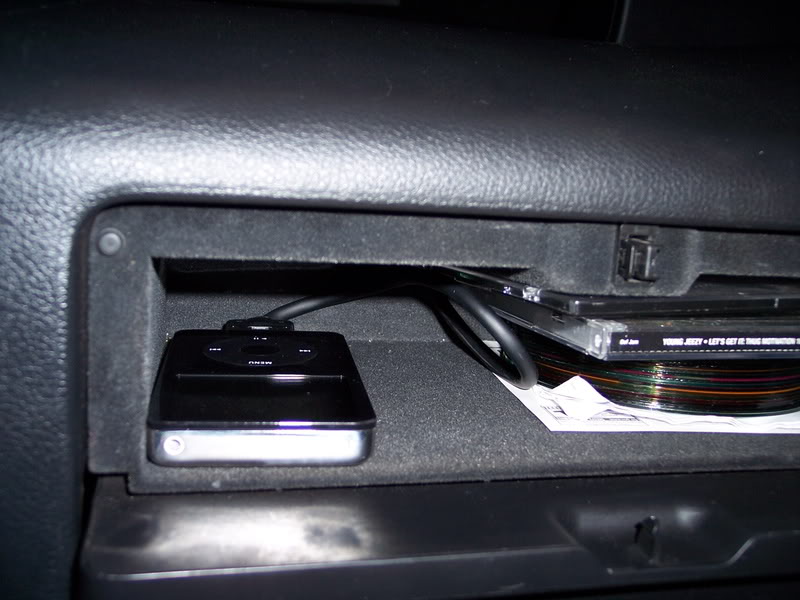
I was already low on room so I put the ipod cable right under the AC box in front of the shifter. Seems like a good place for it anyways.

For right now I am just leaving the ipod cable hanging out right there and plug it up when I use it.

Reconnect the battery.
Some finished shots.

I have a little girl and that was the first movie I saw laying around .
.
First of all I want to say it took weeks to prepare for this install and hours of research and reading. I’m writing this in attempt to try to save people that are in my shoes some time. There probably are shortcuts that could have been taken and everything would have still worked but I didn’t want to cut any corners.
Alright, so I decided to get a Kenwood DNX7100 and figure since my center console would already be out I might as well do the screen in the cubby mod as well. And since I am really picky I wanted to paint the 03 cubby(grayish and will not match) to match the rest of my dash.
Here we go, this is what I bought:
For Head Unit installation
- Kenwood DNX7100
~$700
ebay - PAC ROEM-NIS2 (for Bose only), get a regular Metra wiring harness if you don’t have a Bose
$42.18
http://www.sonicelectronix.com/item_...ROEM-NIS2.html - Metra Dash kit
~$15
Local Circuit City - Kenwood KCA-iP300V iPod Audio Video Adapter
~$25
Ebay
For Cubby Screen installation
- 03 Cubby(retractable door)
$118.12
68250-CD010 Cluster Assembly
68410-CD000 Cluster Finisher (small piece)
https://www.mynismo.com/products/?id=4445 - Farenheit 7” monitor
~$80
www.my350z.com
Can use Power Acoustik and many others - Dupli Color Vinyl & Fabric (Flat Black)
~$7
Local O’Reillys Autopart Store - Dupli Color Adhesion Promoter
~$5
Local O’Reillys Autopart Store
Other things I picked up:
- rubbing alcohol
- soldering iron
- solder
- liquid flux
- masking tape
- heat shrink tubes
- lighter
Section A
Skip to Section C if you don’t want to paint your cubby door.
Skip to Section B if you are not going to do a cubby install.
I did this first because I wanted to give the paint time to dry.
Get your 03 cubby and unlatch the piece circled. This prevents the door from retracting when trying to take it apart.
Slide the door all the way down to expose the pin. Use a small screw driver to push it out. Be careful not to lose it. This releases the door from the retracting mechanism.
Pull back on this piece to pop it off the track.
First prep it by cleaning it of all oils and dust. I used a toothbrush with some soap & water. Than wiped down with rubbing alcohol and a rag. Tape it off and put it on top of a box.
spray Adhesion Promoter
wait 2 minutes
spray Adhesion Promoter
wait 2 minutes
spray Flat Black
wait 5 minutes
spray Flat Black
wait 2 minutes
spray Adhesion Promoter
wait 2 minutes
spray Flat Black
wait 5 minutes
spray Flat Black
I let it sit to dry and started on my head unit install. We’ll come back to this later
Go to section B while you wait.
Section B
Skip to Section C if you are not doing a head unit install
How to solder your wires together:
1. Strip wires
2. Dip in liquid flux
3. Put heat shrink tube on
4. Cross wires at the middle and twist them together(see picture)
5. Hold solder on the soldering iron, the solder should stay on the iron if it is hot enough.
6. Rub the solder on the iron over the wires back and forth. The solder should flow through and around the wires with the help of the flux.
7. Pull your heat shrink tube down and run a lighter back and forth under it to get it to shrink.
Now just match up the colors. I had 4 wires left over from the PAC ROEM-NIS2 and 3 wires left over from the wires from my Kenwood harness.
Here is a close up of my left over wires. I believe you need the mute for Bluetooth but I didnt get that.
Disconnect the battery.
Now lets take the center console out. Pull back and up at the same time.
Pop that cable off. A little screw driver may help.
Turn it to the side and unscrew the 2 screws.
Unscrew the 4 screws at the bottom. I put the white cable inside of the tape deck some it wouldnt be in my way.
This part was really hard for me. You have to pull that white box out as much as you can and disconnect everything from the back of it. Push in the middle of each one and pull off. A small screw driver may help.
Open up your cubby and lift up the mat to reveal 2 screws. Unscrew them.
That piece than comes up.
Get a long screw driver and unscrew the 2 screws in the back.
Pull back a little bit just until it pops loose.
Disconnect.
Now you should be able to pull it back.
Disconnect everything and take it inside. You may have to straighten it back up and lift up to get the metal brackets that hold the radio to come out.
Unscrew the screws to remove the radio from the center console (2 on each side).
Unscrew to remove the radio brackets from the radio (4 on each side). You will reuse the radio brackets.
**OPTIONAL**
Widen the holes so that your unit will sit further back.
I really sucked at this and am sure most people could do a better job. This will allow the radio to go back a little further otherwise it will stick out about a quarter inch. Also if you don’t do this the bottom rear screw will not align. I started with small hole than widen it.
Get your Metra dash kit. You will only need the big frame and the two side spacers. Cut the middle bar of the frame. Line up your spacers and attach the radio brackets.
Go to Section C if you are installing the cubby screen too. Otherwise skip to Section D.
Section C
Unscrew the 4 screws to take off your old cubby.
Grab your 03 cubby and unscrew the metal bracket.
It’s a perfect fit. I put the 2 screws that I took off in the previous step back on to apply some pressure to the sides of the monitor to prevent it from moving.
NOTE: A lot of people drill a little hole to allow the remote to work but I did not because I wanted to keep it smooth. I have to hold the remote really close to the screen to turn it on but its no big deal.
Go to section D if you did not paint your cubby door.
You door should be dried now. Pop it back on track, put the pin back in(this is a little tricky) and be sure to lift A over B when sliding the door back.
Latch A back on to B
Screw everything back into the center console.
Section D
Now we are ready to put the center console back into the car.
Use your manual to make sure everything that is needed plugged up to your head unit. Plug your PAC ROEM-NIS2 up to your car. As you can see it is a very tight fit. I used a lot of zip ties on the wires to save a lot of needed space(sorry no picture of that
).Skip to the next step if you did not install cubby screen. I ran my power and video wires through this hole and than hooked them up from the back.
Don’t forget about your GPS antenna. I put the wires for my GPS antenna behind the cubby.
I had 4 grounds. I grounded my PAC ROEM-NIS2 & cubby monitor to the left one and my Kenwood DNX7100 & the PRK SW(long green one) to the right.
I was already low on room so I put the ipod cable right under the AC box in front of the shifter. Seems like a good place for it anyways.
For right now I am just leaving the ipod cable hanging out right there and plug it up when I use it.
Reconnect the battery.
Some finished shots.
I have a little girl and that was the first movie I saw laying around
.
Last edited by k1653d; Apr 25, 2008 at 05:50 PM.
Again I am no expect and am just stating what I have learn. Please do correct me if I am wrong.
Questions you may have:
Q1: Do I need a PAC ROEM-NIS2 to install my headunit/radio?
A1: Only if you have the stock Bose system. This will give you the best performance out of your stock system. Others that have completed an install with just a Metra wire harness; some say it works fine and others say there is a buzzing noise. I say better safe than sorry. Metra $15, PAC ROEM-NIS2 $45, I will gladly pay the extra $30 to know that I will not need to rip everything apart and install again.
Q2: So do I need the Metra wire harness and the PAC ROEM-NIS2?
A2: No, its one or the other. The PAC ROEM-NIS2 is your wire harness and will replace the Metra if you have a Bose system. So if you dont have a Bose get the Metra, if you have Bose get the PAC ROEM-NIS2, not both.
Q3: Do I need to do a factory amp bypass?
A3: In a car that has a factory amp (Bose system) the speakers are ran to the amp and the amp is ran to the radio. Head units somethings have problems with the factory amp so it is recommend to the a factory amp bypass. This is where you rerun your speaker wires so it will go straight from the new head unit to the speakers thus bypassing the amp. Non-Bose cars don't have a factory amp so the radio is already ran straight to the speakers. A PAC ROEM-NIS2 eliminates the need to do a factory amp bypass. Also note that if you go the factory amp bypass route your sub behind the driver seat will not work.
Q4: So the PAC ROEM-NIS2 bypasses the amp for me?
A4: No, the PAC ROEM-NIS2 allows you to keep your stock amp/set up without complications. This makes life easier because you dont have rewire your whole car and you also get to keep your stock Bose sub. Some after market head unit will not work properly with the stock amp, the PAC ROEM-NIS2 eliminates this problem.
Q5: Wait a second, you're confusing me. What is this PAC ROEM-NIS2?
A5: It is design to take the place of the standard wiring harness you would buy and allows the new head unit to work with the stock amp.
Q6: What did you do with your VSS wire?
A6: Kenwood uses different technology and does not have a VSS wire. Please refer to this guide on what to do if you have a VSS wire. https://my350z.com/forum/audio-and-video/278145-avic-d3-install-guide.html
Q7: Is your painted cubby door a perfect match?
A7: No, but it is damn good for $12. It is very hard to tell and no one will notice. It defiantly looks better than the gray though.
Q8: Where is your power and ground at for your cubby monitor?
A8: Most monitors will come with at least a red and black wire (power and ground) and a video in. Mines did not have power and a ground wire; instead I had a female 12v. I had to buy a universal adapter, plug it up and cut the end off that plugs into the wall. Split the wires, the solid black one is the ground and the other one is the power. I could have cut the 12v female end off and split the wires from there but did not want to do that just in case I used it for something else later on. The universal adapter only cost me $8 anyways.
Q9: Were you able to get your AC(white) box back in?
A9: No, I had too many wires in the back and was not able to screw it in. I just put it back without screwing it down. No big deal, it doesnt move or make any noise. Thinking back, I might have put the PAC under the AC box instead of behind it. That might have given me enough room to screw the box back down.
Hope this was helpful. Tell me what you think.
Thanks goes out to: ttbbsolid, Ichigo, Silverstone-Z, THEDUKE, Spike100, Pete's 03SVT, SuperBlack350z, HyperSprite and orbitalpunk for answering my questions.
Let me know if I missed something or if there is a better way to do something so I can update it.
Others input worth mentioning:
Originally Posted by Pete's 03SVT
I have a couple suggestions that you may consider. The 7100 has a stong nav antenna and it still works great when it is mounted under the dash bezel. My roomate has the 7100 and I installed the antenna right under the bezel between the three guages and the defroster vents. He still gets great signal strength, and the antenna is hidden. I hide the nav antenna on every vehicle that has a plastic dash and have never had any issues.
Also, like you say if you were to extend or re-route the wires on the OEM-1 you will be able to fit it under the climate control brain so you can screw the brain back in. If it doesn't bother you I wouldn't worry about it, but I have gotten them to fit without too much trouble.
If you drill the eight holes in the radio brackets larger, you can slide the deck further back into the kit, making it perfectly flush with the dash. Sometimes it's tough with all the wires and cables on the back, but it is possible.
As far as adjusting the gain controls on the OEM-1, the best way to get the most out of the system without noise and distortion is to turn the ***** all the way down, turn the deck up to approximately 90% volume, then turn up each **** one by one untill the speaker that you are adjusting begins to distort, then back it off just a bit. Basically what you want to accomplish is to set the gains on the OEM-1 so you are able to turn the deck nearly all the way up before the speakers start to distort. The lower the gains on the OEM-1 are set, the better the sound quality will be.
Last edited by k1653d; Apr 28, 2008 at 06:42 AM.


Thank you everyone.
I had a lot of questions and did a ton of searching before I did my install. The whole Bose thing was a real headache when researching what to do. It was also really hard to find all the info to everything I wanted to do in one place. Hopefully this saves some people some time. I tried to be as detailed as possible so that even a caveman would be able to do it
I had a lot of questions and did a ton of searching before I did my install. The whole Bose thing was a real headache when researching what to do. It was also really hard to find all the info to everything I wanted to do in one place. Hopefully this saves some people some time. I tried to be as detailed as possible so that even a caveman would be able to do it

New Member


Joined: Dec 2006
Posts: 7,337
Likes: 204
From: Edina, Minnesota
Excellent thread� great pictures with thorough explanations� your step-by-step format makes it very easy to understand the process. Your Q&A section is very helpful, and answers a lot of questions Bose owners would certainly ask.
A my350z.com Moderator will certainly move your thread to the Audio Builds sub-forum, and that is a good thing since it will live much longer there and get a lot more views.
Very nice job,
--Spike
A my350z.com Moderator will certainly move your thread to the Audio Builds sub-forum, and that is a good thing since it will live much longer there and get a lot more views.
Very nice job,
--Spike
Trending Topics

So how does it sound? After bypassing the Bose amps with the PAC ROEM-NIS2 unit and still using the stock Bose speakers, do you still have a Bose-like sound or a much cleaner, much better sounding system?
I'd like to know cuz this would make it easier to replace the Bloze system, doing it in two steps would be easier on the wallet. I would eventually replace the amps and speakers too but would not have to save up for a longer period of time to get the SQL stuff I really want.
LMK and excellent write up for the install, I'll use it for installing my new system.
Originally Posted by Sponge
So how does it sound? After bypassing the Bose amps with the PAC ROEM-NIS2 unit and still using the stock Bose speakers, do you still have a Bose-like sound or a much cleaner, much better sounding system?
I'd like to know cuz this would make it easier to replace the Bloze system, doing it in two steps would be easier on the wallet. I would eventually replace the amps and speakers too but would not have to save up for a longer period of time to get the SQL stuff I really want.
LMK and excellent write up for the install, I'll use it for installing my new system.
I'd like to know cuz this would make it easier to replace the Bloze system, doing it in two steps would be easier on the wallet. I would eventually replace the amps and speakers too but would not have to save up for a longer period of time to get the SQL stuff I really want.
LMK and excellent write up for the install, I'll use it for installing my new system.
The PAC ROEM-NIS2 does not bypass the amp for you. Check the Q&A for an explanation, I updated it.
I never install a system or an amp before but I would think that if you are planning on doing this in two stages than it would be easier to get the PAC ROEM-NIS2. If not you would have to bypass the factory amp and rerun all your speakers wire directly to the new head unit in stage 1. And than when you get your new system in stage 2, you would have to unwire your speakers from the head unit, run the speakers wires to your new amp and wire the new amp to your new head unit.
As far as sound, I havent really got a chance to adjust my settings. I'll play with it and post an update.
Maybe someone else can chime in so we can have some other opinions as well.
Originally Posted by silverstripes
Man that is the best install DIY Ive seen. This deserves a sticky!
but instead of this:

(edited, quoted the wrong pic earlier ^)
why not just drill a hole in the center console so nothing is in clear sight:


Last edited by ppw350Zunit; Apr 27, 2008 at 02:05 PM.

^^^
if im not mistaken, thats how the ipod cable would come out, like yours. his pic is just showing how the stereo usb cable connects to the ipod cable. at least thats how mine is. i also have the ipod connecter coming out of my center console. my question though is how is your sound? i have the same pieces but imo i dont think the system is as loud as the stock bose. theres def some bass loss.
if im not mistaken, thats how the ipod cable would come out, like yours. his pic is just showing how the stereo usb cable connects to the ipod cable. at least thats how mine is. i also have the ipod connecter coming out of my center console. my question though is how is your sound? i have the same pieces but imo i dont think the system is as loud as the stock bose. theres def some bass loss.
jiggalam, you are correct. I was just showing where I stashed the cables.
I just got done messing with it and I would have to agree. There is a loss in bass. I havent noticed it before because I listen to music conservatively and have only had the install for a few weeks now. The bass sounds really good when inside of the car but when you get outside you can barely hear it.
Anyone know the best settings to get the most boom boom out of the sub? Anyone try to adjust the ***** in the PAC ROEM-NIS2 yet?
ppw350Zunit, your picture would be the equivalant to this one:
But like I mentioned, it is only there until I figure out what to do with it. Good idea on where to put it though
Originally Posted by k1653d
ppw350Zunit, your picture would be the equivalant to this one:
But like I mentioned, it is only there until I figure out what to do with it. Good idea on where to put it though
But like I mentioned, it is only there until I figure out what to do with it. Good idea on where to put it though
i just thought you would want to store the ipod in a hidden spot. you can control the ipod through the deck, correct?
well i took my car to an installer. according to him messing with the ***** on the pac may lead to alot more engine noise or some humming, wasnt really paying attention. he said turning it up may help with the sound, but it might not be worth it with the other noise. i wish i knew cause the lack of higher sound is bothering me.
Originally Posted by ppw350Zunit
my bad...i quoted the wrong pic. i just thought you would want to store the ipod in a hidden spot. you can control the ipod through the deck, correct?
i just thought you would want to store the ipod in a hidden spot. you can control the ipod through the deck, correct?. I was going to buy the 16GB but heard the new 3G iphones were coming out soon so I'm waiting. So that cord just gets tucked away and has only been used once (to test it) since the install. I will probably wind up doing the same thing. Thanks for the pic.
Originally Posted by jiggalam
well i took my car to an installer. according to him messing with the ***** on the pac may lead to alot more engine noise or some humming, wasnt really paying attention. he said turning it up may help with the sound, but it might not be worth it with the other noise. i wish i knew cause the lack of higher sound is bothering me.
.
Very nice install and very nice writeup. Should be stickied.
Glad I could help you.
For anyone wanting more ideas on where to mount the iPod... here's where I put mine:
The DNX7100 and DNX7120 can control the iPod through the headunit and can play all playlists, can search through quickly, and can play video through the ipod as well. Extremely nice.
Glad I could help you.
For anyone wanting more ideas on where to mount the iPod... here's where I put mine:
The DNX7100 and DNX7120 can control the iPod through the headunit and can play all playlists, can search through quickly, and can play video through the ipod as well. Extremely nice.

Nice job for being one of your first installs. I have a couple suggestions that you may consider. The 7100 has a stong nav antenna and it still works great when it is mounted under the dash bezel. My roomate has the 7100 and I installed the antenna right under the bezel between the three guages and the defroster vents. He still gets great signal strength, and the antenna is hidden. I hide the nav antenna on every vehicle that has a plastic dash and have never had any issues.
Also, like you say if you were to extend or re-route the wires on the OEM-1 you will be able to fit it under the climate control brain so you can screw the brain back in. If it doesn't bother you I wouldn't worry about it, but I have gotten them to fit without too much trouble.
If you drill the eight holes in the radio brackets larger, you can slide the deck further back into the kit, making it perfectly flush with the dash. Sometimes it's tough with all the wires and cables on the back, but it is possible.
As far as adjusting the gain controls on the OEM-1, the best way to get the most out of the system without noise and distortion is to turn the ***** all the way down, turn the deck up to approximately 90% volume, then turn up each **** one by one untill the speaker that you are adjusting begins to distort, then back it off just a bit. Basically what you want to accomplish is to set the gains on the OEM-1 so you are able to turn the deck nearly all the way up before the speakers start to distort. The lower the gains on the OEM-1 are set, the better the sound quality will be.
Again, great write up and nice job!!
Pete's 03SVT, thank you very much for your input. I quoted and put you in the Q&A.
On the brackets, I didnt want it to go back any further because it arcs a little from left to right. So if the sides would have been perfectly flushed the middle would have been ~1/8 inch too far in. The picture you saw was a photoshoped so mines does not look exactly like that. I forgot to take a picture and was trying to show the difference widening your holes would make.
Question, after adjusting the gain controls would you say that the bass is louder? If I remember correctly there are 4 *****, I was thinking front right, front left, rear right and rear left. How would you get more bass out of the sub?
Last edited by k1653d; Apr 28, 2008 at 06:55 AM.
Originally Posted by k1653d
Question, after adjusting the gain controls would you say that the bass is louder? If I remember correctly there are 4 *****, I was thinking front right, front left, rear right and rear left. How would you get more bass out of the sub?