
made some brake ducts for the Zed


Registered User
Joined: May 2008
Posts: 8
Likes: 0
From: SoCal
Thanks for taking the time to post all of your works, as a new Z owner I've been hoping an effecient cooling system would allow me to bypass the BBK.
Would you mind giving a little more info on your impressions at grattan? ...did you notice zero fad at all, or was it simply reduced? Are you very experienced with track events?
P.S. +1 on the quality of work, it is really impressive.
Would you mind giving a little more info on your impressions at grattan? ...did you notice zero fad at all, or was it simply reduced? Are you very experienced with track events?
P.S. +1 on the quality of work, it is really impressive.

Thread Starter
Registered User
Joined: Apr 2005
Posts: 58
Likes: 0
From: Ann Arbor, MI
Originally Posted by Fletch69z
So, from the looks of it I'm assuming that this would not work with a SC and intercooler set up? I am not sure of the exact placement and measurement because I am getting my Vortech this winter so it's not on the car yet. But I wouldn't want to spend all this time and effort only to have to remove them when I add the SC,  .
.
.
Thread Starter
Registered User
Joined: Apr 2005
Posts: 58
Likes: 0
From: Ann Arbor, MI
Originally Posted by biggerss
Thanks for taking the time to post all of your works, as a new Z owner I've been hoping an effecient cooling system would allow me to bypass the BBK.
Would you mind giving a little more info on your impressions at grattan? ...did you notice zero fad at all, or was it simply reduced? Are you very experienced with track events?
P.S. +1 on the quality of work, it is really impressive.
Would you mind giving a little more info on your impressions at grattan? ...did you notice zero fad at all, or was it simply reduced? Are you very experienced with track events?
P.S. +1 on the quality of work, it is really impressive.

I just did another event at Grattan this weekend (forgot the pyrometer, AGAIN!) and I had no fade from lap to lap, session to session. A friend who's car we also put ducts on said that the braking was far more consistent too. Even though I now seem to be pretty fade free, I wouldn't mind having bigger brakes for just a bit more stopping power. But then again, I'm not competing at the track, just having fun. I've never felt that the OE brakes are a safety issue, especially since the duct work, so I can't justify the $2k for myself... yet.
To answer your question, I've done a couple summers of auto-x, a few trackdays at Grattan, and the 2 day Mid-Ohio school (which was great). Oh, and also some hot laps in a rental e90 on the Nordschleife.

Last edited by Maizzze; Sep 4, 2008 at 04:50 PM.

Very nice work. Did you have to cut away some of the splash/rock shield from the back of the rotor to get the air there?
In my online research I found this, which also might give some ideas to people that have access to fabrication equipment to make some simple air deflectors to bolt on and then sell them us who have no equipment .
.
http://www.1017.org/nsx/BrakeMods/index.html
In my online research I found this, which also might give some ideas to people that have access to fabrication equipment to make some simple air deflectors to bolt on and then sell them us who have no equipment
.http://www.1017.org/nsx/BrakeMods/index.html
Thread Starter
Registered User
Joined: Apr 2005
Posts: 58
Likes: 0
From: Ann Arbor, MI
Very nice work. Did you have to cut away some of the splash/rock shield from the back of the rotor to get the air there?
In my online research I found this, which also might give some ideas to people that have access to fabrication equipment to make some simple air deflectors to bolt on and then sell them us who have no equipment.
http://www.1017.org/nsx/BrakeMods/index.html
In my online research I found this, which also might give some ideas to people that have access to fabrication equipment to make some simple air deflectors to bolt on and then sell them us who have no equipment
.http://www.1017.org/nsx/BrakeMods/index.html
Quick update: I've driven a couple thousand miles so far with no catastrophies. No pulling of brake ducting through my bodywork and no gouges in my wheel or rotor. I'd say it's a pretty safe modification with a lot of benefits.

So I'm about to undergo this (about could be 2 months for me) and am curious if you ever had a change to compare with/without duct temperatures on the rotors. It would be more ideal to feed the center of the rotor fresh air, but the giant spindle/hub assembly is there, so I'm curious to see how much this helps without making a custom backing plate with a provisional hinge of sorts, etc.

Maizze,
Thanks for the write up. I used your directions, but made it a step or two easier.
Instead of making L brackets and riveting a small piece of tubing to the back of the plastic plates, I bought 3 inch PVC with a female threaded adapter (found in the plumbing section at LOWES or Home Depot) at one end. I then threaded the ducting into the back end and simply pushed the front end through the holes I cut with the Dremel. The front end of the PVC is smooth, and once painted black it looks very good behind the grill. It is not flush, about 3/4 of an inch sticks out. When you look hard you can see them behind the grill, which I kind of like. The simplest part is that you can just slide the PVC through the holes and they will hold steady without having to fab any mounting points. It also looks sexier without the rivets (my opinion).
I have yet to use the aluminum strips to create mounting points. So far heavy duty zip ties seem to be be working. I simply tied it down to the sway bar. After several hundred miles and a track day they are holding up fine.
I'm not sure how well they actually work, but after a fade free track day I am satisfied. I also had ATE Type 200, Stoptech lines and Carbotech XP8s to help slow me down. Great write up.
Last edited by Sooner350; Feb 24, 2010 at 08:57 AM.


Maizze,
Thanks for the write up. I used your directions, but made it a step or two easier.
Instead of making L brackets and riveting a small piece of tubing to the back of the plastic plates, I bought 3 inch PVC with a female threaded adapter (found in the plumbing section at LOWES or Home Depot) at one end. I then threaded the ducting into the back end and simply pushed the front end through the holes I cut with the Dremel. The front end of the PVC is smooth, and once painted black it looks very good behind the grill. It is not flush, about 3/4 of an inch sticks out. When you look hard you can see them behind the grill, which I kind of like. The simplest part is that you can just slide the PVC through the holes and they will hold steady without having to fab any mounting points. It also looks sexier without the rivets (my opinion).
I have yet to use the aluminum strips to create mounting points. So far heavy duty zip ties seem to be be working. I simply tied it down to the sway bar. After several hundred miles and a track day they are holding up fine.
I'm not sure how well they actually work, but after a fade free track day I am satisfied. I also had ATE Type 200, Stoptech lines and Carbotech XP8s to help slow me down. Great write up.
Thanks for the write up. I used your directions, but made it a step or two easier.
Instead of making L brackets and riveting a small piece of tubing to the back of the plastic plates, I bought 3 inch PVC with a female threaded adapter (found in the plumbing section at LOWES or Home Depot) at one end. I then threaded the ducting into the back end and simply pushed the front end through the holes I cut with the Dremel. The front end of the PVC is smooth, and once painted black it looks very good behind the grill. It is not flush, about 3/4 of an inch sticks out. When you look hard you can see them behind the grill, which I kind of like. The simplest part is that you can just slide the PVC through the holes and they will hold steady without having to fab any mounting points. It also looks sexier without the rivets (my opinion).
I have yet to use the aluminum strips to create mounting points. So far heavy duty zip ties seem to be be working. I simply tied it down to the sway bar. After several hundred miles and a track day they are holding up fine.
I'm not sure how well they actually work, but after a fade free track day I am satisfied. I also had ATE Type 200, Stoptech lines and Carbotech XP8s to help slow me down. Great write up.

please.

I have started to do a similar build, and only did the drivers side as a "proof of concept". Mine are not quite as close to the brakes as yours, and I just zipped tied my hose to the grill for now.
Anyway, after a drive home from work (mix of highway and city driving), I checked the temps. Drivers side was 30 degrees cooler on both the rotor and caliper, and this is just mild driving and braking. At higher speeds and perhaps a better inlet, it should be even better.
oh, and to be scientific of course, I compared the temps before and noticed the drivers side was actually a little hotter by about 10 degrees after some heavy braking. So we are talking about a 25% cooler brake.
03 GT, STD brakes and rotors.
I would also like to point out that you shouldn't use dryer duct. The stuff is flimsy, rips easy, and the ribs are much deeper making it harder to flow air. Get the proper stuff.
Last edited by GT-Rob; Jul 22, 2010 at 05:20 AM.

Registered User
Joined: Feb 2008
Posts: 7
Likes: 0
From: tucson, az.
These are all the pics I took from my install. It took a little while, but it was my first time installing brake ducting on a car. I'm sure i could do it even faster now. So I was hooked the moment i found out about the Nismo carbon fiber Ducts, the reason for this install is that and I drive the Nurburgring regularly, and that track is notorious for pushing your car to the limit, especially your brakes.

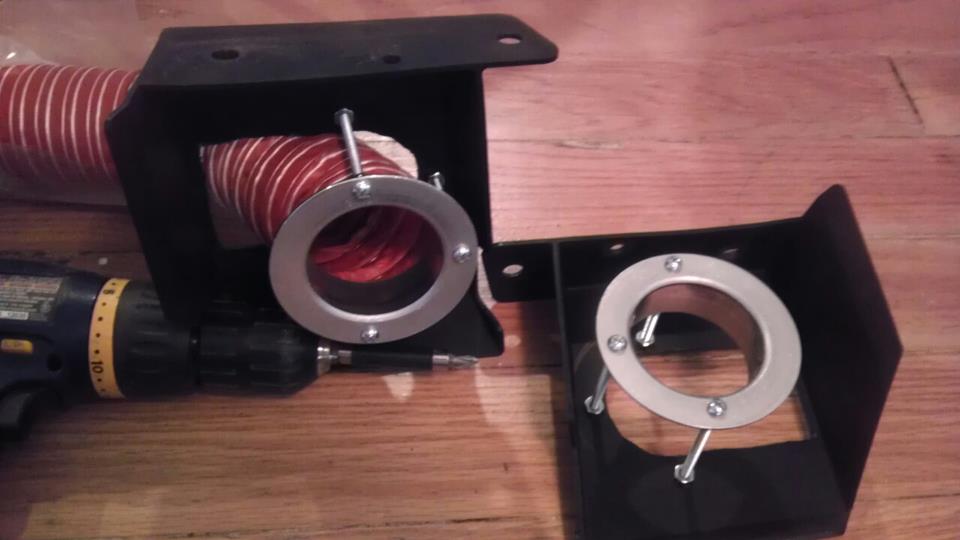
I went with 2.5 in. flanges. from www.aircraftspruce.com

Went with 4 1.81 in. to 2.75 in. clamps from www.pegasusautoracing.com
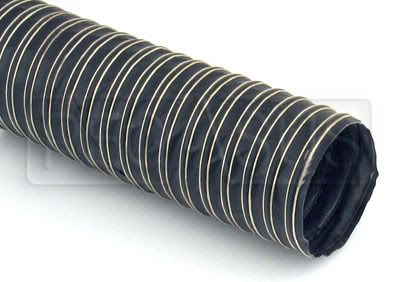
2.5 in. diameter, 12 ft long piece of neoprene ducting. you will use the whole hose, just cut it in half. it fits perfectly. I got it from www.pegasusautoracing.com

and i ordered the Nismo Ducts from www.Ebay.com

drilled out the grill shields

assebled all 3 pieces with 4 rivets each

disassembly of rotor and caliper

removal of Dust shield and Hub assy.

before my cut with the tin snips.

you will have to snip both sides. i originally wasn't going to put them back on, but upon closer inspection i noticed that there was a gap if you just put the hub on the spindle. so this was the easy work around.

the finished result

you will have to file down this little raised section on the spindle in order for the ducts sticky tape to be effective.


onto the other side


make sure you check your gap. you don't want the duct or the aluminum bracket rubbing against your rotor.

what it looks like inside the duct to the rotor.


take off this piece. only three snap clips hold this piece in. i ended up using a saw zaw to achieve this cut. a bit of over kill.


you will have to relocate this harness, just like i did with the zip tie.


make sure you check your clearances. rotate the wheel full left and right.


put her all back together, go home cool off with a good beer.
I went with 2.5 in. flanges. from www.aircraftspruce.com
Went with 4 1.81 in. to 2.75 in. clamps from www.pegasusautoracing.com
2.5 in. diameter, 12 ft long piece of neoprene ducting. you will use the whole hose, just cut it in half. it fits perfectly. I got it from www.pegasusautoracing.com
and i ordered the Nismo Ducts from www.Ebay.com
drilled out the grill shields
assebled all 3 pieces with 4 rivets each
disassembly of rotor and caliper
removal of Dust shield and Hub assy.
before my cut with the tin snips.
you will have to snip both sides. i originally wasn't going to put them back on, but upon closer inspection i noticed that there was a gap if you just put the hub on the spindle. so this was the easy work around.
the finished result
you will have to file down this little raised section on the spindle in order for the ducts sticky tape to be effective.
onto the other side
make sure you check your gap. you don't want the duct or the aluminum bracket rubbing against your rotor.
what it looks like inside the duct to the rotor.
take off this piece. only three snap clips hold this piece in. i ended up using a saw zaw to achieve this cut. a bit of over kill.
you will have to relocate this harness, just like i did with the zip tie.
make sure you check your clearances. rotate the wheel full left and right.
put her all back together, go home cool off with a good beer.
Last edited by talon49; Jul 11, 2011 at 11:56 AM. Reason: resized the pics.

Great work!
One thing, you would get a lot more air to the ducts if you attached a funnel for the incoming air. Something similar in concept to this:
http://store.spectreperformance.com/...6.0.0.0?pp=35&
One thing, you would get a lot more air to the ducts if you attached a funnel for the incoming air. Something similar in concept to this:
http://store.spectreperformance.com/...6.0.0.0?pp=35&
Registered User
Joined: Feb 2008
Posts: 7
Likes: 0
From: tucson, az.
Great work!
One thing, you would get a lot more air to the ducts if you attached a funnel for the incoming air. Something similar in concept to this:
http://store.spectreperformance.com/...6.0.0.0?pp=35&
One thing, you would get a lot more air to the ducts if you attached a funnel for the incoming air. Something similar in concept to this:
http://store.spectreperformance.com/...6.0.0.0?pp=35&
It will help me find what I'm looking for. I will take some readings later this week with one side taped, and the other free to flow, but since this is just regular commuting, I doubt ill see much of a difference.
ill throw some hard braking in there too. The real test will be when i take it back to the Nurburgring.
Last edited by talon49; Jul 11, 2011 at 09:57 AM.


Just a thought, you since you do tear downs etc often, fab another one or two and sell it.
Id surely buy it for more than its worth in Home Depot parts except i ahve a big FMIC on its way in.. but im sure others on the thread share my sentiments.
Making brackets is what id like to avoid... general hassle etc.
Id surely buy it for more than its worth in Home Depot parts except i ahve a big FMIC on its way in.. but im sure others on the thread share my sentiments.
Making brackets is what id like to avoid... general hassle etc.
Registered User
Joined: Feb 2008
Posts: 7
Likes: 0
From: tucson, az.
Just a thought, you since you do tear downs etc often, fab another one or two and sell it.
Id surely buy it for more than its worth in Home Depot parts except i ahve a big FMIC on its way in.. but im sure others on the thread share my sentiments.
Making brackets is what id like to avoid... general hassle etc.
Id surely buy it for more than its worth in Home Depot parts except i ahve a big FMIC on its way in.. but im sure others on the thread share my sentiments.
Making brackets is what id like to avoid... general hassle etc.

love this community, bringing this thread back to life to add a slight modification. Raised the ducting forward w/ machine bolts to give the hose a more obtuse entry angle.
Q: Why would you want a more obtuse entry angle?
A: I don't want to relocate PS cooler and I don't want to reroute oil cooling lines
Im probably going to epoxy a screen on top.
Thanks my350z.
4x 2.5" alumn air ducts
12' of 2.5" high temp silicone hose
2x 10x24 3" machine bolt and nut
Q: Why would you want a more obtuse entry angle?
A: I don't want to relocate PS cooler and I don't want to reroute oil cooling lines
Im probably going to epoxy a screen on top.
Thanks my350z.
4x 2.5" alumn air ducts
12' of 2.5" high temp silicone hose
2x 10x24 3" machine bolt and nut
Last edited by vtchang; Aug 24, 2012 at 12:45 PM. Reason: added Q and A

Goodstuff. I'm still thinking how to do this since I got 3 big oilcoolers (A/T, PS and Engine) hidden behind my Nismo V2 bumper. Need to figure out a way to somehow use these designs you guys posted.
thanks for sharing!
thanks for sharing!

