
Installing long wheel studs in rear with pics


Thread Starter
Registered User
iTrader: (5)
Joined: Aug 2003
Posts: 63
Likes: 0
From: north carolina
I used Axelerates steps to replace the stock wheel studs with longer (ARP) wheel studs. I had a time confirming his steps, because he was using different terms for the parts than what I am accustomed to, so I thought I would expand his guide by adding pics. All the parts referred to by me are what they are called in the service manual (section RAX).
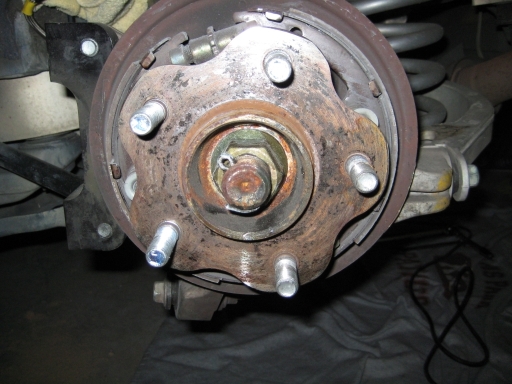
Knockout old studs.
-- I did this after I removed the hubs from the axle, but this can be done first. In general, just use a medium size hammer; a small sledge hammer or a good sized carpenter's hammer and knock the old studs out through the back of the wheel hub.
Remove caliper, rotor.
-- See your manufacturer's instructions for this part.
Loosen axle nut.
-- This is a 32mm nut. First, remove the cotter pin. I used an impact wrench to remove the nut, because with both wheels off the ground, it is hard to get enough torque on the nut without the rear drive shaft turning.
Axle Nut
Remove the six bolts on the stub axles. ( You DO NOT have to remove or take apart the e-brake!)
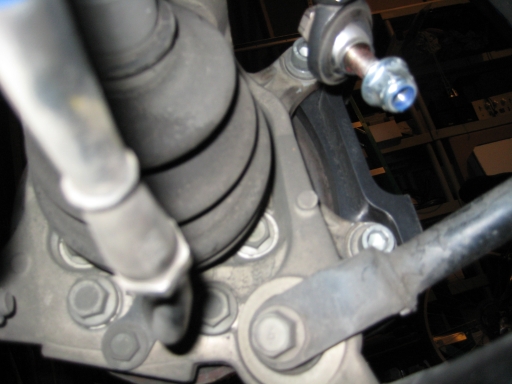
-- The six bolts are on the side flange where the rear drive shaft assembly connects to the differential. There is one on each side, for each wheel. You'll need to rotate the rear drive shaft to gain access to all six bolts.
Here is a picture of the side flange. Three of the bolts can be seen.

Then the axle comes out very easily.
-- Now you can remove the rear drive shaft assembly. It takes a little wrangling to get it out, just be sure to pull the joint sub-assembly straight out and it will come with a few wiggles and tugs. Also, I disconnected the rear sway bar from the end links to get more room to pull the joint sub-assembly out.
Joint sub-assembly boot blocking access to the wheel hub bolts.
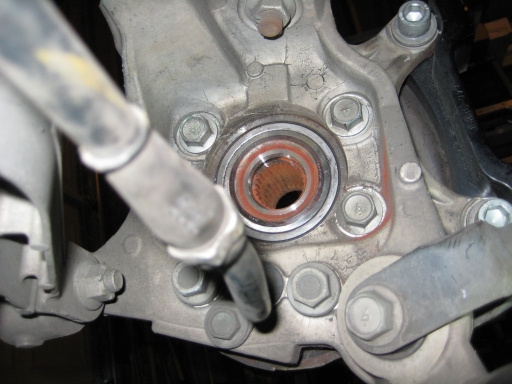
Now you are able to get to the 4 bolts holding the hubs in place.
-- The four bolts holding the wheel hub to the axle are now accessible and can be removed.
Wheel hub bolts after removing the rear drive shaft assembly. Only three bolts are visible in the picture. The fourth bolt is hiding behind the parking brake cable.
Just remove them and place the new studs in.
-- Be sure to have hold of the wheel hub when you remove the last bolt. It fits into a flange in the axle, but if it is at all loose, it will fall to the ground. After removing the wheel hubs, I hammered the old studs out and placed, but did not seat the new studs. I held them in place with the lug nuts until I had the wheel hub reinstalled on the axle.
Pull them in, and then put everything back!
-- Using an impact wrench or a breaker bar seat the new studs into the wheel hub. I bought my studs from SPL Parts. They provided the spacers and heavy duty nut to seat the studs into the wheel hub.
I think the axle nut torque's to 120 ft lb, and the stub axle bolts to 50-60 ft lb.
-- The axle nut ~120 ft/lbs. Differential side flange bolts ~55 ft/lbs. Wheel hub bolts are torqued to about ~65 ft/lbs. See service manual for exact specifications.

My sincerest thanks to Axelerate for writing down these steps, so the rest of us don't have to go through all the pain and frustration he must have gone through figuring this out. It was very easy and should only take a couple of hours. I hope this becomes a useful guide for anyone wanting to perform this upgrade.
Knockout old studs.
-- I did this after I removed the hubs from the axle, but this can be done first. In general, just use a medium size hammer; a small sledge hammer or a good sized carpenter's hammer and knock the old studs out through the back of the wheel hub.
Remove caliper, rotor.
-- See your manufacturer's instructions for this part.
Loosen axle nut.
-- This is a 32mm nut. First, remove the cotter pin. I used an impact wrench to remove the nut, because with both wheels off the ground, it is hard to get enough torque on the nut without the rear drive shaft turning.
Axle Nut
Remove the six bolts on the stub axles. ( You DO NOT have to remove or take apart the e-brake!)
-- The six bolts are on the side flange where the rear drive shaft assembly connects to the differential. There is one on each side, for each wheel. You'll need to rotate the rear drive shaft to gain access to all six bolts.
Here is a picture of the side flange. Three of the bolts can be seen.
Then the axle comes out very easily.
-- Now you can remove the rear drive shaft assembly. It takes a little wrangling to get it out, just be sure to pull the joint sub-assembly straight out and it will come with a few wiggles and tugs. Also, I disconnected the rear sway bar from the end links to get more room to pull the joint sub-assembly out.
Joint sub-assembly boot blocking access to the wheel hub bolts.
Now you are able to get to the 4 bolts holding the hubs in place.
-- The four bolts holding the wheel hub to the axle are now accessible and can be removed.
Wheel hub bolts after removing the rear drive shaft assembly. Only three bolts are visible in the picture. The fourth bolt is hiding behind the parking brake cable.
Just remove them and place the new studs in.
-- Be sure to have hold of the wheel hub when you remove the last bolt. It fits into a flange in the axle, but if it is at all loose, it will fall to the ground. After removing the wheel hubs, I hammered the old studs out and placed, but did not seat the new studs. I held them in place with the lug nuts until I had the wheel hub reinstalled on the axle.
Pull them in, and then put everything back!
-- Using an impact wrench or a breaker bar seat the new studs into the wheel hub. I bought my studs from SPL Parts. They provided the spacers and heavy duty nut to seat the studs into the wheel hub.
I think the axle nut torque's to 120 ft lb, and the stub axle bolts to 50-60 ft lb.
-- The axle nut ~120 ft/lbs. Differential side flange bolts ~55 ft/lbs. Wheel hub bolts are torqued to about ~65 ft/lbs. See service manual for exact specifications.
My sincerest thanks to Axelerate for writing down these steps, so the rest of us don't have to go through all the pain and frustration he must have gone through figuring this out. It was very easy and should only take a couple of hours. I hope this becomes a useful guide for anyone wanting to perform this upgrade.
Last edited by kydiwl; Nov 28, 2008 at 04:06 AM.

Good job!
I seriously spent hours trying to figure out a way around removing the axles. Wish I would of just did it from the start!
Thanks for the pics, it will make it much easier for the next guy!
I seriously spent hours trying to figure out a way around removing the axles. Wish I would of just did it from the start!
Thanks for the pics, it will make it much easier for the next guy!


Thread
Thread Starter
Forum
Replies
Last Post