
DIY: Painting '06- Headlights.


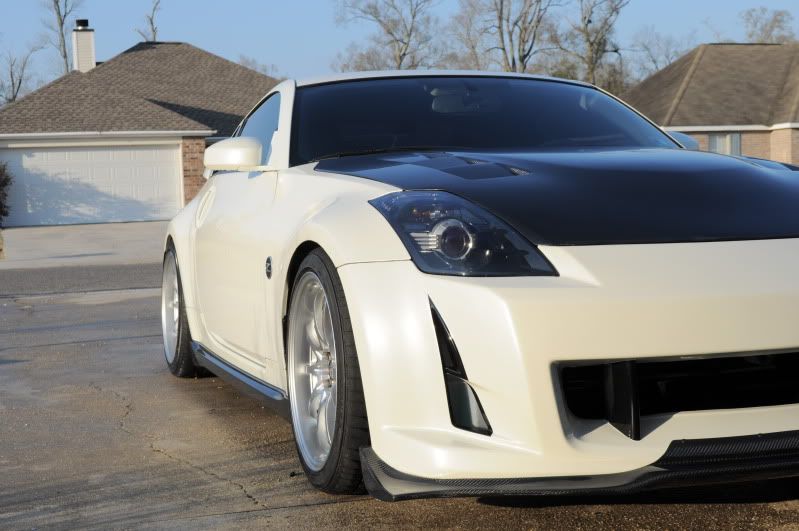
Did mine about a month ago. It's kind of scary starting, especially when your too broke poor to buy a new set if you F up your only set.... lol I'm happy with the way they turned out. I got a little paint happy and painted the cups red. It looks pretty cool when the sun hits it right.


really nice


Registered User
Joined: May 2011
Posts: 17
Likes: 0
From: Newark, CA
I'm painting mine this week too. I also have a Magnetic Black '06 Touring. I picked up a can of Satin Black Krylon Fusion. In my honest opinion, I'd go with Satin or Gloss and stay away from the flat. Flat looks good only on certain colors, like a white Z. Let me know how yours turns out, bro!
I'll post pictures of my car once I'm done.
I'll post pictures of my car once I'm done.

Registered User
Joined: May 2011
Posts: 17
Likes: 0
From: Newark, CA
Quick question for OP or anybody that has done this already..
Do I need to prime the housing first before applying the paint?
Also, one can of Krylon Fusion should suffice, right? I saw somewhere in the forums that someone used 2 cans... that seems a bit excessive to me..
Do I need to prime the housing first before applying the paint?
Also, one can of Krylon Fusion should suffice, right? I saw somewhere in the forums that someone used 2 cans... that seems a bit excessive to me..
Registered User
Joined: May 2011
Posts: 17
Likes: 0
From: Newark, CA
FINISHED! This was definitely a much more tedious of a project than I expected...

Iron Man Halo installed... yea, I definitely need to clean and buff out the lens.. :P

Mounting everything back in place

Dis-assembling the headlights

Priming the pieces that I want to paint

More hi-quality pictures to come once I get them off my friends camera. Most of these were taken from my iPhone, so I apologize for the lack of picture quality.
Thanks OP for the great DIY!
Iron Man Halo installed... yea, I definitely need to clean and buff out the lens.. :P
Mounting everything back in place
Dis-assembling the headlights
Priming the pieces that I want to paint
More hi-quality pictures to come once I get them off my friends camera. Most of these were taken from my iPhone, so I apologize for the lack of picture quality.
Thanks OP for the great DIY!
Last edited by justinjohnlau; Jul 15, 2011 at 05:42 AM.


Any chance there is someone in the northern VA area that would be interested in doing this for me?
Also, what color would you guys suggest for a Magnetic black car? I was thinking either a gloss black or a darker/medium gray.
Also, what color would you guys suggest for a Magnetic black car? I was thinking either a gloss black or a darker/medium gray.
Registered User
Joined: May 2011
Posts: 17
Likes: 0
From: Newark, CA
Sorry bro, I'm in California. If you take a look at my pictures (I posted mine a few posts down), I have a Magnetic Black Z as well and I did mine Satin Black. It turned out real nice, imo.


Just finished painting all my lights black, decided to leave the chrome dish in the headlights as apposed to go all black.
Just an FYI for anyone trying to "tinit" chrome, VHT Taillight tint doesn't stick to chrome coated plastic, found it just puddled in the bottom of the signal light dish but i also didn't sand any of the chrom finish off.
I used Dupli-color Trim Paint for my head lights and VHT taillight tint for all the rest of my lights.


damn look really nice!
i always want to do this mod but my headlights got many tiny stress cracks. i am afraid it will break under the heat from the oven or heat gun. And i dont feel like spending 1k for headlights to do the mod!!!! so sad!!
i always want to do this mod but my headlights got many tiny stress cracks. i am afraid it will break under the heat from the oven or heat gun. And i dont feel like spending 1k for headlights to do the mod!!!! so sad!!
i cooked mine on a cookie sheet with damp paper towel just so i didn't run the risk of melting any of the plastic on the hot metal.
Pre Heat to 235 and bake for 8 minutes and then you pull them out, and get an old butter knife that you don't plan to use again and gently bend the tab's back (REMEMBER TO REMOVE THE CASE SCREWS BEFORE YOU BAKE!!!). once you have that i found it was easiest to get ahold of the bottom of the light and then the tug a war begins.
Once you have the casing off you just dis assemble what you wanna paint then reassemble it after.
Instead of RE-BAKING my headlights a buddy and i used 2 heat guns and reheated the seal till it was nice and soft and then slid it all back together. My buddy has baked them before and he found that re-baking in the over he got a bit of moisture but with the heat guns it worked slick when it came to putting it back together.
I then used a compound that is used for replacing windshields that is moisture proof and stays nice and plyable and if you were to redo it the stuff isn't a ***** to get off it will peal off nicely, and it's moisture proof.
I was timid at first but honestly i would do it all over again cuz it was quite simple once i started.
Did mine about a month ago. It's kind of scary starting, especially when your too broke poor to buy a new set if you F up your only set.... lol I'm happy with the way they turned out. I got a little paint happy and painted the cups red. It looks pretty cool when the sun hits it right.

