
DIY: Blacking out '06-'08 JDM Clear Side Markers


(Sorry '03-'05 guys, your side markers are quite different, and I don't know if any of this applies to you. If any of you want to give this a shot and add to the thread, feel free.)
My goal in this project was to get rid of the amber colored USDM front side markers, yet still try to retain some of the reflective properties.
Since I have blacked-out headlights, I thought "clear" (or maybe more accurately, "white") JDM side markers would look too stark on my redline. So I knew from the start I wanted to go black.
I read that some folks simply scuffed up their ambers and shot black over them, or tinted with an overlay or window film.
However, I wondered if there was a better way.
The cons to simply spraying or tinting over the outside are:
1) Lose (in the case of paint) or reduce (in the case of tint) any reflective properties.
2) Possibility of paint or tint chipping off over time, revealing the ugly amber (or less ugly white) underneath. After looking at my pitted and chipped front bumper, I consider this a real possibility.
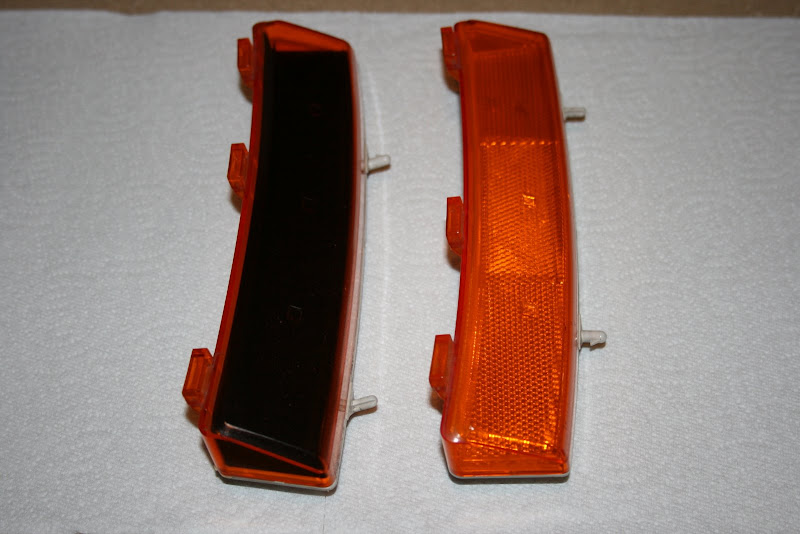
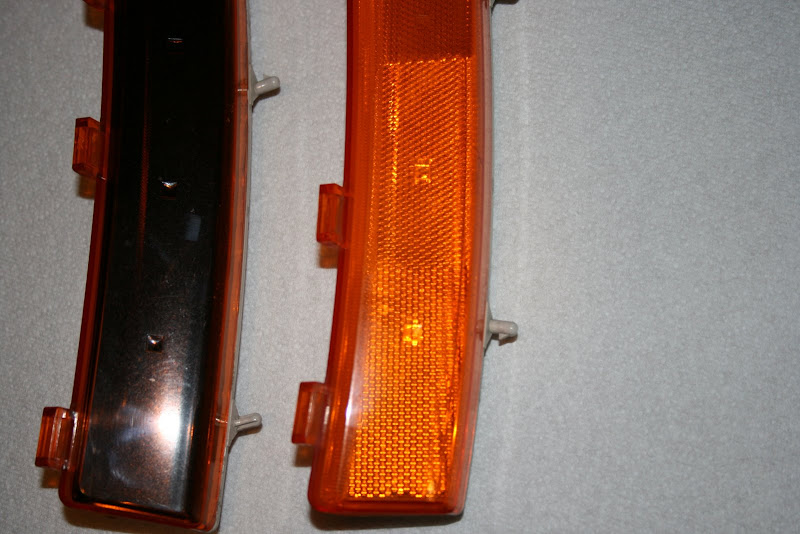
I bought a set of JDM clears off the forum (thanks JEKL!), and decided to crack them open to see what could be done.
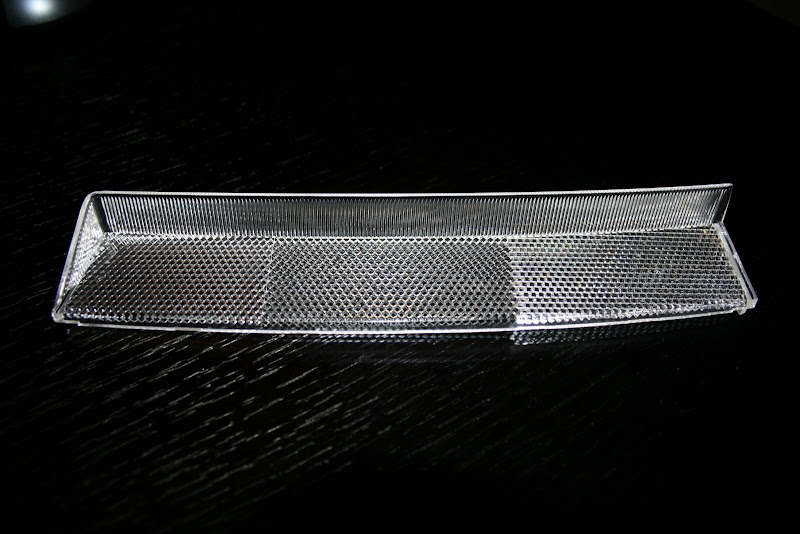
As I suspected, the '06-'08 side markers are actually 3 pieces.
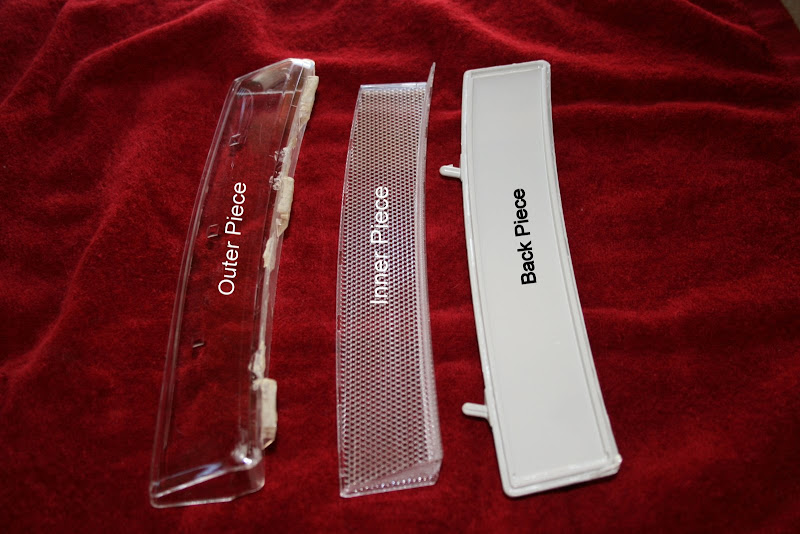
Fig 1: Side marker is actually made of three pieces. Named each piece for future reference.
This opens up a whole bunch of possibilities... One could:
A. Spray the back sides of the inner piece black. This could potentially leave reflective surfaces reflective, and would never chip off because nothing would ever be touching or rubbing against it.
B. Spray or tint with window film the front sides of the inner piece. This would certainly black out the side marker, but would most likely lose any chance of retaining reflective properties. Would also never chip off.
C. Spray or tint with window film the inside of the outer piece. This would never chip off, but may be losing or reducing reflective properties.
D. Spray the back piece black. I think this would be best bet for saving reflective properties, but I don't know how "black" the side marker would look after this.
After weighing all the pros and cons, I decided to go with option A.
Tools used:
Oven
Cookie Sheet
Sharp Knife - Xactos may be too flimsy. I used a hunting knife, but a steak knife might works just as well.
Materials Used:
JDM Clear Side Markers for '06-'08
Black spray paint - I had some left over from the headlight job.
Masking Tape (I like 3M Blue)
Silicone or Crazy Glue
Process:
Step 1 - Bake JDM Clears to loosen adhesive. Preheat oven to 250 F, put rack in middle of oven, and bake the side markers for 5 mins. DO NOT GO LONGER THAN THAT.
Step 2 - Separate outer piece from back piece. Using your sharp knife, carefully and slowly work around the seam where the housing joins. Use your discretion here, I am not responsible for loss of limb or life! Get as much of the blade in the seam as you can, and simply twist the blade to force the two halves apart, then move the blade slightly to the next spot. You will probably hear a sound like cracking walnuts, that is the housing separating. But again, work SLOWLY and check the rest of the housing frequently to make sure you are not breaking anything. I had a small corner of one of mine chip off, but it stayed on the back piece so I didn't worry about it too much.
Step 3 - Carefully pry inner piece off of back piece. It is glued onto the pack piece via two small strips.
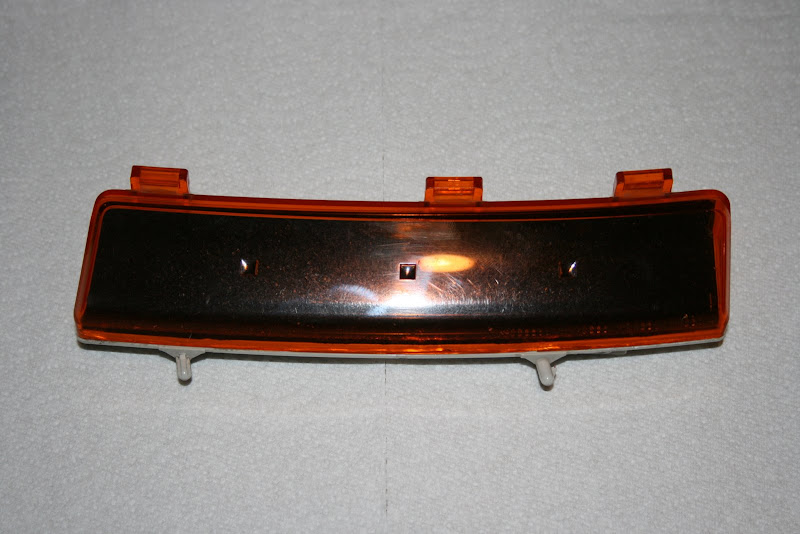
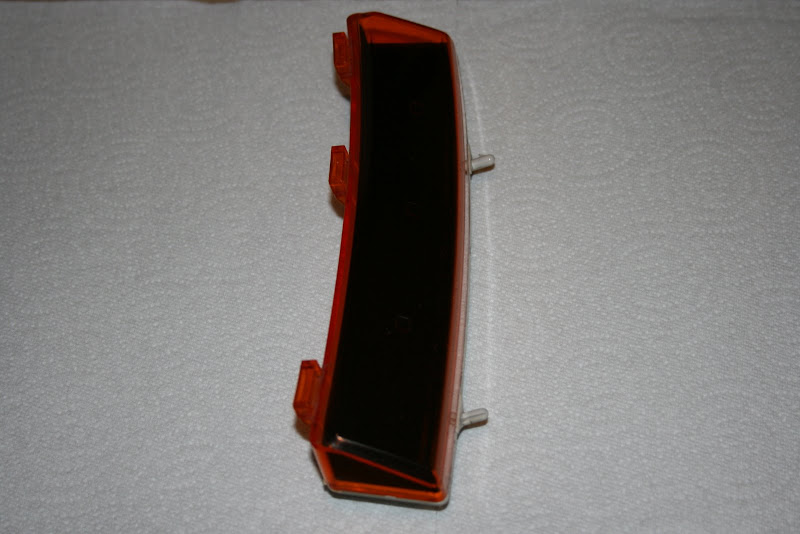
Step 4 - Since I chose option A, I taped off the front sides of my inner piece. The back side of the inner piece is textured on the large surface, and smooth on the small. Rattle-canned the back with two light coats.
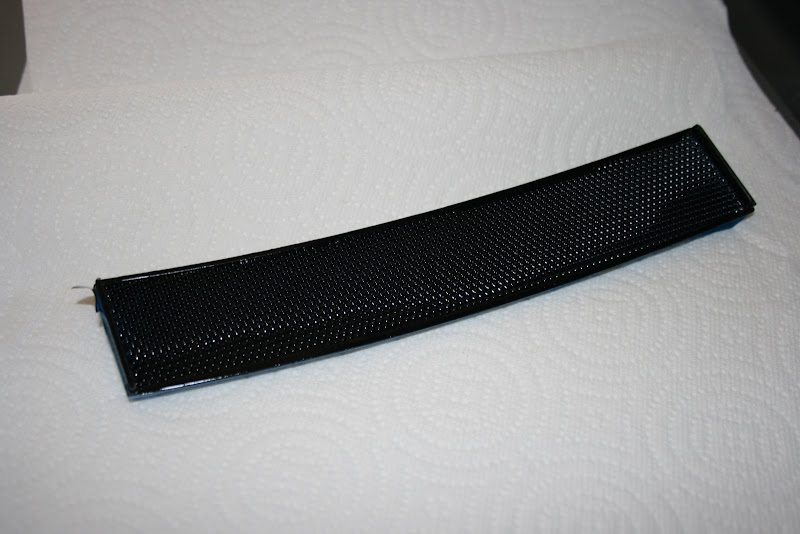
Fig 2: Back of inner piece painted. Two light coats.
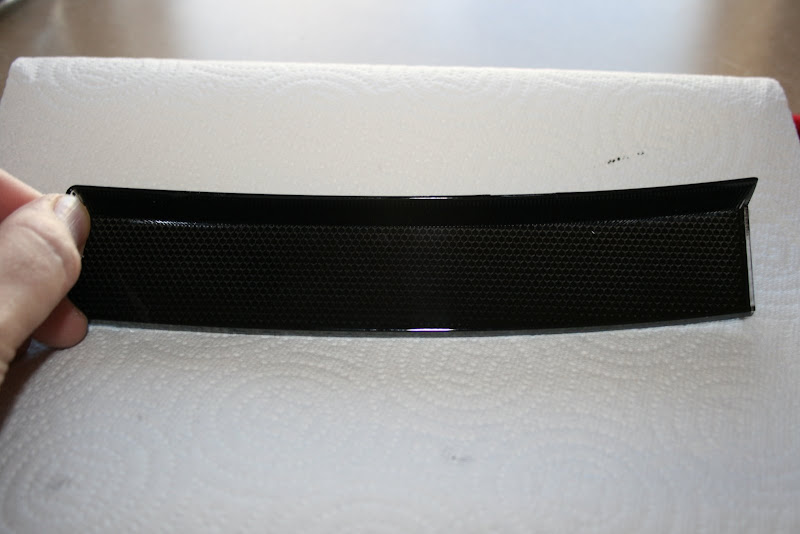
Fig 3: Inner piece, as viewed from the front, after painting. Note that the "reflective" surfaces are still visible here.
Step 5 - Reassemble and reseal. I just used super glue, but I probably should have used a silicone of some sort.
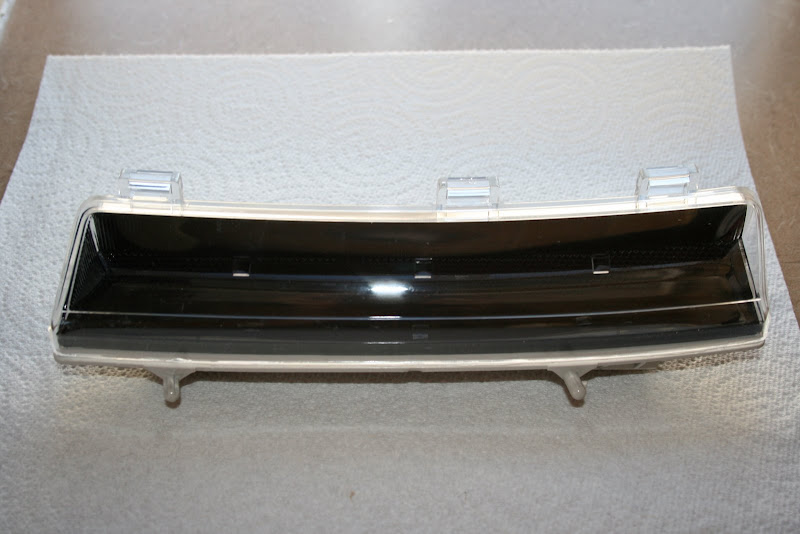
Fig 4: Sealed up and ready to go.
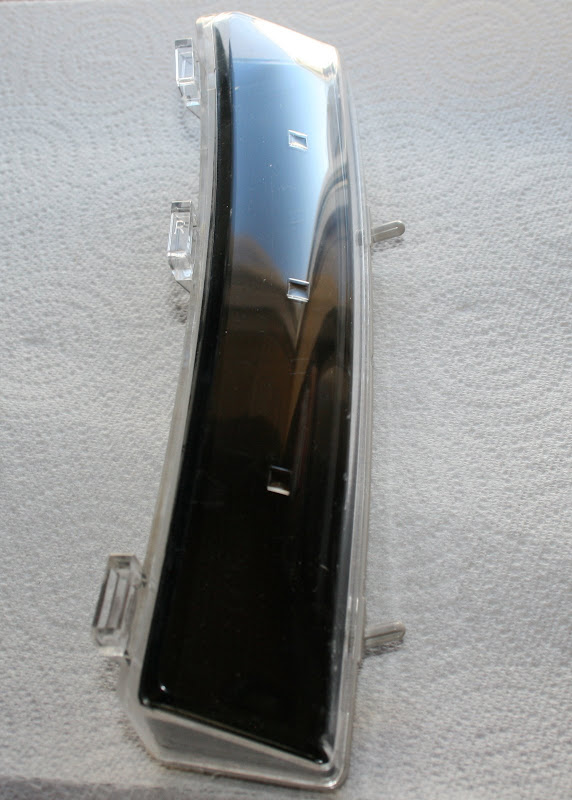
Fig 5: Another shot once sealed.
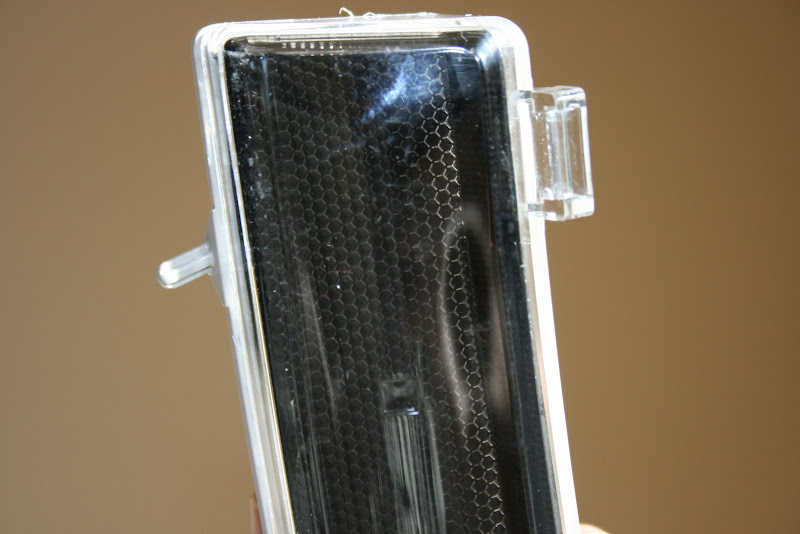
Fig 6: Close-up in the sun.
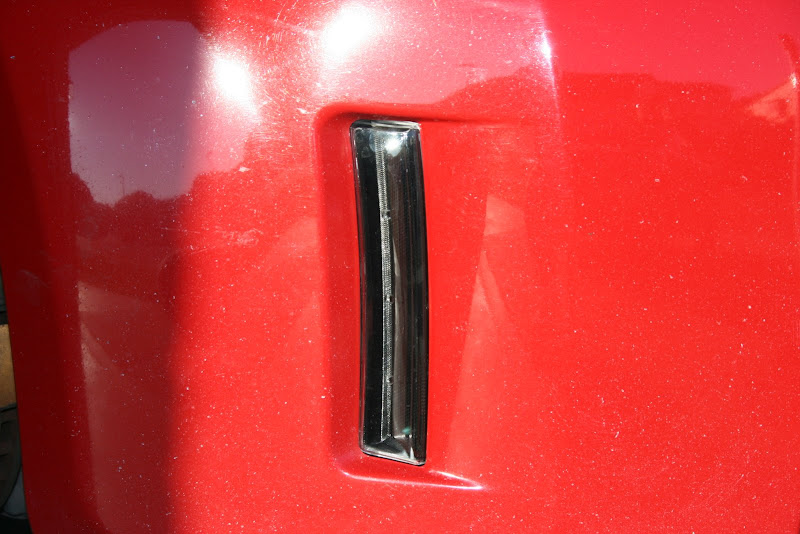
Fig 7: Close up once installed. Note that the side still reflects the sun due to the texture of that part of the inner piece.
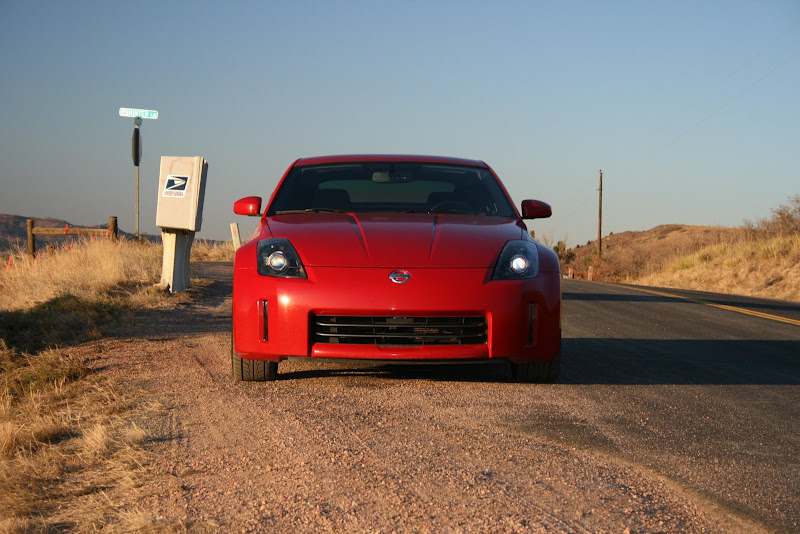
Fig 8: Looks just fine from the front too.
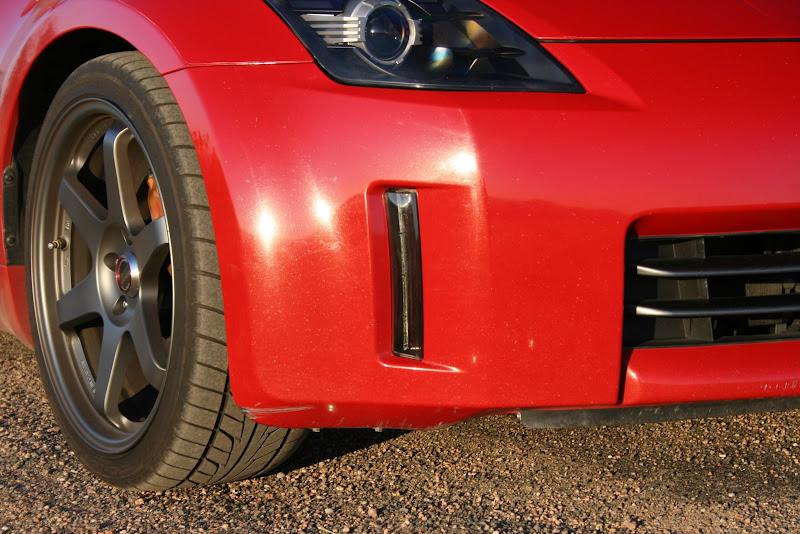
Fig 9: Another shot in the sun. Yes, I know, I need a drop...
My goal in this project was to get rid of the amber colored USDM front side markers, yet still try to retain some of the reflective properties.
Since I have blacked-out headlights, I thought "clear" (or maybe more accurately, "white") JDM side markers would look too stark on my redline. So I knew from the start I wanted to go black.
I read that some folks simply scuffed up their ambers and shot black over them, or tinted with an overlay or window film.
However, I wondered if there was a better way.
The cons to simply spraying or tinting over the outside are:
1) Lose (in the case of paint) or reduce (in the case of tint) any reflective properties.
2) Possibility of paint or tint chipping off over time, revealing the ugly amber (or less ugly white) underneath. After looking at my pitted and chipped front bumper, I consider this a real possibility.
I bought a set of JDM clears off the forum (thanks JEKL!), and decided to crack them open to see what could be done.
As I suspected, the '06-'08 side markers are actually 3 pieces.
Fig 1: Side marker is actually made of three pieces. Named each piece for future reference.
This opens up a whole bunch of possibilities... One could:
A. Spray the back sides of the inner piece black. This could potentially leave reflective surfaces reflective, and would never chip off because nothing would ever be touching or rubbing against it.
B. Spray or tint with window film the front sides of the inner piece. This would certainly black out the side marker, but would most likely lose any chance of retaining reflective properties. Would also never chip off.
C. Spray or tint with window film the inside of the outer piece. This would never chip off, but may be losing or reducing reflective properties.
D. Spray the back piece black. I think this would be best bet for saving reflective properties, but I don't know how "black" the side marker would look after this.
After weighing all the pros and cons, I decided to go with option A.
Tools used:
Oven
Cookie Sheet
Sharp Knife - Xactos may be too flimsy. I used a hunting knife, but a steak knife might works just as well.
Materials Used:
JDM Clear Side Markers for '06-'08
Black spray paint - I had some left over from the headlight job.
Masking Tape (I like 3M Blue)
Silicone or Crazy Glue
Process:
Step 1 - Bake JDM Clears to loosen adhesive. Preheat oven to 250 F, put rack in middle of oven, and bake the side markers for 5 mins. DO NOT GO LONGER THAN THAT.
Step 2 - Separate outer piece from back piece. Using your sharp knife, carefully and slowly work around the seam where the housing joins. Use your discretion here, I am not responsible for loss of limb or life! Get as much of the blade in the seam as you can, and simply twist the blade to force the two halves apart, then move the blade slightly to the next spot. You will probably hear a sound like cracking walnuts, that is the housing separating. But again, work SLOWLY and check the rest of the housing frequently to make sure you are not breaking anything. I had a small corner of one of mine chip off, but it stayed on the back piece so I didn't worry about it too much.
Step 3 - Carefully pry inner piece off of back piece. It is glued onto the pack piece via two small strips.
Step 4 - Since I chose option A, I taped off the front sides of my inner piece. The back side of the inner piece is textured on the large surface, and smooth on the small. Rattle-canned the back with two light coats.
Fig 2: Back of inner piece painted. Two light coats.
Fig 3: Inner piece, as viewed from the front, after painting. Note that the "reflective" surfaces are still visible here.
Step 5 - Reassemble and reseal. I just used super glue, but I probably should have used a silicone of some sort.
Fig 4: Sealed up and ready to go.
Fig 5: Another shot once sealed.
Fig 6: Close-up in the sun.
Fig 7: Close up once installed. Note that the side still reflects the sun due to the texture of that part of the inner piece.
Fig 8: Looks just fine from the front too.
Fig 9: Another shot in the sun. Yes, I know, I need a drop...

It wasn't too bad. I did raise car, remove wheels and inner fender liner, made it easier, but probably not absolutely necessary. Suggest doing driver's side first, so one can see how stuff goes together. One would be working blind on the passenger side due to the window washer reservoir being in the way.


If I get ambitious tonight, I might bake open the ambers to see what that looks like. One thing for sure, the inner piece on the ambers has much better reflective qualities... It probably boils down to some US regulation somewhere. Anyway, I would be curious to know if the inner piece on the USDM amber side markers is amber or clear. My guess is amber, but who knows.
Even if it is amber, what would it look like once painted? Maybe the USDM's can attain similar results without having to invest in clears to begin with.
The inside of the USDM Ambers ARE clear! But, they may have a "silvery" coating to enhance reflective properties... and they were significantly tougher to crack open, and the one I did get open resulted in a "ring" of amber plastic left on the back piece. I am going to experiment a little and see what I can come up with.
If anyone wants to donate their ambers to the cause, I would be happy to try variations... it would be a true donation, as in don't expect them back in perfect shape. But if anything good comes of it, you can have them back if you want them. PM and we can work something out.
If anyone wants to donate their ambers to the cause, I would be happy to try variations... it would be a true donation, as in don't expect them back in perfect shape. But if anything good comes of it, you can have them back if you want them. PM and we can work something out.
Trending Topics
Yeah, there would be a lot of room for LEDs in there... even between the back piece and the inner piece, there is roughly 4.5mm of space there (little less than a quarter of an inch).
Here is inner piece painted black (just like I did in the clears) with the amber cover.
I have concluded that you would retain little or no reflective properties, so one may just want to spray the inside of the amber cover black and get almost the same effect.
Here is inner piece painted black (just like I did in the clears) with the amber cover.
I have concluded that you would retain little or no reflective properties, so one may just want to spray the inside of the amber cover black and get almost the same effect.

Go for it! Try a little longer in the oven with the Ambers... 5 mins wasn't quite enough.
Yeah, that was my feeling for my car. Since the ambers are already on there, might as well try those first, I would be interested to see how they look installed. Clears are between $40-$60, depending on if you get used ones like I did or order new ones.
Yeah, that was my feeling for my car. Since the ambers are already on there, might as well try those first, I would be interested to see how they look installed. Clears are between $40-$60, depending on if you get used ones like I did or order new ones.

Registered User
Joined: Sep 2010
Posts: 4
Likes: 0
From: Dallas, Texas
[QUOTE=gr8scott_o;7956823]Go for it! Try a little longer in the oven with the Ambers... 5 mins wasn't quite enough.
Ok so I've read posts where people have had their reflectors melt in the oven.. I have my clears coming in the mail tomorrow and my LED's are ready and waiting, so I'm thinking of having a test run with my oem ambers. Did you or anyone have any problems with baking? And as for sealing it back, how do you feel about a waterproof epoxy for plastics?
Ok so I've read posts where people have had their reflectors melt in the oven.. I have my clears coming in the mail tomorrow and my LED's are ready and waiting, so I'm thinking of having a test run with my oem ambers. Did you or anyone have any problems with baking? And as for sealing it back, how do you feel about a waterproof epoxy for plastics?
Ok so I've read posts where people have had their reflectors melt in the oven.. I have my clears coming in the mail tomorrow and my LED's are ready and waiting, so I'm thinking of having a test run with my oem ambers. Did you or anyone have any problems with baking? And as for sealing it back, how do you feel about a waterproof epoxy for plastics?
I didn't have any problems with baking... however, the clears I bought came apart a lot easier than the ambers that were OEM. I don't know if the clears were OEM or not, but regardless the ambers were tougher.
I would definitely do a waterproof epoxy, or even just a silicone sealant. I just used superglue on my clears and moisture got it. It was a minor annoyance not a major catastrophe... In this pic here you can see the white fog of condensation on the front reflector:
No one would have noticed unless I pointed it out. I had just washed the car, and by the afternoon the fog was gone.

Wish I have seen this before blacking my reflectors. I did 4 coats total, 2 in the front and 2 in the back.  Wish I did 2 coats in the back.
As for sealing the reflectors, use Nissan Butyl Sealer. It is the best sealer there is.

My attempt,


Wish I did 2 coats in the back. As for sealing the reflectors, use Nissan Butyl Sealer. It is the best sealer there is.
My attempt,


