
DIY 350Z Track, Rotor and Pad Install, and System Bleed.


Any body have a motive pressure bleeder in the tri-state I can borrow? Otherwise, I guess I'll buy one from Z1 Performance. They are pretty close by...in Long Island. I wish I could make the trip in the Z, I could use the mileage.
Originally Posted by rrmedicx
Any body have a motive pressure bleeder in the tri-state I can borrow? Otherwise, I guess I'll buy one from Z1 Performance. They are pretty close by...in Long Island. I wish I could make the trip in the Z, I could use the mileage.

I'm going to buy the power bleeder from amazon though i don't know which one? Help me get one.
http://www.amazon.com/s/ref=nb_ss_gw...leeder&x=0&y=0
Would it be better to bleed or replace the fluid. How many pints of brake fluid do i need to bleed and how many should i use to replace?
Also, how can I tell if my rotors need to be replaced. My car has 32,000 miles on it and i don't drive it hard or track it. Should I simply resurface it ?
Thanks
Last edited by donricouga; Jun 24, 2008 at 07:21 AM.
I wanted to add in some additional info, this is a great write up, BUT always start with the brake furthest from the master cylinder, this goes for every car. You have a better ability to change the most spent fluid

Great write-up, and helped me a lot.
Two lessons learned. On the first caliper, I had the toughest time getting the bolts lined up when the rotor was loose. I took two of my lugs nuts and screwed them on to hold the rotor onto the hat, it just made lining up the caliper and everything else much easier.
Second, because it wasn't mentioned in this write-up, you do bleed both sides of the caliper. I did outside first, but some say Brembo says to do the inside first. A few love-taps from the rubber mallet to dislodge any air bubbles, and the little Mrs. to pump for me, and all was good with the world.


Amazingly, I did all my rotors and pads a couple weekends ago. I'm new to wrenching on my car - so I was pretty intimidated, but, did it anyways.
The rear rotors were very stubborn. Juice them good with WD-40 or whatever and LET IT SOAK in for 30mins. That's much easier than beating on it for that 30mins+. I did try loosening the parking brake with the screwdriver the the hole trick - that might have helped but I still had to let the WD-40 soak in to the studs and hub to pop those rears off.
The rear rotors were very stubborn. Juice them good with WD-40 or whatever and LET IT SOAK in for 30mins. That's much easier than beating on it for that 30mins+. I did try loosening the parking brake with the screwdriver the the hole trick - that might have helped but I still had to let the WD-40 soak in to the studs and hub to pop those rears off.


Registered User
Joined: Dec 2007
Posts: 290
Likes: 0
From: Valrico, FL
A good idea is to check the lug bolts for galling (i.e.threads worn) while you are changing out the rotors. Since you are removing most of the items in the way; the stud bolts are inexpensive part to change. Nissan has stud bolts and Nismo has longer stud bolts if your are adding wheel spacers. The last I check the Nissan stud bolts are approx. $2 each. Most of the brake parts (i.e calipers/rotors well have to be removed should one has to change out the stud bolts. 

Originally Posted by sugarspunZ

When bleeding your brake system you want to start with the wheel that is furthest away from
the driver. Bleed in the following order.
Right Rear
Left Rear
Right Front
Left Front

i'm having a b*tch of a time removing the lower 19mm bolt holding on the rear caliper. there simply isn't too much room to work the wrench and breaker bar. anyone have any tricks? i might try a 19mm open wrench. i hate not having the correct tools.

for anyone looking for an inexpensive DIY stock brake replacement i used slotted only rotors and axxis/PBR ultimate pads from 88rotors ($280), gruppe-s SS lines ($99), valvoline synth dot3-4 fluid ($7). i had to spray paint the rotors in high temp gloss black for a rust resistant finish. this is my $0.02. hopefully it saves someone the $1,000+ stealership cost.

Just did my rears. For the 19mm bolts holding the calipers on I used a wratcheting closed wrench and a 5 pound cast iron dumbell. My hammer wasn't heavy enough. I found a piece of rubber foam to wrap around the wrench so I could put pressure on the other end of the wrench with my hand.
The ratcheting wrench was a good fit, makes the most of the limited space.
On my Motive Power Bleeder, I used the universal adpater. Held the pressure at 10 PSI. I would pump it up to 15 when I started each one, it would go down to 10 slowly and stay put. I didnt want to monkey around with the fitment of the adapter and was making progress so I just left it.
I ended up bleeding the entire system. I put 2 qts of brake fluid in the power bleeder to start. I figure the extra time it would take was worth it.
Motive sells sport drink style bottles with about 12" of hose and a thin braided steel lanyard for hanging off the suspension. Very handy.
Last edited by lbz; Jan 25, 2009 at 02:19 PM.

Registered User
Joined: Dec 2007
Posts: 422
Likes: 0
From: San Mateo
Is there an inner and outer bleeding valve on the calipers?
edit: nvm. found a pic and there is an inner valve. I assume bleed inner then outer based on posts I've read.
edit: nvm. found a pic and there is an inner valve. I assume bleed inner then outer based on posts I've read.
Last edited by zettahertz; Mar 2, 2009 at 01:03 PM.

REAR ROTOR REMOVAL:
Your bit about hammering the rear rotors off (and the other comment about soaking in WD40 or PB Blaster) are incorrect. No need for hammering or any brute force at all:
You can use this to append your DIY:
https://my350z.com/forum/autocross-r...ml#post3173770
"You need to loosen the parking brake shoes. There is a little rubber plug on your rotor. Align this plug so it is at 11 or 12 o'clock. Then remove the plug. Now, with a flathead screwdriver, you need to turn the adjuster to loosen the parking brake shoes. If you do this, the rotor will come off freely just as the fronts. I see too many threads of people pounding away, when that is totally unnecessary and probably damages your parking brake system and rotors. The FSM is your friend:
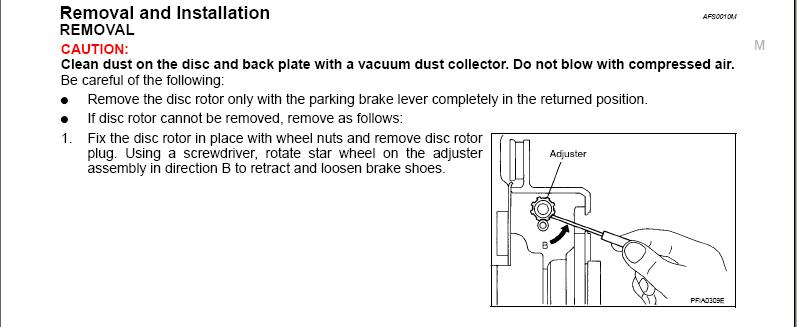
Once you have replaced your rotor or completed whatever work you are doing, you need to re-adjust the parking brake. From the FSM:

I thought I would add that it takes quite a few turns to loosen the rotor, so just keep at it!! Also, a flashlight helps in locating the adjuster if you have never adjusted it before...no pounding necessary!!"
Your bit about hammering the rear rotors off (and the other comment about soaking in WD40 or PB Blaster) are incorrect. No need for hammering or any brute force at all:
You can use this to append your DIY:
https://my350z.com/forum/autocross-r...ml#post3173770
"You need to loosen the parking brake shoes. There is a little rubber plug on your rotor. Align this plug so it is at 11 or 12 o'clock. Then remove the plug. Now, with a flathead screwdriver, you need to turn the adjuster to loosen the parking brake shoes. If you do this, the rotor will come off freely just as the fronts. I see too many threads of people pounding away, when that is totally unnecessary and probably damages your parking brake system and rotors. The FSM is your friend:
Once you have replaced your rotor or completed whatever work you are doing, you need to re-adjust the parking brake. From the FSM:
I thought I would add that it takes quite a few turns to loosen the rotor, so just keep at it!! Also, a flashlight helps in locating the adjuster if you have never adjusted it before...no pounding necessary!!"
Last edited by guitman32; Mar 4, 2009 at 09:38 AM.