
Another Oil Catch Can DIY - Pix


I recently removed the MREV2 and reinstalled my revup lower plenum. In the process, I discovered where all the oil that my engine 'misplaced' went to. It pooled into several areas on the lower plenum, and from there it apparently was drawn into the engine through the tiny orifices drilled into each runner. I read up on this a little bit and found that several high performance cars, including the S2000 and Corvette, suck a lot of oil through the PCV into the intake manifold at high RPMs. Consequently, there is a number of products specifically made for these cars, to catch the oil that comes out of the crankcase before it gets into the intake manifold.
I ordered a nice billet aluminum unit from Custom Corvette Accessories. There are good pics of the catch can and available accessories on the website. BTW, do NOT get the one for the C6, it uses a custom mounting bracket.
Here's what the 35th Anniversary revup looked like before I started.
P471

The installation is pretty much self explanatory, but I want to mention a couple of things that may make the job even easier. Although it took me over 4 hours, an hour of that was trying to find a place to mount it. Space under the hood comes at a premium. If it weren't for the close quarters, this would be a 20 minute task. Another hour was wasted looking for parts and tools that I dropped through the engine bay. The best place to put the catch can is on the passenger side, using the upper mounting screw for the power steering (PS) reservoir bracket.
The first thing to do is pull off the plastic engine cover so we can get to both ends of the PCV hose and the passenger side body-to-timing cover ground strap.
P472

Next, remove the single screw (P478) on the radiator overflow tank and pull it up and forward so you can get to the ground strap - you don’t need to disconnect the hose to the radiator. The ground strap is attached to the timing cover at two places with one bolt each (P472), and to the passenger side body, underneath the overflow tank, with two bolts through a single lug. The second lug on the timing cover is very hard to see, but you can follow the strap over from the other end, and it’s pretty easy to unbolt. Slide the two clamps off, and remove the PCV hose (P472) that connects the plenum to the PCV on the valve cover.
This is what the area looks like after it’s readied for the catch can.
P476

P478

Remove the top bolt (P478) off of the PS reservoir bracket and slide the rubber grommet off. Slice the grommet in half (but not the metal insert). Insert the original bolt through the metal grommet insert, the first half of the rubber grommet, the catch can bracket, the PS tank bracket, and the second half of the rubber grommet - just 'snug up' the bolt for now. Mount the hose fittings on the catch can using teflon tape - see pic P480 for proper orientation.
You will need to unscrew the bottom of the can in order to slide it into the bracket from the top, then reinstall the bottom. There is an English size allen screw through the back of the bracket to secure the can in place. Finally, tighten the top screw of the PS bracket to the passenger side strut tower.
Measure and cut the length of hose you need, and connect the top can fitting to the PCV. The braided hose looks great, but it is also a royal PITA to work with. I would stick with the standard 3/8" fuel service rubber hose and SS hose clamps instead.
Now we’re almost done, and it looks like this:
P480

P481

Measure and cut hose for the lower can fitting and connect it to the nipple on the front of the lower plenum. Reinstall the ground strap, and route it in front of the catch can (P487), and then across toward the timing cover. Bend the larger lug at the timing cover as necessary, to make the connection easier. Slide the radiator overflow tank into its bracket and secure. If everything is oriented as shown in the pics, no part of the catch can should be touching the strut tower or the PS suction hose.
P482

P483

P487

After driving about 400 miles, which included a lot of 6000+ RPM shifts, I opened the drain valve and some oil trickled out. I unscrewed the bottom of the can and found the inside coated with a light film of oil around the drain valve. It WORKS!
This is an inexpensive, simple mod, and it will keep the intake manifold, combustion chamber, and exhaust piping clean. Especially useful for those of us lucky enough to own a revup with the 'hide the oil' feature. I am very pleased with it. Good luck!
I ordered a nice billet aluminum unit from Custom Corvette Accessories. There are good pics of the catch can and available accessories on the website. BTW, do NOT get the one for the C6, it uses a custom mounting bracket.
Here's what the 35th Anniversary revup looked like before I started.
P471
The installation is pretty much self explanatory, but I want to mention a couple of things that may make the job even easier. Although it took me over 4 hours, an hour of that was trying to find a place to mount it. Space under the hood comes at a premium. If it weren't for the close quarters, this would be a 20 minute task. Another hour was wasted looking for parts and tools that I dropped through the engine bay. The best place to put the catch can is on the passenger side, using the upper mounting screw for the power steering (PS) reservoir bracket.
The first thing to do is pull off the plastic engine cover so we can get to both ends of the PCV hose and the passenger side body-to-timing cover ground strap.
P472
Next, remove the single screw (P478) on the radiator overflow tank and pull it up and forward so you can get to the ground strap - you don’t need to disconnect the hose to the radiator. The ground strap is attached to the timing cover at two places with one bolt each (P472), and to the passenger side body, underneath the overflow tank, with two bolts through a single lug. The second lug on the timing cover is very hard to see, but you can follow the strap over from the other end, and it’s pretty easy to unbolt. Slide the two clamps off, and remove the PCV hose (P472) that connects the plenum to the PCV on the valve cover.
This is what the area looks like after it’s readied for the catch can.
P476
P478
Remove the top bolt (P478) off of the PS reservoir bracket and slide the rubber grommet off. Slice the grommet in half (but not the metal insert). Insert the original bolt through the metal grommet insert, the first half of the rubber grommet, the catch can bracket, the PS tank bracket, and the second half of the rubber grommet - just 'snug up' the bolt for now. Mount the hose fittings on the catch can using teflon tape - see pic P480 for proper orientation.
You will need to unscrew the bottom of the can in order to slide it into the bracket from the top, then reinstall the bottom. There is an English size allen screw through the back of the bracket to secure the can in place. Finally, tighten the top screw of the PS bracket to the passenger side strut tower.
Measure and cut the length of hose you need, and connect the top can fitting to the PCV. The braided hose looks great, but it is also a royal PITA to work with. I would stick with the standard 3/8" fuel service rubber hose and SS hose clamps instead.
Now we’re almost done, and it looks like this:
P480
P481
Measure and cut hose for the lower can fitting and connect it to the nipple on the front of the lower plenum. Reinstall the ground strap, and route it in front of the catch can (P487), and then across toward the timing cover. Bend the larger lug at the timing cover as necessary, to make the connection easier. Slide the radiator overflow tank into its bracket and secure. If everything is oriented as shown in the pics, no part of the catch can should be touching the strut tower or the PS suction hose.
P482
P483
P487
After driving about 400 miles, which included a lot of 6000+ RPM shifts, I opened the drain valve and some oil trickled out. I unscrewed the bottom of the can and found the inside coated with a light film of oil around the drain valve. It WORKS!
This is an inexpensive, simple mod, and it will keep the intake manifold, combustion chamber, and exhaust piping clean. Especially useful for those of us lucky enough to own a revup with the 'hide the oil' feature. I am very pleased with it. Good luck!
Last edited by undrgnd; Feb 5, 2008 at 02:46 PM.


Trending Topics


Originally Posted by meaj82
Wow! good job. Did you use the c5 or c6 version or does it not matter.

Originally Posted by undrgnd
Long story > short: Wanted to restore the OEM power and driving characteristics to the classic 35th Anniv.
Thanks
Nope, no problems at all. I just like the linear power progression of the revup motor better. I will be selling the MREV2, APS plenum and strut bar here shortly, in case someone is interested. 
Originally Posted by undrgnd
Nope, no problems at all. I just like the linear power progression of the revup motor better. I will be selling the MREV2, APS plenum and strut bar here shortly, in case someone is interested.
 ). it's a great lookin' kit that is actually pretty functional.
Registered User
Joined: Jan 2008
Posts: 4
Likes: 0
From: Germany
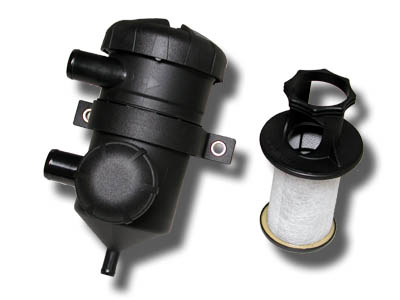
I was considering putting my old catch can from my old tuner into the Z. After looking at the Vette can and others, I never noticed the way the internals worked... making me wonder if all catch cans are designed that way, soi can keep mine or if I need to just buy a new one. I went with an inexpensive can since they are simple designs (at least thought they were) and I thought all they do is let regular air pass-through while catching oil. The whole 'condensing fumes' junk is new to me.