
DIY - Urethane Transmission Mount

Thread Starter
Former Sponsor
iTrader: (564)
Joined: Feb 2003
Posts: 19,266
Likes: 5
From: Long Island, New York
Kwame and I had some time today to do some more stuff to my Z. Even though it's getting colder, I still like doing little stuff to the car here and there. Today we got a chance to install and test a new urethane transmission mount.
I did a how-to write up on our blog, but figured I'd post it here too:
http://cornerbalance.wordpress.com/2...mount-350zg35/
It was straight forward, and can easily be done at home for all you DIY'ers
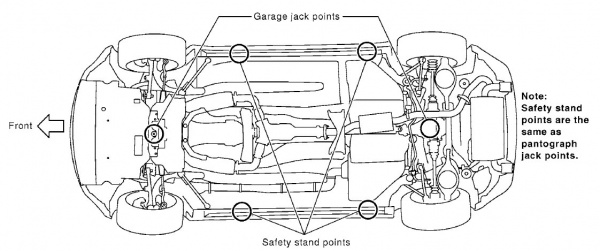
To start off, use the factory recommended jack points front and rear
With the car up in the air, your first thing is to remove the factory transmission cross member. This is a black steel beam that runs the width of the transmission (sorry the below is so small, and I forgot to snap a pic of it when it was out of the car, but you really can't miss it!)

To loosen the crossmember from the chassis, there are 4 x 14mm bolts. You'll now see the transmission mount, attached to the underside of the transmission, like here:

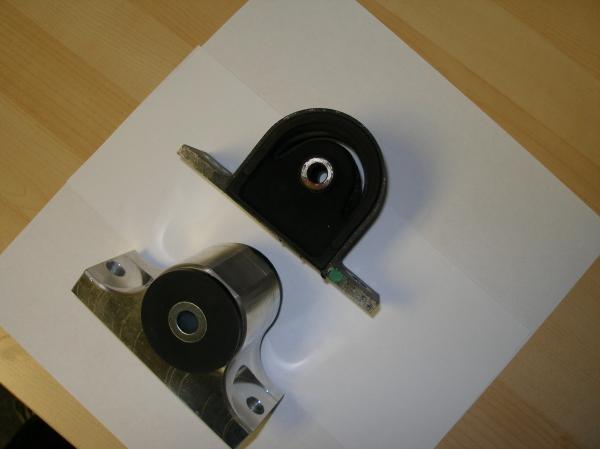
Next, you will remove the long gold bolt/spacer from the stock transmount, which runs through the crossmember. To gain better access to the bolt, we found it easiest to remove the Y pipe, as it makes things. Since mine has been in there for a few years and I had noticed a bit of an exhaust leak recently, I took this opportunity to replace all the Y pipe gaskets and kill 2 birds with one stone. Take a jack, or jackstand, and place it under the transmission to keep it from sagging. It is still attached to the engine at the bellhousing, as well as the driveshaft, but you don't want any accidents! Finally, remove the 2 x 14mm bolts and the transmissiom mount comes off the transmission. Fitting the new mount is just a direct reversal of the above process and goes right in. Here is a pic of the new mount installed, before the crossmember goes back in:

Next, reinstall the crossmember, using the jack to still support the transmission. Once the crossmember has been torqued to spec, you can remove the jack from the transmission case.
That's all there is to it!
So what does it feel like – HOLY **** stiff! The car immediately has a much deeper tone inside the cabin just by virtue of the fact that the new mount has much less slop in it, and has a full radius bushing (if you look in the picture showing the comparison with the stock mount, you can see daylight with the stock mount!). This disconnect keeps things quiet and Camry like, but also gives the car a much vaguer feeling compared to the new mount. It was so much different sounding I thought my Y pipe was still disconnected! The shifter has a much more positive feel to it, which is very noticeable especially at higher rpm shifts. Engaging first and running through the gears from a dead stop, you immediately notice that the car has a much more direct overall feel. If you are in a higher rpm and just crusing (for example 2nd, entering a turn) the slight rocking back and forth that the car used to have is completely gone. I’ll drive the car through the weekend provided the weather is nice and post any noticeable changes.
We've toyed around with maybe doing a urethane motor mount set as well, but are still up in the air. The stock mounts are quite rigid already. However, we still may do it if demand is there, as it would be a nice alternative for those who don't want to run a full solid motor mount set.
Any questions, let me know
I did a how-to write up on our blog, but figured I'd post it here too:
http://cornerbalance.wordpress.com/2...mount-350zg35/
It was straight forward, and can easily be done at home for all you DIY'ers
To start off, use the factory recommended jack points front and rear
With the car up in the air, your first thing is to remove the factory transmission cross member. This is a black steel beam that runs the width of the transmission (sorry the below is so small, and I forgot to snap a pic of it when it was out of the car, but you really can't miss it!)
To loosen the crossmember from the chassis, there are 4 x 14mm bolts. You'll now see the transmission mount, attached to the underside of the transmission, like here:
Next, you will remove the long gold bolt/spacer from the stock transmount, which runs through the crossmember. To gain better access to the bolt, we found it easiest to remove the Y pipe, as it makes things. Since mine has been in there for a few years and I had noticed a bit of an exhaust leak recently, I took this opportunity to replace all the Y pipe gaskets and kill 2 birds with one stone. Take a jack, or jackstand, and place it under the transmission to keep it from sagging. It is still attached to the engine at the bellhousing, as well as the driveshaft, but you don't want any accidents! Finally, remove the 2 x 14mm bolts and the transmissiom mount comes off the transmission. Fitting the new mount is just a direct reversal of the above process and goes right in. Here is a pic of the new mount installed, before the crossmember goes back in:
Next, reinstall the crossmember, using the jack to still support the transmission. Once the crossmember has been torqued to spec, you can remove the jack from the transmission case.
That's all there is to it!
So what does it feel like – HOLY **** stiff! The car immediately has a much deeper tone inside the cabin just by virtue of the fact that the new mount has much less slop in it, and has a full radius bushing (if you look in the picture showing the comparison with the stock mount, you can see daylight with the stock mount!). This disconnect keeps things quiet and Camry like, but also gives the car a much vaguer feeling compared to the new mount. It was so much different sounding I thought my Y pipe was still disconnected! The shifter has a much more positive feel to it, which is very noticeable especially at higher rpm shifts. Engaging first and running through the gears from a dead stop, you immediately notice that the car has a much more direct overall feel. If you are in a higher rpm and just crusing (for example 2nd, entering a turn) the slight rocking back and forth that the car used to have is completely gone. I’ll drive the car through the weekend provided the weather is nice and post any noticeable changes.
We've toyed around with maybe doing a urethane motor mount set as well, but are still up in the air. The stock mounts are quite rigid already. However, we still may do it if demand is there, as it would be a nice alternative for those who don't want to run a full solid motor mount set.
Any questions, let me know
Last edited by Z1 Performance; Nov 29, 2009 at 06:08 AM.

Thread Starter
Former Sponsor
iTrader: (564)
Joined: Feb 2003
Posts: 19,266
Likes: 5
From: Long Island, New York
Thread Starter
Former Sponsor
iTrader: (564)
Joined: Feb 2003
Posts: 19,266
Likes: 5
From: Long Island, New York
spent awhile with the car today, so figured I'd post some updated impressions
shifting is very noticeably quicker, especially downshifts. It's a weird thing - I have always felt the factory Z shifter was among the best I've ever driven. I've owned S2000's before (2 of them) and to me, that was the benchmark of what a precise shifter linkage should feel like. I've also owned manual transmission Audi's, and they are the anthithesis of what an accurate shifter is! Anyway, as good as the stock Z shifter is, the combination of my short shift kit and this new bushing is really dramatic. Downshifts are now a very quick snick-snick affair. There is no slop, no backlash from the gearbox, it just slides in no matter how quick you want to be.
You do notice more noise in the cabin for sure, especially at WOT. I'll probably pick up some dynamat during the week and go over that section and see if we can get rid of it. The good thing is, that after around 100 miles of driving today, already I can feel the mount settling in a bit, which is nice.
You definitely feel the mount vs stock. My cas has cams, etc so it's not as nice at idle as a stock engine is in the first place. You feel the engine more, and there is definitely increased NVH, but the extra shifting precision makes it so nice. I mentioned yesterday things sound deeper in the car, and they do, without question.
We have a couple customers who have installed these so far in the past week, and once I've got some more seat time, we'll make a for sale thread in the vendor classified section
Overall if I had to do it again I'd opt for the 60a, as it's still a welcome amount stiffer than stock (about 50%) and should offer more out of the box daily civility.
Last edited by Z1 Performance; Nov 29, 2009 at 06:09 AM.

Adam,
If you ever get the chance to drive either fox or sn95 mustang with an aftermarket shifter ( ex. Pro 5.0 Power tower shifter), go fo it.......that is the best feeling shifter EVER! it epitomizes the "rifle bolt" description. it is so positive and accurate, every shifter after it will feel loose and sloppy.
If you ever get the chance to drive either fox or sn95 mustang with an aftermarket shifter ( ex. Pro 5.0 Power tower shifter), go fo it.......that is the best feeling shifter EVER! it epitomizes the "rifle bolt" description. it is so positive and accurate, every shifter after it will feel loose and sloppy.


Thread Starter
Former Sponsor
iTrader: (564)
Joined: Feb 2003
Posts: 19,266
Likes: 5
From: Long Island, New York
We should have these in stock late next week, so stay tuned for a thread in the classified section soon. They are out being anodized
Quadcam - I don't have alot of Fox body experience. Back in the 90's, a buddy of mine had a pretty wild notchback that we helped do a T1000 (The Thumper!) on, and it hauled - but his was a 3 speed. But, I have a T5 in my Datsun, and you're right, with a proper short shift kit and the corresponding trans mount, it is extremely accurate and positive.
I was really blown away when we did this to my car though, and I think you guys will be really pleased with them
Trending Topics

I just placed an order for one of these today, got the 60A which is the least stiffest one. Sounds like a really good mod, can't wait to get it! I'll write a review once its installed.

Is it a good idea to have a stiff trans mount, and a soft rear diff mount + softer engine mount?
I have been toying with the idea of doing all the drivetrain mounts in the same stiffness material but so far I havnt had the ***** to do it.
I have been toying with the idea of doing all the drivetrain mounts in the same stiffness material but so far I havnt had the ***** to do it.


looks great.......
I see that the part thickness is there on the machined aluminum mount.....
but i still question the edge margin on the fastener mounting holes. May want to monitor for cracks down the line....??
why not machine those flanges wider, the room is there in comparison to the oem mount...flange width, edge margin on the fasteners.
-J
Last edited by JasonZ-YA; Feb 13, 2010 at 11:35 AM.
Thread Starter
Former Sponsor
iTrader: (564)
Joined: Feb 2003
Posts: 19,266
Likes: 5
From: Long Island, New York
Jason - that's the sample piece that currently resides in my car. I'll take a look at them when they arrive hopefully next weekend. Keep in mind though that the stock piece is cast aluminum, this is T6061, and is substantially thicker than stock. Not to mention, a far more rigid bushing inside. So overall, it has way less movement and way less chance for movement than a stock one does
plumpzz - at present, my car is using this mount, stock engine mounts and stock rear bushings, and it's worked out very well. I intend on staying with stock motor mounts for now, but my rear will soon be upgraded with the SPL solid pieces once my new pumpkin goes in the car
plumpzz - at present, my car is using this mount, stock engine mounts and stock rear bushings, and it's worked out very well. I intend on staying with stock motor mounts for now, but my rear will soon be upgraded with the SPL solid pieces once my new pumpkin goes in the car
I think when I get a diff I will do the same and do the semi-race urethane material and swap out the rear with SPL solid bushings. Ive felt that the engine bushings are stiff, but after 70k miles they're starting to feel sloppy when I rev.
I just installed my today, and all i can say is "WOW"!!!!!! You definitely feel the engine more. I can tell a big difference on take off in first gear, way more responsive... Almost feels like I have a new clutch or something. I'm telling you guys, just by adding this mount almost feels like i have a totally different transmission now. Pretty loud on the inside of the cabin, but a good loud.


Just ordered my 60A mount and some Whiteline diff. bushings to go in while I have the car on the lift. Can't wait to feel the difference! Lately, my car wants to be a PITA to downshift so I feel like this might be needed.