
DIY: ram/cai w/ airbox


So i was looking on the forums trying to find a good write up on how to make your own cold air/ ram air intake, with an airbox.
Well here it goes i documented my own project and its nothing special And im not sure if you gain Horsepower from it But, I do know that you will notice a difference in your throttle response and the tone in your exhaust. Plus you hear a distinct intake whistle that i know a lot of people like. Now i do live in florida which is why i kind of strayed away from making a true CAI as it does rain a lot down here and floods most of the time. Dont want my beauty hydrolocking on me.
Okay so first we need a shopping list
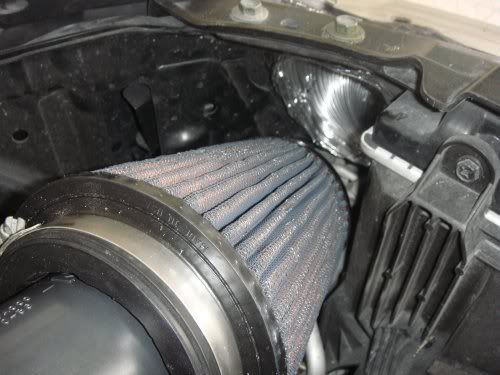
1. Air Filter (Any kind, i used a spare/leftover K&N from one of my older cars)
2. (If not using the z tube) I had a spare intake pipe laying around
3. 4" Air conditioner duct work/ exhaust tube
4. sheet of aluminum
5. foam insulator for the edges of the box to seal it in
6. Aluminum tape (**** is expensive try and buy the smallest roll)
7. Pair of tin snips
8. zip ties
9. sharpie
10. Piece of carboard (i used a shipping box, already had bends in it)
11. cooking skewers lol
12. 3 3" couplers
13. can of high heat barbecue grill flat black paint
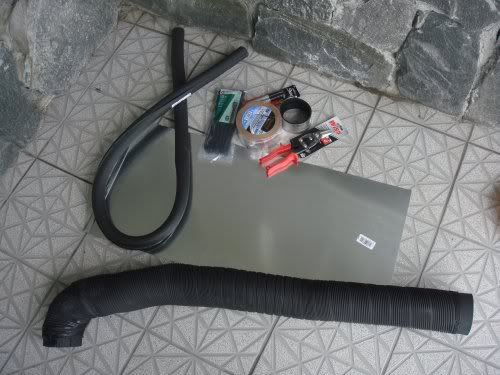
Everything was purchased at Home Depot for about $80.00 I know your really not saving a whole lot of money in the process but i like to do a lot of my own work on my car and this was just a little fun project i thought up.
Tools needed
1. 10mm socket
2. flat head
3. phillips head
4. pair of needle nose pliers
Okay now to disasemble the stock intake,
-Remove the bolts holding the airbox in place
-Disconnect the wire that goes to the air flow meter
-loosen up the couplers on the z tube
-Pull everything right on out of the engine bay and store it away for safe keeping incase you go back to stock.
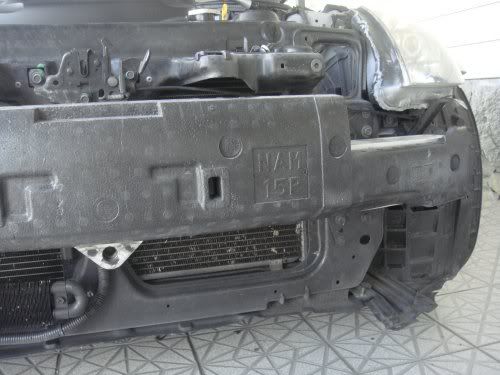
Remove the front bumper,
-take off all 6 i believe of the lil clips near the radiator
- you need a snub nose phillips to remove the screw in the inner wheelwell of each side
-peel back the dust guard(plastic shield piece)
-remove the exposed 10mm nut holding the bumper on ( mirror for both sides)
-remove the bumper
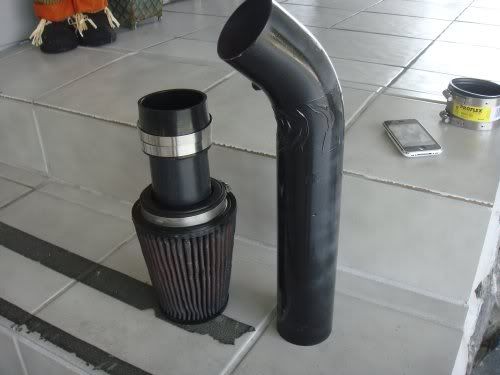
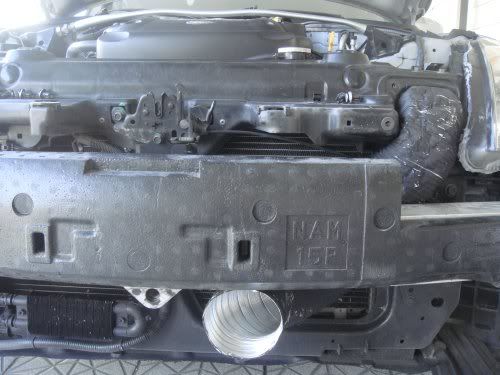
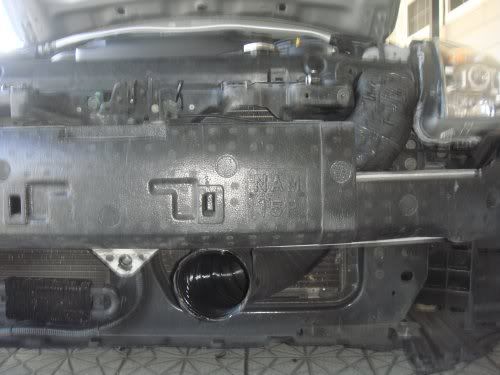
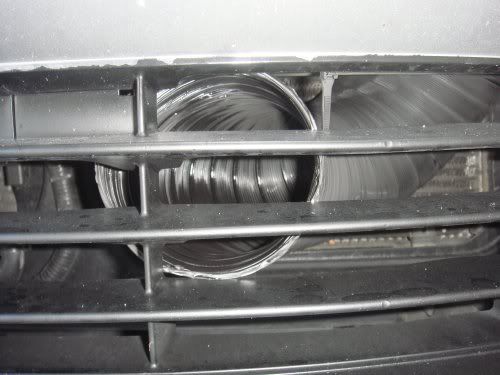
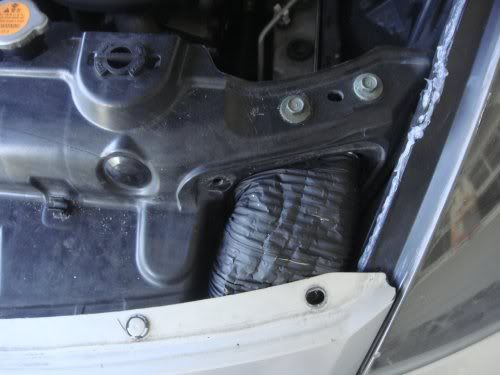
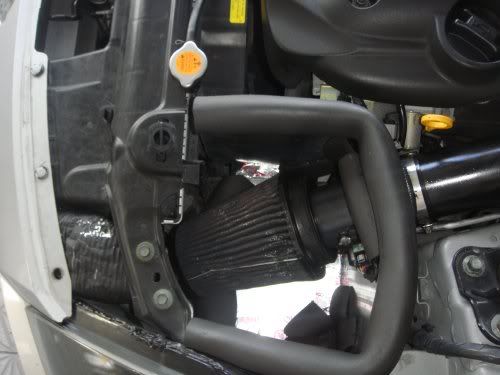
Routing of the air conditioner Piping,
-bend and twist and do all sorts of stuff to make the tub form the way you want it to fit from the bottom of the bumper to the top intake whole your stock airbox connected to.
-Once in shape i removed it and painted it flat black so i didnt get any wierd looks from people when they are starring at my front bumper
-reinstall it and i removed the solid round pieces at each end of the tube so i could flare them out a little bit.
- I plane on putting a velocity stack at the end by the bumper to possibly help the flow but i have to find a 4" to fit first
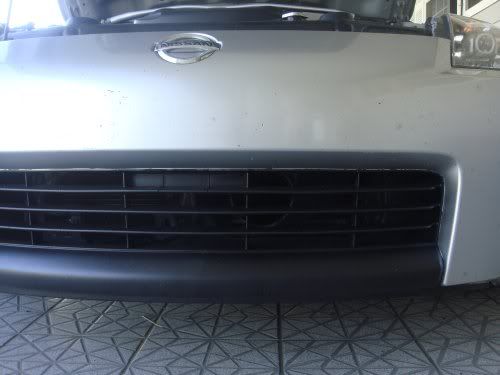
- Now my end by the bumper intakes from about the center of the bumper near the top, you can put yours wherever you like but i put mine here for 2 reasons, 1. avoid as much debris as possible from being so low 2. just gives it that extra hidden look because you have to actually get down to see it.
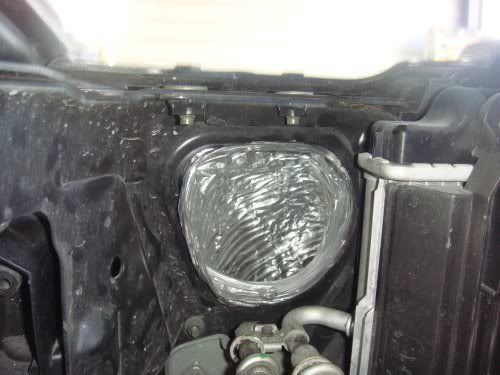
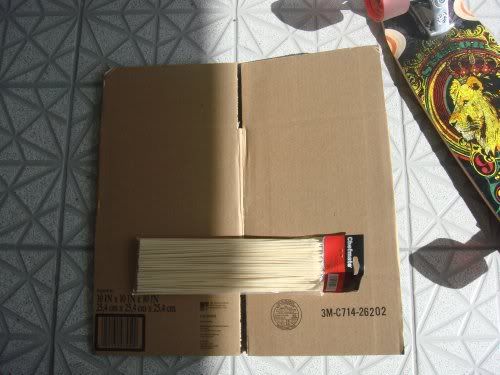
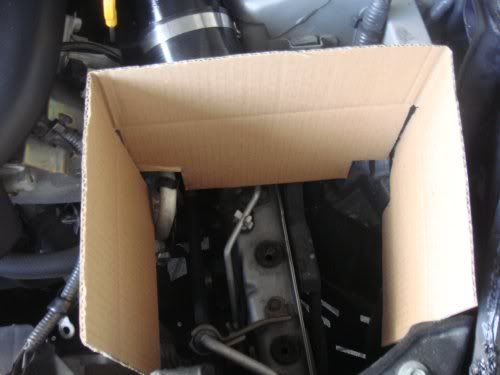
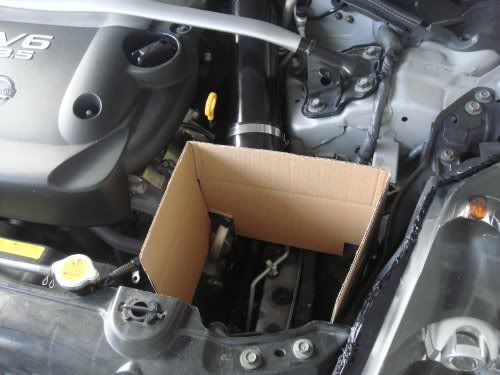
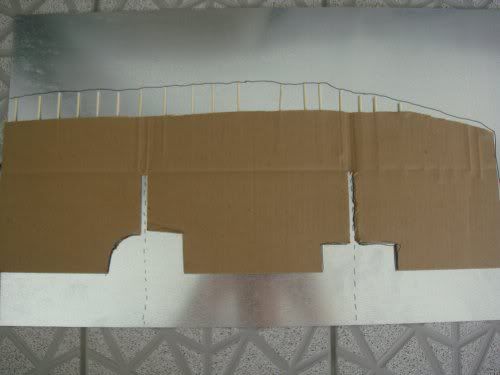
Fabbing up your airbox,
-take your piece of cardboard and fold it to the correct angles so you can fit it into that tight little space.
-mark where it hits pipes fenderwall etc.
-trim up your areas that need to be and test fit it back into the space.
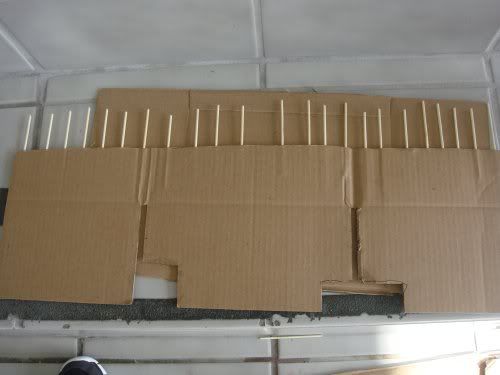
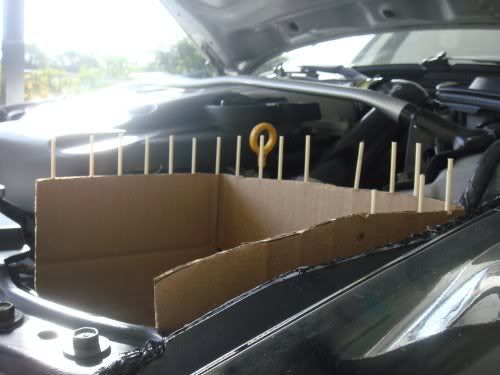
-now take your skewers and push them into the cardboard edges and shut the hood
-trim up the skewers as needed until you achieve just enough clearance for the hood to shut and latch.
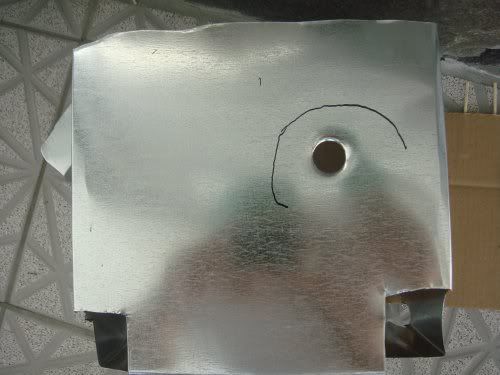
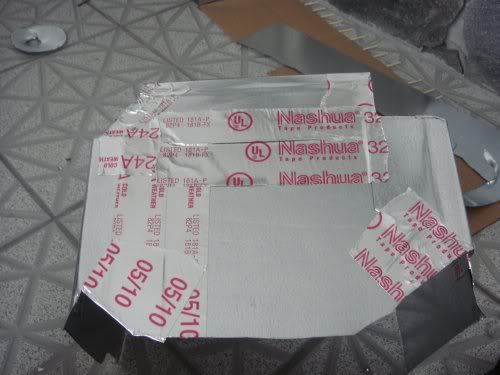
-now lay out your sheet of aluminum and lay your piece of carboard flat on the sheet and trace it out (leave some extra aluminum at the bottom so you can make flaps for the bottom of the box
-make a dott'd line where yo are suppose to fold the sheet and solid lines where you need to cut
-test fit the aluminum and trim up if neccesary
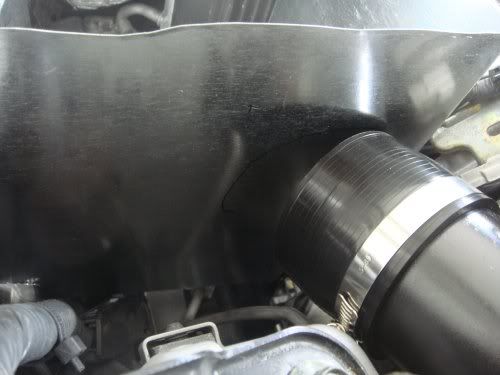
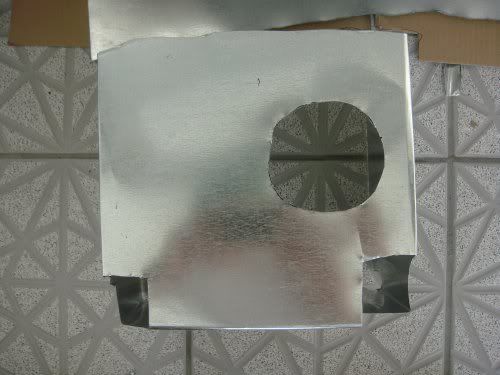
-trace where the intake tube will run into the airbox and make the best 3" circle you can and cut a lil extra notch in it you you can fit the air flow wire in also.
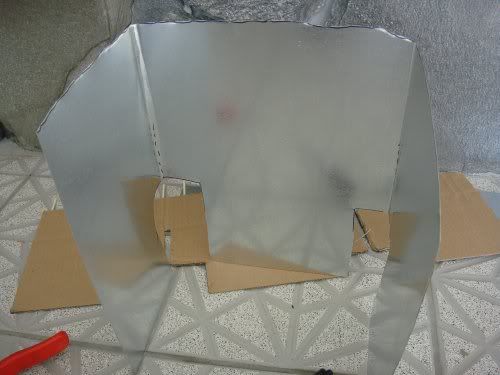
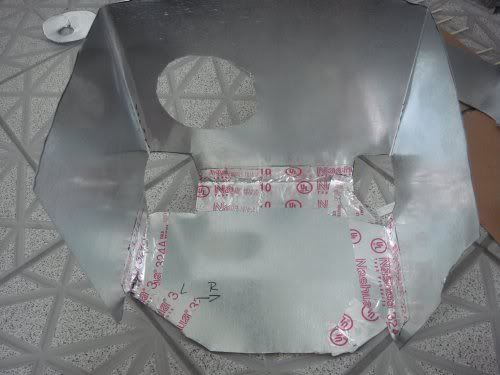
-with your spare aluminum cut a square the size of your box, push it donw into the bottom of the space where it will sit.
-mark areas that need to be cut
-trim it up
-combine the box and bottom together and use your aluminum tape to hold the pieces together
-tape it up good as this is what bonds the pieces together, dont worry the tape is strong and is also a good heat insulator (keeps cold air in hot air out)
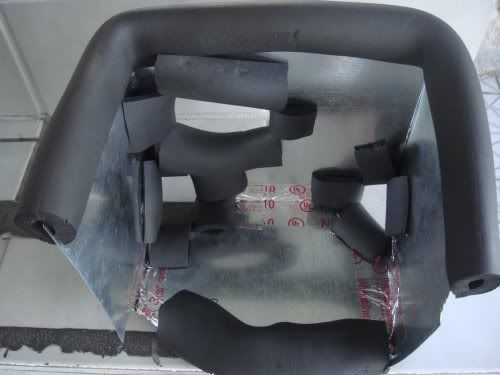
-now take your insulator tubing and line the edges of the box. I did not line the front edges because i didnt see the point.
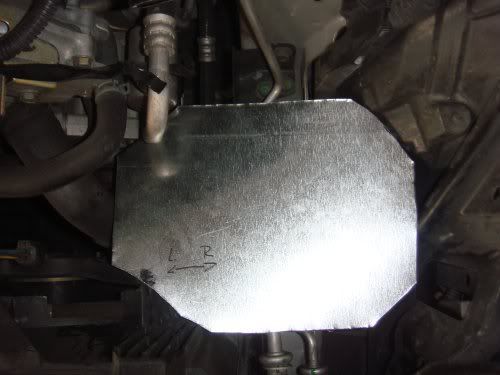
-test fit everything again
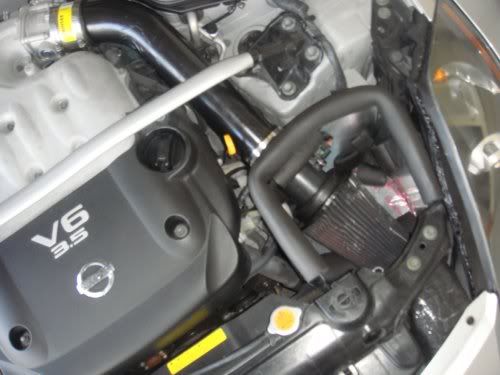
-install and crack a beer because you are done.!
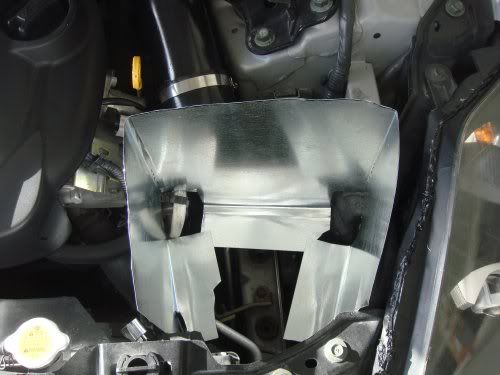

Woohoo pat yourself on the back for Doing. It. Yourself.
This is by no means my idea or am i taking credit for this, i simply went on a couple froums and took a bunch of their ideas and combined them into this. No single forum had a total write up for everything so i decided to put it all together and make it happen.
Its not the most spectacular thing to look at but it does its job or so i can tell.
Well here it goes i documented my own project and its nothing special And im not sure if you gain Horsepower from it But, I do know that you will notice a difference in your throttle response and the tone in your exhaust. Plus you hear a distinct intake whistle that i know a lot of people like. Now i do live in florida which is why i kind of strayed away from making a true CAI as it does rain a lot down here and floods most of the time. Dont want my beauty hydrolocking on me.
Okay so first we need a shopping list
1. Air Filter (Any kind, i used a spare/leftover K&N from one of my older cars)
2. (If not using the z tube) I had a spare intake pipe laying around
3. 4" Air conditioner duct work/ exhaust tube
4. sheet of aluminum
5. foam insulator for the edges of the box to seal it in
6. Aluminum tape (**** is expensive try and buy the smallest roll)
7. Pair of tin snips
8. zip ties
9. sharpie
10. Piece of carboard (i used a shipping box, already had bends in it)
11. cooking skewers lol
12. 3 3" couplers
13. can of high heat barbecue grill flat black paint
Everything was purchased at Home Depot for about $80.00 I know your really not saving a whole lot of money in the process but i like to do a lot of my own work on my car and this was just a little fun project i thought up.
Tools needed
1. 10mm socket
2. flat head
3. phillips head
4. pair of needle nose pliers
Okay now to disasemble the stock intake,
-Remove the bolts holding the airbox in place
-Disconnect the wire that goes to the air flow meter
-loosen up the couplers on the z tube
-Pull everything right on out of the engine bay and store it away for safe keeping incase you go back to stock.
Remove the front bumper,
-take off all 6 i believe of the lil clips near the radiator
- you need a snub nose phillips to remove the screw in the inner wheelwell of each side
-peel back the dust guard(plastic shield piece)
-remove the exposed 10mm nut holding the bumper on ( mirror for both sides)
-remove the bumper
Routing of the air conditioner Piping,
-bend and twist and do all sorts of stuff to make the tub form the way you want it to fit from the bottom of the bumper to the top intake whole your stock airbox connected to.
-Once in shape i removed it and painted it flat black so i didnt get any wierd looks from people when they are starring at my front bumper
-reinstall it and i removed the solid round pieces at each end of the tube so i could flare them out a little bit.
- I plane on putting a velocity stack at the end by the bumper to possibly help the flow but i have to find a 4" to fit first
- Now my end by the bumper intakes from about the center of the bumper near the top, you can put yours wherever you like but i put mine here for 2 reasons, 1. avoid as much debris as possible from being so low 2. just gives it that extra hidden look because you have to actually get down to see it.
Fabbing up your airbox,
-take your piece of cardboard and fold it to the correct angles so you can fit it into that tight little space.
-mark where it hits pipes fenderwall etc.
-trim up your areas that need to be and test fit it back into the space.
-now take your skewers and push them into the cardboard edges and shut the hood
-trim up the skewers as needed until you achieve just enough clearance for the hood to shut and latch.
-now lay out your sheet of aluminum and lay your piece of carboard flat on the sheet and trace it out (leave some extra aluminum at the bottom so you can make flaps for the bottom of the box
-make a dott'd line where yo are suppose to fold the sheet and solid lines where you need to cut
-test fit the aluminum and trim up if neccesary
-trace where the intake tube will run into the airbox and make the best 3" circle you can and cut a lil extra notch in it you you can fit the air flow wire in also.
-with your spare aluminum cut a square the size of your box, push it donw into the bottom of the space where it will sit.
-mark areas that need to be cut
-trim it up
-combine the box and bottom together and use your aluminum tape to hold the pieces together
-tape it up good as this is what bonds the pieces together, dont worry the tape is strong and is also a good heat insulator (keeps cold air in hot air out)
-now take your insulator tubing and line the edges of the box. I did not line the front edges because i didnt see the point.
-test fit everything again
-install and crack a beer because you are done.!
Woohoo pat yourself on the back for Doing. It. Yourself.
This is by no means my idea or am i taking credit for this, i simply went on a couple froums and took a bunch of their ideas and combined them into this. No single forum had a total write up for everything so i decided to put it all together and make it happen.
Its not the most spectacular thing to look at but it does its job or so i can tell.

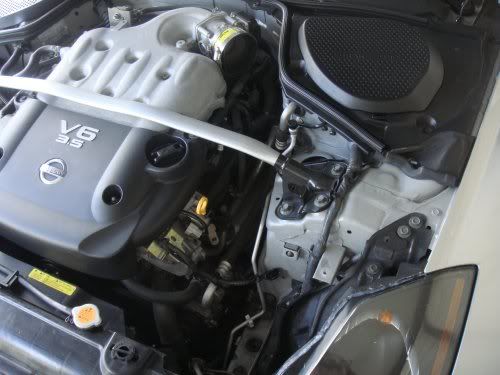
thanks for posting, but did you notice that the stock airbox utilizes the positive pressure of the whole front bumper opening for a ram air effect?
what you did was concentrate the front pressure into the small area of the tube opening, and also introduced a lot of potential areas for leaks and heat soak...
what you did was concentrate the front pressure into the small area of the tube opening, and also introduced a lot of potential areas for leaks and heat soak...
Although i did like i said notice a huge throttle response difference and it roars at wot and the exhaust tone changed a lot also. The only other mod i have is Test pipes
Thanks for the comment though
Last edited by Washman; Sep 22, 2010 at 06:42 AM.

Registered User
Joined: May 2008
Posts: 2,481
Likes: 5
From: my350z
idk woulda seems color to do the bumper mod where a hole is drilled in bumper and finished off with that one aftermarket duct. probably coulda fabbed a little pipe to go from the bumper hole to the air box. btw should kept the oem airbox or modded that instead of the sheet metal thing u created lol
Yes, i actually took the "sheetmetal thing" off haha So now its just the ram air pipe with a filter and the duct from the bumper to the filter.
And i love how someone is telling me i dont hear a difference in the tone... buddy i didnt know you lived next door to me and heard my car before and after. Lurk status
And i love how someone is telling me i dont hear a difference in the tone... buddy i didnt know you lived next door to me and heard my car before and after. Lurk status
Trending Topics
Yes, i actually took the "sheetmetal thing" off haha So now its just the ram air pipe with a filter and the duct from the bumper to the filter.
And i love how someone is telling me i dont hear a difference in the tone... buddy i didnt know you lived next door to me and heard my car before and after. Lurk status
And i love how someone is telling me i dont hear a difference in the tone... buddy i didnt know you lived next door to me and heard my car before and after. Lurk status

Last edited by G4nismo; Sep 24, 2010 at 01:30 PM.


