
OEM style carbon fiber door panels, in progress/build thread

Thread Starter


Joined: Aug 2006
Posts: 8,321
Likes: 467
From: Scottsdale/coyote drophouse
Yo.. since people like rice, and some people hate it, i thought Id share my little bowl of the white stuff. 
Ive been tackling lots of tedious projects in my garage while Intense tackles my FI and block build in theirs.
Did a headlight modification write up thread, and this ones following in suit, but nowhere near as majopr and complete, AND i dont have them 100% done or have pictures of everything yet, so I will leave a few posts reserved for the next few days worth of updates.
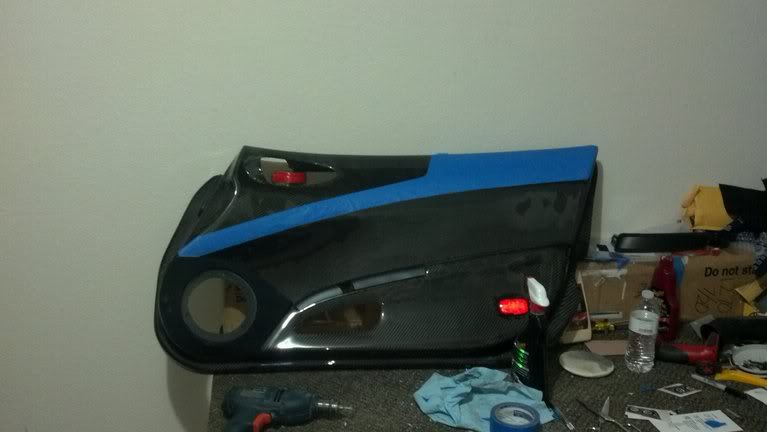
I had SEVERAL of these door panels. I had Seibon, and i had a few pairs of OEM style ones from a place called frpbodykits.com
scary, i know. But they were cheap, like 399... and since one set came in less than perfect condition, they sent me a 2nd set for free aside from light shipping.
SOld a few sets here n there, and was left with one set of these OEM style to build.
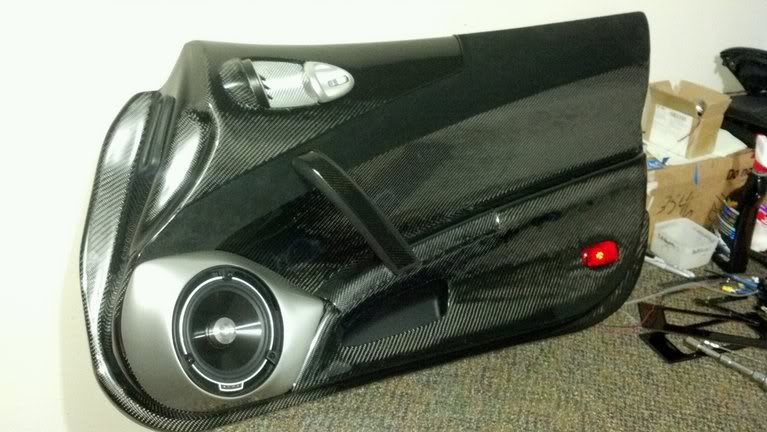
Here's some pics of whats involved as there are very few existing on teh interwebz at this time. .
Ultimately, having them cut, recleared and buffed and followed up with some clear bra would be the best bet, its a little wavy, but still pretty cool.
First off, youll need to cut out the section of the OEM door panel that holds the door handle and vents on, you will need to cut about an 1/8th inch off each stud for each screw for panel gap clearance, and use silicone adhesive and some binder clips to stick it on there, works very well.
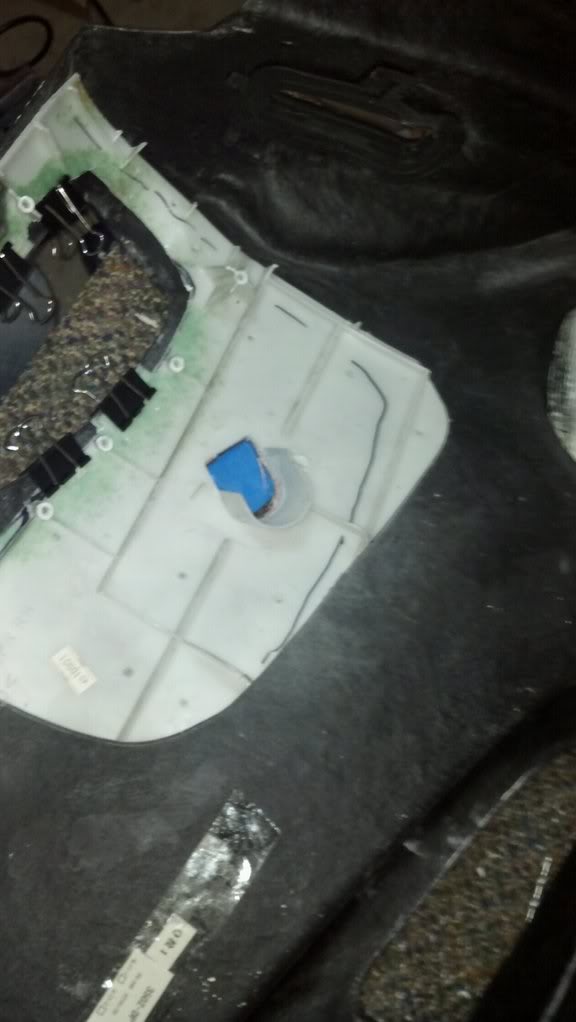
I also cut the door panel clip strip off the bottom of the door panel itself and glued int in the bottom of the panel in the same fashio, then trimmed off the excess flange with a jigsaw. The door panel clip farthest towards the rear of the door panel and nearest the latch and striker actually needs to be moved back in by almost a half inch, so cut it off, grind it down, and I used JB quick weld to reattach it. Its very solid.
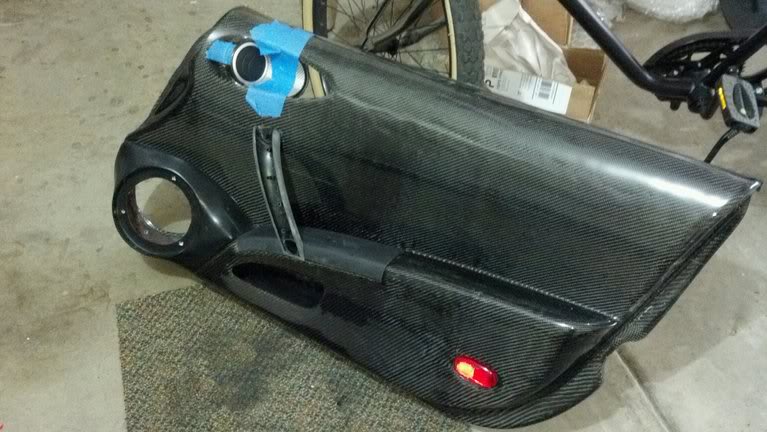
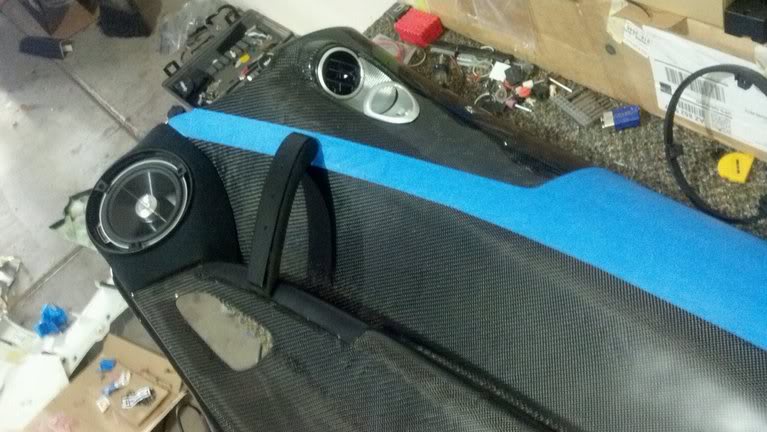
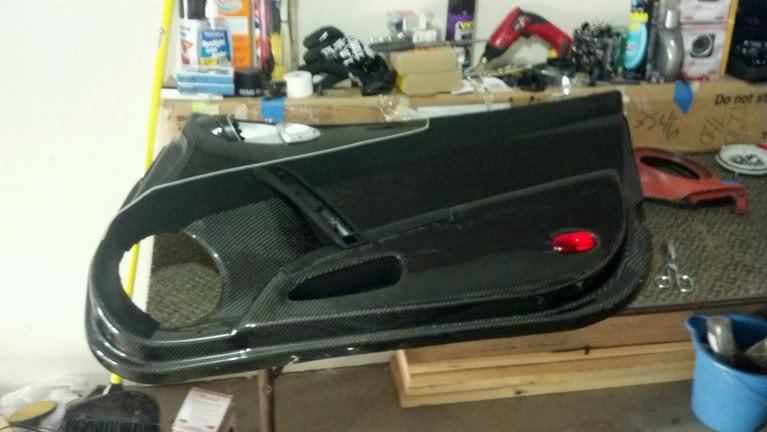
Below are a few various pictures in my mock up stages.. wicked CAS pods for My Boston Pro 60 speakers.. they were orig painted black ( and poorly at that) in the OME dor installation, and then i wrapped them in black suede, turns out it didnt look good.. i went a few different routes until i figured out what id do w them, ill note that later.
The suede piece is there so i dont burn the living hell out of my arms in the summer time here in AZ. I will have ti redone professionally as will i also redo my black suede headliner... i jsut saw another thread w diamond tuck and i think it looks fantastic and would look even better in my car haha.. but thats for another time.
Here's the test fit shot and mock up of wherei thought the suede would look decent. Its a little sport truck ish, but still looks ok i think.
The cool part??? EVERYTHING LINED UP.. WHEW.. this car was 40 miles away as these were being built. The screw hole behind the handle, perfect. The panel pos? Dead on. Holes for the door pull handle? Stellar. Window channel was a litttle crooked, but thats since been fixed.
Its again obvious hat the sueded pod looked lame, so i yanked it.
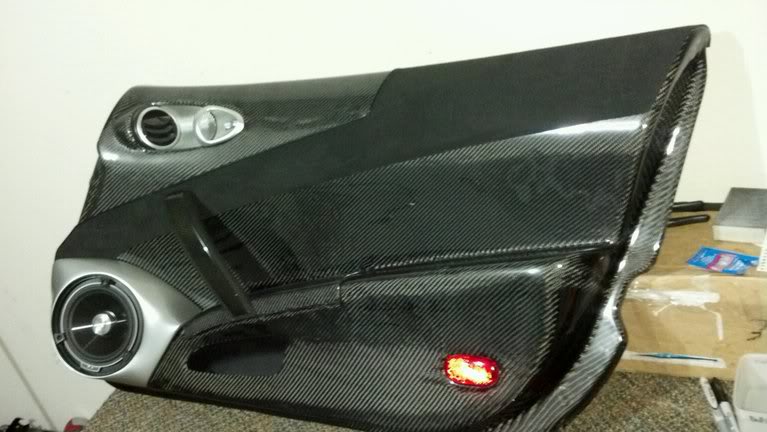
They have actually been prepped and sent out to paint KYO/ Chrome Silver just like the OEM door handle pulls above them are.

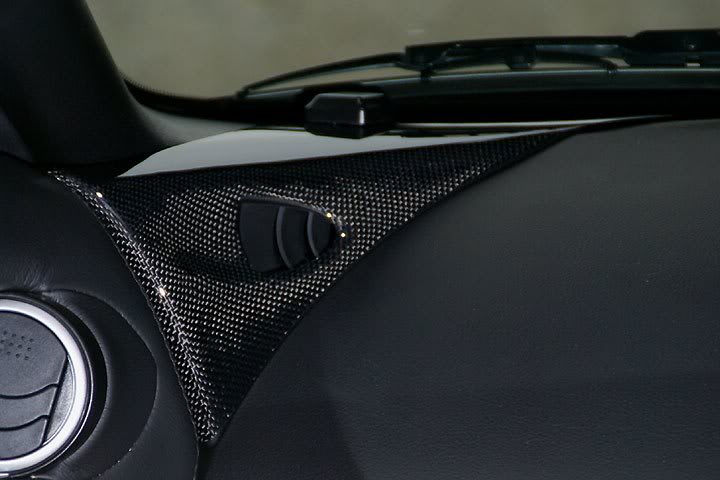
Here are the RSW carbon fiber corner pieces i will eventualy order to help flow a bit more.
I ended up using some orange and them satin chrome resin adhesive trim around the suedes edge.. but i think for the time being the chrome is fine, but the orange is actually pretty paintable, and can be sprayed black using Duplicolor trim black and some adhesion promoter. The chrome line looks cool on the panel, jst not so sure how good it will look actually IN the car. Thers no shiny silver stuff in there really.
I also purchased another real CF stick on dash kit to pillage some extra parts out of it, namely the sunglass bin, vanity mirrors, rear cubby box covers, and the passenger side door pull handle.. i decided having CF instead of abcklit would look alot better.
I dont have pics yet, but I added an amber led strip to the inside edge of the map pockets before gluing them back on, so they are very dimly and diffusely lit in amber when the illumination is on.. its not as ricey as it sounds, its very OEM looking like the GS 300 lexus is.. except i chose amber.
ANyways, ill post some better behind the panel pictures ( sound deadening material, OEM foam pieces etc) as well as lighting pictures and more detail on the strips you need to cut out and modify, window channel mounting etc.. as well as some finished pics when the CAS pods come back silver, as well as some installed final pics whenever that actually happens.
Ive been tackling lots of tedious projects in my garage while Intense tackles my FI and block build in theirs.
Did a headlight modification write up thread, and this ones following in suit, but nowhere near as majopr and complete, AND i dont have them 100% done or have pictures of everything yet, so I will leave a few posts reserved for the next few days worth of updates.
I had SEVERAL of these door panels. I had Seibon, and i had a few pairs of OEM style ones from a place called frpbodykits.com
scary, i know. But they were cheap, like 399... and since one set came in less than perfect condition, they sent me a 2nd set for free aside from light shipping.
SOld a few sets here n there, and was left with one set of these OEM style to build.
Here's some pics of whats involved as there are very few existing on teh interwebz at this time. .
Ultimately, having them cut, recleared and buffed and followed up with some clear bra would be the best bet, its a little wavy, but still pretty cool.
First off, youll need to cut out the section of the OEM door panel that holds the door handle and vents on, you will need to cut about an 1/8th inch off each stud for each screw for panel gap clearance, and use silicone adhesive and some binder clips to stick it on there, works very well.
I also cut the door panel clip strip off the bottom of the door panel itself and glued int in the bottom of the panel in the same fashio, then trimmed off the excess flange with a jigsaw. The door panel clip farthest towards the rear of the door panel and nearest the latch and striker actually needs to be moved back in by almost a half inch, so cut it off, grind it down, and I used JB quick weld to reattach it. Its very solid.
Below are a few various pictures in my mock up stages.. wicked CAS pods for My Boston Pro 60 speakers.. they were orig painted black ( and poorly at that) in the OME dor installation, and then i wrapped them in black suede, turns out it didnt look good.. i went a few different routes until i figured out what id do w them, ill note that later.
The suede piece is there so i dont burn the living hell out of my arms in the summer time here in AZ. I will have ti redone professionally as will i also redo my black suede headliner... i jsut saw another thread w diamond tuck and i think it looks fantastic and would look even better in my car haha.. but thats for another time.
Here's the test fit shot and mock up of wherei thought the suede would look decent. Its a little sport truck ish, but still looks ok i think.
The cool part??? EVERYTHING LINED UP.. WHEW.. this car was 40 miles away as these were being built. The screw hole behind the handle, perfect. The panel pos? Dead on. Holes for the door pull handle? Stellar. Window channel was a litttle crooked, but thats since been fixed.
Its again obvious hat the sueded pod looked lame, so i yanked it.
They have actually been prepped and sent out to paint KYO/ Chrome Silver just like the OEM door handle pulls above them are.
Here are the RSW carbon fiber corner pieces i will eventualy order to help flow a bit more.
I ended up using some orange and them satin chrome resin adhesive trim around the suedes edge.. but i think for the time being the chrome is fine, but the orange is actually pretty paintable, and can be sprayed black using Duplicolor trim black and some adhesion promoter. The chrome line looks cool on the panel, jst not so sure how good it will look actually IN the car. Thers no shiny silver stuff in there really.
I also purchased another real CF stick on dash kit to pillage some extra parts out of it, namely the sunglass bin, vanity mirrors, rear cubby box covers, and the passenger side door pull handle.. i decided having CF instead of abcklit would look alot better.
I dont have pics yet, but I added an amber led strip to the inside edge of the map pockets before gluing them back on, so they are very dimly and diffusely lit in amber when the illumination is on.. its not as ricey as it sounds, its very OEM looking like the GS 300 lexus is.. except i chose amber.
ANyways, ill post some better behind the panel pictures ( sound deadening material, OEM foam pieces etc) as well as lighting pictures and more detail on the strips you need to cut out and modify, window channel mounting etc.. as well as some finished pics when the CAS pods come back silver, as well as some installed final pics whenever that actually happens.
Thread Starter
Joined: Aug 2006
Posts: 8,321
Likes: 467
From: Scottsdale/coyote drophouse
reserved for more pics at a later date..
painted the orange trim flat black, edged the suede w it.
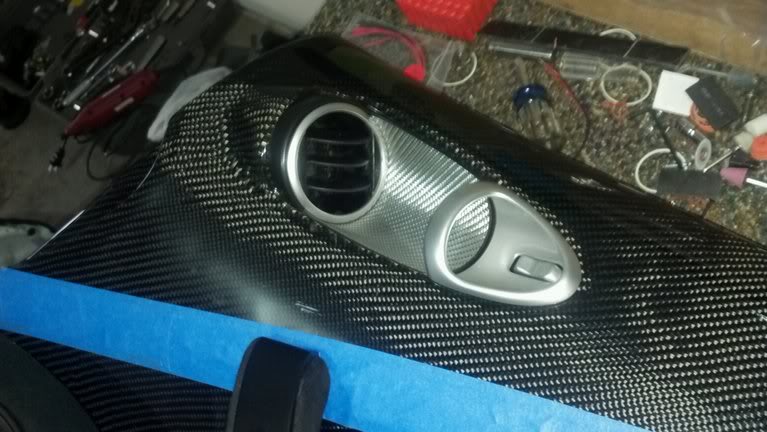
Carbon fiber on the handle pull and the vent blades as well. They are slightly darker.. and i like that. Its not all 100% the same, but i thnk in a good way. Breaks up the parts that need it.
painted the orange trim flat black, edged the suede w it.
Carbon fiber on the handle pull and the vent blades as well. They are slightly darker.. and i like that. Its not all 100% the same, but i thnk in a good way. Breaks up the parts that need it.
Last edited by bmccann101; Mar 12, 2012 at 12:12 PM.

Thread Starter
Joined: Aug 2006
Posts: 8,321
Likes: 467
From: Scottsdale/coyote drophouse
Thank you..and yes..they are certainly going to be required. ill probably do the matching defroster vent across the windshield ..but at about a grand for both parts shipped...its going to have to wait a bit haha.
But.... im truly truly running out of things to buy for this car that still has no engine in it.
ill probably do the matching defroster vent across the windshield ..but at about a grand for both parts shipped...its going to have to wait a bit haha.But.... im truly truly running out of things to buy for this car that still has no engine in it.
Last edited by bmccann101; Mar 12, 2012 at 12:08 PM.

Trending Topics


Thread Starter
Joined: Aug 2006
Posts: 8,321
Likes: 467
From: Scottsdale/coyote drophouse
added a few finished product pictures to the reserved posts from earlier in the thread, take a peek, not the best pictures.. in person i must say they are quite stunning, especially in lower normal lighting. the shines and the juxtaposition of the materials looks sick.
I had the Cas pods smoothed way down and painted chrome silver kyo to amtch the door handles.
I do have grilles for the Bostons still, so no they wont be exposed.
Jumbo depot carbon switch plates were actually quite nice.
I cant wait to hang my arm out the window over one and go for a sunny weekend drive..
Grr.. one day.
Still working on the gated shifter, but im not really ready to move fwd on anymore of it until i can test the fit when the transmissions back in the car.
Last edited by bmccann101; Mar 12, 2012 at 12:13 PM.

Thread Starter
Joined: Aug 2006
Posts: 8,321
Likes: 467
From: Scottsdale/coyote drophouse
They are Wicked CAS pods, with pretty much all of the "smoothing material" aka body filler they use when they send them out. Lots of pinholes as they were sanded thru that had to be filled i hear. I used an aggressive sanding wheel to get them to fit alot better before sending them out to be finished.
I had Intense spray them for me. 75 bones. Hooked up.
I had Intense spray them for me. 75 bones. Hooked up.
yeah i have some leather that i will wrap mine in, thinking i might just do some myself, i have material leftover from my custom box build...thanks tho! how do they mount to the door?
Thread Starter
Joined: Aug 2006
Posts: 8,321
Likes: 467
From: Scottsdale/coyote drophouse
i used some binder clips to hold them in place and made some decent holes thru both panels, used the standard nissn 10mm bolts , screws and other nissan leftover ahrdware to fasten them at most corners from behind the panel. The screws they come with suck.
Be careful w the leather tho as it doesnt stretch well w out steam, or it shows wrinkles just like skin does..AND.. thers ZERO room between my Boston grille ruings and the wall of these things.. wasnt even enuff space for the suede.. had to yank it.
I like the paint FAR better now anyways.
Be careful w the leather tho as it doesnt stretch well w out steam, or it shows wrinkles just like skin does..AND.. thers ZERO room between my Boston grille ruings and the wall of these things.. wasnt even enuff space for the suede.. had to yank it.
I like the paint FAR better now anyways.
ahh but if i custom make some ill make sure there is enough clearance for the leather, my dad is a master upholsterer so getting the leather stretched without wrinkles will be cake lol here is my trunk setup that he wrapped for me lol

