
First time vinyl wrap...


one more question, when you used the heat gun, did you use it after applying the vinyl on the panel and after it was set in its place? Or did you ever have to use the heat gun to correctly apply and lay the vinyl on the body panel? This was mainly a dry application correct? You didnt spray any application fluid or soap/water besides the primer on the corners?

Reminds me of this: http://www.dipyourcar.com/
Anyway, car looks seriously amazing bro I couldn't imagine being able to do my entire car like this. Props for your patience!
Anyway, car looks seriously amazing bro
I couldn't imagine being able to do my entire car like this. Props for your patience!

Thread Starter
Registered User
Joined: Oct 2011
Posts: 81
Likes: 0
From: Vancouver B.C
one more question, when you used the heat gun, did you use it after applying the vinyl on the panel and after it was set in its place? Or did you ever have to use the heat gun to correctly apply and lay the vinyl on the body panel? This was mainly a dry application correct? You didnt spray any application fluid or soap/water besides the primer on the corners?
I used the same method for both, is as follows,
Have the bumper on the car but make sure you can easily remove it to finish all the edges.
Cut your vinyl to fit, In my case the front bumper was 7ft x 2.5ft, This gives you extra vinyl on top bottom and sides, The rear was 8ft x 3ft much harder to work with than the front.
Next Peel of half the backing paper cut off and discard, Start from the center of the bumper and work your way to the outside, When you get to the corner of the bumper this is where you heat the **** out of the vinyl, Only then you lay the vinyl down as much as you can, You will have to repeat this process many times until you get pass the curved surfaces, Two sets of hands makes this possible.
Next repeat process with other side.
The longer you have the paper backing off the greater chance dust will attach to the adhesive.
When finishing the areas around the lights/extreme curved areas make sure you heat the vinyl fairly hot, this will create a memory that the vinyl will hold, otherwise it will bubble up after a few days especially in the heat.
Another tip is to try and place a little vinyl slack into the licence plate areas and marker light areas, That way later on you wont have to stretch the vinyl so much that the adhesive weakens.
This is the method that worked for me. I tried most others...applied from left to right, Taking off all the backing first, but in the end they did not work for me. Finally on the fourth attempt I got it!

Hope this helps.
Let me know if you have anymore questions!
Reminds me of this: http://www.dipyourcar.com/
Anyway, car looks seriously amazing bro I couldn't imagine being able to do my entire car like this. Props for your patience!
Anyway, car looks seriously amazing bro
I couldn't imagine being able to do my entire car like this. Props for your patience!Patience was definitely the key with this stuff!
one question to your advice. When you say take off half the backing off, you just cut either the left half or right half and then applied and started out from the middle? So when do you take off the other backing if you are working from the middle?

Registered User
Joined: May 2012
Posts: 2
Likes: 0
From: Orange County
buddy just got his wrapped . just in time for bimmerfest '12. the guys at precision put aside everything for him to get his car done and got a 2-night allnighter done..
just took the photos from what they shared.


there's a bentley waiting to be wrapped next by these guys. they're pretty crazy with their work..
. just in time for bimmerfest '12. the guys at precision put aside everything for him to get his car done and got a 2-night allnighter done.. just took the photos from what they shared.
there's a bentley waiting to be wrapped next by these guys. they're pretty crazy with their work..
Last edited by sooh; May 20, 2012 at 01:46 AM.

that's amazing work.
i want mine to be flat black so bad but i don't really have the time to do this nor do i think the 3000$ people are charging is worth it. I would probably give 1000-1500 to have this done.
i want mine to be flat black so bad but i don't really have the time to do this nor do i think the 3000$ people are charging is worth it. I would probably give 1000-1500 to have this done.
Thread Starter
Registered User
Joined: Oct 2011
Posts: 81
Likes: 0
From: Vancouver B.C
^
That gloss wrap looks really good on that BMW! All done in two days, Well done!
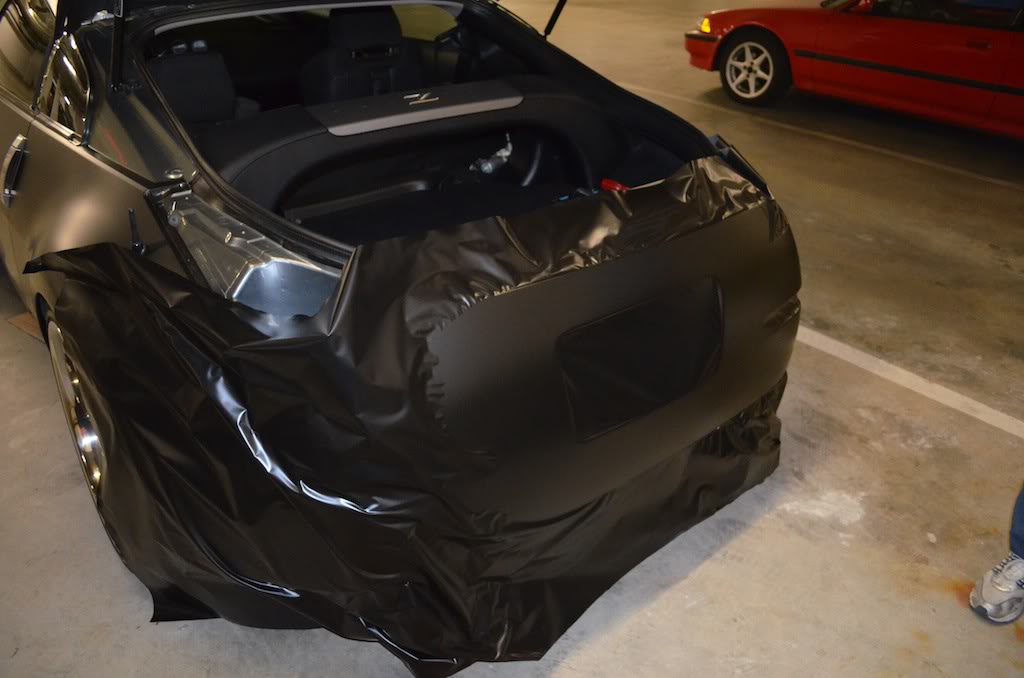
I wrapped from the centre of the bumper out, One side at a time. I wrapped the passenger side first leaving the backing on the driver side until the passenger side was finished! This pic kinda shows what I mean.
That gloss wrap looks really good on that BMW! All done in two days, Well done!

Thread Starter
Registered User
Joined: Oct 2011
Posts: 81
Likes: 0
From: Vancouver B.C
^^Ah I see. THe pic confused me at first because the vinyl on the driver side looks like the backing is already peeled off, it looks very flexible as if the paper backing was already off. The vinyl that I have is hard like paper.
Btw, did you do this by yourself mostly? Like cutting/applying the vinly on the big bumper parts?
Btw, did you do this by yourself mostly? Like cutting/applying the vinly on the big bumper parts?
Last edited by (ZzzzzZ); May 22, 2012 at 11:25 AM.


SO I too just did my hood.
question.....The heating shrinks the vinyl kinda like shrink wrap. SO around a compound curve (like bumper area) you shrink it to take out the 'extra' then squegee it into place since the adhesive is pressure activated....correct? I had read something about keeping tension on the vinyl. Heat plus even a little tension creates more wrinkles.
I'm kinda confused about heating to shrink and heating to stretch....and stretching while heating...vomit.
Not to many curves on a G hood so I used heat only to get wrinkles out. Greddy Front bumper is next.....
Thanks!!

Registered User
Joined: Mar 2011
Posts: 81
Likes: 0
From: New Jersey
Heating to get rid of wrinkles is shrinking. When you heat the vinyl, it becomes stretchable. heating to get rid of wrinkles can be seen as flattening the vinyl. Once its warm, you can then stretch it
Soooo around a compoud curve do you heat the vinyl before laying it or do you heat then stretch then lay it and heat again to take up excess?
Know what I mean?
Gracias
Last edited by eZg; May 23, 2012 at 10:02 AM. Reason: goober
Thread Starter
Registered User
Joined: Oct 2011
Posts: 81
Likes: 0
From: Vancouver B.C
In recesses or groves heat push into place then blast with heat fairly hot, this will give the vinyl a memory.... So it won't lift up on a hot day!
Thread Starter
Registered User
Joined: Oct 2011
Posts: 81
Likes: 0
From: Vancouver B.C
^^Ah I see. THe pic confused me at first because the vinyl on the driver side looks like the backing is already peeled off, it looks very flexible as if the paper backing was already off. The vinyl that I have is hard like paper.
Btw, did you do this by yourself mostly? Like cutting/applying the vinly on the big bumper parts?
Btw, did you do this by yourself mostly? Like cutting/applying the vinly on the big bumper parts?
I wrapped it with help from my wife, No way I could wrap it on my own, the piece of vinyl is just to big to work with for one person. That goes for most pieces!
Registered User
Joined: Mar 2011
Posts: 81
Likes: 0
From: New Jersey
sorry to hijack but maybe you could help
<a href="http://s232.photobucket.com/albums/ee267/Karkiss/?action=view&current=stuck.jpg" target="_blank"><img src="http://i232.photobucket.com/albums/ee267/Karkiss/stuck.jpg" border="0" alt="Photobucket"></a>
What is a remedy for this? Thinking about cutting and just overlapping the cut. Heatgun doesn't seem to be working for this.