When you click on links to various merchants on this site and make a purchase, this can result in this site earning a commission. Affiliate programs and affiliations include, but are not limited to, the eBay Partner Network.
Can anybody comment on how difficult the installation is? I'm interested, but live in the middle of farm land and there aren't any reputable shops I trust around here.
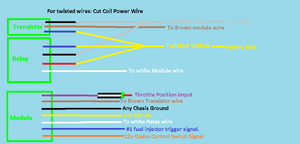
If you are comfortable using a volt meter to find different wires throughout the car that is a great start. Most wires are fairly easy to find and tap in to. The hardest is the wire that controls the coils. It is the same color from coil to coil and if you don't interrupt it before it gets to any coil the two step won't work properly.
The module itself mounts inside the car and you will have to route wires from inside the cabin to under the hood. Under the hood you'll need to route wires away from moving parts and heat sources and protect the wires with loom or some other form of protection.
Agreed it is a bit involved and took the better part of a few hours for experienced techs. If we were installing these things all day it wouldn't be a big deal but finding everything manually takes alot of time.
That said, the best place to get the coil wire is in the battery compartment. There's no chance of getting only 'some' of the coils... it's in the three plug harness on the main engine harness in front of the battery above the BCM. Keep in mind the coil AND injector power wire were both the same color (but in different connectors). We did a continuity test to make sure we had the right one. Another benefit to grabbing it here (other than being dead easy compared to grabbing it in the cramped engine bay) is that if you ever remove/swap your engine there aren't any extra wires to deal with. You can also switch from ignition cut to fuel cut in less than 10 minutes since the wires are only a few inches apart.
My installer fortunately is a master nissan mechanic so he was able to find wires using the Infiniti FSM software on a work PC. The best place to get the coil wire is in the battery compartment. There's no chance of getting only 'some' of the coils... it's in the three plug harness on the main engine harness in front of the battery above the BCM. Keep in mind the coil AND injector power wire were both the same color (but in different connectors). We did a continuity test to make sure we had the right one. Another benefit to grabbing it here (other than being dead easy compared to grabbing it at the engine) is that if you ever remove/swap your engine there aren't any extra wires to deal with. You can also switch from ignition cut to fuel cut in less than 10 minutes.
I've never tried to grab it there as that circuit powers more then just the coils. The cam sensors are also there and I believe one other circuit. Another shop tried that location and it threw codes. Glad to hear it worked out for you - that definitely makes it easier.
I've done this on several VQ35s and the "correct" location seems to be different on different cars. Like I said though, that is the hardest part.
We looked up the schematic in the FSM before locating/cutting anything and nothing else was powered by the wire. If it were grabbed on the other side of or closer to the BCM then you would have issues as it also runs to the ECU, probably so the ECU can monitor the power state of the coils.
Ultimately it might depend on year as well... mine's a 2004.5.
djamps, this may be asking a lot but can you look at the schematic on the 07-08? You seemed to be very skilled in these areas. I'm not great at wiring schematics.
djamps, this may be asking a lot but can you look at the schematic on the 07-08? You seemed to be very skilled in these areas. I'm not great at wiring schematics.
Let me know the exact year/model of your car and I'll look it up next time I'm at the shop. But it might only be infiniti in the FSM software system not sure...
Let me know the exact year/model of your car and I'll look it up next time I'm at the shop. But it might only be infiniti in the FSM software system not sure...
Mine is a 2007. I do have the FSM if that would help you. I did some more research tonight. The unit is initialized and set for six cylinders. I get those clicks properly. But I can't get it to enter programming mode. It does not click. Just so I'm clear to enter programming mode: Throttle and Clutch to floor, Turn Key to On, within 10 seconds release throttle - I should hear a click but I get nothing. I know right now that the orange wire from the unit is running to the bottom clutch switch which I know is incorrect. I bought and gave the switch to Z1 but they had a HELL of a time figuring it out and at the end of the day, its not right. This concerned me obviously being that they are a reputable Nissan shop.
Djamps, does the wire in the battery compartment you tap into power the injectors and coils?
So I've been trying to install this two step but been having issues. Anyone has done this recently? I'm having a hard time finding the wire that cuts off all the coil power. I've tried contacting djamps, but no luck, I want to try getting to the wire in the battery compartment like he did, but no go. Any assistance would be appreciated.
So I've been trying to install this two step but been having issues. Anyone has done this recently? I'm having a hard time finding the wire that cuts off all the coil power. I've tried contacting djamps, but no luck, I want to try getting to the wire in the battery compartment like he did, but no go. Any assistance would be appreciated.
I've gotten feedback that cutting the wire in the battery compartment causes undesired issues - it's been a while but I believe that it also cuts power to the variable valve solenoids.
The wire should be in a large loom on the passenger side of the motor (around the injectors and coils). Inside that harness there should be a big factory splice where all the individual wires for each coil connect to the power wire - they are all the same color so you will need to use an ohm meter to determine which is the main feed. If you interrupt the wrong wire it obviously won't kill all the coils. Finding this wire is the hardest part of the installation but with a little patience it's not too bad.
Hey KP, thanks for replying back, i didn't know you guys were still on the forums. You are right about the coil wire, that was the hardest part of the installation. I re-read the FSM last night, the vvt power wire is in the same harness as the coil wire, so if you splice the wrong ones, you can have issues. I tried different wires by the engine and had no luck, i had the issues you are talking about where all the coils weren't killed causing the rpms not to hold well.
I did cut it in the battery area, here is a video of it afterwards, would you say everything is acting right? Thanks again for your assistance.
It sounds good to me, hard to tell without actually being there. The RPMs seem to be pretty constant. Any check engine lights or drivability issues?
The only issue I had was when I cut the wrong wire, it wasn't cutting off all the coils, so I got a misfire code. Afterwards, cutting the wire in the battery compartment, I did not get a code and the driveability is fine.
There is an issue though. When I launch, it holds the rpms well and I feather the clutch. When the 2 step deactivates and goes back to normal, there is a delay, and the rpms drop before going back to normal, i guess like its cutting all the coils then reactivating maybe. Not sure if I described it well.
I notice that there is a **** there, I guess that is for the no-lift module to determine the cut off amount, does that affect the 2 step portion of cutting it off also?
I've never noticed a delay before going back to "normal", it's always been instantaneous. The only thing I can think of is there being a delay between the transistorized control and the deactivation of the relay that breaks the OEM signal. I'm not even sure how you would test for that and the two should happen at the exact same time.
The **** is only for the no lift shift timing. It has no function on the two step side of things.
Can you get a video of a full launch where you can see the delay?