
Back home lets build!


 05-26-2012, 09:14 PM
#102
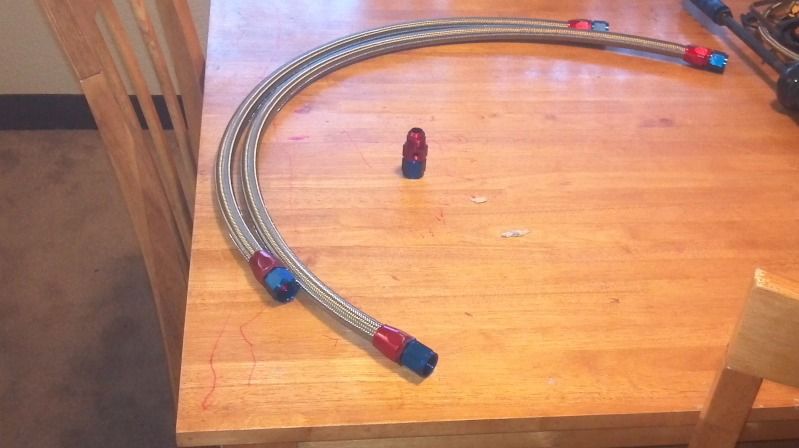
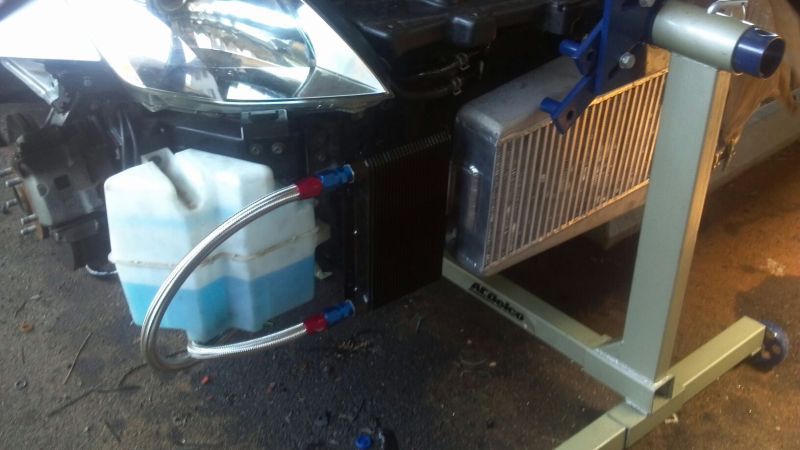
aside from getting the sprocket loose i also assembled the oil cooler hoses. kinda worried though with them pointed at a 45 degree angle toward the front of the car they would route under the sway bar(damn non flexing 10 an stainless.) not sure if im worring over nothing and should just zip tie them to the sway bar or what. i really dont wanna buy 10 an 90 fittings because then these ones would be a waste(its what came in the kit. i could potentially point them straight forward but then i might run into the alternator bracket. ill find out more, one i get the z speed shroud it wont be a big deal but until then *shrug* also included in the pic is the 10 an extension with 1/8th npt port. my pressure sensor will go in that and my temp sensor will go in the t fitting that sasha provides with his kit so it gives the oil cooler hoses room to actually fit and still be in there at a 45 degree angle.
which speaking of the T fitting i need to pull it out and see whats going on. i think i might have stripped it when i pulled it out before. kinda nervous about trying to helicoil a oil galley that small so i might try some red threadlocker since i can tighten it enough that i have to use a wrench to get it out anymore by backing it up just a couple turns.
which speaking of the T fitting i need to pull it out and see whats going on. i think i might have stripped it when i pulled it out before. kinda nervous about trying to helicoil a oil galley that small so i might try some red threadlocker since i can tighten it enough that i have to use a wrench to get it out anymore by backing it up just a couple turns.
Last edited by jerryd87; 05-26-2012 at 09:16 PM.
05-27-2012, 08:02 AM
#103
New Member
iTrader: (8)

Join Date: Jan 2007
Location: terre haute, IN; STL, MO
Posts: 6,457
Likes: 0
Received 7 Likes
on
6 Posts
I would just use those fittings you have depending how far down they run. If you could mock them up and get a pic it would be helpful. I would definitely not zip tie them to the sway bar for any period of time. That stainless will start eating into the sway bar and could start to fray the braiding as well. Mine rest on the fender guard and don't seem to sag at all the small distance from the fender guard over to the adapter plate. Once you get the shroud under the car it can just rest on top of that.
about the stripped fitting. You might have to drill and tap a whole new port next to the original one. There is a nice flat machined area just to the rear of the original one that you could drill into and tap.
the temp and pressure sensors. The temp sensor is hard to place anywhere since the probe sticks out so far. If you use it in the oil cooler lines then it would obstruct the oil flow somewhat. It would do the same at the sending unit that you said you were putting it in. I wouldn't want to obstruct flow out of the sending unit since that oil supplies your turbo. I also noticed that on a T fitting the probe of a temp sensor was too long to put into a T fitting without bottoming it out. I placed mine in the oil pan so it wasn't obstructing anything.
Pressure could go anywhere. As long as your oil cooler isn't thermostat controlled you could put it in the fitting you have pictured with no problems and get a good reading. I just replaced my oem oil pressure sensor with the aftermarket one.
05-27-2012, 02:40 PM
#105
the probe for the temp sensor(autometer) actually isnt very big i can fit it into the end of of the T fitting and run the oil feed from the middle port its about the same length as the pressure sensor but is smaller diameter. im definitly going to have to zip tie it somewhere if not mayby the frame rail otherwise its definitly going to hit something. im gona spend some time today figuring it out though.
i did forget about the thermostat though i might just have to use the other port in the oil pan spacer autometer included enough adapters.
i did forget about the thermostat though i might just have to use the other port in the oil pan spacer autometer included enough adapters.
I would just use those fittings you have depending how far down they run. If you could mock them up and get a pic it would be helpful. I would definitely not zip tie them to the sway bar for any period of time. That stainless will start eating into the sway bar and could start to fray the braiding as well. Mine rest on the fender guard and don't seem to sag at all the small distance from the fender guard over to the adapter plate. Once you get the shroud under the car it can just rest on top of that.
about the stripped fitting. You might have to drill and tap a whole new port next to the original one. There is a nice flat machined area just to the rear of the original one that you could drill into and tap.
the temp and pressure sensors. The temp sensor is hard to place anywhere since the probe sticks out so far. If you use it in the oil cooler lines then it would obstruct the oil flow somewhat. It would do the same at the sending unit that you said you were putting it in. I wouldn't want to obstruct flow out of the sending unit since that oil supplies your turbo. I also noticed that on a T fitting the probe of a temp sensor was too long to put into a T fitting without bottoming it out. I placed mine in the oil pan so it wasn't obstructing anything.
Pressure could go anywhere. As long as your oil cooler isn't thermostat controlled you could put it in the fitting you have pictured with no problems and get a good reading. I just replaced my oem oil pressure sensor with the aftermarket one.
about the stripped fitting. You might have to drill and tap a whole new port next to the original one. There is a nice flat machined area just to the rear of the original one that you could drill into and tap.
the temp and pressure sensors. The temp sensor is hard to place anywhere since the probe sticks out so far. If you use it in the oil cooler lines then it would obstruct the oil flow somewhat. It would do the same at the sending unit that you said you were putting it in. I wouldn't want to obstruct flow out of the sending unit since that oil supplies your turbo. I also noticed that on a T fitting the probe of a temp sensor was too long to put into a T fitting without bottoming it out. I placed mine in the oil pan so it wasn't obstructing anything.
Pressure could go anywhere. As long as your oil cooler isn't thermostat controlled you could put it in the fitting you have pictured with no problems and get a good reading. I just replaced my oem oil pressure sensor with the aftermarket one.
05-27-2012, 03:14 PM
#106
New Member
iTrader: (8)
Join Date: Jan 2007
Location: terre haute, IN; STL, MO
Posts: 6,457
Likes: 0
Received 7 Likes
on
6 Posts
ah, my probe for the defi temp gauge was like 1/2" long so it wouldn't fit in a T fitting. Some people cut them down but i did'nt want to do this so i just put it in the oil pan.
If it's not taking up a lot of room in the middle of the hose flowing the oil then it should be fine.
If it's not taking up a lot of room in the middle of the hose flowing the oil then it should be fine.
05-27-2012, 04:03 PM
#107
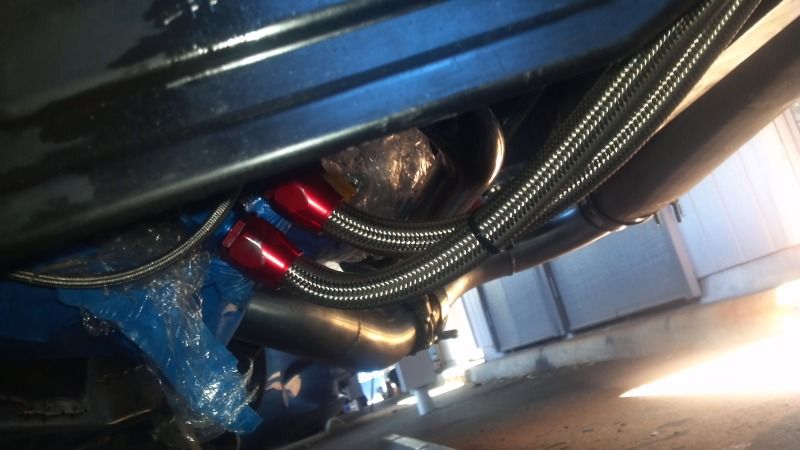
i was a bit wrong the adapter made a optical illusion so mines about just as long mayby a little shorter. looks like ill end up putting it into the otherside of the spacer. this is going to be the final routing it looks like, its at a slight angle the lowest part of the hose is about in the middle of the intercooler pipe for ground clearance so will be ok. without the wire ties it would hang on the ground the lines seem a bit long but i needed to so there wasnt an insane amount of tension on them, the 10 an does not like to flex. only thing im going to change is when i find my bigger rubberized hose mounts im going to use those to mount it along the bottom of the core support, they are in a box somewhere..............
05-27-2012, 08:25 PM
#110
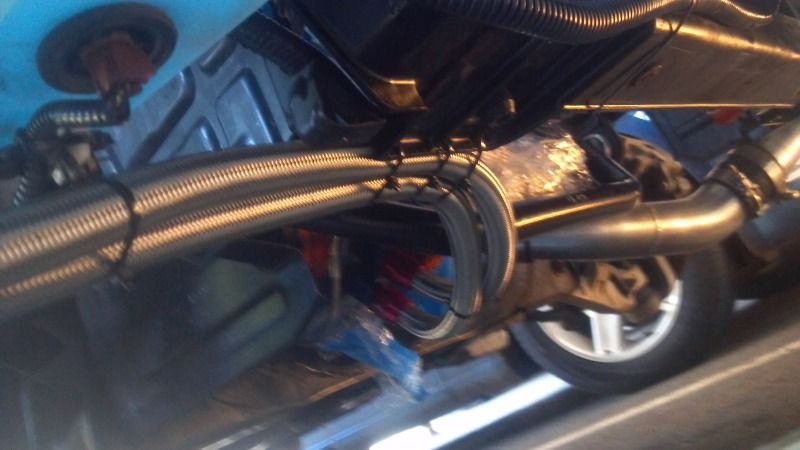
redid the oil cooler hoses like i said with the rubberized clamp mounts and put the front bumper back on and its tight with the oem one, i have to move the top hose around and do a little shoving on the bumper. because of all the stuff i have under it now i have a slight odd gap on the driver side fender but w/e its not a show car and the whole thing needs painted anyway(especially since i have a slight crack over there from the shoving and pushing, i need a bumper without markers because those are what are giving me a hard time >.<) ill worry about it when i do the body as the final stage of the project some years down the road though haha
05-28-2012, 07:24 AM
#111
New Member
iTrader: (8)
Join Date: Jan 2007
Location: terre haute, IN; STL, MO
Posts: 6,457
Likes: 0
Received 7 Likes
on
6 Posts
haha, i hear ya on that. i need both front and rear repainted on my car but i'm just lazy. I drove mine daily year round for 3 years in indiana. Snow, ice, dirt roads. So the car looks amazing for what it has been through but I'm just too lazy to try to perfect how clean it looks. I keep it clean and that's it. If someone laughs at some of my blemishes i just tell them lets go take a ride....lol
05-28-2012, 12:47 PM
#112
i was highly considering plastidiping it, $300 bucks to matte black the car and hide alot of the uglyness until i get to the body section of the project. dont really wanna do much because i wanna get the voltex kit down the road, plus when i get stateside i intend for some top speed stuff so it will wind up with a splitter and wing as well. sooooo actual paint job can wait, now i have to decide how i want to run a bypass line for the tstat since my heater core is removed. i can run a heater hose in the back of the engine to simulate a heater core or i have the mishimoto silicone hoses so i can use the front bypass so i dont run into tstat issues i just havnt decided yet. was also considering running it to the front port on the tstat and just using a block off plate on the driver head and deleting both those tubes.
 05-29-2012, 08:35 PM
#114
yah i was looking at your thread but the thing that had me curious was that stock that port you have going to your radiator goes from the heater log to oil cooler then t stat adding extra hot water to open it. on your setup it would appear that your just adding extra cold flow from the radiator which had me a little perplexed. edit, its interesting that you had issues replacing the heater core but introducing colder coolant from the radiator solved the problem. kinda leads me to believe that you had air in the system and allowing the radiator to bypass the tstat a little solved the problem. if thats the case i should be fine since the mishimoto tstat had a 1/8th(mayby 3/16's) hole in it with a little bar i assume to help bleeding but i cut the bar out allowing a small amount of coolant to flow through it at all times. did you try the simulated heater core hose before the bung on the radiator?
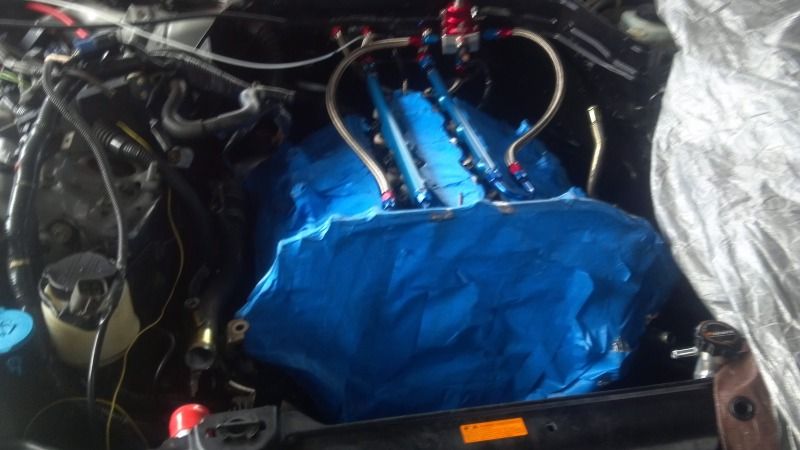
on a side note i finished up the fuel lines up front, not really happy with how tight the feed lines are but not much i can do, i cant cut down anymore because then they will rub on the brake lines and if i tryed to raise them with spacers on the motor mounts then it will rub the return lines(and i wont even be able to fit them on there everything barely fits with the intake and valve covers test fitted, mayby 1/16th inc space in the tightest spots.) so ill have to deal, they are too short to be able to use 45 degree hose ends and would probably make it even tighter. the 180 6 an for the returns barely fit i have to start the pass side one verticle then rotate it 45 degrees below horizontal one its thumb tight. tryed to prime the system and noobness kicked in, had to drain all the lines to redo the system and i only have half a tank in it........... soooo only thing the intake picks up is air. although it does hold 25 psi of compressed air np from the pumps sucking air lol gotta loosen the fittings to release the air and go get gas to prime the system and recheck with actual fuel in it.
sorry for the shitty pic
supposedly the cams made it into the US today so gona try and get them over nighted or two day aired to me, and gotta go to dealership tomarrow and get a new exhuast cam bolt.
Last edited by jerryd87; 05-29-2012 at 08:42 PM.
06-01-2012, 08:43 PM
#115
did up the brake vacuum pump, 99% of people wont need it but i wanted it for gradual high speed slow downs where i run out of vacuum. also did the hood pins, dont have a cable release anymore ditched it.
hooked the boost control solenoid back up to the wastegate, but i realised i did a huge noob mistake. when i put the heads on i forgot to replace the little o-rings in the front, realised it when i was staring at my far to large pile of orings that are left. soooooo now i have to pull the front cover off but that should be like a 1 hour job tops to pull it off, clean the gasket material off, replace the o rings and put it back on. outside that and bolting on the timing chain guides i have nothing i can do right now but stare at it. put on the extended lug studs the other day. tires wont be here till monday or tuesday and hopfully cams will be the same. apparently adam at z1's supplier had a huge order come in that has taken a couple days to go through. as soon as they find my cams though they are 2 day airing them to me directly from the distributor he even ate the extra cost because it has taken so long so def ok in my book.
hooked the boost control solenoid back up to the wastegate, but i realised i did a huge noob mistake. when i put the heads on i forgot to replace the little o-rings in the front, realised it when i was staring at my far to large pile of orings that are left. soooooo now i have to pull the front cover off but that should be like a 1 hour job tops to pull it off, clean the gasket material off, replace the o rings and put it back on. outside that and bolting on the timing chain guides i have nothing i can do right now but stare at it. put on the extended lug studs the other day. tires wont be here till monday or tuesday and hopfully cams will be the same. apparently adam at z1's supplier had a huge order come in that has taken a couple days to go through. as soon as they find my cams though they are 2 day airing them to me directly from the distributor he even ate the extra cost because it has taken so long so def ok in my book.
06-02-2012, 08:42 AM
#116

interested to hear about teh vac pump.
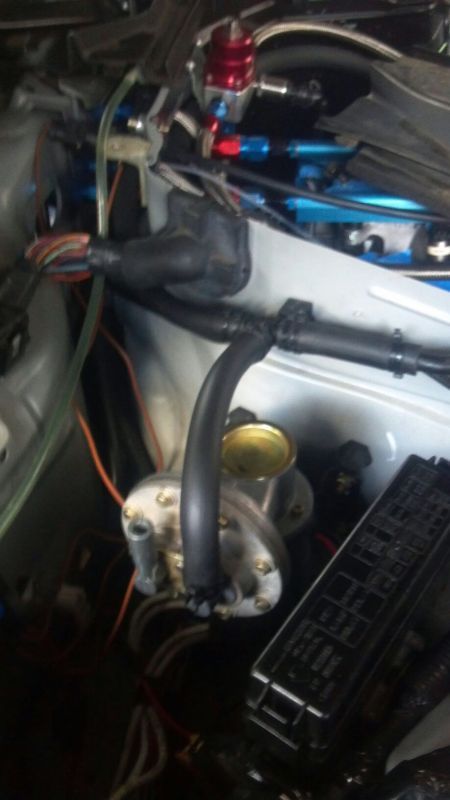
Those180* An fittings on your rails that look terrible. you could just ran the left line to the right rail and the right line to the left rail with some 90*/45* fittings. Thats how all the RFS kits do it. Looks very clean and line tucks outta sight under the injectors.
Does your plenum even fit on with the lines to the FPR like that?
Those180* An fittings on your rails that look terrible.
you could just ran the left line to the right rail and the right line to the left rail with some 90*/45* fittings. Thats how all the RFS kits do it. Looks very clean and line tucks outta sight under the injectors.Does your plenum even fit on with the lines to the FPR like that?
06-02-2012, 02:13 PM
#117
yah its not the best looking admittedly, at this point i dont want to order anymore damn fittings to be honest or i would order one 90 and run the driver side under the pleanum like the passanger side so its out of sight. i have a kinetix plenum so it fits, the fpr is at a slight angle so it clears the sending unit but if it where a mechanical sending unit it would clear being level and have a good amount of room to spare. once the intake is on the only thing see will be the driver side return line. really just dont want to buy anymore fittings to be honest.
for the vacuum pump its for some high speed gradual slowdowns i found the car dosnt store enough vacuum, after 2 pumps i was running out of vacuum. not really something anyone will experience even i will only experience it sometimes but he best to be prepared. really happened during a couple 135 runs, where i just kind of eased on he brakes(very long "track) went from 135 down to 55, was really mostly just to save pads and rotors dont wanna use up more then i have to if its not needed. 99% of the time even i wont have the pump on but it will ensure even that 1% of the time i dont run out. once i upgrade to the package concept z offers with centric rotors, axxis ultimate pads, stainless lines, and fluid i might even be a waste of time to have the pump. but it only cost me 88 bucks soooooo lol
edit: i could probably make the fuel lines look alot better also by simply putting 90's on the fpr but again run into the dont wanna buy fittings thing, i have like 4 or 5 extra now that are just going to sit in a box >.< it hits the fuel feed lines if i try and center it though, and tbh im not doing a wire tuck or anything like that ill try and make it look good after i do the suspension and brakes, and put the roll bar/cage in it w/e i decide prob a weld in roll bar though. i just dont wanna do a bunch of work to make it look pretty then have to cut into it again or make it look like crap again down the road when i start on another part of the project. was considering plastidip for that reason, repaint the car for 300 bucks since it really needs it and will make i look ALOT better. *shrug*
Last edited by jerryd87; 06-02-2012 at 02:30 PM.
06-04-2012, 10:55 PM
#118
tires showed up at 5 pm so had to hurry up and go get em mounted. too dark to take pics but i could drop the car half a inch and have 0 issues with rubbing, or next time go bigger diameter over the current 285/30/18's in all four corners.
06-05-2012, 03:09 PM
#119
Registered User
iTrader: (15)

Join Date: Sep 2007
Location: Staten Island,NY
Posts: 704
Likes: 0
Received 0 Likes
on
0 Posts
How does that plasti dip look when applied on the whole car? I looked at the website and the kit with the electric spray gun is $300 . I can't tell on the vid how it looks tho
06-05-2012, 03:43 PM
#120
the only one i have seen is there video on youtube one of a audi and another of a vw both matte black, looks pretty good to me for 300 bucks even if it isnt amazing and just good it will be worth it. if it blows then it can be pealed off pretty easily.
imagine alot of it has to do with how capable the user is just like real auto paint
imagine alot of it has to do with how capable the user is just like real auto paint