
Z Turbo Project (fun, fun, fun!!! ^ ^)


Thread Starter
Registered User
Joined: Jan 2012
Posts: 108
Likes: 0
From: south carolina
I've heard recently (two days ago) from a shop with a pro tuner for uprev that Uprev GT is hard to get a hold of... back ordered for a couple weeks. PMAS will run higher HP- but Uprev GT has fewer resolution issues down in the lower load areas. Not sure how you're planning to drive your car... but if you're shooting for 500hp- GT is probably the target. However- if the guy tuning your ride is comfortable with PMAS... that may be a more timely option.
Anyone else have an opinion on 500 with a 255? I literally don't know- but I know when I was looking at 500+ the 340 was recommended. Don't skimp on fuel- another repeated lesson.
Anyone else have an opinion on 500 with a 255? I literally don't know- but I know when I was looking at 500+ the 340 was recommended. Don't skimp on fuel- another repeated lesson.
guess will just stick to the MAF GT. I see one for sale in classifieds. I surely don't want problems driving normally outside of boost. Car will be daily driven, maybe a few interstate runs for kicks and giggles. But all in all Will never see a track while im the owner.lol.

As djamps will tell you- make sure whoever tunes it knows the intricacies of Uprev... You can run into several issues with MAF tuning- not the least of which is our hot / warm start issues.
Last edited by Eno; Sep 20, 2012 at 01:34 AM.
Thread Starter
Registered User
Joined: Jan 2012
Posts: 108
Likes: 0
From: south carolina
Ok Im losing my mind. and my dad doesnt believe me lol.
I bought a MLS Engine Gasket Set few months back and assumed the 350z had an oil pan gasket. Every other gasket is in the package....I did disassembly so long ago, i dont remember an oil gasket...my question is
Does the Vq35de have an oil pan gasket? or just the RTV sealant used? I have a big container of that, but I thought it was used in conjuction with a gasket.
please someone confirm, only rtv is used....If so, I can completely finish engine tonite.
also, no bashing. thanks.


It'll probably work better too. At least with my spacer, it starts seeping after 6 months no matter what. Getting it redone for the 3rd time next week.
I don't think a gasket will do a good enough job in that patricular spot after the pan is removed for the first time, with the OEM RTV in place. The gasket should work well though on the top half of the spacer, since it is a solid billet piece.
Last edited by Boosted Performance; Sep 27, 2012 at 11:08 AM.
I have had my on for over three years, never had an issue using only RTV. It is important to bend the OEM pan back in to shape after a "forced removal" with a screwdriver. I think this is where you need to add more RTV than anywhere else on the OEM pan. It is thin, and easly bends out of shape in that spot.
I don't think a gasket will do a good enough job in that patricular spot after the pan is removed for the first time, with the OEM RTV in place. The gasket should work well though on the top half of the spacer, since it is a solid billet piece.
I don't think a gasket will do a good enough job in that patricular spot after the pan is removed for the first time, with the OEM RTV in place. The gasket should work well though on the top half of the spacer, since it is a solid billet piece.


I used to use a napa oil pan gasket with the stock pan because of the crappy thin aluminum. Now with this greddy pan I have it is machined nicely so the RTV works.
As for maf's. DO NOT listen to all the BS about the pmas being crappy. Many tuners use them and tons of vq cars run perfectly fine. Anyone that says it runs crappy doesn't have a good tuner. Every maf, no matter which one, needs to have the maf table scaled exactly for their car. If you try to use the given maf table and then just correct with the base fuel schedule then it won't work properly. Since you are going to modify the maf table to work exactly perfect for your maf (since every maf is slightly different) then why waste double the money on a GT maf? It's seriously a money making scheme by osiris.
Mine ran fine for a whole year on the pmas before I went to a haltech. It ran better than stock after a tune so driving it around town as a daily was never an issue. It's the tuner. Crappy tuners cut corners, don't touch the maf tables (which the given values in osiris for pmas, gt maf and stock maf all need to be fine tuned) then you will have driving issues. The 350z I tuned in may had a pmas and it drove smooth as can be on the street after my tune.
as for fuel pump, low to mid 500s is what a 255 walbro will support. You will probably be fine with that unless you wanted to go for more power. It's an easy upgrade down the line if you need more fuel. If you want to do it all at once and not mess with it the aero 340 is a drop in replacement but costs double a walbro 255.
Thread Starter
Registered User
Joined: Jan 2012
Posts: 108
Likes: 0
From: south carolina
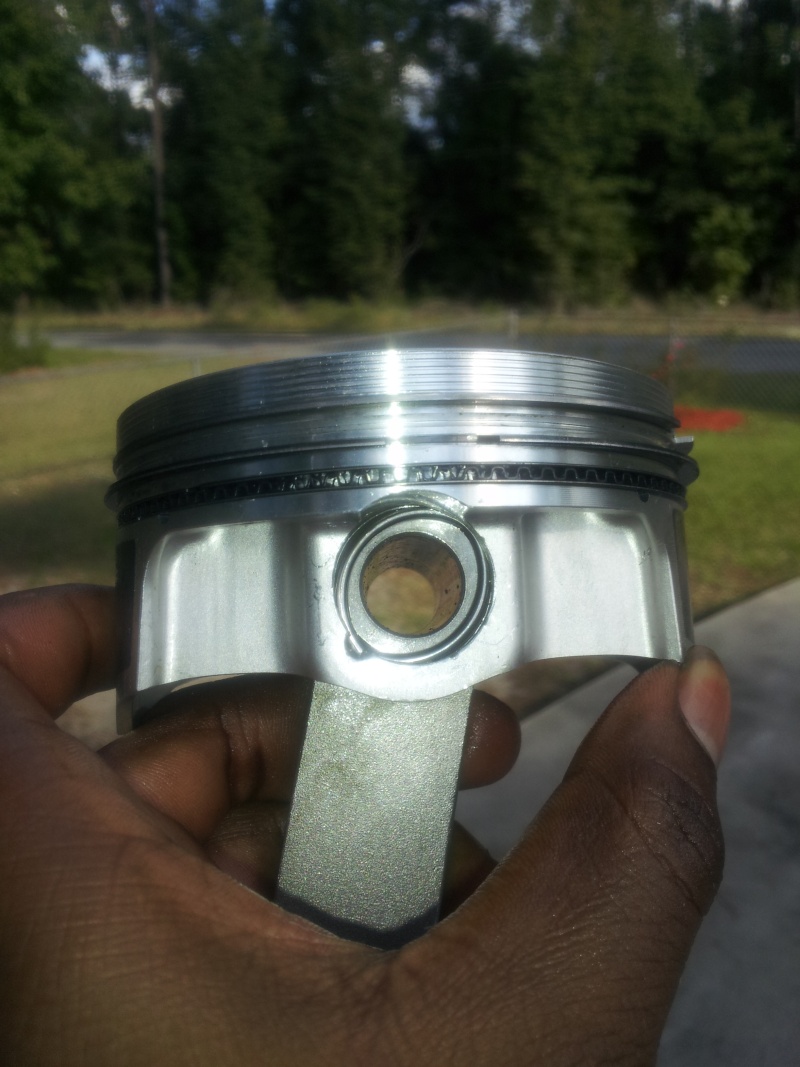
As someone suggested, I scrapped the rtv idea and went with a gasket for the lower oil pan. Found one from Felpro for 12bucks. Also, I didnt post it at the time, but during my wrist pin lock installs i slightly bent one c-clip on the #4 piston. So I ordered another c clip from wiseco, and fixed that. As you can see with the pics, Bottom End Full Assembled. Before I put l19s in and headgasket, I put #1 piston at TDC.... Then slapped heads on.. Torqued my L19s in stages until I got to 90lbs. When I got to doing the camshafts, I was kinda confused on what to torque the retainer caps to. The Manual had 4 different numbers, So I msg'd Jeff and he cleared that up for me....Once I had the Cams in, there came another question. So I sent out some queries again. The manual said to have #1 piston 240deg from TDC. As I stated before, I left #1 at TDC. Don't own any fancy hardware to accurately move crank that much without seeing with my own eyes with just bottom end sitting there. I installed cams anyway. Didnt go any further. I did searches on images with the rear timing installed only just to see how the keys in the pics looked in relation to mine, but that wouldnt help much because i wouldnt know the position of the crank.
Engine Can be fully assembled though. Kit Installed and everything. I just had to stop here, because I wasnt 110% sure those cams were in right position. Wasn't sure if notches on each intake came had to offset or the same. Same with Exhaust. in the pic below I have each one offset. Cam key sticking out on exhaust is at 6oclock on one side and 12oclock on other side (in relation to cylinder angle)....Same orientation with Intake 6 and 12. Intake cam key are circular hole, no key sticking out..
Next Step is to buy Electronics/Clutch and do the Swap. Looking at my finances, Gonna Need at least another 1400 to finish. Think only $600 left in my project build account lol.
bent cclip that i switched out.
L19s; mls headsgaskets in place
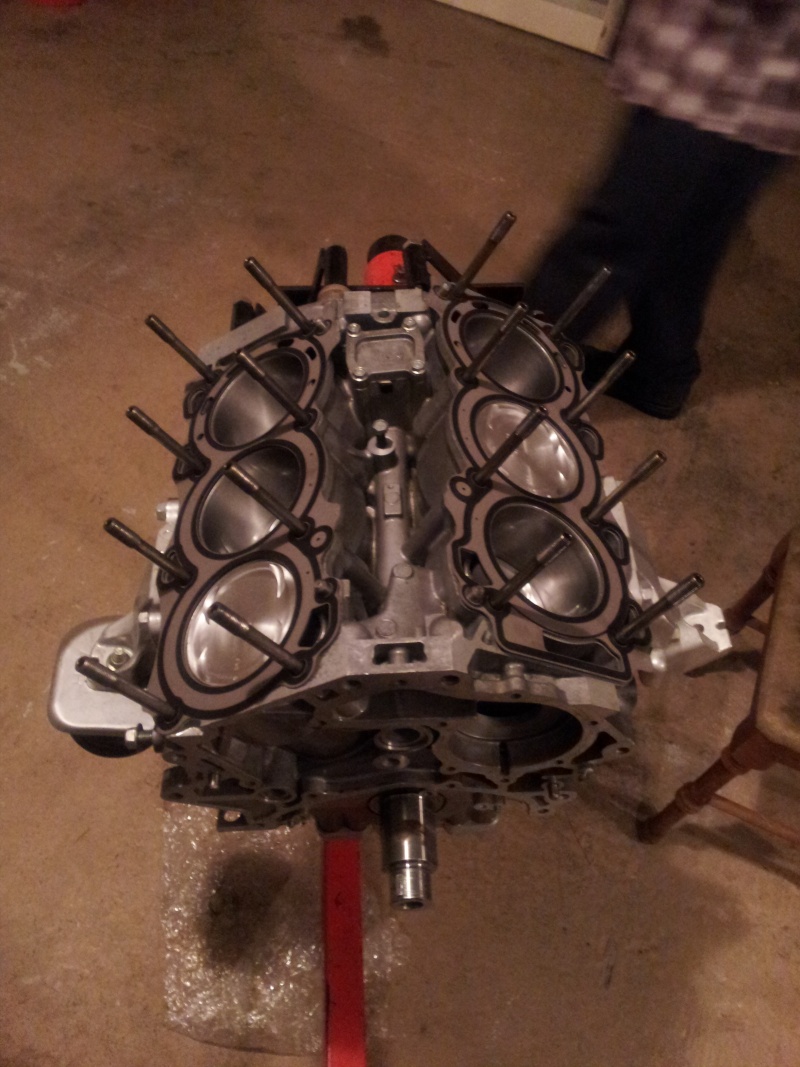
torqued down

cams installed
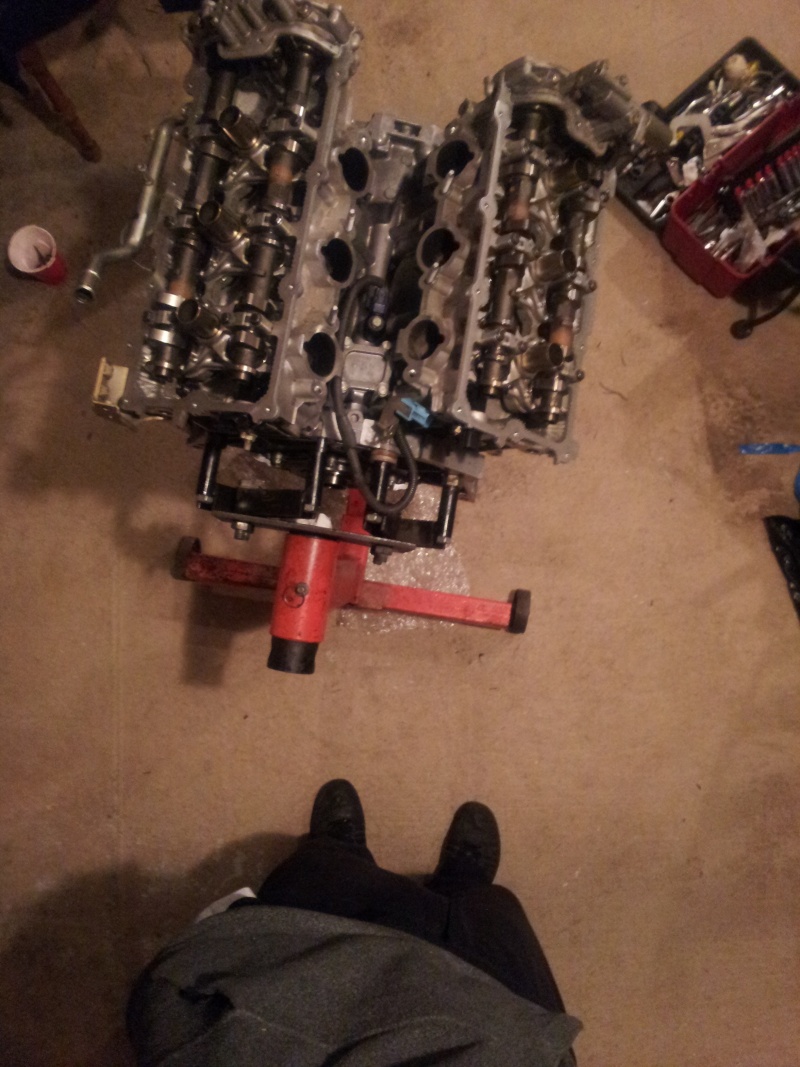
Engine Can be fully assembled though. Kit Installed and everything. I just had to stop here, because I wasnt 110% sure those cams were in right position. Wasn't sure if notches on each intake came had to offset or the same. Same with Exhaust. in the pic below I have each one offset. Cam key sticking out on exhaust is at 6oclock on one side and 12oclock on other side (in relation to cylinder angle)....Same orientation with Intake 6 and 12. Intake cam key are circular hole, no key sticking out..
Next Step is to buy Electronics/Clutch and do the Swap. Looking at my finances, Gonna Need at least another 1400 to finish. Think only $600 left in my project build account lol.
bent cclip that i switched out.
L19s; mls headsgaskets in place
torqued down
cams installed
Last edited by bgant3; Oct 22, 2012 at 10:58 AM.
Thread Starter
Registered User
Joined: Jan 2012
Posts: 108
Likes: 0
From: south carolina
went to the nissan dealership today to get a couple intake solenoid gaskets. Only was $5. When I was doing tear down earlier this year, i threw away all gaskets. Forgot I had to get another set of the these.
Anyone know somewhere other than Greddy to get inlet/outlet gaskets (2 each) for 18g Turbos? IF I gotta pay 20 per gasket there, then guess no choice. Just seeing if anyone had other options.
Anyone know somewhere other than Greddy to get inlet/outlet gaskets (2 each) for 18g Turbos? IF I gotta pay 20 per gasket there, then guess no choice. Just seeing if anyone had other options.


Thread Starter
Registered User
Joined: Jan 2012
Posts: 108
Likes: 0
From: south carolina
Ok guys I cannot get my cam position right on the side with cylinder 1...The first two pictures are where I can put the cams, and they seat in their journals. But this is wrong because with #1 piston at TDC, the lobes are supposed to diagonally facing each other. You can see in the 3rd picture, thats how it suppose to be, but I CANNOT seat them down because the lobes on the 3rd cylinder (intake), and 5th cylinder (exhaust) are hitting the silver
How the manual, and Hal has told they should sit with #1 at TDC
If u look closely, u see the lobes hitting on the #3 intake side, and #5 exhaust. I cant seat them down into journals.
simply put guys, im lost. Can I go forward, placing my cams how the guy in the Infiniti FX build is doing?????
How the manual, and Hal has told they should sit with #1 at TDC
If u look closely, u see the lobes hitting on the #3 intake side, and #5 exhaust. I cant seat them down into journals.
simply put guys, im lost. Can I go forward, placing my cams how the guy in the Infiniti FX build is doing?????
Last edited by bgant3; Dec 17, 2012 at 10:15 PM.

Ok. So the front sprocket keys have to be opposing 180 degrees on both heads, and the cam sprocket key things will be lined up with the lines you see on the front most cam retainer. So yes, you must balance the lobes to open valves. This can be tricky but it's not impossible. You should find there to be enough resistance to get them to hold. You should install your cam sprockets and use the timing chain to help out. Really the timing chain is the best way to get it dialed in. Once you think you got the timing chain lined up just right, do one full crank (all 6 cylinders go through compression stroke) and check to see that the chain is still lined up, nothing slipped etc. If you did something wrong, your valves will hit pistons and or the chain slipped etc.
And I didn't look at what that thread had in it, that's just what I recall when I did it. I remember I didn't know what the fock was with the extra key things on the front of the cam for the sprocket and I called Hal and was like "WTF AM I DOING WRONNNGG?"
Put cylinder 1 at TDC. Line up the cam lobes and sprocket marks like the manual and when you place the cams down in the journals some lobes will slightly hit the tappets. That is normal. The cams will never fully sit down into the journals while #1 is exactly TDC but they shouldn't be up very high. As you gently tighten down the cam caps in sequence the cams will go into place. Just make sure they fit smoothly into the journals when you set them into it so it doesn't bind as you start to tighten the cam caps. Once all the cam caps are tightened and cams in place then start checking your alignment before moving the engine around. No damage will occur sitting there without turning the engine over so don't worry.
Then make sure all the chain marks and cam marks line up. Once they look perfect then get the tensioner on it and turn the engine over once to see if the timing holds. If it lines up perfectly again then the engine is properly timed. You have my email. I might be slow this week to respond because I have my final licensing boards next week and it's quite important.
Then make sure all the chain marks and cam marks line up. Once they look perfect then get the tensioner on it and turn the engine over once to see if the timing holds. If it lines up perfectly again then the engine is properly timed. You have my email. I might be slow this week to respond because I have my final licensing boards next week and it's quite important.
Thread Starter
Registered User
Joined: Jan 2012
Posts: 108
Likes: 0
From: south carolina
Havent updated this page in awhile. Holiday Season, and Finals at school. I havent been down to my Dad's in 5weeks!! Funny happenings today during the engine build. Well 1st things 1st, Im doing Timing. I put my secondary chains on, get them tighten down, then I do my primary chain..Sit back, feeling happy. Then I realize I didn't Put the tensioners on the secondary chain...lmao. I was so pissed, but I just had to laugh. you guys were right too about the cams...They were easily positioned using the sprockets, then using the vice grips to hold them in place when i was tightening. : )
The only way you can put the tensioner on the right bank (looking from engine front), is before putting on the rear timing cover on. So anyway, took it all back apart and put it together. So as of now the motor is complete.
by the way, My Dad thinks I shouldn't destroy a perfectly running car I have now and install this project. I get where he is coming from with the fact this is my only vehicle, but buying a junk Z or G to do swap with just doesnt make any sense to me. i think he thinks im trying to build a race car or something..lol.
----------------------------------------------------------------------
IMPORTANT BEFORE I GO AHEAD. ITS 230AM CURRENTLY, WOULD LIKE SOME VERIFICATION BEFORE I WAKE, SO THAT I CAN COMPLETE THIS BAD BOY WHEN I WAKE UP...
question:
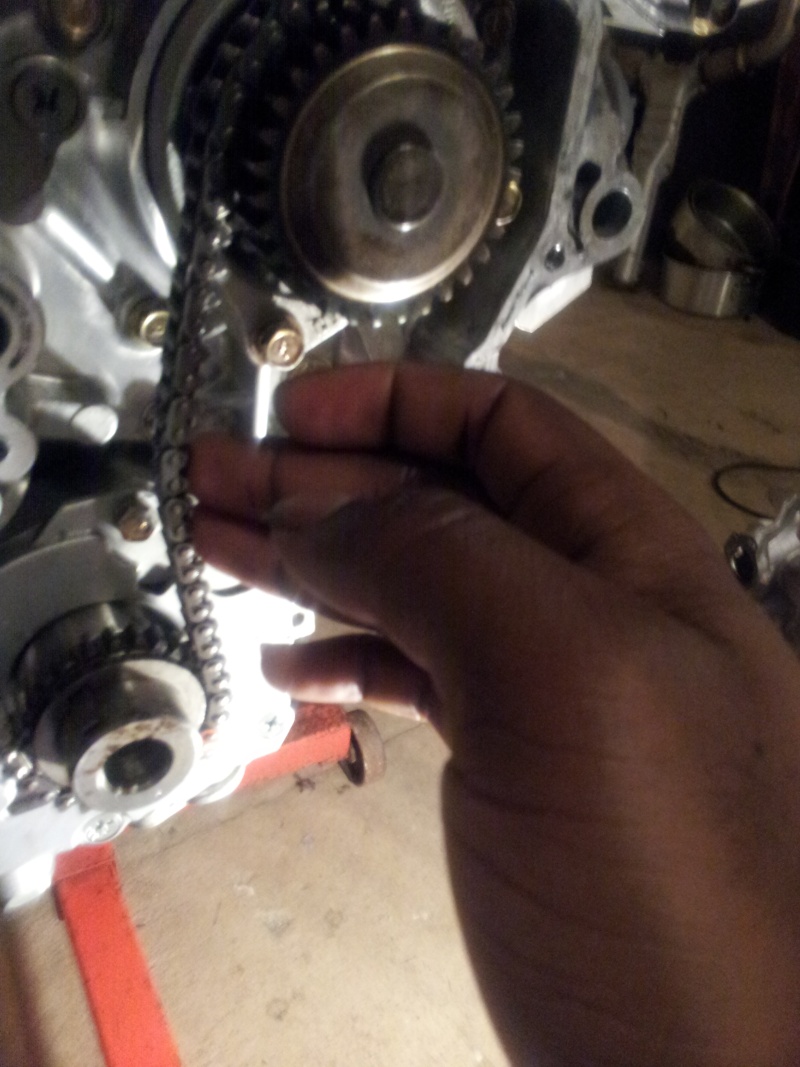
Can Someone Confirm that It's normal for the primary timing chain to be loose around water pump...I followed EM guide to T and here is what i got
I can push chain in on the right side, the other side doesnt move of course because of primary tensioner on it. Just wanna know if thats normal.
pic1

pic2
The only way you can put the tensioner on the right bank (looking from engine front), is before putting on the rear timing cover on. So anyway, took it all back apart and put it together. So as of now the motor is complete.
by the way, My Dad thinks I shouldn't destroy a perfectly running car I have now and install this project. I get where he is coming from with the fact this is my only vehicle, but buying a junk Z or G to do swap with just doesnt make any sense to me. i think he thinks im trying to build a race car or something..lol.
----------------------------------------------------------------------
IMPORTANT BEFORE I GO AHEAD. ITS 230AM CURRENTLY, WOULD LIKE SOME VERIFICATION BEFORE I WAKE, SO THAT I CAN COMPLETE THIS BAD BOY WHEN I WAKE UP...
question:
Can Someone Confirm that It's normal for the primary timing chain to be loose around water pump...I followed EM guide to T and here is what i got
I can push chain in on the right side, the other side doesnt move of course because of primary tensioner on it. Just wanna know if thats normal.
pic1
pic2
Last edited by bgant3; Dec 17, 2012 at 10:16 PM.