When you click on links to various merchants on this site and make a purchase, this can result in this site earning a commission. Affiliate programs and affiliations include, but are not limited to, the eBay Partner Network.
Progress -
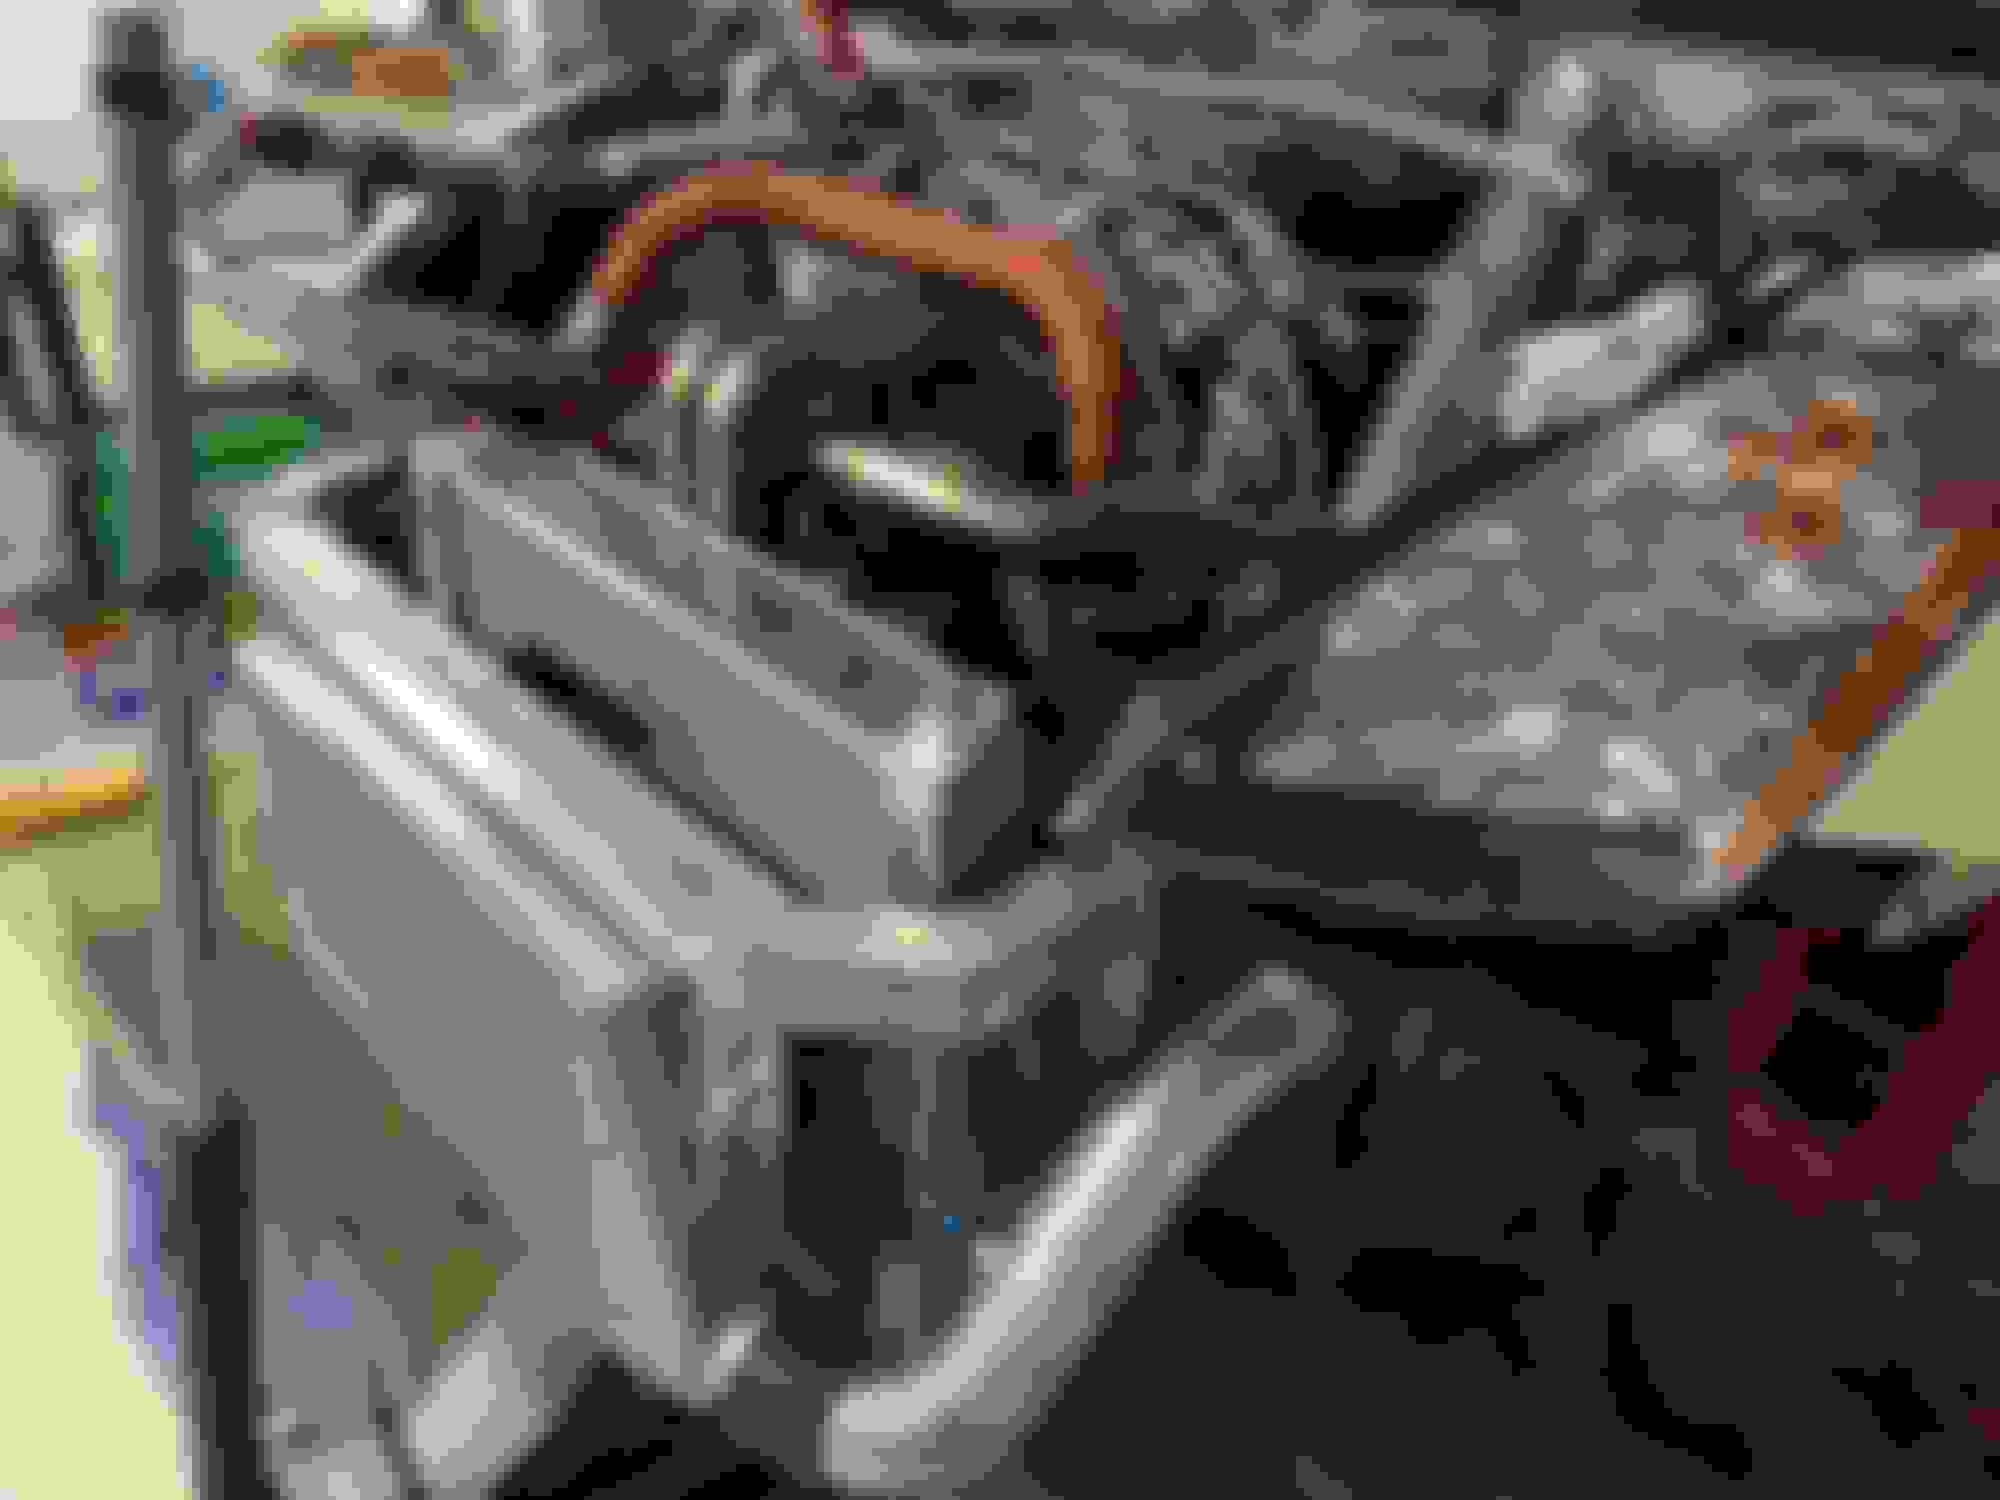
Good news - was able to identify that my crank position sensor is connected and sending a signal to the ECU and the ECU is reading it fine.
Bad news - cam shaft position sensor is not communicating with the ECU. Started there - continuity checked each pin to two different points along the harness before the ECU and also double checked the pin number it's connecting to on the ECU - everything was good.
Checked ground on both banks, and both are grounding-out
Put the volt-meter on the connector and while key is 'on' I got 13volts and about 10.5volts during crank. I thought this was supposed to be 5volts - but it's 13volts on each cam sensor and the crank sensor too … wondering if this is something specific to the Link ECU?
I tried testing resistance of the of the sensor during cranking and I am not getting any resistance on any of the pins - this was during crank but the sensor was not hooked up (which may have been a problem).
Took 3 short data logs of the engine cranking sequence and I'm gonna give Link a shout today.
a 350z buddy here locally has an extra set of sensors I let him borrow (to test his car) and I'm gonna get those back and see if that's the issue.
Worked on the car last night and didn't find anything I already didn't know aside from being little more intimate knowledge of the FSM.
Got up this morning and had to run errands and picked up new non-OEM sensors along with a few other things at the parts store (brake cleaner BOGO - aint passing that up!)
got home and took volt readings off each of the cam shaft position sensors (as suggested by conway) and with key on, they both read ~12 volts, when you engage the starter the voltage starts to drops between .5 and 4.5 volts to sync everything up and fire the engine. The OEM sensors I had would get into the 5 to 8 volt range but would not catch. About the 3rd time while monitoring voltage they did catch and the car started up. It was rough (albeit the TB was unpluged)but it did get going and run.
I did this a few times and it started each time after a few seconds of cranking which was pretty encouraging. Ever more - the engine built oil pressure up to about 30 psi after 15seconds of running.
I ran into a hiccup where the engine would not start. Cam signal voltages were back in the 8volt range. At this point I installed the new sensors and a new connector on the passenger side and the car started up pretty easily. I ran the car for a minute and built up 60psi of pressure. Pretty stoked at this point.
bad stuff
got the replacement radiator in and started welding on it and surer than **** about 3/4 the way through a 1/8" hole blew through the side tank - damn near out of no-where - not sure why other than I likely got too much heat in it - FORK, $200 mistake … but - do you know how good it feels to put a 5lb sledge through a new & shinny radiator …
car isn't starting … the starter has a louder single click (not the 10volt battery is dead clicking) … gonna swap in a second starter I have on the shelf - damn I hope its the starter! EDIT: forken starter motor chit the bed, fixed
good stuff:
got a 6.5 out of 10 OEM pikes peak white bumper - paid $100 for it and will need some modification to fit the IC / exhaust
made a small exhaust bracket to take stress off the exhaust housing. Also fab'd a little heat shield between the exhaust & intake charge pipe.
got my laptop back and I'll see about some pictures -
bad stuff
got the replacement radiator in and started welding on it and surer than **** about 3/4 the way through a 1/8" hole blew through the side tank - damn near out of no-where - not sure why other than I likely got too much heat in it - FORK, $200 mistake � but - do you know how good it feels to put a 5lb sledge through a new & shinny radiator �
car isn't starting � the starter has a louder single click (not the 10volt battery is dead clicking) � gonna swap in a second starter I have on the shelf - damn I hope its the starter! EDIT: forken starter motor chit the bed, fixed
good stuff:
got a 6.5 out of 10 OEM pikes peak white bumper - paid $100 for it and will need some modification to fit the IC / exhaust
made a small exhaust bracket to take stress off the exhaust housing. Also fab'd a little heat shield between the exhaust & intake charge pipe.
got my laptop back and I'll see about some pictures -
I admire your dedication, persistence, and patience on this build after all this time. I've wanted to go FI with the Z, but aside from the funds, it's a lot of work that I fear I will ultimately not have time for. The payoff would be absolutely worth it though.
I admire your dedication, persistence, and patience on this build after all this time. I've wanted to go FI with the Z, but aside from the funds, it's a lot of work that I fear I will ultimately not have time for. The payoff would be absolutely worth it though.
Thanks 813 - one step at a time / Rome wasnt built in a day. I appreciate the support and encouragement from you and others on the forum.
I like this realm of work and my 'happy-place' is in the garage...so this may seem like torture to some but it's stress-relieving to me. I like the planning, budgeting, designing, fabricating, and installation of everything. Every step of the way I've learned something and eventually I know the car 100% in & out.
You get out what you put in and the journey is the reward.
It is alot of work no matter what and the best thing you can do if this is your first FI build is get a well designed kit with a good reputation. This is the 6th induction setup I've had on the car - I'm used to the ups & downs.
A few other things that have helped me:
Have a reliable daily driver other than the Z ... mine is a 2004 ford f150 with 223k miles. Helps if both vehicles are paid-off. Society & popular culture have normalized car-loans. Borrowing money on an asset that goes down in value is dumb.
Have zero debt - stuff like this is only possible if you have disposable income...if youre making payments to anyone thats money you are not paying yourself. I dont do anything with credit. No credit cards, no loans, no nothing. My credit score is zero and it'll be that way until the day I die.
Put your retirement & investing on autopilot ... my workplace retirement and investing (roth ira) are 100% automatic - I never see the money so I cant spend it. Yes, I'm tossing $100 bills into the car modification fire-pit but its not effecting my long-term well-being.
Live on a budget and dont spend money you dont have. Pay with cash - cash is king!
Have a healthy income and/or multiple jobs - I'm a civil engineer and I have an (unrelated) small business - I work my *** off but it's worth it.
Do as much of the work yourself and learn everything you can along the way. If you break something than buy a replacement and consider that a expensive lesson (like a $200 radiator).
Dont try to keep up with the Jones' or the car culture - you never will.
Did a bunch of minor clean-up work on the car this weekend and started fabricating the frame the next radiator will be bolted to. I got the radiator on order but still need a few sticks of aluminum stock to finalize it.
The link has a unique way to show error codes and it's giving me some where throttle body voltage codes...saying the TB voltage is below 7volts? Gotta look into this.
Installed a Tee off my fuel pressure regulator - will dedicate one leg to the fuel pressure sensor and the other to a mechanical gauge. I have an extra 0-100psi oil pressure gauge, I installed and hung off the block. Did some trouble shooting on the autometer electric fuel pressure gauge and it's toast ... worked a few times when I put differing 0-5v samples on it but nothing consistent. I'll be picking up another one when funds permit.
modified a previously fabricated clutch master cylinder reservoir bracket and installed.
re-crimped my cam position sensor harness and installed two test-leads so I could check voltage off the cam sensors if needed in the future. Might do this the crank position sensor.
EDITED** Ignorance on my part for not reading the whole post.
Welcome, brother. The support can sometimes be what keeps you going in those "F this" moments.
I agree with you. I love working on the Z. Even if it is just something minor. Thankfully we have two other vehicles as well, both paid off, so the Z is my weekend toy. My wife and I just had a little one and we decided it was cheaper in the long run for my wife to just stay at home. It places us on a VERY tight budget, but I can go to work with the peace of mind that a stranger making $7 dollars an hour while watching 10 children isn't going to do her harm in any way.
You're absolutely right about everything you posted. I must, however, veer slightly from your advice. I do have a few active credit cards. I have always tried to keep a decent chunk of change set aside, but sometimes life hits you with more than you are prepared for. Case in point, when I attempted to get into my dream profession in 2014 I had run a credit check and found I had medical bills that my previous employer refused to cover from 2008. Somehow, I was never made aware of them. Cost me my savings, but I paid them off. I could have said "screw it" and waited for them to drop off, but in the line of work I was going in to I would have been much less desirable once that had been discovered because it would appear as irresponsible.
Sometimes it is nice to have that additional "cushion", if you will, to fall back on, should life decided to rain down on you with more than you're ready for.
Again, I agree and appreciate everything you posted. Many could benefit from that advice.
In the future I may attempt to build her up. Your build has been a huge motivator and I am appreciative of it.
Thanks 813 - one step at a time / Rome wasnt built in a day. I appreciate the support and encouragement from you and others on the forum.
I like this realm of work and my 'happy-place' is in the garage...so this may seem like torture to some but it's stress-relieving to me. I like the planning, budgeting, designing, fabricating, and installation of everything. Every step of the way I've learned something and eventually I know the car 100% in & out.
You get out what you put in and the journey is the reward.
It is alot of work no matter what and the best thing you can do if this is your first FI build is get a well designed kit with a good reputation. This is the 6th induction setup I've had on the car - I'm used to the ups & downs.
A few other things that have helped me:
Have a reliable daily driver other than the Z ... mine is a 2004 ford f150 with 223k miles. Helps if both vehicles are paid-off. Society & popular culture have normalized car-loans. Borrowing money on an asset that goes down in value is dumb.
Have zero debt - stuff like this is only possible if you have disposable income...if youre making payments to anyone thats money you are not paying yourself. I dont do anything with credit. No credit cards, no loans, no nothing. My credit score is zero and it'll be that way until the day I die.
Put your retirement & investing on autopilot ... my workplace retirement and investing (roth ira) are 100% automatic - I never see the money so I cant spend it. Yes, I'm tossing $100 bills into the car modification fire-pit but its not effecting my long-term well-being.
Live on a budget and dont spend money you dont have. Pay with cash - cash is king!
Have a healthy income and/or multiple jobs - I'm a civil engineer and I have an (unrelated) small business - I work my *** off but it's worth it.
Do as much of the work yourself and learn everything you can along the way. If you break something than buy a replacement and consider that a expensive lesson (like a $200 radiator).
Dont try to keep up with the Jones' or the car culture - you never will.
.
I don't want to come off as preaching … just what has worked for me - by no means is this the only and/or best way … just my way and my opinion - take all, portions, or none moving forward!
Originally Posted by 813_350Z
I agree with you. I love working on the Z. Even if it is just something minor. Thankfully we have two other vehicles as well, both paid off, so the Z is my weekend toy. My wife and I just had a little one and we decided it was cheaper in the long run for my wife to just stay at home. It places us on a VERY tight budget, but I can go to work with the peace of mind that a stranger making $7 dollars an hour while watching 10 children isn't going to do her harm in any way.
Something about satisfaction of solving a problem!
Smart to have multiple vehicles!
With the cost of childcare, having a stay-at-home makes financial/emotion/practical sense - I've been told a 'stay-at-home-mom' is a full time job!
Originally Posted by 813_350Z
however, veer slightly from your advice. I do have a few active credit cards
I hear what youre saying, I don't necessarily agree, but it's not my money and therefore not my decision … that's why they call it 'personal' finance. And I don't get mad anyone that maintains a credit card so it's all good!
Originally Posted by 813_350Z
In the future I may attempt to build her up. Your build has been a huge motivator and I am appreciative of it.
Radiator #3 came in today ... sorta bittersweet in one of those - dont f it up this time kind of ways...got the bottom fitting welded on with minimal issues.
Fabricated a mounting frame that'll be welded to my front bar (same bar holding the IC) and dropped in mounts for the fan - in hind-sight the fan may be too far out to clear the exhaust turbine - it's only got about 3/4" ... I can make it closer to 1.5" by modifying the mounts or I can look into dual 8", 9" or 10" fans.
My inclination is to slide the radiator as far right (drivers side) as I can to give a clear path between the air filter and fresh air - I'm dreaming up ideas on a sheet-metal conduit to do this but it's a back-burner item as of right now.
Im missing the 2" x 3/4" aluminum bar or I'd get this thing installed ... aluminum should be here tomorrow or friday.
I see you�re going all out this time around. Great custom job on the piping. I like the mount supports. I�ll have to steal some ideas. The new compressor housings won�t clear my engine mounts so I�ll have to possibly redo the mount brackets on the block.
I like your build thread bealjk. Every time I check up on you, you�re doing a custom job. Please don�t be mad if u see me copy some stuff. Lol
^Nah man … you're 100% good - copy away with the exception of making it better.
One step at a time!
The custom mounts are night & day … I highly suggest it - that's just stock aluminum cut & drilled by a machinist - I paid $80 for those (I tried paying more!). Having a bolt that drops in from the top was a huge help - the OEM / aftermarket design where the bolt is part of the mount is dumb.
Do you have a preferred supplier for your aluminum stock? So I can get a good deal on the metals.
I�ve tried shopping a Lowe�s but they only have mild steel thick enough to fab an engine mount.
Your manifold setup is sick. What made you go single this time around?
I usually buy my aluminum stock from Paul at Stoner Materials in Colorado Springs - I bought from him directly and off ebay. He has quite a bit of material but he may not have this solid round stock. He didnt have 4" aluminum tube I needed last I was down at his warehouse.
Locally, home depot has better selection than lowes but I've bought from both when I needed it right-away - but their selection overall is a joke.
The thought on the headers were to make improvements on the previous greddy twin kit - such as
-heavily reduce the amount of charge pipe volume between the turbo to the IC and the IC to the TB
-upgrade to a ball-bearing / high(er) efficency / twin scroll / water cooled blower
-fabricate a setup that can be maintained/repaired must faster/easier compared to a twin setup (greddy)
-take 'build headers' off my bucket list
hindsight downsides
-the engine bay will gets very hot (hoping to get my stuff ceramic coated)
-increased the volume between the back of the exh valves & the turbine(this was a trade-off for shorter charger pipes)
-negatively moves weight away from the rear-wheels (hoping the smaller, as compared to the greddy IC, the smaller radiator, and smaller front rack, helps reduce front weight)
-significantly less money in my bank account
Some progress pics from last night (that didnt load) and from tonight ...
I had the CJM stage 2 return fuel system and sold it. I didn't like that it had soft lines and that they ran under the car exposed to elements. I essentially mimicked the CJM kit with hardlines. Yeah, standard aeromotive fuel pressure regulator.
I followed the above link for the swirl-jet modification. I drilled the hole as big as I could as the 525lph pump will push fuel pressure out of control if the swirl jet hole isn't big enough - look into Conway's thread on this.
Update:
Got the radiator frame finalized/installed. A few speed bumps along the way...my bottom outlet port is angled wrong so I cut, rotated, and realigned. I got the hoses hooked up and system filled and I have a few small leaks coming from the fittings. I emptied the system, removed the hoses and recut the hoses, cleaned the threads/mating surface, and used thread-seal on the AN fittings (despite AN fittings shouldn't needing sealant). Gonna give the system a day or two to cure/dry and I'll refill.
I can say I'm a better person over the past few days -
to the My350z community and beyond -
Over the past few days I've had conversations with Kyle at IPP about my block, my impressions of IPP(in general), and my post (above).
The following considerations should be noted:
I went back to my build sheet and indeed Kyle did use the 'Race' series bearings in my build. The bearing / bearings that failed (as installed in 2009) looked different than the replacement bearings I recently bought in 2019. Without digging in deeper and (as easy as it sounds) running the part number I assumed (100% on me) it was the 'performance' bearing - to which it wasnt - it was likely an ACL redesign over the years.
Furthermore and lastly - I attribute my failure to many other factors outside of IPPs control and I had 25k to 30k miles on my IPP built engine between 2009 and 2018 running between 450hp and 600hp before it went out.
Next - there is a guy locally that has trashed IPP and the block purchased from IPP - and I only got his side of the story from our local facebook group. Without getting Kyle's / IPP side it seemed like he got scammed off his ***. More reading into it and getting the other half of the story balances things and after reading the steps IPP took seems beyond the expectations, IPP did their due diligence, and offered up solutions to the problem to which I tip my hat to IPP for digging into the problem and offering up solutions.
aside from above the 'stories' I've heard from guys I've come across through the past 5 to 10 years and are essentially second hand - I'm not dismissing anyone but I am acknowledging there is always two sides to every story. My lesson here is that when I hear about a individual or company getting trashed-on I will always remember that there is another side, another story that isnt being told. I hope you consider the same.
If nothing more - remember that there is two sides to any story.
Lastly - as a community and as a whole we owe a small debt of gratitude to the staples in our community ... off the top of my head its been the IPPs, the Z1s, the ConceptZ, and the Dynostys ... if nothing more, we should (and I include myself) patronize these companies as they've continued to keep our platforms relevant.
dang'it � radiator is still leaking between the radiator and the fitting - pretty sure I have some (self inflicted) thread damage that's passing water despite the copious amounts of thread sealant � ok � f ' it � I'm doing it � gonna (coolant grade) RTV the f'n fitting in. I could take everything apart and weld the fitting to the radiator but I don't think I want to go this far quite yet.
that's all I know �
11pm edit:
Cleaned/brushed/dried the fitting and connection by 6pm ... very tempted to fill it ... but ... not gonna ... gonna give it its 24hrs.
What radiator cap are you using? I'm not sure what kind of pressure RTV can handle.
a simple 18psi cap I picked up from the autoparts store - nothing fancy like yours!
same RTV that I used on the thermostat housing and my turbo's return line � I think it'll hold - the gaps I'm hoping it seals are tiny � the 'one drip every 5minutes' type. It looked solid last night right before I went to bed. I'll fill it when I get home tonight.