Notices
Media Share Z Related Photos and Video

Satin Grey 350Z Project

Thread Tools
 
Search this Thread
 
Old 10-04-2012, 02:03 PM
  #21  
ordinaryme
Registered User
Thread Starter
 
ordinaryme's Avatar
 
Join Date: Jul 2009
Location: Finland
Posts: 182
Likes: 0
Received 0 Likes on 0 Posts
Default

Added details in my first post
Old 10-04-2012, 02:16 PM
  #22  
ordinaryme
Registered User
Thread Starter
 
ordinaryme's Avatar
 
Join Date: Jul 2009
Location: Finland
Posts: 182
Likes: 0
Received 0 Likes on 0 Posts
Default

hmm

Last edited by ordinaryme; 10-04-2012 at 02:18 PM.
Old 10-04-2012, 02:28 PM
  #23  
KingBaby
Hardest Setting
iTrader: (3)
 
KingBaby's Avatar
 
Join Date: Feb 2008
Location: MexiCali dodging potholes
Posts: 13,406
Received 130 Likes on 102 Posts
Default

kids are a delightful delay...keep it going man...thanks for continuing to share!
Old 10-04-2012, 05:17 PM
  #24  
solidsnake
New Member
iTrader: (14)
 
solidsnake's Avatar
 
Join Date: Aug 2004
Location: Austin, TX
Posts: 10,913
Likes: 0
Received 3 Likes on 3 Posts
Default

I demand to know where you got the add ons for the Amuse bumper. I likey
Old 10-04-2012, 06:47 PM
  #25  
ordinaryme
Registered User
Thread Starter
 
ordinaryme's Avatar
 
Join Date: Jul 2009
Location: Finland
Posts: 182
Likes: 0
Received 0 Likes on 0 Posts
Default

I'm kind embarrased to say but yeah from ebay
Old 10-05-2012, 04:32 AM
  #26  
puertorican
Registered User
iTrader: (5)
 
puertorican's Avatar
 
Join Date: Jun 2007
Location: The 808 state
Posts: 1,566
Received 7 Likes on 4 Posts
Default

Very nice work op and props for doing it yourself. Keep posting updates and lots of pics.
Old 10-07-2012, 06:03 AM
  #27  
gixxert
Registered User
iTrader: (4)
 
gixxert's Avatar
 
Join Date: Aug 2010
Location: clever mo
Posts: 254
Likes: 0
Received 0 Likes on 0 Posts
Default

Originally Posted by ordinaryme
I'm kind embarrased to say but yeah from ebay
ebay or not they look good and add just a little more to the front
Old 08-14-2013, 11:48 AM
  #28  
ordinaryme
Registered User
Thread Starter
 
ordinaryme's Avatar
 
Join Date: Jul 2009
Location: Finland
Posts: 182
Likes: 0
Received 0 Likes on 0 Posts
Default


I also Intalled GTM Supercharger

-Rotrex C38 supercharger
-GTM compressor housing
-GTM Supercharger Billet aluminum brackets
-GTM billet aluminum Sc pulley
-GTM supercharger cooler kit
-Rotrex Supercharger Traction fluid
-4-Ply High Resistance Nomex Silicon couplers
-Stainless Steel T-Bolt clamps
-2.5 x 10 x 24 Bar and Plate Core Intercooler Rated @ 700hp
-Polished aluminum IC Piping
-GTM oil Filter Relocation Kit
-Cold Air Intake System (Biggest K&N Filter)
-Turbosmart Bypass valve
-Pre-made steel braided oil and P.S Supply & Return lines
-All Necessary Hardware and Installation Instructions
-Osiris Uprev Engine management.
-GTM Basic fuel system with Denso 600cc Injectors and - Walbro 255 Fuel Pump .
-GTM Custom Drive belt By Bando
-GTM Heavy duty Belt idlers


waterpipes


Installing cai and ByPass valve


Old 08-14-2013, 12:04 PM
  #29  
mr. sparco
New Member
iTrader: (13)
 
mr. sparco's Avatar
 
Join Date: Dec 2005
Location: Sunny Beaches
Posts: 7,086
Received 454 Likes on 318 Posts
Default

Nice work, new paint looks great, glad you got rid of the graphics.
Old 08-14-2013, 12:08 PM
  #30  
sry110
New Member
iTrader: (17)
 
sry110's Avatar
 
Join Date: Jan 2006
Location: Malvern, PA
Posts: 6,650
Received 35 Likes on 26 Posts
Default

Wish I had the cajones / time / money / garage space to build my car like this. Keep up the good work.

Something about the new wheel+tire fitment looks off to me. Maybe the wheels don't sit far enough out fir how thin and stretched the tires appear. Maybe some spacers would help.
Old 08-14-2013, 12:13 PM
  #31  
ordinaryme
Registered User
Thread Starter
 
ordinaryme's Avatar
 
Join Date: Jul 2009
Location: Finland
Posts: 182
Likes: 0
Received 0 Likes on 0 Posts
Default

One more pic of fitment.. rear are already 20x11 ET0 maybe 10mm spacers would help a bit

Old 08-14-2013, 03:23 PM
  #32  
ksuberk54
New Member
iTrader: (2)
 
ksuberk54's Avatar
 
Join Date: Jul 2011
Location: Manhattan, Kan.
Posts: 1,121
Likes: 0
Received 3 Likes on 3 Posts
Default

Nice dude. What kind of numbers did you put down with that setup? I can't even imagine the kind of money you've put into that project.
Old 08-14-2013, 03:55 PM
  #33  
kno
Registered User
iTrader: (22)
 
kno's Avatar
 
Join Date: Aug 2007
Location: MIAMI, Florida
Posts: 3,427
Received 120 Likes on 87 Posts
Default

i love version 2.0 great work!!
Old 08-14-2013, 05:01 PM
  #34  
zx_732
Registered User
 
zx_732's Avatar
 
Join Date: Apr 2012
Location: New Jersey
Posts: 35
Likes: 0
Received 0 Likes on 0 Posts
Default

Killer set up I support the color choice too super clean. More updates soon plus would love a video dying to hear how she sounds
Old 08-14-2013, 05:19 PM
  #35  
mr. sparco
New Member
iTrader: (13)
 
mr. sparco's Avatar
 
Join Date: Dec 2005
Location: Sunny Beaches
Posts: 7,086
Received 454 Likes on 318 Posts
Default

Originally Posted by ordinaryme
One more pic of fitment.. rear are already 20x11 ET0 maybe 10mm spacers would help a bit
No spacers, keep it the way it is. I prefer 19s on Zs but that still looks great.
Old 08-14-2013, 06:28 PM
  #36  
ordinaryme
Registered User
Thread Starter
 
ordinaryme's Avatar
 
Join Date: Jul 2009
Location: Finland
Posts: 182
Likes: 0
Received 0 Likes on 0 Posts
Default

Thanks guys! I'll get you a video asap.

ksuberk54 with little help of sponsors ja DIY almost everything this can be done without huge amount of money.

Plus you'll learn so much

mr. Sparco: I agree, but 19's are little hard to find with proper withds, plus tires are much more expensive.

Last edited by ordinaryme; 08-14-2013 at 06:30 PM.
Old 08-15-2013, 04:03 PM
  #37  
ordinaryme
Registered User
Thread Starter
 
ordinaryme's Avatar
 
Join Date: Jul 2009
Location: Finland
Posts: 182
Likes: 0
Received 0 Likes on 0 Posts
Default

Anyone have experince with code P0078 - exhaust heat circuit valve (bank1)? Double checked connections already but new try tomorrow
Old 09-09-2013, 10:38 AM
  #38  
ordinaryme
Registered User
Thread Starter
 
ordinaryme's Avatar
 
Join Date: Jul 2009
Location: Finland
Posts: 182
Likes: 0
Received 0 Likes on 0 Posts
Default

Everything works fine now. Here's one pic from weekends show

Last edited by ordinaryme; 09-09-2013 at 10:39 AM.
Old 09-13-2013, 03:35 AM
  #39  
ordinaryme
Registered User
Thread Starter
 
ordinaryme's Avatar
 
Join Date: Jul 2009
Location: Finland
Posts: 182
Likes: 0
Received 0 Likes on 0 Posts
Default

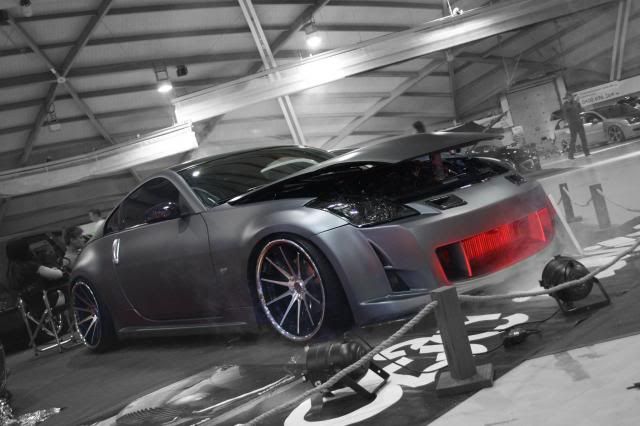
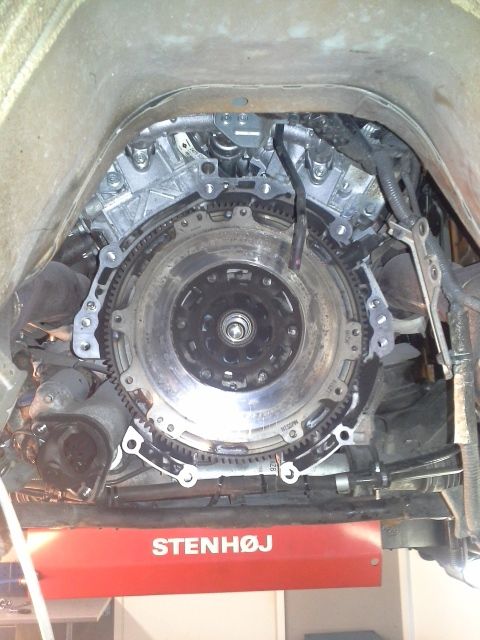
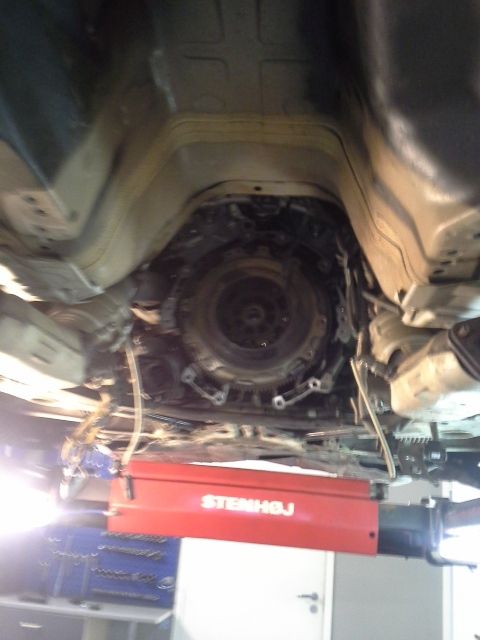
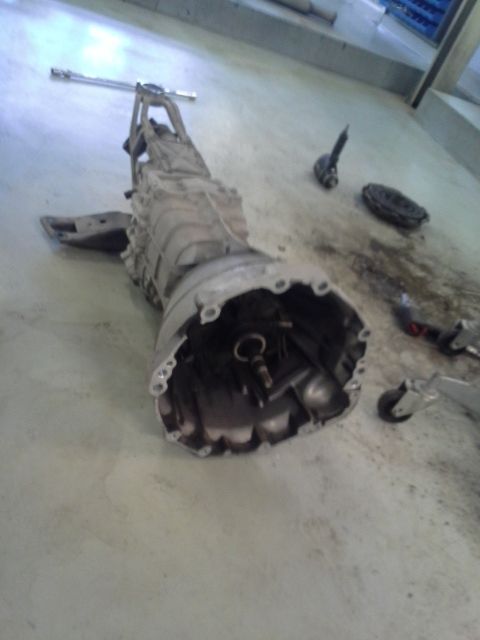
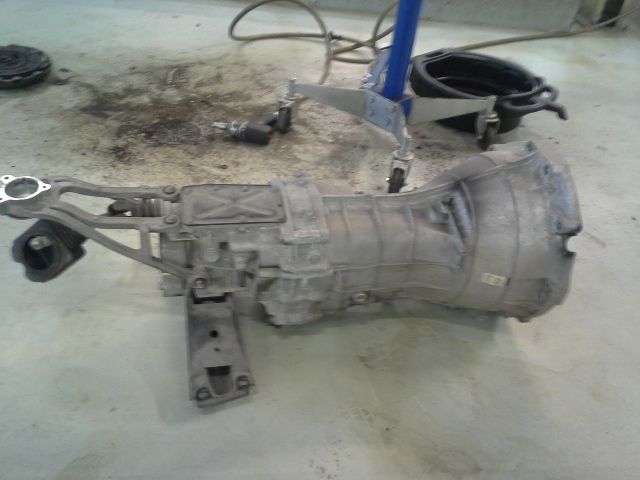
One more pic from the show and started to change my clutch. Setup is Xtremeclutch stage 2 Cro-mo Flywheel and Xtremeclutch HD CSC


Last edited by ordinaryme; 09-13-2013 at 03:38 AM.
Old 09-29-2013, 01:31 AM
  #40  
ordinaryme
Registered User
Thread Starter
 
ordinaryme's Avatar
 
Join Date: Jul 2009
Location: Finland
Posts: 182
Likes: 0
Received 0 Likes on 0 Posts
Default

Got the clutch setup BUT!!! Does this look ok to you??? Well not to me


Quick Reply: Satin Grey 350Z Project


All times are GMT -8. The time now is 02:14 PM.