
*** Picture Doctor Thread ***


Thread Starter
Registered User
iTrader: (9)
Joined: Dec 2003
Posts: 2,069
Likes: 1
From: Waipahu HI; Phoenix AZ
This thread is pretty much inspired by PopPhoto Magazine's Piture Doctor in which readers send pictures and the pros try to fix it, or leave it be if it's already good. So if you want to improve a pic, or ask how it can be improved, post a pic. Hopefully others will chime in on this...
Ultimately though, as with all post-processing, the creative decision of color (saturation), contrast, white-balance, etc... is all up to you. It's what YOU think that matters most. But if you care about the critique, it will leave you room to grow.
By all means, I do not consider myself a pro, and others may do things other ways. What I learned in life is there are multiple paths to a destination.
On to the pics... GiftOfGab PM'd me some pics that he'd like "fixed"...
Original:

My Medicine:
Opened .jpg with Adobe Camera RAW, a plug-in for Photoshop, in this case Elements 6 for Mac. Camera RAW has more available features for CS3 BTW, and IS IDENTICAL TO ADOBE LIGHTROOM. All Lightroom is, is a GUI'ed version of Camera RAW, but with an image organizer.
Camera RAW usually opens when you use Photoshop (CS3 or Elements) to open a RAW file. In this case, to open a .jpg, start Photoshop Elements 6, go to 'FILE' in the menu and click 'OPEN.' Choose your .jpg file but change the 'Format' pull down menu to 'CAMERA RAW.' When you click open, the .jpg image should open within Camera RAW.
All sliders are going to be set on '0' (ZERO) as default. Here's what was changed:

The result:

Obviously, you can play with the sliders to see how what effects the image. But it's apparent that the original's saturation was too low and the shadows lost detail. A simple crop to remove a distracting sign can also do wonders. Personally, I like it cropped close to the tires... just my take on the cropping. I think it works...
Next time, shoot in RAW so you can correct mistakes easier in software. Also, crop before you resize the pic.
Here's some tips about Camera RAW:
Clarity affects the midtone contrast and pretty much does what it name implies, clarifies the image. Identical to "burn."
Recovery recovers lost detail in the highlights. Try playing with this slider with images with lots of sky, it'll recover clouds you thought wasn't there. Identical to "dodge."
Fill Light brightens shadows without affecting overall brightness.
Ultimately though, as with all post-processing, the creative decision of color (saturation), contrast, white-balance, etc... is all up to you. It's what YOU think that matters most. But if you care about the critique, it will leave you room to grow.
By all means, I do not consider myself a pro, and others may do things other ways. What I learned in life is there are multiple paths to a destination.
On to the pics... GiftOfGab PM'd me some pics that he'd like "fixed"...
Original:
My Medicine:
Opened .jpg with Adobe Camera RAW, a plug-in for Photoshop, in this case Elements 6 for Mac. Camera RAW has more available features for CS3 BTW, and IS IDENTICAL TO ADOBE LIGHTROOM. All Lightroom is, is a GUI'ed version of Camera RAW, but with an image organizer.
Camera RAW usually opens when you use Photoshop (CS3 or Elements) to open a RAW file. In this case, to open a .jpg, start Photoshop Elements 6, go to 'FILE' in the menu and click 'OPEN.' Choose your .jpg file but change the 'Format' pull down menu to 'CAMERA RAW.' When you click open, the .jpg image should open within Camera RAW.
All sliders are going to be set on '0' (ZERO) as default. Here's what was changed:
The result:
Obviously, you can play with the sliders to see how what effects the image. But it's apparent that the original's saturation was too low and the shadows lost detail. A simple crop to remove a distracting sign can also do wonders. Personally, I like it cropped close to the tires... just my take on the cropping. I think it works...
Next time, shoot in RAW so you can correct mistakes easier in software. Also, crop before you resize the pic.
Here's some tips about Camera RAW:
Clarity affects the midtone contrast and pretty much does what it name implies, clarifies the image. Identical to "burn."
Recovery recovers lost detail in the highlights. Try playing with this slider with images with lots of sky, it'll recover clouds you thought wasn't there. Identical to "dodge."
Fill Light brightens shadows without affecting overall brightness.
Last edited by ctwentytwo; May 8, 2008 at 02:48 AM.
Thread Starter
Registered User
iTrader: (9)
Joined: Dec 2003
Posts: 2,069
Likes: 1
From: Waipahu HI; Phoenix AZ
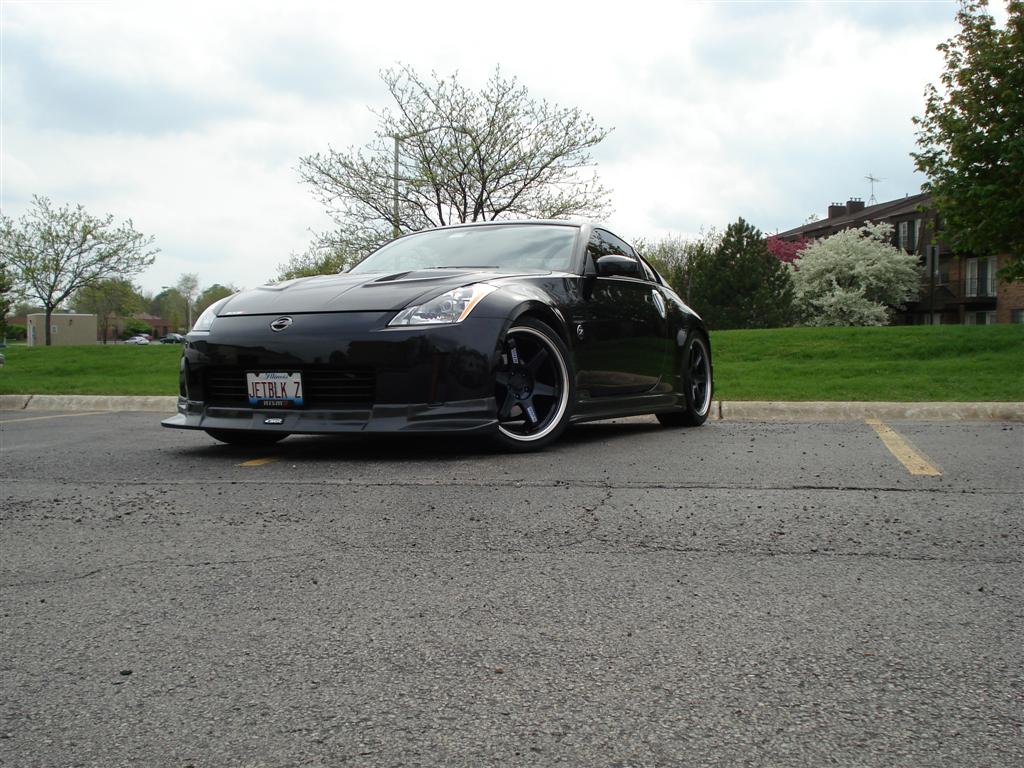
Another one of GiftOfGab's pics.
Original:

My Medicine:
Again, cured with Camera RAW within Elements 6 for Mac.
All sliders are going to be set on '0' (ZERO) as default. Here's what was changed:

The result:

Again, I added tons of saturation as with the pic above. I don't know why, but your program that you're using to resize these pics are under-saturating your pics. Normally, adding +40 or more saturation in Camera RAW starts blowing out the details. Simple, yet effective. Used the "fill light" slider to recover the shadow detail in your tire treads and front grill... some of it anyway. You still want some parts of the image a true black.
BTW dude, your lens is sharp. I don't know why the other pics you posted were soft looking.
Original:
My Medicine:
Again, cured with Camera RAW within Elements 6 for Mac.
All sliders are going to be set on '0' (ZERO) as default. Here's what was changed:
The result:
Again, I added tons of saturation as with the pic above. I don't know why, but your program that you're using to resize these pics are under-saturating your pics. Normally, adding +40 or more saturation in Camera RAW starts blowing out the details. Simple, yet effective. Used the "fill light" slider to recover the shadow detail in your tire treads and front grill... some of it anyway. You still want some parts of the image a true black.
BTW dude, your lens is sharp. I don't know why the other pics you posted were soft looking.

Thread Starter
Registered User
iTrader: (9)
Joined: Dec 2003
Posts: 2,069
Likes: 1
From: Waipahu HI; Phoenix AZ
Hmmm... no other "patients" yet. Guys, we need more "doctors" as I may be "out of the office" sometimes, so don't be afraid to jump in there.
ANYWAYS, I was asked where can I get ADOBE CAMERA RAW?
You can download trial copies of Photoshop CS3/Elements 6/Lightroom here:
http://www.adobe.com/downloads/?ogn=EN_US-gn_dl
When you open a RAW file taken by a compatible camera with Photoshop CS3 or Elements, this Adobe plug-in will automatically come up. To open .jpg files with Camera RAW in Elements, just follow the instruction in post #1 above.
To open .jpg files with Camera RAW in CS3, you have to go to the Preferences menu and select the tickbox next to "open .jpg as RAW..." or something like that as my trial has expired.
Camera RAW within Elements has been crippled some, but those missing features such as the "shadows/highlights" tab, as well as more precise color adjustment and distortion control are available within Elements 6 itself. Adobe might has seen this as a redundancy for the casual user.
Almost all of my processing from my pictures usually takes place ONLY IN CAMERA RAW.
Now if you shoot RAW, and CS3 or Elements 6 is not recognizing the file, you will have to update the plug-in file.
Currently, Camera RAW is at 4.4.1. Just go back to the Adobe downloads page with the above hyperlink that I gave, and look to the right side of the page.
Again... the CS3 version of Camera RAW has more tabs so you can adjust more within the plug-in, and again, the missing features are pretty much available within photoshop itself. I feel using Camera RAW is easier for beginners as it compacts most of the most needed tools for pic adjustment.
Also, the CS3 version of Camera RAW is exactly the same as Adobe Lightroom. All Lightroom is, is CS3 Camera RAW + image organizer.
Lastly, if you look in the above Camera RAW interface, there is a "detail" tab next to the "basic" tab. That detail tab lets you adjust sharpness and noise. It's those tabs that are more plentiful in the CS3 version of Camera RAW.
Originally Posted by ctwentytwo
Hmmm... no other "patients" yet. Guys, we need more "doctors" as I may be "out of the office" sometimes, so don't be afraid to jump in there.
ANYWAYS, I was asked where can I get ADOBE CAMERA RAW?
You can download trial copies of Photoshop CS3/Elements 6/Lightroom here:
http://www.adobe.com/downloads/?ogn=EN_US-gn_dl
When you open a RAW file taken by a compatible camera with Photoshop CS3 or Elements, this Adobe plug-in will automatically come up. To open .jpg files with Camera RAW in Elements, just follow the instruction in post #1 above.
To open .jpg files with Camera RAW in CS3, you have to go to the Preferences menu and select the tickbox next to "open .jpg as RAW..." or something like that as my trial has expired.
Camera RAW within Elements has been crippled some, but those missing features such as the "shadows/highlights" tab, as well as more precise color adjustment and distortion control are available within Elements 6 itself. Adobe might has seen this as a redundancy for the casual user.
Almost all of my processing from my pictures usually takes place ONLY IN CAMERA RAW.
Now if you shoot RAW, and CS3 or Elements 6 is not recognizing the file, you will have to update the plug-in file.
Currently, Camera RAW is at 4.4.1. Just go back to the Adobe downloads page with the above hyperlink that I gave, and look to the right side of the page.
Again... the CS3 version of Camera RAW has more tabs so you can adjust more within the plug-in, and again, the missing features are pretty much available within photoshop itself. I feel using Camera RAW is easier for beginners as it compacts most of the most needed tools for pic adjustment.
Also, the CS3 version of Camera RAW is exactly the same as Adobe Lightroom. All Lightroom is, is CS3 Camera RAW + image organizer.
Lastly, if you look in the above Camera RAW interface, there is a "detail" tab next to the "basic" tab. That detail tab lets you adjust sharpness and noise. It's those tabs that are more plentiful in the CS3 version of Camera RAW.
ANYWAYS, I was asked where can I get ADOBE CAMERA RAW?
You can download trial copies of Photoshop CS3/Elements 6/Lightroom here:
http://www.adobe.com/downloads/?ogn=EN_US-gn_dl
When you open a RAW file taken by a compatible camera with Photoshop CS3 or Elements, this Adobe plug-in will automatically come up. To open .jpg files with Camera RAW in Elements, just follow the instruction in post #1 above.
To open .jpg files with Camera RAW in CS3, you have to go to the Preferences menu and select the tickbox next to "open .jpg as RAW..." or something like that as my trial has expired.
Camera RAW within Elements has been crippled some, but those missing features such as the "shadows/highlights" tab, as well as more precise color adjustment and distortion control are available within Elements 6 itself. Adobe might has seen this as a redundancy for the casual user.
Almost all of my processing from my pictures usually takes place ONLY IN CAMERA RAW.
Now if you shoot RAW, and CS3 or Elements 6 is not recognizing the file, you will have to update the plug-in file.
Currently, Camera RAW is at 4.4.1. Just go back to the Adobe downloads page with the above hyperlink that I gave, and look to the right side of the page.
Again... the CS3 version of Camera RAW has more tabs so you can adjust more within the plug-in, and again, the missing features are pretty much available within photoshop itself. I feel using Camera RAW is easier for beginners as it compacts most of the most needed tools for pic adjustment.
Also, the CS3 version of Camera RAW is exactly the same as Adobe Lightroom. All Lightroom is, is CS3 Camera RAW + image organizer.
Lastly, if you look in the above Camera RAW interface, there is a "detail" tab next to the "basic" tab. That detail tab lets you adjust sharpness and noise. It's those tabs that are more plentiful in the CS3 version of Camera RAW.
Edit > Preferences > General... > File Handling OR press Control + K
Check "Prefer Adobe Camera Raw for JPEG Files"
Click "OK"
Trending Topics


Thread Starter
Registered User
iTrader: (9)
Joined: Dec 2003
Posts: 2,069
Likes: 1
From: Waipahu HI; Phoenix AZ
Originally Posted by ahero4eternity
I went with a warmer approach.
What should be noted is that the Camera RAW version (CS3) he's using has the full features. Look at the tabs below the histogram, it has 8 other tabs ranging from color specific adjustments, to sharpening/noise control, to distortion and CA control, to highlights/shadows, while the Elements6 version has only tabs (main and sharpening/noise control).
BTW Calvin, Camera RAW is up to 4.4.1


Originally Posted by ctwentytwo
As Calvin has demonstrated, there is no one correct way to process a pic. He likes the warmness of the pic as it corrected the blue tint on the car that was a reflection of the sky, but I preferred to keep it rather cool as I wanted to keep the skies bluer.
What should be noted is that the Camera RAW version (CS3) he's using has the full features. Look at the tabs below the histogram, it has 8 other tabs ranging from color specific adjustments, to sharpening/noise control, to distortion and CA control, to highlights/shadows, while the Elements6 version has only tabs (main and sharpening/noise control).
BTW Calvin, Camera RAW is up to 4.4.1
I can't keep up with them.

*Downloading now!
*Edit: Done! I'll play with it later after I study some (or so I tell myself).
Last edited by ahero4eternity; May 8, 2008 at 02:27 PM.


Registered User
Joined: Apr 2004
Posts: 4,801
Likes: 0
From: Hawaii
**New Levels adjustment layer**
- Use the drop down and start with blue
- Move the right slider towards the left to where the blues start to drop off
- Do the same to each color
* Some pictures may require you to move the left slider, too.
(tip: hold the alt key when moving the sliders. if moving the right slider, stop when the color you are adjusting start to show. if moving the left slider, stop when the black starts to show.)

**Brighten**
- Duplicate the layer
- Change from "Normal" to "Screen"
- Use the "Opacity" slider to adjust brightness
- Use the "Eraser Tool" to erase the Car.
(keeps everything bright without affecting the car's brightness.)

**Unsharp Mask**
- Image|Mode|Lab Color
- Select only the "Lightness" channel
- Filter|Sharpen|Unsharp Mask...

Here's the settings I used


- Use the drop down and start with blue
- Move the right slider towards the left to where the blues start to drop off
- Do the same to each color
* Some pictures may require you to move the left slider, too.
(tip: hold the alt key when moving the sliders. if moving the right slider, stop when the color you are adjusting start to show. if moving the left slider, stop when the black starts to show.)
**Brighten**
- Duplicate the layer
- Change from "Normal" to "Screen"
- Use the "Opacity" slider to adjust brightness
- Use the "Eraser Tool" to erase the Car.
(keeps everything bright without affecting the car's brightness.)
**Unsharp Mask**
- Image|Mode|Lab Color
- Select only the "Lightness" channel
- Filter|Sharpen|Unsharp Mask...
Here's the settings I used
Last edited by stu46; May 8, 2008 at 10:43 PM.
Thread Starter
Registered User
iTrader: (9)
Joined: Dec 2003
Posts: 2,069
Likes: 1
From: Waipahu HI; Phoenix AZ
LOL... Guys... this pic has already cured!
We have another sick patient from DJNC...
Please, post what you did to fix it. Program and adjustment figures, what you did and why, and what to do the next time so the problem does not happen again. The whole point of this thread is to let other not so good photographers learn. We just need more of them to donate some large pictures.


Registered User
Joined: Apr 2004
Posts: 4,801
Likes: 0
From: Hawaii
**Color correction via Curves**
- New adjustment layer|Threshold
- Move the slider all the way to the left till the least amount of black appears on the scree.
- Hold shift and click on a black point

- Move the slider to the right till you find the smallest white patch
- Hold shift and click on the white patch

- New adjustment layer|Curves
- Click on the first dropper then click on your black point that you just created to set your black point
- Click on the 3rd dropper then click on your white point that you just created to set your white point

**Make the sky darker**
- Duplicate layer
- Change from "Normal" to "Multiply"
- Use the Eraser Tool to erase everything but the sky

**Lighten up the car**
- Duplicate layer
- Change from "Normal" to "Screen"
- Use the Eraser Tool to erase everything but the car


- New adjustment layer|Threshold
- Move the slider all the way to the left till the least amount of black appears on the scree.
- Hold shift and click on a black point
- Move the slider to the right till you find the smallest white patch
- Hold shift and click on the white patch
- New adjustment layer|Curves
- Click on the first dropper then click on your black point that you just created to set your black point
- Click on the 3rd dropper then click on your white point that you just created to set your white point
**Make the sky darker**
- Duplicate layer
- Change from "Normal" to "Multiply"
- Use the Eraser Tool to erase everything but the sky
**Lighten up the car**
- Duplicate layer
- Change from "Normal" to "Screen"
- Use the Eraser Tool to erase everything but the car
Registered User
Joined: Apr 2004
Posts: 4,801
Likes: 0
From: Hawaii
**Sharpen**
Decided to sharpen it up a little
- Unsharp Mask with the following values

**Soften**
There was a bit of noise in the sky so I softened it with the Gaussian Blur
- Duplicate layer
- Filter|Blur|Gaussian Blur
- Value 1.0
- Erase everything but the sky

Final Product

Decided to sharpen it up a little
- Unsharp Mask with the following values
**Soften**
There was a bit of noise in the sky so I softened it with the Gaussian Blur
- Duplicate layer
- Filter|Blur|Gaussian Blur
- Value 1.0
- Erase everything but the sky
Final Product

