Adjusting ride height on BC BR Coilovers
 06-27-2011, 11:02 AM
#1

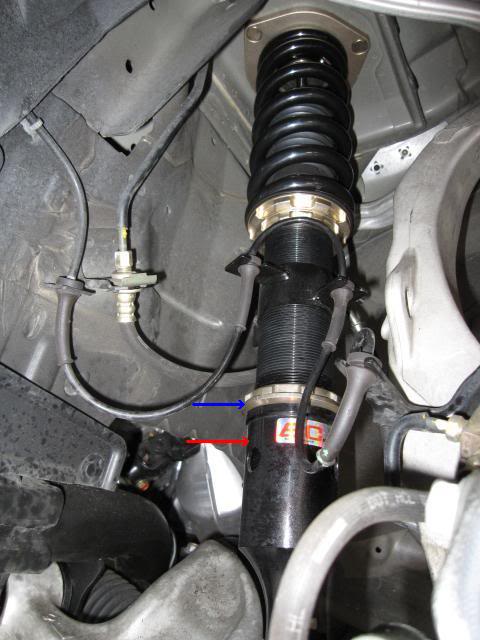
Next week I will be installing my BC BR series coilovers and I have a question regarding ride height adjustment. (I stole this picture from a post on Freshalloy where the guy was installing them on an Infiniti M35, so the shock configuration is similar to the 350z if not identical).
I've inspected the product and see that the bottom portion of the front shock, indicated by the red arrow, threads onto the main shock body, so the overall length of the assembly can be lengthened or shortened. This adjustment is simple when the shock is not installed on the car, by loosening the gold collar (indicated by the blue arrow) and threading the bottom portion up or down relative to the main shock body. Of course this only limits your ride height options because the bottom portion has to be positioned in 180 degree increments so that it can bolt to the lower portion of the suspension.
My question is, once the coilover is installed on the car, how do I adjust ride height? Do I loosen the lower gold collar (blue arrow) and somehow thread the entire shock body up or down relative to the lower portion? If so, where do I put my spanner wrench to make that adjustment without affecting the height (pre-load) of the spring? (Side note: If the entire shock body can be turned, then I'm guessing I also need to loosen the brake line bracket so as to not twist the lines?)
Any help will be appreciated!
 06-27-2011, 01:53 PM
#2
Registered User
iTrader: (5)

Join Date: Dec 2008
Location: orange county, so calif
Posts: 892
Likes: 0
Received 0 Likes
on
0 Posts
You pretty much answered your own questions. Remove brake line bracket from shock body, loosen lower collars, (blue arrow) (both) and rotate shock body accordingly, lower or raise. Once you have your desired height, retighten the collars, reinstall your brake line bracket and your repeat on the other side. Take your time, check twice and make sure you tighten the collars. Good luck........
06-27-2011, 05:06 PM
#3
You pretty much answered your own questions. Remove brake line bracket from shock body, loosen lower collars, (blue arrow) (both) and rotate shock body accordingly, lower or raise. Once you have your desired height, retighten the collars, reinstall your brake line bracket and your repeat on the other side. Take your time, check twice and make sure you tighten the collars. Good luck........
Conversely if the two top collars are tight against each other and I put my wrench on the bigger collar and turn it counter-clockwise (looking up at the strut tower) then the collars should again not move relative to each other and instead it will rotate the entire shock body effectively threading it into the lower portion and lowering the ride height. Is my logic sound?
06-27-2011, 05:15 PM
#4
Registered User
iTrader: (59)
Join Date: Feb 2007
Location: Raleigh, North Carolina
Posts: 8,517
Likes: 0
Received 4 Likes
on
4 Posts

you adjust the red for height and then the yellow is the locking nut.
once you do the install, you will see how easy it is to just take off that bolt and adjust the bottom piece in your original pic. it's the best way IMO to keep your spring rates the same.
06-27-2011, 05:40 PM
#5
Yeah that's my concern, is how to adjust the overall assembly length (and therefore ride height) without changing the compression on the spring. Kind of seems like the only way to do that is removing the bottom bolt. Otherwise if I move the upper collars, then I'm changing the compression of the spring which affects performance.
06-27-2011, 05:45 PM
#6
Trending Topics
06-27-2011, 06:53 PM
#10
Super Moderator
MY350Z.COM
MY350Z.COM


iTrader: (8)
If you are making an adjustment in height that is more than 1/2 inch i would disco the endlinks to make it easier.
 06-28-2011, 12:18 PM
#11
So here's the million dollar, long-shot question: I want to get my ride height so that the tops of the tires are even with the tops of the wheel arches, both front and rear. For the fronts does anyone know what distance I need between the bottom gold collar and the smaller top collar to achieve that ride height? This would save me probably an hour's worth of work when I eventually install them.
*crosses fingers*
*crosses fingers*
06-28-2011, 02:44 PM
#12
Super Moderator
MY350Z.COM
MY350Z.COM
iTrader: (8)
So here's the million dollar, long-shot question: I want to get my ride height so that the tops of the tires are even with the tops of the wheel arches, both front and rear. For the fronts does anyone know what distance I need between the bottom gold collar and the smaller top collar to achieve that ride height? This would save me probably an hour's worth of work when I eventually install them.
*crosses fingers*
*crosses fingers*
Measure how much you need to go, move the adjuster 1/2 of your measurement ( basically if you want 1 inch drop, move the adjuster 1/2 inch) and this will get you in the ballpark much faster.
06-28-2011, 04:21 PM
#13
Former Sponsor
iTrader: (564)
Join Date: Feb 2003
Location: Long Island, New York
Posts: 19,266
Likes: 0
Received 5 Likes
on
5 Posts
large height adjustments are done via the lower mounting perch
small height adjustments (1/4 or so or less) are done via the locking collar that holds the spring (loosen, spin spring to desired height, retighten to lock spring in place)
there is no worrying about keeping spring rates the same as the springs are linear. Only progressive springs have a large spread as they compress for this to be a concern
06-28-2011, 05:42 PM
#14
All cars are different, spring are not perfect , some car weight more than others.
Measure how much you need to go, move the adjuster 1/2 of your measurement ( basically if you want 1 inch drop, move the adjuster 1/2 inch) and this will get you in the ballpark much faster.
Measure how much you need to go, move the adjuster 1/2 of your measurement ( basically if you want 1 inch drop, move the adjuster 1/2 inch) and this will get you in the ballpark much faster.
What I'm trying to do is get the overall damper length as close as possible before I put them on the car, but with the dampers sitting on the floor in front of me I have no reference point for how the damper length relates to ride height.
large height adjustments are done via the lower mounting perch
small height adjustments (1/4 or so or less) are done via the locking collar that holds the spring (loosen, spin spring to desired height, retighten to lock spring in place)
there is no worrying about keeping spring rates the same as the springs are linear. Only progressive springs have a large spread as they compress for this to be a concern
small height adjustments (1/4 or so or less) are done via the locking collar that holds the spring (loosen, spin spring to desired height, retighten to lock spring in place)
there is no worrying about keeping spring rates the same as the springs are linear. Only progressive springs have a large spread as they compress for this to be a concern
06-28-2011, 07:45 PM
#15
Super Moderator
MY350Z.COM
MY350Z.COM
iTrader: (8)
It's a bit late and I'm a beer in on an empty stomach...are you saying adjusting half of the desired drop will give me the desired drop? Or are you saying just to cut it in half to get me closer to being in the ballpark?
What I'm trying to do is get the overall damper length as close as possible before I put them on the car, but with the dampers sitting on the floor in front of me I have no reference point for how the damper length relates to ride height.
What I'm trying to do is get the overall damper length as close as possible before I put them on the car, but with the dampers sitting on the floor in front of me I have no reference point for how the damper length relates to ride height.
07-10-2011, 05:21 PM
#17
Just wanted to say thanks for the input guys. Got my fronts installed this afternoon and had them too low at my first attempt. I was able to easily adjust the ride height higher with the shocks installed on the car by the following:
1) Jack up the car to get both front wheels in the air
2) Remove wheels
3) Remove speed sensor wire and brake line from strut mounting bracket
4) Loosen the bottom collar
5) Use spanner wrench on the smaller (bottom) of the upper two collars and turn to the right. Spring stays in place and the bottom portion stays in place bolted to the translink member of the suspension, while the shock body threads up out of the bottom portion. (Effectively pushes the translink down to give overall higher ride height).
I was a bit leery of this at first but it seems like the entire shock can rotate while the triangular tower mounting plate stays fixed, so no harm done as far as I know. Just thought I would update this thread in case anyone is ever researching the topic. No need to disconnect the lower bolt on the shock to adjust height in my opinion.
09-18-2011, 06:05 PM
#18
New Member
iTrader: (19)

Join Date: Jul 2010
Location: Huntsville,Al
Posts: 165
Likes: 0
Received 0 Likes
on
0 Posts
I know this thread is a couple months old but it's about the most recent one I have found. OP: Did you have any issues with the rear of your BC's? I got my set put on and i'm hearing a pretty loud rattling/clunking noise coming from the right rear. I checked everything and it's all tight! I saw some posts on myg35 and seen a lot of people have had the rattling problem in the rear with the BC's.
09-19-2011, 02:43 PM
#19
I know this thread is a couple months old but it's about the most recent one I have found. OP: Did you have any issues with the rear of your BC's? I got my set put on and i'm hearing a pretty loud rattling/clunking noise coming from the right rear. I checked everything and it's all tight! I saw some posts on myg35 and seen a lot of people have had the rattling problem in the rear with the BC's.
Do you have the rear adjustment extenders installed? Might seem like a weird question, but maybe they are bouncing around and hitting the rear strut bar structure?
Also make sure that the rear shock travel is set so that you still have some compression on the spring when the shock is extended, i.e when you're hitting a bump and the rear suspension momentarily unloads you want the spring to always have some force on it. Otherwise if the shock wants to extend past the free length of the spring, then the spring will have no load on it and therefore bounce/rattle around between the upper perch and lower cup / arm.

Thread
Thread Starter
Forum
Replies
Last Post
Lt_Ballzacki
Brakes & Suspension
39
08-06-2021 06:19 AM
350Z_Al
Exterior & Interior
133
10-29-2020 07:44 PM