
DIY Clutch Stopper aka. free D-wolf Clutch Kit

Thread Starter
Registered User
iTrader: (7)
Joined: Jul 2003
Posts: 2,311
Likes: 0
From: New Orleans, LA
Yume over at g35driver.com was kind enough to buy a kit and find parts to make a DIY for us. Bravo guys, bravo.
Original Post: http://g35driver.com/forums/showthread.php?t=168519
Originally Posted by Yume
In response to the thread on the D-Wolf Clutch "Kit" that just came out (http://g35driver.com/forums/showthre...163723&page=5), I decided to post a DIY on how to fix this clutch issue that is common in the G's and Z's. I felt that the creator of this "kit" is just trying to make money off of us members here on the forums rather than help us out. Why do I think that? Because they come up with their clutch "kit" and do not want to share with anyone on how it works. I purchased this "kit" myself and in part of the instruction it states that even though i had purchased this kit, it does not give me the right to post pictures of the "kit" and the instructions online for others to see, blah blah blah...
I would not even call this piece of plastic with double sided tape on it, that they are selling, a "kit",...its more like a "fix" is what i think of it. That just sickens me that they would rather make money off of people rather than post a simple DIY on how to remedy the problem that G and Z owner have with the transmission engaging when the clutch is halfway depressed.
Enough of my ranting...
Here are the steps to help resolve the halfway engaging clutch issue:
Before you start...if you had adjusted your clutch pedal before, you must set your clutch pedal back to the original position for this mod to work.
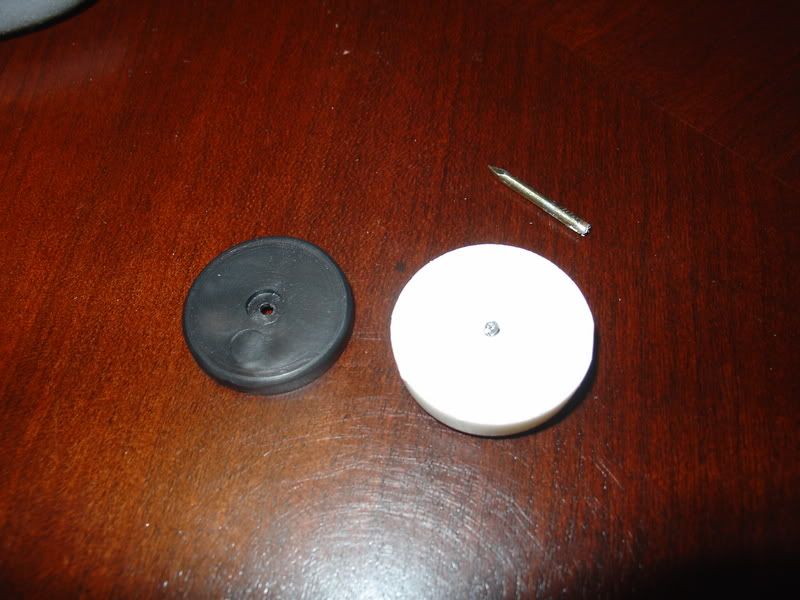
1) Go to Home Depot and buy 29mm "nail-on glides". They come in a pack of four for $2.01 (that's including tax). :biggthumpup: then buy some double sided tape mounting tape (I had bought mine a while ago, so i don't remember the price, shouldn't be more than $5). Here is what they look like.

2) Separate the black and white plastic pieces and bend/cut the nail off.
3) Use 1 strip of double sided tape to put the black and white pieces together and then put two strips of double side tape on the end of the black piece (the reason is because it need to be a certain thickness for the transmission to engage when you release the clutch pedal. 2 strips of tape might not do the trick because the tape compresses when you push down on it, so you might want to use 3...but try 2 strips first.)
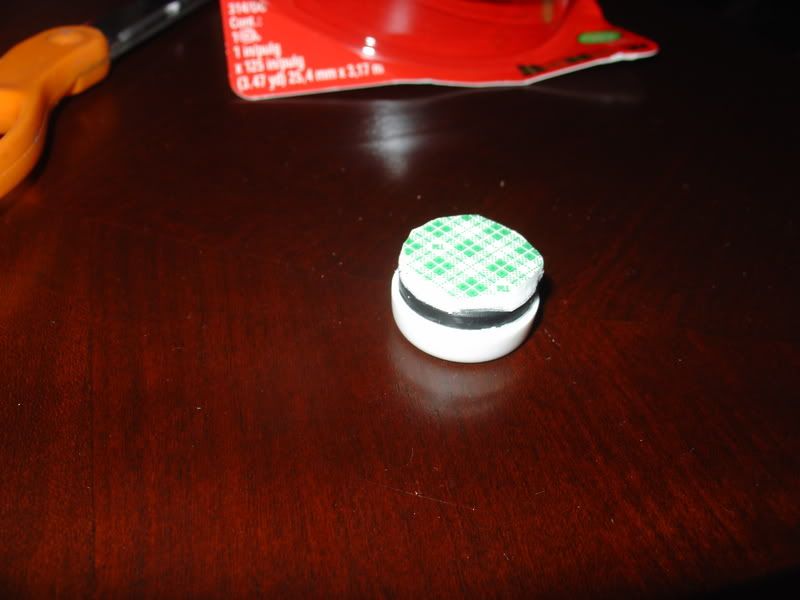
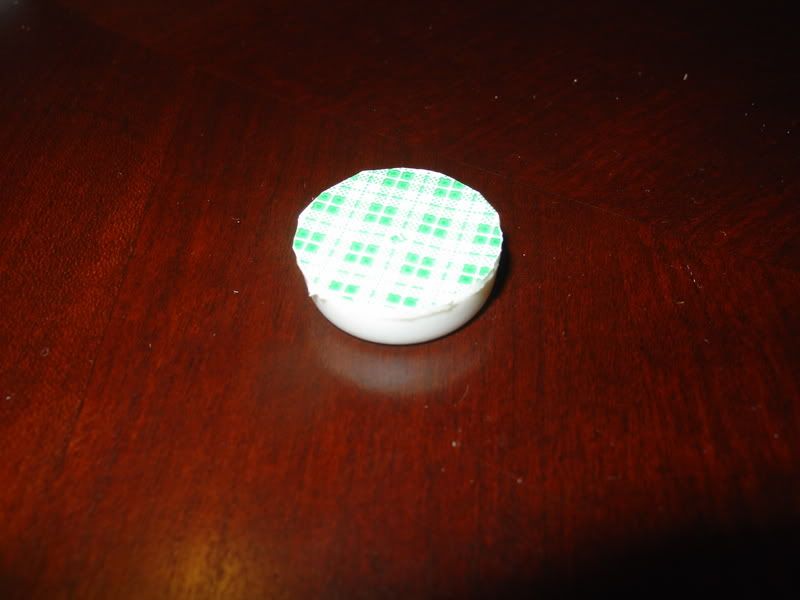
4) Next, take another white plastic piece and put 1 strip of double sided tape on it.
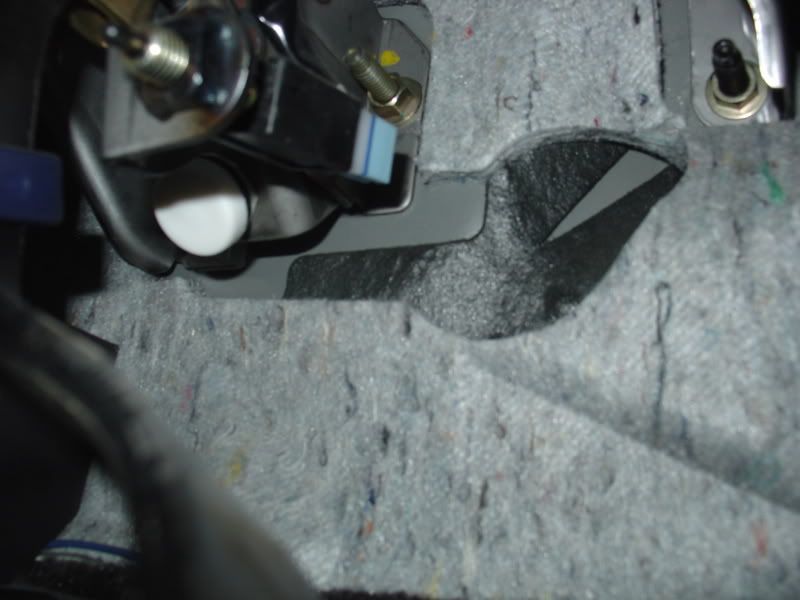
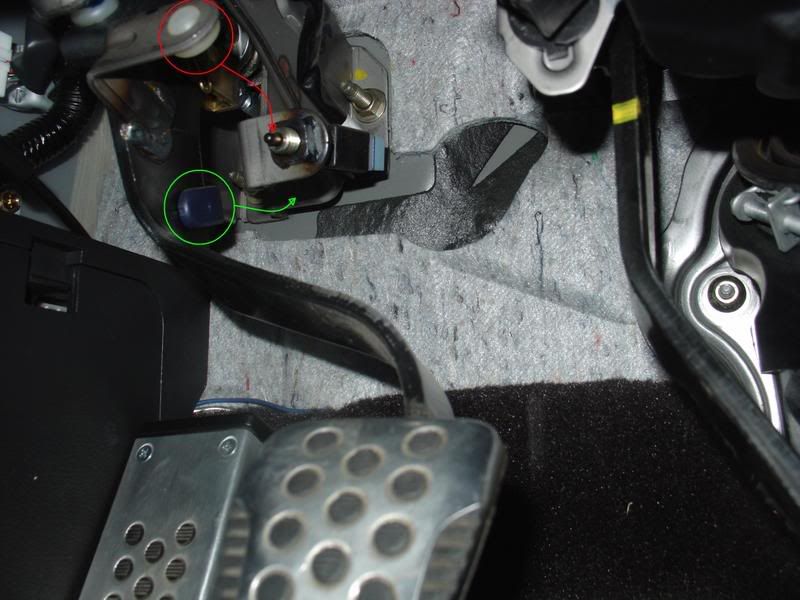
5) Then, once you have those assembled, attach the black and white piece from step 3 and place it in the area of the green oval as shown in the picture.
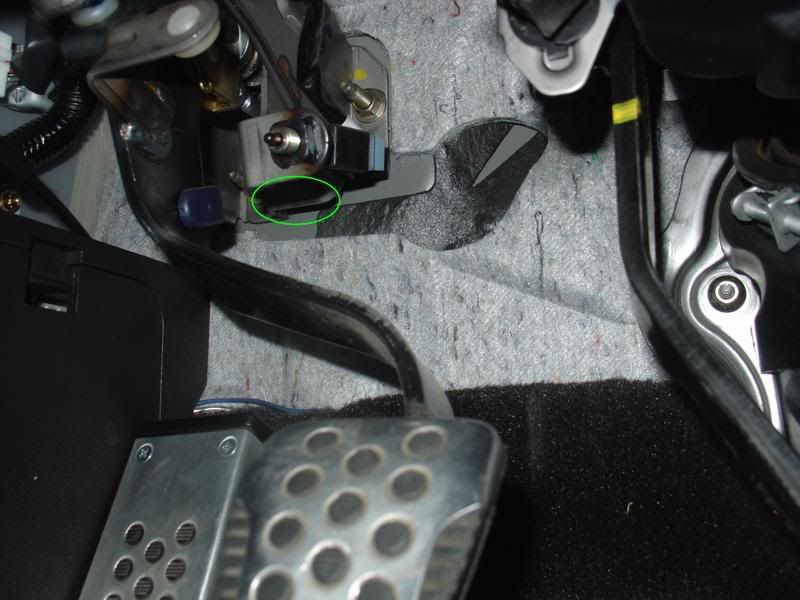
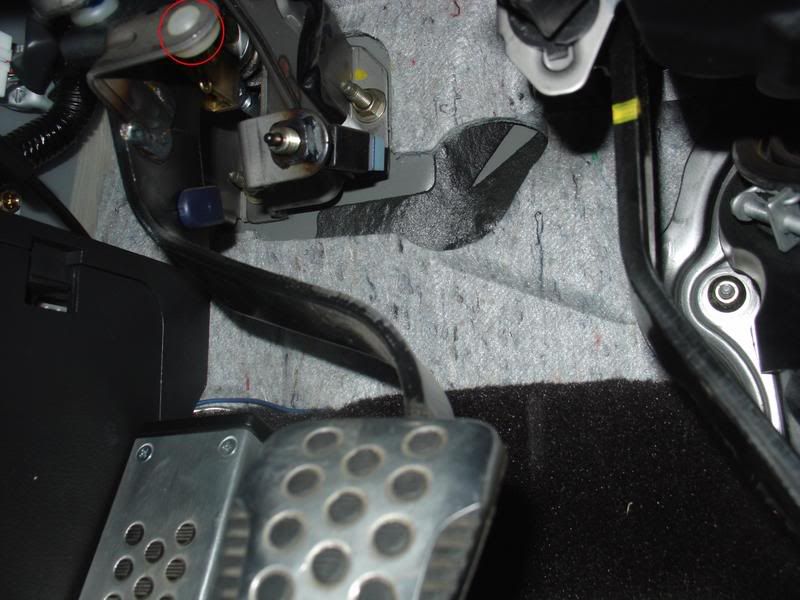
6) Then attach the white plastic piece to the area in the red circle.
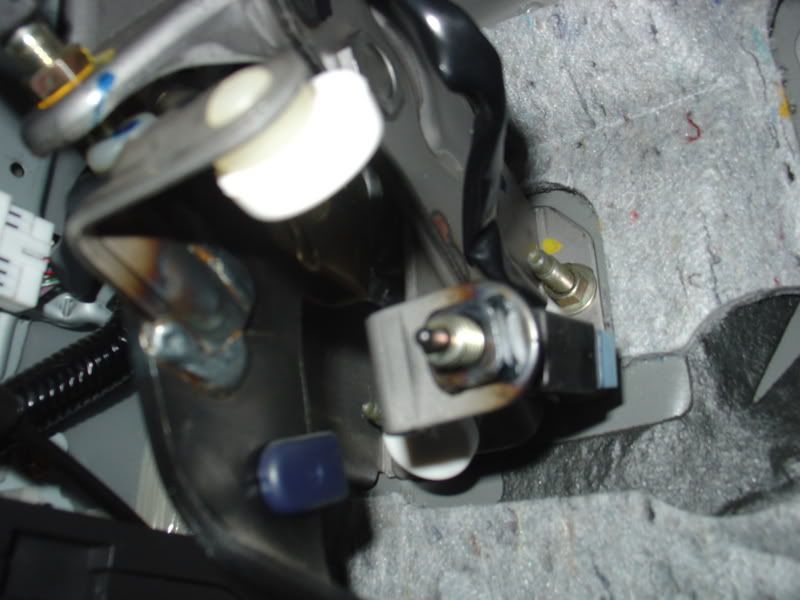
The blue piece on the clutch pedal should hit the black and white plastic and the single white plastic piece should press the switch.
There are other way of making this. I just made this piece really quick and tested it out. It works just as good as the D-Wolf clutch "kit". But is has a softer feeling compared to the D-Wolf "kit" due to the compression 3 layers of double sided tape. If you want a more firmer feel, rather than taping the black and white pieces together, GLUE two white pieces together (use super glue or something similar) and then use a strip of double sided tape to mount onto the vehicle. leave the single white piece that touches the kill switch as is.
Good luck for those that do this mod. You will notice a better feel when you push and release your clutch pedal because you don't have to push the pedal all the way down and release it halfway before your car starts to move. Feel free to PM me if you have any questions.
EDIT:
Another idea is to use coins...i got it from Blasian from my350Z in this post.
https://my350z.com/forum/showthread.php?t=278666&page=7
u can use pennies, nickels, dimes or quarter. Make the big piece about 7 nickels thick and the smaller piece about 3 nickels thick. Just glue them together. and then use double-sided tape to attach to the vehicle. attach more coins if you feel that still does not feel like it catches where you want it to.
Caution
Do not make these pieces too thick otherwise your clutch might not fully disengage. You should be fine with 7 nickels for the big piece and 3 for the smaller piece. I have not had a chance to try this yet, but will when i get the chance...i just went out real quick right now to measure the thickness needed. If someone wants to confirm for me, that would be great. I will try it when i get the chance and let you guys know asap.
I would not even call this piece of plastic with double sided tape on it, that they are selling, a "kit",...its more like a "fix" is what i think of it. That just sickens me that they would rather make money off of people rather than post a simple DIY on how to remedy the problem that G and Z owner have with the transmission engaging when the clutch is halfway depressed.
Enough of my ranting...
Here are the steps to help resolve the halfway engaging clutch issue:
Before you start...if you had adjusted your clutch pedal before, you must set your clutch pedal back to the original position for this mod to work.
1) Go to Home Depot and buy 29mm "nail-on glides". They come in a pack of four for $2.01 (that's including tax). :biggthumpup: then buy some double sided tape mounting tape (I had bought mine a while ago, so i don't remember the price, shouldn't be more than $5). Here is what they look like.
2) Separate the black and white plastic pieces and bend/cut the nail off.
3) Use 1 strip of double sided tape to put the black and white pieces together and then put two strips of double side tape on the end of the black piece (the reason is because it need to be a certain thickness for the transmission to engage when you release the clutch pedal. 2 strips of tape might not do the trick because the tape compresses when you push down on it, so you might want to use 3...but try 2 strips first.)
4) Next, take another white plastic piece and put 1 strip of double sided tape on it.
5) Then, once you have those assembled, attach the black and white piece from step 3 and place it in the area of the green oval as shown in the picture.
6) Then attach the white plastic piece to the area in the red circle.
The blue piece on the clutch pedal should hit the black and white plastic and the single white plastic piece should press the switch.
There are other way of making this. I just made this piece really quick and tested it out. It works just as good as the D-Wolf clutch "kit". But is has a softer feeling compared to the D-Wolf "kit" due to the compression 3 layers of double sided tape. If you want a more firmer feel, rather than taping the black and white pieces together, GLUE two white pieces together (use super glue or something similar) and then use a strip of double sided tape to mount onto the vehicle. leave the single white piece that touches the kill switch as is.
Good luck for those that do this mod. You will notice a better feel when you push and release your clutch pedal because you don't have to push the pedal all the way down and release it halfway before your car starts to move. Feel free to PM me if you have any questions.
EDIT:
Another idea is to use coins...i got it from Blasian from my350Z in this post.
https://my350z.com/forum/showthread.php?t=278666&page=7
u can use pennies, nickels, dimes or quarter. Make the big piece about 7 nickels thick and the smaller piece about 3 nickels thick. Just glue them together. and then use double-sided tape to attach to the vehicle. attach more coins if you feel that still does not feel like it catches where you want it to.
Caution
Do not make these pieces too thick otherwise your clutch might not fully disengage. You should be fine with 7 nickels for the big piece and 3 for the smaller piece. I have not had a chance to try this yet, but will when i get the chance...i just went out real quick right now to measure the thickness needed. If someone wants to confirm for me, that would be great. I will try it when i get the chance and let you guys know asap.


Originally Posted by Blazemaster
can somebody post the same instructions with a Z instead of G? My clutch assembly is different than the one shown in the instructions.
All you need to do is fine a good spot to stick these on at that limits the clutch pedal. Not rocket science

Originally Posted by Blazemaster
can somebody post the same instructions with a Z instead of G? My clutch assembly is different than the one shown in the instructions.
Trending Topics
My impressions posted here:
https://my350z.com/forum/engine-and-drivetrain/288536-clutch-high-engagement-remedy-diy-2.html
https://my350z.com/forum/engine-and-drivetrain/288536-clutch-high-engagement-remedy-diy-2.html

Thread Starter
Registered User
iTrader: (7)
Joined: Jul 2003
Posts: 2,311
Likes: 0
From: New Orleans, LA
heres the lowes parts you'll need if you hate home depot


Edit: you won't need two rolls of tape (unless you're severely retarded and cant tape something the first 400 times)
Edit: you won't need two rolls of tape (unless you're severely retarded and cant tape something the first 400 times)
I'll post this here as well, since I believe I have a valuable addition to this DIY to ensure you do it right and cannot damage your clutch.
Well, crap. I just realized I re-invented the wheel. I was all about to post up a big DIY on this and here it is, someone's already done it.
BUT, I'd like to add something: how to determine the exact thickness the spacers should be for YOUR clutch. I got this info. from an old post by Jason@Performance as I was researching the mod. This was a post from '06 where an adjustable clutch stop was discussed:
Here's the original thread:
https://my350z.com/forum/2003-2009-nissan-350z/203637-how-far-do-you-push-down-the-clutch-pedal-when-shifting.html
Using the above method, you can be assured that you are spacing up the clutch stop safely. I just layed a yard stick at the top edge of the floor mat and rested it on the seat as I depressed the clutch pedal as a buddy tried to spin the real wheels. I determined that (as I had the yard stick sat and from my perspective) my clutch was fully disengaged at 2.5" from the floor, so I pressed the pedal in another inch to 1.5" from the floor and measured the gap between the clutch stop and the bumper on the pedal arm with a set of measurement calipers. The gap was 10mm, so I glued a stack of coins together in this thickness and used it there (I used silicone adhesive to first glue the coin stack, then glue the stack in position, holding it in place with a zip-tie to cure). For the clutch interlock switch spacer, since it is further up the clutch arm, it's travel is slightly less and I found a spacer 1mm less than the clutch stop spacer to be the right fit for there, so for me a 9mm stack of coins did the trick.
Now, my clutch pedal travel is reduced by 1.5" at the bottom and the clutch begins to engage just over 1" off the floor and is fully engaged 1.5" off the floor. It feels great going into gears and makes gear changes lightning quick and no more guess-work on modulating clutch and gas pedals for smooth shifts; just let out the clutch and hit the gas simultaneously and shifts are smooth and jerk free.
*EDIT* as a final check to make sure everything is good, once the coin stack spacers are in place, and with the rear of the car lifted and secured on jack stands, start the car, put it in gear and make sure the wheels do not move at all whith the clutch fully depressed. This way you are gauranteed that no damage will copme to your clutch by using this method.
After driving on it a couple of weeks, I have discovered, however, that I can now shift so quickly that the revs are not dropping fast it is taxing the synchros, so I have to make a point of slowing down my shifts a bit to be kind to the tranny. A lightened flywheel would deffinitely be of benefit here.
Here's the pic I made up for the DIY I was going to do:

Well, crap. I just realized I re-invented the wheel. I was all about to post up a big DIY on this and here it is, someone's already done it.
BUT, I'd like to add something: how to determine the exact thickness the spacers should be for YOUR clutch. I got this info. from an old post by Jason@Performance as I was researching the mod. This was a post from '06 where an adjustable clutch stop was discussed:
W/ the car OFF... Lift the rear wheels off the ground...
Put car in gear (2nd 3rd doesnt really matter) ((CAR OFF REMEMBER))
Have a buddy try turning the rear wheels (forward)... while the wheels are trying to be turned, slowly press down the clutch until the rear wheels spin freely... once they spin freely this is the point in which the clutch is released...
For OEM Clutch, set the pedal stop to travel 1"-1.25" AFTER the above point...
https://my350z.com/forum/2003-2009-nissan-350z/203637-how-far-do-you-push-down-the-clutch-pedal-when-shifting.html
Using the above method, you can be assured that you are spacing up the clutch stop safely. I just layed a yard stick at the top edge of the floor mat and rested it on the seat as I depressed the clutch pedal as a buddy tried to spin the real wheels. I determined that (as I had the yard stick sat and from my perspective) my clutch was fully disengaged at 2.5" from the floor, so I pressed the pedal in another inch to 1.5" from the floor and measured the gap between the clutch stop and the bumper on the pedal arm with a set of measurement calipers. The gap was 10mm, so I glued a stack of coins together in this thickness and used it there (I used silicone adhesive to first glue the coin stack, then glue the stack in position, holding it in place with a zip-tie to cure). For the clutch interlock switch spacer, since it is further up the clutch arm, it's travel is slightly less and I found a spacer 1mm less than the clutch stop spacer to be the right fit for there, so for me a 9mm stack of coins did the trick.
Now, my clutch pedal travel is reduced by 1.5" at the bottom and the clutch begins to engage just over 1" off the floor and is fully engaged 1.5" off the floor. It feels great going into gears and makes gear changes lightning quick and no more guess-work on modulating clutch and gas pedals for smooth shifts; just let out the clutch and hit the gas simultaneously and shifts are smooth and jerk free.
*EDIT* as a final check to make sure everything is good, once the coin stack spacers are in place, and with the rear of the car lifted and secured on jack stands, start the car, put it in gear and make sure the wheels do not move at all whith the clutch fully depressed. This way you are gauranteed that no damage will copme to your clutch by using this method.
After driving on it a couple of weeks, I have discovered, however, that I can now shift so quickly that the revs are not dropping fast it is taxing the synchros, so I have to make a point of slowing down my shifts a bit to be kind to the tranny. A lightened flywheel would deffinitely be of benefit here.
Here's the pic I made up for the DIY I was going to do:
Last edited by MustGoFastR; Aug 10, 2007 at 07:44 PM.


Thread Starter
Registered User
iTrader: (7)
Joined: Jul 2003
Posts: 2,311
Likes: 0
From: New Orleans, LA
Originally Posted by myZter
you guys are some cheap people 43 bucks is nothing to what some of you spend on the Z good luck with pennies. if i need some change ill look for your Zs
") Tell your friend (the creator of the d-wolf kit) I said **** you.
Tell your friend (the creator of the d-wolf kit) I said **** you.
Originally Posted by myZter
you guys are some cheap people 43 bucks is nothing to what some of you spend on the Z good luck with pennies. if i need some change ill look for your Zs

Apparently your buddy is cheap as well for trying to make a profit over something that could have just been shared with the community.
Guess people need to start charging here for help
Originally Posted by myZter
you guys are some cheap people 43 bucks is nothing to what some of you spend on the Z good luck with pennies. if i need some change ill look for your Zs
Originally Posted by bugsbbunny
What happened to open source? Are we not here to share our knowledge?
As I stated before, I don't believe the Z owner who contributed the two penny trick to fix the problem with the hatch asked for $40 for a kit.
Originally Posted by blasian
Exactly...
As I stated before, I don't believe the Z owner who contributed the two penny trick to fix the problem with the hatch asked for $40 for a kit.
As I stated before, I don't believe the Z owner who contributed the two penny trick to fix the problem with the hatch asked for $40 for a kit.

Originally Posted by RedBullRR
+ 1, I would have been pist if that was all I got for 40 Bucks. If someone invents something great, more power to you for making a profit, but this doesnt change the engangement point as they marketed it to do. This simply stops it from using the free play on the clutch. Not really a product more like a trick, something that def should have been shared. I know I would have.
+1 on that. Plus, it's not like anyone is ripping off the idea of this "kit"; this is an old trick that has been around for a long time and used on many cars. More power to the guy for putting together a ready-made kit specifically for the Z and if someone wants to go that route rather than DIY, then that's fine, but there ws no reason for the cloak and dagger melodramatics about the way it has been marketed.