
Replacing the Top w/ Used Top

Thread Starter
Registered User
iTrader: (32)
Joined: Apr 2008
Posts: 2,115
Likes: 0
From: Ann Arbor, Michigan
Tomorrow, I'm driving up North to meet a fellow member about buying a used convertible top. It's still on the car so if I approve of it, I'll have to remove the top with full frame. (Along with the bow motors.)
Any tips for inspecting the top, motors or on the removal and handling of the top?
Any tips for inspecting the top, motors or on the removal and handling of the top?
Thread Starter
Registered User
iTrader: (32)
Joined: Apr 2008
Posts: 2,115
Likes: 0
From: Ann Arbor, Michigan
When I do the install, I'll be sure to take lots of photos and make a tutorial out of it. I'm buying the used top with the frame already attached so It shouldn't be that hard.
(If I do everything correctly.)
(If I do everything correctly.)
Thread Starter
Registered User
iTrader: (32)
Joined: Apr 2008
Posts: 2,115
Likes: 0
From: Ann Arbor, Michigan
Well, I took a look at the top. I plan to head back on Saturday to pick it up along with the bow motors. The top looks good even though the rest of the car is mangled. Not a bad deal for a local sale.
Pics coming this weekend. (Three posts all from me. I think I'm talking to myself.) It's a good thing that I'm schizophrenic.
Pics coming this weekend. (Three posts all from me. I think I'm talking to myself.) It's a good thing that I'm schizophrenic.
Last edited by Phreakdout; Oct 3, 2008 at 11:45 AM.

Registered User
Joined: Aug 2008
Posts: 174
Likes: 0
From: Malaysia
Well, I took a look at the top. I plan to head back on Saturday to pick it up along with the bow motors. The top looks good even though the rest of the car is mangled. Not a bad deal for a local sale.
Pics coming this weekend. (Three posts all from me. I think I'm talking to myself.) It's a good thing that I'm schizophrenic.
Pics coming this weekend. (Three posts all from me. I think I'm talking to myself.) It's a good thing that I'm schizophrenic.
Thread Starter
Registered User
iTrader: (32)
Joined: Apr 2008
Posts: 2,115
Likes: 0
From: Ann Arbor, Michigan
The top is on.  It took only an hour to do.
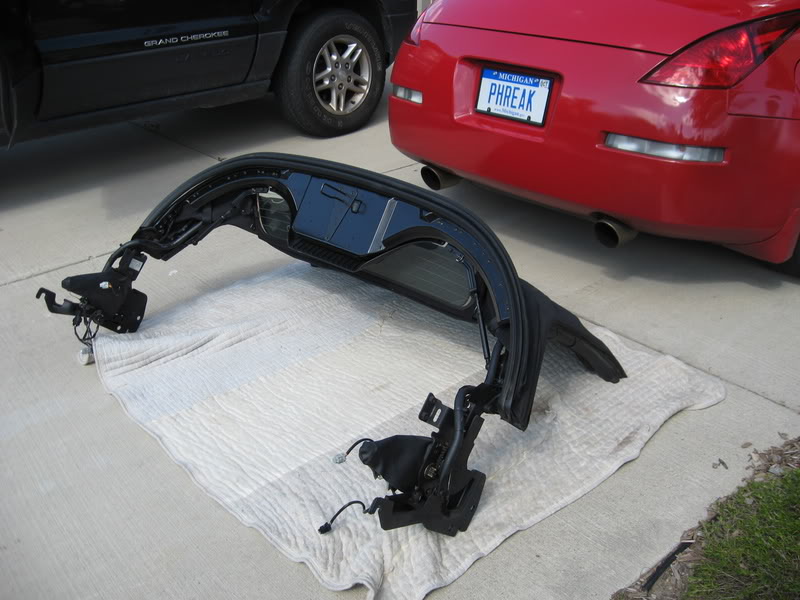
In my case, I bought a used top already mounted to the frame and with the bow motors attached.
I didn't take enough pictures to make tutorial. Honestly, the tutorial we really need is attaching a new top skin to the existing frame.
Anyway, the top has to be removed either way so here are a few tips to make the process easier. (Stuff not mentioned in the service manual.)
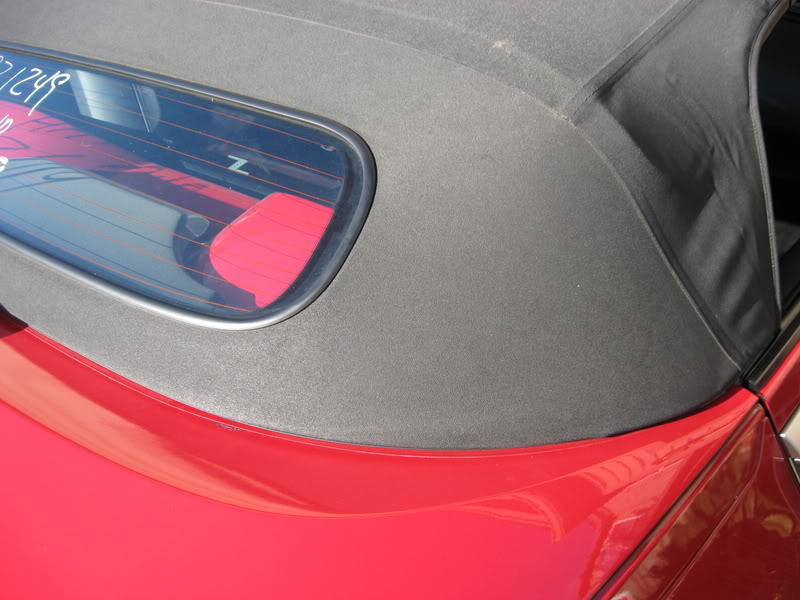
Here's the old top.
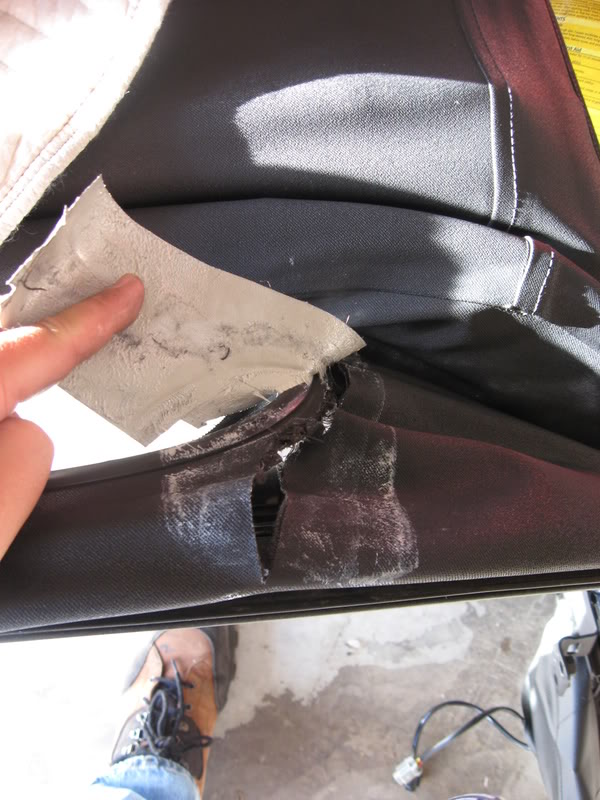
The new top ...

Open the top so the tonneau is open and the rear window is fully up. Stop it short of having the front half of the top start to go up and fold.
1) Loose the rear end of the black plastic trip behind the aluminum kick plate in the door jam. Just pull upward.
2) Pull the door weather strip on the rear of the door jam. Just pull straight out on it. There's no glue or anything.
3) Pop open the trim on top of the seat belt anchor. Use a 14mm socket to remove the bolt.
(You don't have to do this but it helps when removing the rear side trim. That trim is easy to break so I advise you do this.)
4) With the weather strip and seat belt anchor removed, use a flat head screwdriver to pop off the side trim. These buttons break easy. To prevent this, stick the flathead at the base of two of the main buttons. You can see them where the weather stripping used to be.
5) Use a 12mm socket to remove two bolts from the front side of the hinge bracket. Remove the gold colored nut on the rear side of the hinge bracket in the top storage bay.
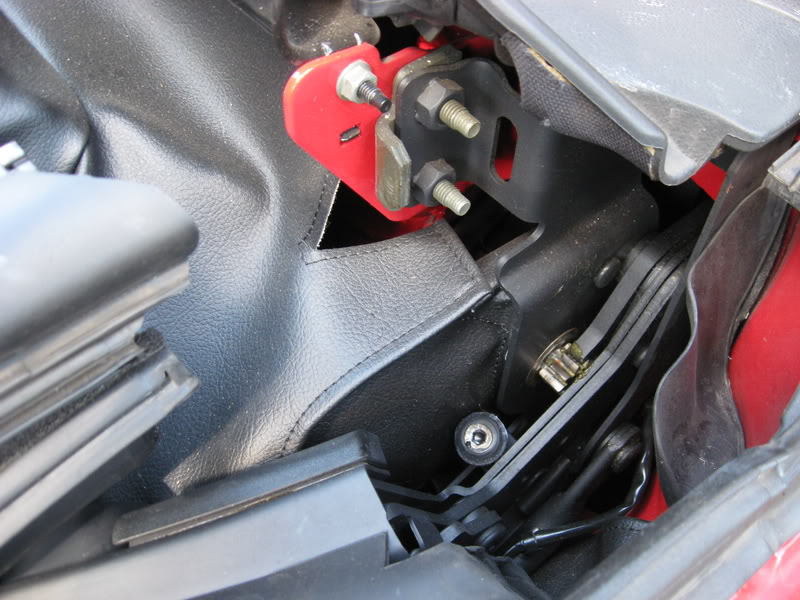
^^ Inside the top storage bay.
6) Use painter's tape to hold the trim flaps up. This will make installation much easier.
7) Look at the top of the picture. See the two bolt ends facing us? Remove these bolts. Keep the shims mounted on these bolts. Don't mix them side to side.
8) See the silver nut on the black stud (on the red bracket)? Remove this nut. (The service manual does not say this.) The stud is part of the black bracket behind the red bracket. Pry down the snap button under the trim behind the roll bar. (Sorry so confusing.) In short, you want to remove this bracket. That black stud will get in the way of removing the top.
9) Unclip all the electrical connections. (5 in total)
10) Use two persons to lift the top off. It weighs 132lbs and it's bulky. Reverse the removal for installation.
Here's the top installed. Woo-hoo. No more ghetto patch duct tape.
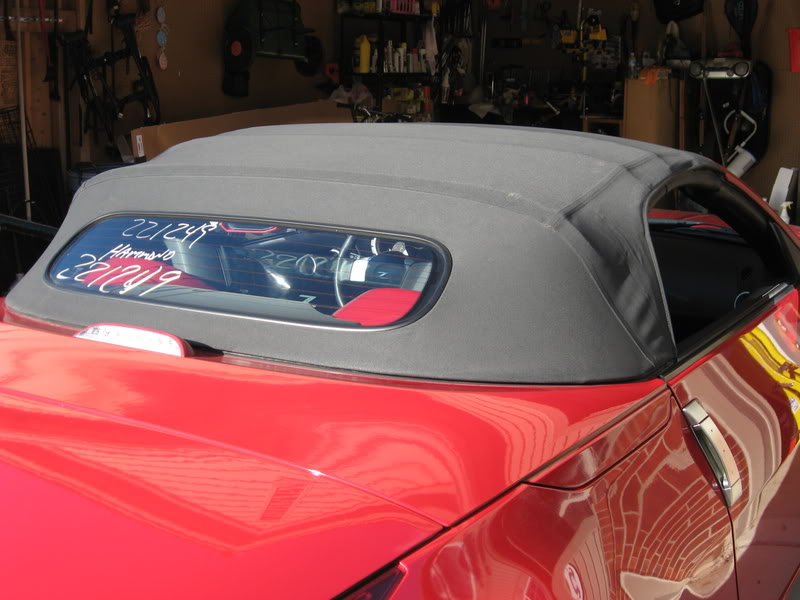
No rips!!!
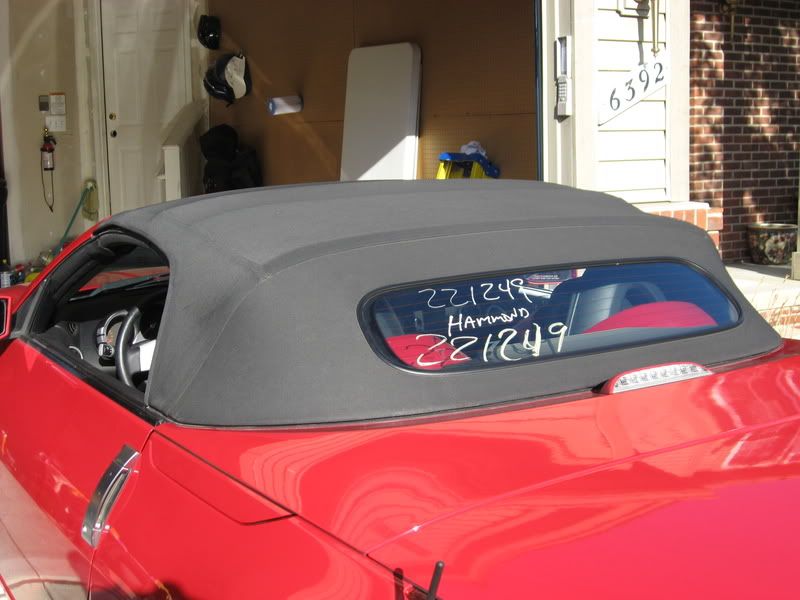
Not bad. A "used" top on the frame with bow motors for $500. (Off an '04 with 24k miles) A good deal in my book. Now I have extra bow motors in case one of these fail.
It took only an hour to do. In my case, I bought a used top already mounted to the frame and with the bow motors attached.
I didn't take enough pictures to make tutorial. Honestly, the tutorial we really need is attaching a new top skin to the existing frame.
Anyway, the top has to be removed either way so here are a few tips to make the process easier. (Stuff not mentioned in the service manual.)
Here's the old top.
The new top ...
Open the top so the tonneau is open and the rear window is fully up. Stop it short of having the front half of the top start to go up and fold.
1) Loose the rear end of the black plastic trip behind the aluminum kick plate in the door jam. Just pull upward.
2) Pull the door weather strip on the rear of the door jam. Just pull straight out on it. There's no glue or anything.
3) Pop open the trim on top of the seat belt anchor. Use a 14mm socket to remove the bolt.
(You don't have to do this but it helps when removing the rear side trim. That trim is easy to break so I advise you do this.)
4) With the weather strip and seat belt anchor removed, use a flat head screwdriver to pop off the side trim. These buttons break easy. To prevent this, stick the flathead at the base of two of the main buttons. You can see them where the weather stripping used to be.
5) Use a 12mm socket to remove two bolts from the front side of the hinge bracket. Remove the gold colored nut on the rear side of the hinge bracket in the top storage bay.
^^ Inside the top storage bay.
6) Use painter's tape to hold the trim flaps up. This will make installation much easier.
7) Look at the top of the picture. See the two bolt ends facing us? Remove these bolts. Keep the shims mounted on these bolts. Don't mix them side to side.
8) See the silver nut on the black stud (on the red bracket)? Remove this nut. (The service manual does not say this.) The stud is part of the black bracket behind the red bracket. Pry down the snap button under the trim behind the roll bar. (Sorry so confusing.) In short, you want to remove this bracket. That black stud will get in the way of removing the top.
9) Unclip all the electrical connections. (5 in total)
10) Use two persons to lift the top off. It weighs 132lbs and it's bulky. Reverse the removal for installation.
Here's the top installed. Woo-hoo. No more ghetto patch duct tape.
No rips!!!
Not bad. A "used" top on the frame with bow motors for $500. (Off an '04 with 24k miles) A good deal in my book. Now I have extra bow motors in case one of these fail.
Last edited by Phreakdout; Oct 4, 2008 at 04:00 PM.

Trending Topics


thats the best way of changing a top. if you wanted to do just the canvas..well lets just say its pain in the  .. your new top looks great! did you need to just any adjustments for air/water leaks?
.. your new top looks great! did you need to just any adjustments for air/water leaks?
Thread Starter
Registered User
iTrader: (32)
Joined: Apr 2008
Posts: 2,115
Likes: 0
From: Ann Arbor, Michigan
No adjustments made. I tightened the front hinge bolts first which pulls the top outward till the outside edge of the top sits flush with the indentation in the old weather stripping at the door jam.
Then I tightened the one gold nut in the storage bay and lastly the two bolts on the red (body colored) bracket.
So far, no leaks. The windows sealed well. No abnormal noise at highway speeds.

Registered User
Joined: Oct 2008
Posts: 1
Likes: 0
From: Temple, TX
I was searching the internet for 350Z top issues and happened upon your post. So I registered onto the forum. I have an '04 roadster and just discovered a rip in the top but on the drivers side. Did you ever figure out what might have caused the rip? Is it just the fact that the top is 5 years old and dried out? I'm trying to work with the local dealer, but I don't want to spend $3,000 to get the top replaced. I don't think the top should rot out after only 5 years.
I'm new to the forum, so please correct me if I make any mistakes while I'm here.
Thanks
I'm new to the forum, so please correct me if I make any mistakes while I'm here.
Thanks
Thread Starter
Registered User
iTrader: (32)
Joined: Apr 2008
Posts: 2,115
Likes: 0
From: Ann Arbor, Michigan
I was searching the internet for 350Z top issues and happened upon your post. So I registered onto the forum. I have an '04 roadster and just discovered a rip in the top but on the drivers side. Did you ever figure out what might have caused the rip? Is it just the fact that the top is 5 years old and dried out? I'm trying to work with the local dealer, but I don't want to spend $3,000 to get the top replaced. I don't think the top should rot out after only 5 years.
I'm new to the forum, so please correct me if I make any mistakes while I'm here.
Thanks
I'm new to the forum, so please correct me if I make any mistakes while I'm here.
Thanks
I'm honored that your search engine found my post. LOL
I'm not aware of Nissan admitting this is a problem. To me, the material in this area is very soft. Esp when hot. The cause could be anything.
> I used a convertible top cleaner by armor all before the rips appeared.
> The wife took my car through a "touchless" car wash. Perhaps the water jets started it.
> The rips are always in the same spots, so perhaps the defroster wire behind the top is wearing the material everytime the top is folded.
If someone finds a TSB that will cover cars out of the bumper to bumper warranty, you will be hero for the year.
Let us know how the dealer conversation goes. As for replacing it yourself, you should consider a used top already mounted to the frame. Reskinning the top will take a huge amount of time and effort. I even considered how I can work this so a little accident claim on the comprehensive insurance can cover it. But I didn't go the dishonest route.


Registered User
Joined: Mar 2013
Posts: 5
Likes: 2
From: sydney
1st of all, Welcome to my350z!
I'm honored that your search engine found my post. LOL
I'm not aware of Nissan admitting this is a problem. To me, the material in this area is very soft. Esp when hot. The cause could be anything.
> I used a convertible top cleaner by armor all before the rips appeared.
> The wife took my car through a "touchless" car wash. Perhaps the water jets started it.
> The rips are always in the same spots, so perhaps the defroster wire behind the top is wearing the material everytime the top is folded.
If someone finds a TSB that will cover cars out of the bumper to bumper warranty, you will be hero for the year.
Let us know how the dealer conversation goes. As for replacing it yourself, you should consider a used top already mounted to the frame. Reskinning the top will take a huge amount of time and effort. I even considered how I can work this so a little accident claim on the comprehensive insurance can cover it. But I didn't go the dishonest route.
Sorry to wake a dead post.
The rips are cause by the weight of the rear glass. The length of the rear glass is held by material and once the material that holds up the window fails, the window sags down a little further. What happens is when the roof opens up and in the vertical position, the window is pushed up because the material used to hold down the window has failed. The tension is enough to tear.
The material that holds the glass, usually fails on one side first. The side that fails will be the side that rips first. After a few more folds, the other side will sag and both sides will rip.


Thread
Thread Starter
Forum
Replies
Last Post
350Z_Al
Exterior & Interior
133
Oct 29, 2020 07:44 PM
Vigman
Maintenance & Repair
17
Nov 17, 2015 04:34 AM