
Amp Rack


Hey, anyone have the dimensions for the zenclosure amp rack?
I asked a rep if I can buy one and the shipping cost more then the actual ramp lol. Rather build it myself, could save majority of the money.
I just need the dimensions of it and also the base it should have since my under the strut box doesn't have the extension in the back.
Any insides would be appreciated

Registered User
Joined: Jun 2012
Posts: 189
Likes: 0
Zenclosures has 3 amp racks. One is a flat piece of wood measuring 20 by 11.5"
The second is a flat piece of wood measuring 20 by 13, with 2.5 or 3 inch legs
The third is essentially the same as the second, only missing one leg and the other moved over a few inches.
Their "amp racks" are extremely simple and depending on where you want to put it you could just measure the area yourself along with your amp to make sure it will fit.

I tried that originally, but in the California heat my amp overheats and wont turn on until it cools down when I'm driving. Roughly 20 min or so
Registered User
Joined: Jun 2012
Posts: 189
Likes: 0
Ohh I gotcha. I was always under the impression of that piece of wood was part of the sub box itself, not an amp rack. I thought it was for a box that instead of going under the strut bar went behind it.
Using all that space just for an amp is such a waste though, just screw the amp into the back of your under strut box and let it be. You also talked about it overheating if it was in the stock bose location, however if you've looked in there there's a TON of space! If they were going in the glove box I could understand, but its at least as big as the space you would be covering up with that "amp rack" (if that's what it really is), and since you're covering it the AC isn't going to help it, so there's not much advantage there.
Using all that space just for an amp is such a waste though, just screw the amp into the back of your under strut box and let it be. You also talked about it overheating if it was in the stock bose location, however if you've looked in there there's a TON of space! If they were going in the glove box I could understand, but its at least as big as the space you would be covering up with that "amp rack" (if that's what it really is), and since you're covering it the AC isn't going to help it, so there's not much advantage there.
I agree with you on the wasting space, but if you think about it there's not much you can put there if you have a box there anyways.
I'm going to drill the amps on top of the rack not under it

Plus even if i decided to put it back in the stock bose location I have 2 amps now, decided to save money and bought a 4 channel and a 2 chanel rather than buying a 5 channel lol, so there wont be enough room regardless

Never understood why people would put their amps on a sub box and expose it to all that vibration; can't be good on all the electronics and solder joints.
I'm building an amp rack like the one above with 1/2 MDF, it's supporting two DLS amps A3 - A6. Don't close off the opening and attach a good 12v Lg cooling fan from the computer shop, then mount it to the metal bose sub bracket. Use a relay and the amp remote on to turn the fan on and off. It will pull the hot air out or reverse it and suck the cool air in from the cabin through the sub trim panel holes.
I'm building an amp rack like the one above with 1/2 MDF, it's supporting two DLS amps A3 - A6. Don't close off the opening and attach a good 12v Lg cooling fan from the computer shop, then mount it to the metal bose sub bracket. Use a relay and the amp remote on to turn the fan on and off. It will pull the hot air out or reverse it and suck the cool air in from the cabin through the sub trim panel holes.
Last edited by coanan; Aug 16, 2012 at 11:48 AM.
Trending Topics
The amps can either be placed under or on top of that


Yeah I saw that, honestly don't really like how it looked tho. I had a design set out to create my own box to save most space. Since I have no idea on building boxes I went to a few audio shops, each wanted about $900 to build the box.

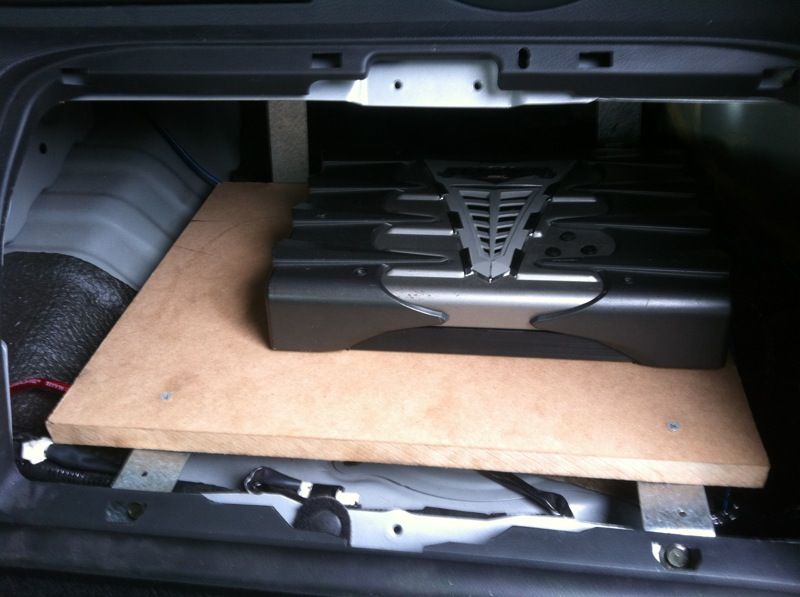
This is what I am working on now (as you can see from all the sawdust on the panel (Lol).)
Almost done though. I had a Zenclosure amp rack before but was not happy with how the wires to the back of the amps were exposed. So I cut a base shape similar to the Zen rack on a 1/2 inch MDF. I did not need that to be perfect since is is not visible (One side is shown in the last pic). I cut out the shapes for the amps and attached slabs on the edges to hold the amps. It does not sit on the sub box. I attached it to a bracket I bolted to the floor using the existing threaded holes on the floor ( one is for the child seat strap thing). The reason I cut out was to provide 1/2 inch drop for the amps and ended up with some "kind" of ventilation under the amps (if any lol). The top pieces are also of 1/2 inch MDF. I went with 2 pieces instead of one piece for easy install and removal. Right now they are just sitting on and not secured. That little gap you see on the edge where it meets the strutbar vanishes when secured. I plan on finishing with some plexiglass and LED lights. Not one of the nicest installs but I like it better than it was before


Almost done though. I had a Zenclosure amp rack before but was not happy with how the wires to the back of the amps were exposed. So I cut a base shape similar to the Zen rack on a 1/2 inch MDF. I did not need that to be perfect since is is not visible (One side is shown in the last pic). I cut out the shapes for the amps and attached slabs on the edges to hold the amps. It does not sit on the sub box. I attached it to a bracket I bolted to the floor using the existing threaded holes on the floor ( one is for the child seat strap thing). The reason I cut out was to provide 1/2 inch drop for the amps and ended up with some "kind" of ventilation under the amps (if any lol). The top pieces are also of 1/2 inch MDF. I went with 2 pieces instead of one piece for easy install and removal. Right now they are just sitting on and not secured. That little gap you see on the edge where it meets the strutbar vanishes when secured. I plan on finishing with some plexiglass and LED lights. Not one of the nicest installs but I like it better than it was before
Last edited by beezee; Aug 19, 2012 at 06:22 PM.
This is what I am working on now (as you can see from all the sawdust on the panel (Lol).)
Almost done though. I had a Zenclosure amp rack before but was not happy with how the wires to the back of the amps were exposed. So I cut a base shape similar to the Zen rack on a 1/2 inch MDF. I did not need that to be perfect since is is not visible (One side is shown in the last pic). I cut out the shapes for the amps and attached slabs on the edges to hold the amps. It does not sit on the sub box. I attached it to a bracket I bolted to the floor using the existing threaded holes on the floor ( one is for the child seat strap thing). The reason I cut out was to provide 1/2 inch drop for the amps and ended up with some "kind" of ventilation under the amps (if any lol). The top pieces are also of 1/2 inch MDF. I went with 2 pieces instead of one piece for easy install and removal. Right now they are just sitting on and not secured. That little gap you see on the edge where it meets the strutbar vanishes when secured. I plan on finishing with some plexiglass and LED lights. Not one of the nicest installs but I like it better than it was before
Almost done though. I had a Zenclosure amp rack before but was not happy with how the wires to the back of the amps were exposed. So I cut a base shape similar to the Zen rack on a 1/2 inch MDF. I did not need that to be perfect since is is not visible (One side is shown in the last pic). I cut out the shapes for the amps and attached slabs on the edges to hold the amps. It does not sit on the sub box. I attached it to a bracket I bolted to the floor using the existing threaded holes on the floor ( one is for the child seat strap thing). The reason I cut out was to provide 1/2 inch drop for the amps and ended up with some "kind" of ventilation under the amps (if any lol). The top pieces are also of 1/2 inch MDF. I went with 2 pieces instead of one piece for easy install and removal. Right now they are just sitting on and not secured. That little gap you see on the edge where it meets the strutbar vanishes when secured. I plan on finishing with some plexiglass and LED lights. Not one of the nicest installs but I like it better than it was before

Thread
Thread Starter
Forum
Replies
Last Post
m_0g
Audio, Video & Electronics (DIY)
12
Jun 3, 2021 10:05 AM
bcoffee20
Zs & Gs For Sale
5
Nov 19, 2015 06:39 PM
dragon11689
Brakes & Suspension
2
Sep 7, 2015 02:47 PM