When you click on links to various merchants on this site and make a purchase, this can result in this site earning a commission. Affiliate programs and affiliations include, but are not limited to, the eBay Partner Network.
Hello Fellow 350Z enthusiasts! I'm creating this thread as a method of documenting my take on upgrading from the OEM Non-Bose system (2006 Enthusiast Coupe) to a modern DD Touchscreen radio with features that most users would be happy with. Such as backup camera, wireless carplay, Sirius XM, and high-res audio support. I wish I took more pictures of the entire process, but I think I covered the most important points. I will also list out all the hardware & accessories I'm using for the infotainment upgrade. I hope some of you find this information helpful. I did a lot of research before starting the install and I hope that this will help add clarity for those less familiar with the 350Z.
A quick note about my installation philosophy. My Z is primarily a daily driver/commuter and I want to maintain the best of both performance/function and aesthetics. A huge subwoofer adding weight and taking up space in the trunk isn't my style. I also don't require the power of a discrete amplifier. I went through that phase in my youth and got it out of my system shall we say? My goal with this upgrade is to improve overall sound quality based on my listening preferences, while keeping modifications to the factory wiring and interior at a minimum. In short, everything I'm installing is easily reversible, no permanent modifications are being made. The aesthetics of the install also need to blend in with the OEM interior. This means no large panel gaps, clashing colors, or new appendages slapped on the dash.
Starting with the hardware & accessories.
1) Kenwood DMX908S (Double Din Touchscreen Radio)
2) SiriusXM SXV300V1 Tuner
3) Axxess ASWC-1 (Steering Wheel Control Adapter)
4) HDMEU "Amazon Special" Backup Camera for Nissan's (integrated with lic plate bulb lense)
5) Metra 70-7550 Receiver Wiring Harness
6) Metra 72-7401 Speaker Wiring Harness (Front)
7) Metra 72-7400 Speaker Wiring Harness (Rear)
8) Focal ASE 165 S (Front Component, slim design)
8) Focal ACX 165 (Rear Coaxial, standard depth)
10) Stinger Roadkill RKFR6 FAST Rings
11) American International NDK744 Dash Kit (For faceplate bezel)
12) Boom Mat (Sound/Vibration insulation)
13) Miscellaneous items - solder, heatshrink, crimp terminals, wire sheathing, tessa tape, electrical tape, zip-ties, velcro, etc.
I purchased most of these items from Crutchfield. Their support is legendary and their prices/selection are excellent. The only items I had to procure elsewhere were the Backup Camera, Dash Kit, Boom Mat, and miscellaneous items.
The Plan...
If you've been following my Z refresh updates in the "What have you done to your Z..." thread, then you will know that I've spent a considerable amount of time and effort repainting all the interior pieces that have the garbage OEM paint (I have a 2nd set of pieces). That work is complete. Because installing the new sound system requires the removal of said pieces, I'm tackling both at the same time. To keep things organized, I'm breaking the installation down into two phases.
Phase-1 covers installing the headunit (Kenwood), backup camera, mic, gps, & sirius receiver. . Also includes replacing dash pieces I repainted (center waterfall, shifter bezel, gauge cluster).
Phase-2 covers installing the front and rear speakers, adding the fast rings and insulating the doors and rear speaker boxes. Also includes replacing the door card pieces I repainted (switch bezels & ac vent bezels).
I just finished Phase-1. So let's get into it.
I started with building my wire harness adapter. Crutchfield provides a very easy to follow wiring chart that's color matched based on your radio selection and vehicle. This covered about 85% of the wiring and the process went smoothly. I don't like butt connectors, so I soldered everything using high quality Kester and shrink tubed it all. Things started to get interesting when it came to the Axxess steering wheel adapter, although this goes against the Axxess' instructions, I chose to deploy Posi-taps rather than direct splicing (5 wires total, 3 of which are for the ASWC-1). I chose Posi-taps because they are very reliable, easy to install, and easy to remove without cutting/hacking the factory wiring.
After I had most of the wire harness work done, it was time to start dismantling the interior. I started with removing the main gauge cluster, followed by removing the shifter bezel and center waterfall. The center waterfall can be a pain since the OEM radio comes out with it as one solid piece. There's not much slack on the OEM harness, so make sure you cover up the shift **** to prevent scratching/damaging things while you fight to unplug the harness. After the main waterfall is out, I recommend removing the Unified AC Amplifier box (computer box with large ribbon cable that mounts underneath the radio). Removing this piece makes it much easier to gain access to the VSS wire and test fit the new radio while you plan your wire routing.
Next, I removed the lower dash panels on the driver side. I needed access to the M12 harness on the driver's side and my wire routing for the backup camera and mic was done on the passenger side. I also needed to connect up my USB-A pass-thru port from the Scosche adapter I installed last year, to the Kenwood USB port. I covered this in another thread, but in short, I replaced the passenger lower dash 12V outlet with the Scosche adapter, the USB data cable on the adapter has simply been tucked away waiting for the new stereo. For this phase, I decided to wait on removing the passenger dash panels, I was more interested in making sure my backup camera worked before I started routing the wiring.
Once those panels were out of the way, it was time to do a "dry run" with the new Head unit. I’m glad I did! I quickly discovered that both the backup camera and the ASWC-1 were not working. After some quick troubleshooting, I discovered one of the bullet style crimps for the 12V+ to the camera was flakey and that a few of my Posi-Taps for the steering wheel control wires failed to pierce! Both cases came down to user/installer error and were easily resolved. Another test run after corrections and I had picture from the camera and started getting programming responses from the ASWC-1. Head Unit - Wiring test.
My thoughts on the Axxess adapter. It’s a good unit, it works very well and installation from a wiring standpoint is straightforward. The programming instructions could be better. I discovered quickly that the software utility for upgrading the firmware doesn’t program the button inputs/mapping, it’s strictly for changing the function bindings, meaning you still need to go through the manual button or key assignment process. Because I’m mentally challenged, this took me about an hour to figure out what I was doing wrong. I read the instructions, but missed a crucial piece of information when it comes to key assignments. Lesson learned (again!), read the instructions fully and thoroughly, don’t use the Cliffs Notes version! SWC Posi-taps on factory harness 3.5mm jack from Axxess to Kenwood. The Axxess ASWC-1 brainbox and main wiring.
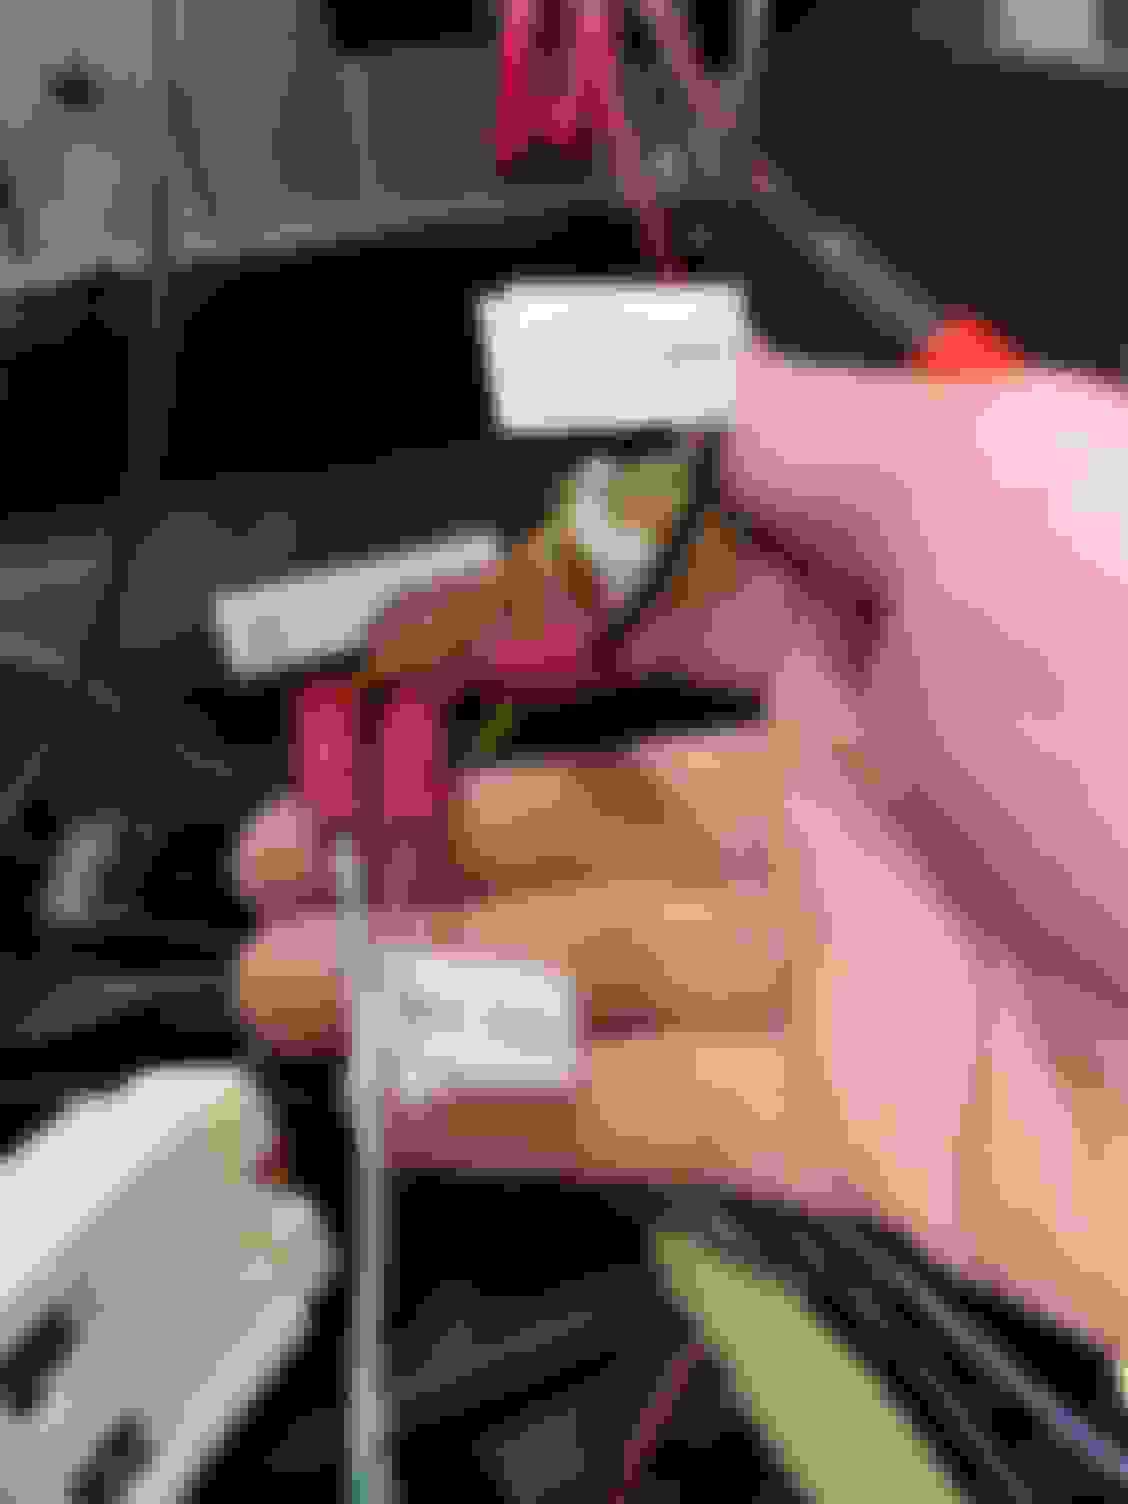
For the GPS and SIRIUS receivers, installation worked nicely. I routed these to the factory location Nissan used if you had a NAV equipped 350Z. The OEM gps location sits in the dash, forward of the main gauge cluster. The top dash piece on the driver’s side is removable and exposes the factory mount location. I re-used this little shelf area for both. I put the gps slightly closer to the driver and the Sirius receiver closer to the windshield glass (see pic). It’s a perfect location. It’s well hidden, still receives solid signal, and routing the wiring is a breeze. I had always assumed that the NAV equipped Z33s had the antenna on the roof (shark fin). Side note, while working in this area, I discovered the driver’s side dash was slightly loose, the root cause was the main bolt securing the upper dash. These dash bolts have a built-in spacer, similar to many valve covers bolts, this design prevents over torqueing and breaking things. Overtime, I guess the dash plastic yielded. I added a thin washer to tighten things back up, no more dash movement on the driver’s side (YAY!). GPS & SIRIUS antennae location. Also the problem bolt on the left side.
I need to break for dinner now, so I’m going to continue this in another post.
Stay tuned!
Cheers!
-Icer
Following up from where I left off in my last post...
After verifying all the wiring was good, it was time to start routing the Backup camera. To keep things brief, I basically followed AnthonyJ350's advice and ran the cable under the hatch weather stripping (passenger side), up to the B pillar cover, then headliner, and down the A-pillar into the dash where I latched onto the main dash harness that routes above the AC Blower box and comes down right next to center waterfall/radio. It was pretty easy and straightforward, I think the hardest bit was fishing the wiring through the trunk grommet and then up to the license plate bulb area. I used a very long zip-tie taped to the camera wiring. How the camera looks with the integrated license plate bulb/lens. Interior camera wires, these were Tessa Taped and zip-tied to the OEM harness before routing to the forward dash.
After the camera routing was done, started running the mic. Since I have a homelink mirror, I piggy-backed off the mirror's wiring harness cover. I modified the microphone mount so I could double-sided tape it to the OEM mirror harness cover. This looks very clean and is totally reversible if desired. The mic is barely noticeable and blends in very nicely with the black harness cover, mirror frame, and black etching at the top of the windshield. I routed the mic cable just behind the edge of the headliner (as far as I could get it) over to the passenger A-pillar where it met up with the backup camera cable. I used some stick on wiring clips and PET sheathing to bundle and secure both cables together. This not only looks super clean, but will prevent loose wiring from rattling. (sorry no pics, but I'll try to rectify this in a future edit).
With the mic and camera out of the way, I needed to properly route & tap the Reverse Switch Wire from the radio (4th wire tap). This seemingly simple task gets complicated because of conflicting information on the interwebs about the wire's location and color code under the driver's side dash. In the end I decided to refer to my factory service manual for the truth and I discovered the reasons for the confusion. My Crutchfield wiring guide stated that I needed to look for an orange wire above the driver side interior fuse box. There was also a note stating that the wire could also be a light green color. So I have a somewhat vague area to look and two different colors, this isn't very helpful when you consider there's a ton of wiring at the fuse box and BCM.
After much jumping around in the FSM, I was able to make sense of it all. The reverse switch wire starts from the PCM, it is Orange and routes across the main dash harness from the passenger side over to the driver's side, where it terminates at pin 75J on the M12 harness plug (see picture). M12 - PIN 75J - Orange Wire
The mating harness plug is noted in the FSM as B1 (see pic), also a white plug, and also pin 75J. This Body harness splits off to multiple interior locations and eventually runs to the rear of the vehicle. This is where the wire color changes from Orange to Light Green. Since I've wired my backup camera to be powered on 100% of the time (accessory/ignition power only), thus allowing me to switch to a live rear video feed anytime I want (like a towing/trailer camera), I did not want to grab the +12V power off the Light Green wire at the trunk. I only needed the 12V+ reverse switch signal at the headunit so that when I put the Z in reverse, the screen automatically switches to the camera view. Doing it this way also meant I didn't need to run another wire from the headunit, back to the trunk. Just a short 3-4ft run to the M12 harness under the driver's side dash. This harness is easiest to access if you remove the lower dash panel under the steering column, just be careful when disconnecting the hood release cable. The harness is bolted and clipped to a mount against the sidewall (see pic). B1 - PIN 75J - Light Green Wire
M12 and B1 mating location. M12 is upper plug, B1 is lower plug with release latch. Notice the Posi-Tap on the orange wire!
I hope this clarifies things with the reverse switch wire once and for all and helps someone else!
The next & final (5th) wire tap that I needed to make was at the VSS (Vehicle Speed Sensor) wire. My Kenwood radio uses the VSS signal to more accurately calculate map location and eta when using GPS via wireless carplay. It's not 100% necessary, but since the VSS wire is literally located right underneath the headunit, why not hook it up!? The VSS wire is on pin 26, on the M49 harness. This plug is the smaller gray plug on the back of the Unified Meter & Amplifier (computer box under the headunit). The VSS wire on pin 26 is the only white wire on this plug. (sorry, no picture this time).
With all the wire taps done, and major cable routing done, I spent a considerable amount of time dressing everything down with wire sheathing, zip-ties, velcro, tessa tape, etc. I don't want any rattles from the wiring, I don't want anything getting pinched or kinked either. I also want to keep things easily accessible, so I made sure there's enough slack to the head unit should I ever need to pull it out in the future. Unfortunately, I had my hands full during this portion of the install, so I don't have any pictures of the wiring job behind the radio. But the end result is very clean. I used velcro to secure the SiriusXM receiver and Axxess ASWC-1 to the rear plastic wall behind the headunit. I kept the bulkier parts of the wiring tucked away from the Kenwood's rear cooling fan. The ground wires were routed to the dash support frame, this is the large steel tube frame that runs directly behind the triple gauge pod. Nissan was kind enough to machine two holes into it, I simply enlarged the holes and then tapped them for the standard M6 bolt thread that Nissan uses everywhere for electrical grounds. I grabbed a spare zinc plated M6 bolt from my parts bucket (came from my old Z) and used that in conjunction with my ring terminals. It works great. no issues. Nissan already uses this tube frame as a main ground for the dash harness, so if it's good enough for Nissan's engineer's, then it's good enough for me.
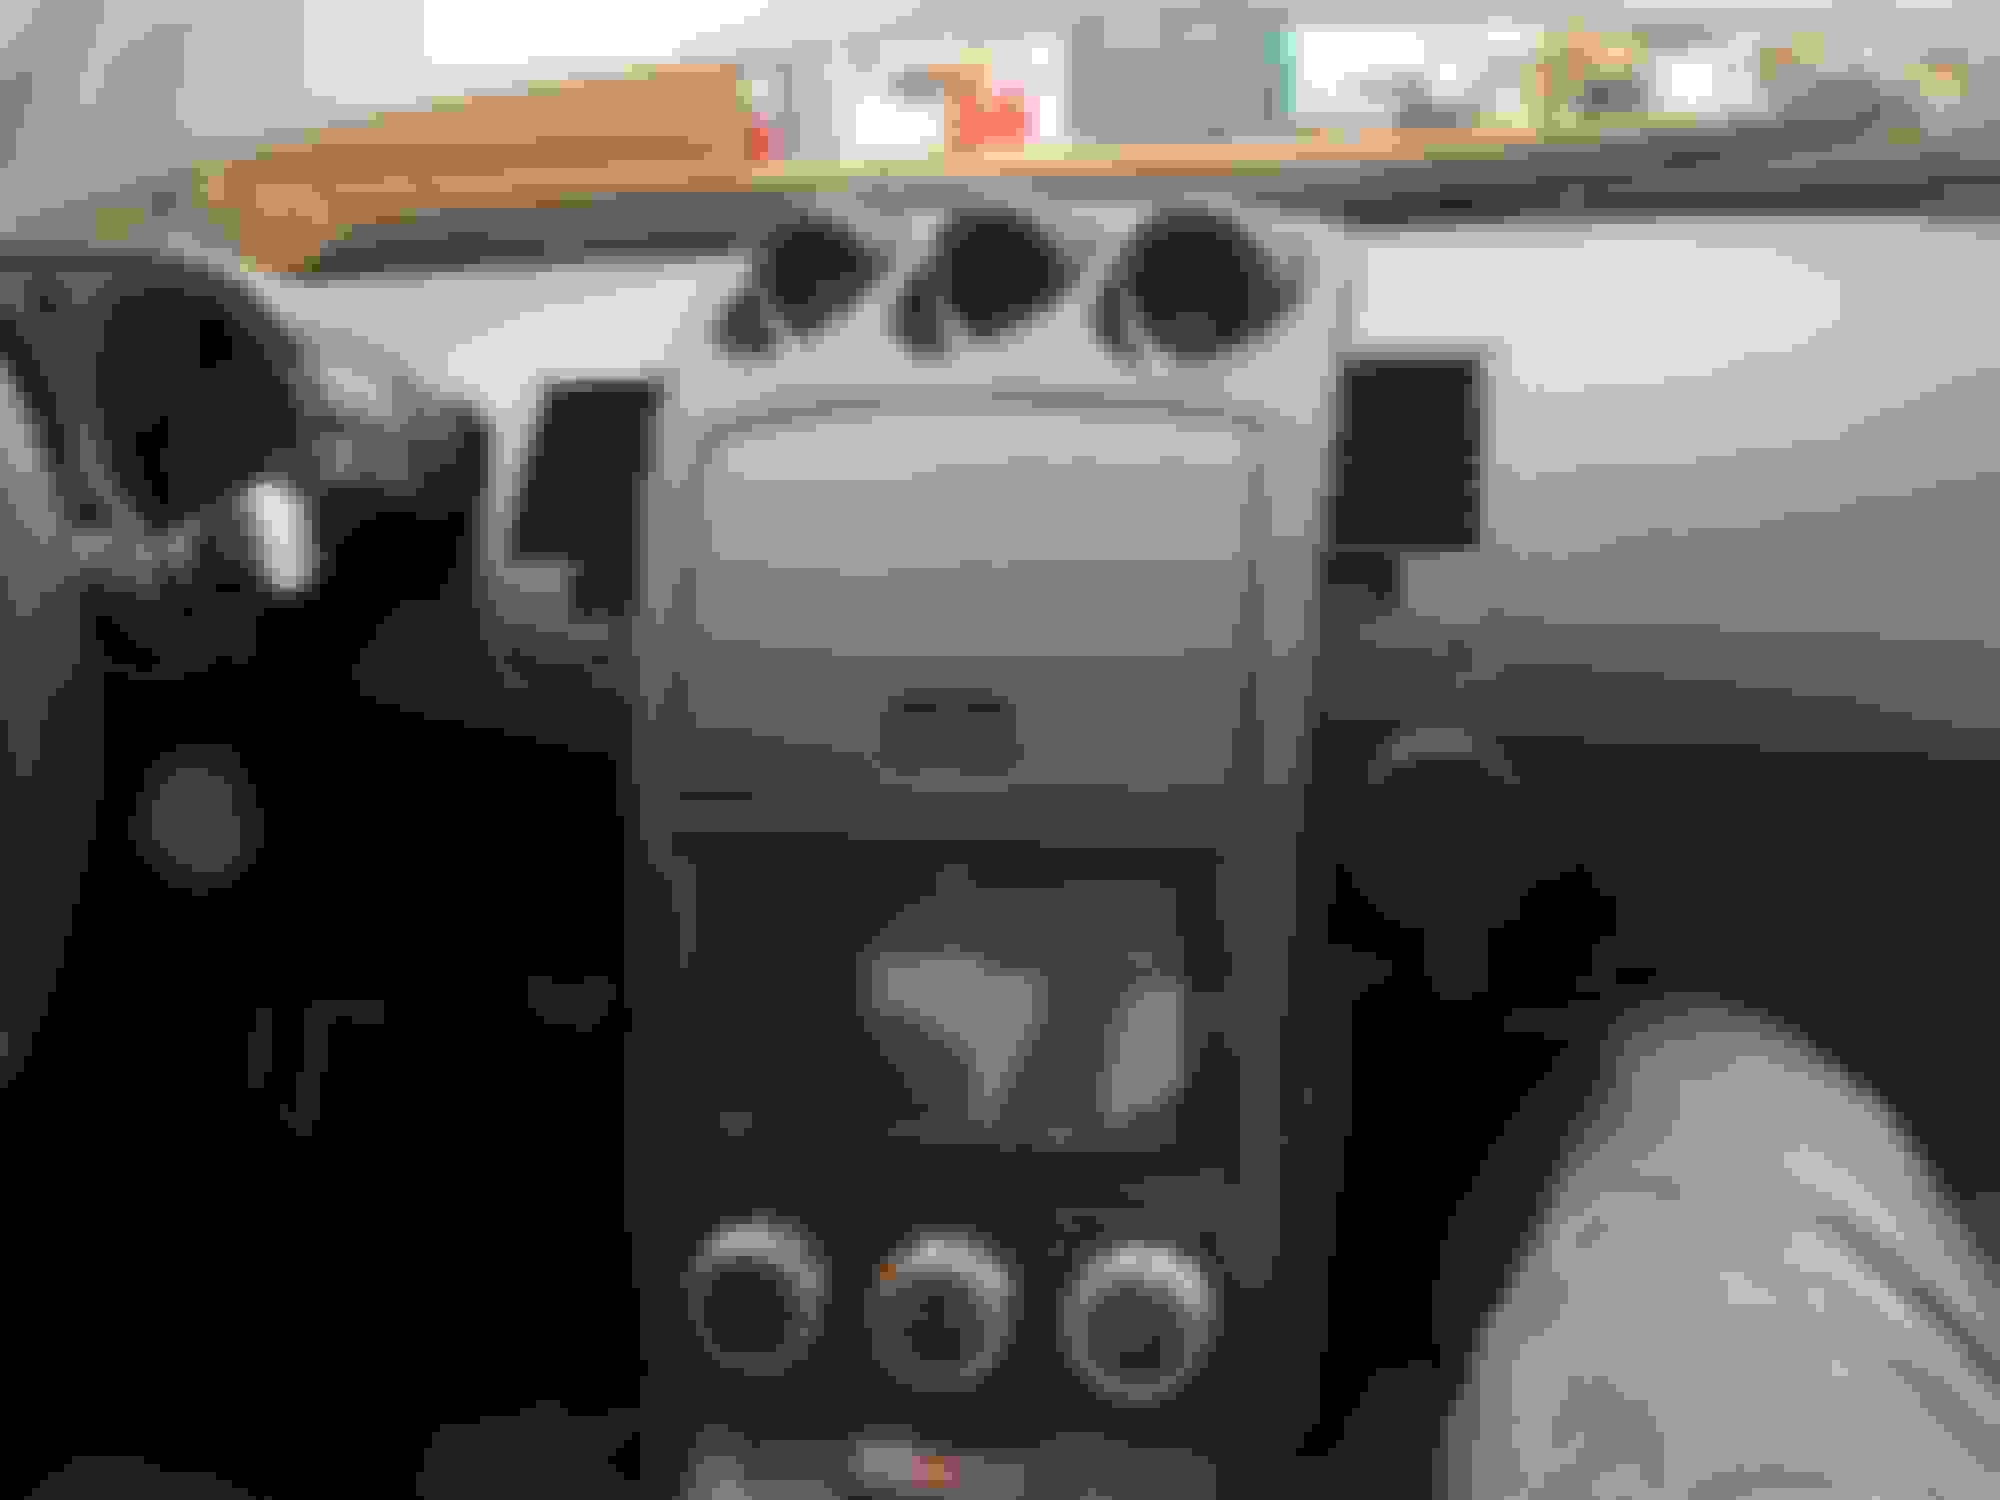
I think the end result speaks for itself. The freshly painted center waterfall and shifter bezel, along with the freshly painted main gauge cluster furniture really make the dash look clean next to the new Kenwood unit. I really like the fit and finish of the American International double din bezel. Crutchfield had included a Metra adapter kit with the order, but after test fitting it, I hated it. The panel gaps were terrible and the piece was very flimsy. Do yourself a favor and purchase the American International kit, just for the double din bezel. For the radio support brackets, I re-used the OEM metal brackets & simply trimmed off the front facing mounts the factory radio used. The OEM brackets lined up perfectly with the Kenwood, even the OEM screws were a complete match, no additional modifications were necessary.
Phase-1 Complete, looking good! Closer view of the flush install and clean panel gaps.
I'm sure I missed a few details here and there. I'll try to fill in gaps or snap a few more pictures as I continue on with Phase Two in the coming days/weeks. Feel free to ask questions or comment.
Cheers!
-Icer
Very nice! Looks super clean and way better than a tablet install. Extremely detailed write-up (as is expected from the likes of you). I've always had good luck with Kenwood. I'm still using a Kenwood DDX773BH in my Z that I got back in 2016. I also have a similar back-up camera that is integrated into the license plate bulb housing.
A few things I forgot to mention. After some tinkering with the Kenwood, I learned quickly that my rear right factory speaker is completely dead and my rear left sounds very weak, so it's a good thing I'm upgrading to the Focals. After I finished installing the headunit and getting my dash back together, I took the Z out for a short spin to test the signal integrity of the SiriusXM receiver and GPS. I'm happy to report both are working flawlessly, I didn't have any signal drop-outs or glitches regardless of which direction (North, East, South, or West) I was traveling. The backup camera works exactly as I was hoping/planning and my steering wheel controls are all working great.
A few oddities I wish I knew about the Kenwood before purchasing, these are minor but still worth mentioning...
1) If you hold "Volume Up" on the steering wheel control, it stops when it hits level 15. To increase volume further, you have to release and tap (one level at a time!). I've never experienced this type of volume safety mechanism before on any brand stereo in the past. I think this is a very poor user experience choice by JVC/Kenwood, and there should be a setting to disable this feature, unfortunately, none such option exists yet.
2) Once Carplay connects to the Kenwood and the Apple Homescreen is displayed, if I use the "mode button" on the steering wheel to switch audio sources (to SiriusXM for example), the display of the touchscreen sticks to the Apple Homescreen. I have to use the main menu button on the touchscreen to transition away from Carplay. I suspect this is by design in case you want to watch your GPS/Map location while listening to your favorite tunes regardless of source. I suppose if the Z had more audio steering wheel controls to program, this wouldn't be an issue. Unfortunately, the Axxess adapter doesn't support duplex button programming (pressing two buttons at once). If it does support this, I have yet to figure out how to make it work
Overall I'm still a newb with the Kenwood, I haven't played with the user interface and settings much yet as I didn't want to kill the Car's battery. Side note about the battery, because of the paint project and stereo project, the Z has been sitting in my garage for about a month without being driven. I was genuinely concerned about the battery's health. So I purchased a Topdon TB6000Pro (Smart Battery Charger/Tester). I hooked this up to my battery and let it run all day Sunday and overnight into Monday morning. When I 1st checked the state of health on my battery it was reading 25% @ 11.6V (NOT GOOD). After charging for nearly 24 hrs, it's back to 100% @ 13.1V. I have an Interstate AGM battery (650CCA) in the Z right now, it's less than 2 years old, and I would really hate to see it damaged because the Z spent to much time undergoing improvements/upgrades.
Anyway, I think this charger/tester is great despite some quirks with Bluetooth connectivity (doesn't always reconnect when you leave and come back hours later to check status). Not sponsored or anything, I simply think this is a versatile product with excellent value for the price. Really great for the home user.
Good feedback for others with steering wheel controls. I don't have them, so I never noticed the "quirks" that you mentioned.
My go-to charger/maintainer is a Clore Automotive/Pro-Logix PL2320. I think I got turned on to that one needing a stable source of clean power when doing different repairs/diagnostics requiring the the vehicle to be on without the engine running. The interwebs seemed to like that one.
Very clean install, looks great!!
I made the mistake of buying a thirdparty head unit - only to find out afterwards that it did not support wireless carplay , ended up getting an adapter which thankfully solved the problem.

 08-12-2024, 08:33 PM


 , ended up getting an adapter which thankfully solved the problem.
