
HeadlightArmor DIY Guide for Smoking your Tails

Thread Starter
Registered User
Joined: Oct 2005
Posts: 43
Likes: 0
Hello from the folks at HeadlightArmor! We are a brand new sponsor here on my350z.com. While there are other tutorials for installing a �Smoked Taillight� kit, if you have gone with or are interested in our premium kits it is very important to follow our installation guidelines as using other methods may result in a sub-optimal install or worse.
Smoking your tails is a popular DIY project and with our pre-cut kits, a pretty straightforward install. Although the 350Z has one of the longest taillights our there, they are one of the easier installs given their very gentle curves.
There are a wide variety of materials being used today and each has its own preferred application method. Depending on what the material is made from you will see a variety of processes needed for installation. The most important tip I can offer is to follow the instructions for whomever's product you go with. These steps are specifically designed to work with our film. HeadlightArmor uses a different material than most and thus require a different application process. If you use a different process your results may vary.
Items required not included with our kit.
-Clean spray bottle (plant mister works great) fill with just plain old water � hot water if it is cold out.
-Sharp razor knife
-Cleaner for your lights
-Clean lint free towels
-Patience and a positive attitude
-Your car of course LOL
Step .5 � unroll the kit and lay out in a sunbeam to help with handling later on.
First off, clean everything, your lamps, the area around them (open hatch and clean the inside edge too), your hands etc. Installation is best preformed out of the wind in a clean, calm and well-lit area. For the 350Z tails installing with the hatch open is probably a little easier - just didn't look good for the photos. The film is much happier when warm - 80-90 is a nice sweet spot. If you are working in a hotter environment (we are in TX sun) the adhesive is a bit more sensitive - it is more pliable but the adhesive is a bit more sensitive (pressure sensitive). If it is cool gentle warming with a hair dryer works wonders. You don't want to go wild with the heat; if the film is too hot to touch it is too hot.
After cleaning everything - Without removing the lens cover from the backing paper hold it up to the lens and make sure you have the correct side and the correct orientation. Wet down one lens with water.

Wet down your hands and peel the kit part way off the backing paper (hold the edges with wet hands or the handling tabs) and mist with water. When the piece is off the backing paper mist down both the kit and the taillight and them place the piece on the taillight.

Handling the edges align the front portion of the piece - (right side of the above photo) then generally align the remaining edges. The piece will be 'floating' on the beads of water on the lens. Be gentle the adhesive is pressure sensitive. Align the outside edge and lower inner corner as shown below.

Now squeegee the 'front' corner as shown below (from left to right in the photo). You want to just squeegee the leading 3-4 inches from the forward most point, and no more at this time.

With your mister, mist down the surface of the kit. Now firmly squeegee from the front corner where you started diagonally along the centerline down toward the inside lower corner. In the photo you will squeegee firmly from 3 o'clock to 8 o'clock. Steps 5-6-7-8 really should be done in one firm motion � so it is important that you aligned the kit as best you could in the above steps.


Re-wet the outside of the kit and squeegee firmly from the centerline you just squeegeed toward the edge of the kit as shown.
NOTE: This kit was installed with ambient air temps ~75 degrees F and in the afternoon sun. If it is cool out the use of a hair dryer on low will be very helpful for steps 9-14.
Do not overheat the film; you just want to warm to about 90 degrees F.

Continue squeegeeing down from the center toward the outside edge.
Squeegee in .5 - 1.0 inch increments from left to right to distribute the film around the curve as shown.

Continue in short firm strokes

Continue to the bottom of the kit.

Repeat the process in steps 9-12 on the top half of the kit as shown.
As noted earlier steps 13 and 14 are probably easier with the hatch open as the material curves down into the recess a bit.

Continue squeegeeing firmly into recess, being careful not to trap any water / air bubbles along the curve inward.

With a sharp razor knife carefully trim off the handling tabs. If you have any areas that are misaligned or overhanging you can either wrap the edge if it a flat surface or simply trim off the excess.
Go over the edges with a suede detail cloth / paper towel wrapped squeegee to make sure the edge is fully set. Gentle heat from a hair dryer on low can help things along if it is cool out.

Now you are done, stand back and enjoy!
If there are ant small bubbles or small wrinkles they will flatten out as the water evaporated from underneath the film and as the adhesive sets.
DO NOT WASH THE VEHICLE FOR 3 DAYS.

Oops, forget the cold one you need to do the other side!!!

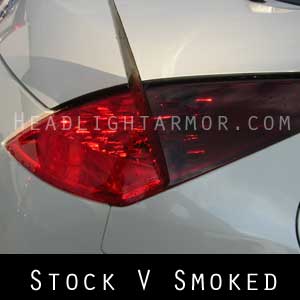
Now that they are done just refrain from washing the vehicle for a few days and you will good to go. A periodic wipe down with a high quality non-petroleum based vinyl conditioner will keep them looking good for years. The Standard Smoke (30%) covers shown in this tutorial will turn the bright red tails to a rich deep dark burgundy red. If you are looking for something darker you can select Stealth Smoke (20%). Unlike painting your tails these can be removed at some point if you or the next owner is so inclined.
You can remove these at some point in the future if you are so inclined - though they can only be used once.
While we do try and make our kits as 'installable' as possible we realize that even an easier kit can be harder than it needs to be if you install them from the seat of your pants. We hope the photos of the process were helpful, and please let us know if you have any questions about the process.
HeadlightArmor.com
Smoking your tails is a popular DIY project and with our pre-cut kits, a pretty straightforward install. Although the 350Z has one of the longest taillights our there, they are one of the easier installs given their very gentle curves.
There are a wide variety of materials being used today and each has its own preferred application method. Depending on what the material is made from you will see a variety of processes needed for installation. The most important tip I can offer is to follow the instructions for whomever's product you go with. These steps are specifically designed to work with our film. HeadlightArmor uses a different material than most and thus require a different application process. If you use a different process your results may vary.
Items required not included with our kit.
-Clean spray bottle (plant mister works great) fill with just plain old water � hot water if it is cold out.
-Sharp razor knife
-Cleaner for your lights
-Clean lint free towels
-Patience and a positive attitude
-Your car of course LOL
Step .5 � unroll the kit and lay out in a sunbeam to help with handling later on.
First off, clean everything, your lamps, the area around them (open hatch and clean the inside edge too), your hands etc. Installation is best preformed out of the wind in a clean, calm and well-lit area. For the 350Z tails installing with the hatch open is probably a little easier - just didn't look good for the photos. The film is much happier when warm - 80-90 is a nice sweet spot. If you are working in a hotter environment (we are in TX sun) the adhesive is a bit more sensitive - it is more pliable but the adhesive is a bit more sensitive (pressure sensitive). If it is cool gentle warming with a hair dryer works wonders. You don't want to go wild with the heat; if the film is too hot to touch it is too hot.
After cleaning everything - Without removing the lens cover from the backing paper hold it up to the lens and make sure you have the correct side and the correct orientation. Wet down one lens with water.
Wet down your hands and peel the kit part way off the backing paper (hold the edges with wet hands or the handling tabs) and mist with water. When the piece is off the backing paper mist down both the kit and the taillight and them place the piece on the taillight.
Handling the edges align the front portion of the piece - (right side of the above photo) then generally align the remaining edges. The piece will be 'floating' on the beads of water on the lens. Be gentle the adhesive is pressure sensitive. Align the outside edge and lower inner corner as shown below.
Now squeegee the 'front' corner as shown below (from left to right in the photo). You want to just squeegee the leading 3-4 inches from the forward most point, and no more at this time.
With your mister, mist down the surface of the kit. Now firmly squeegee from the front corner where you started diagonally along the centerline down toward the inside lower corner. In the photo you will squeegee firmly from 3 o'clock to 8 o'clock. Steps 5-6-7-8 really should be done in one firm motion � so it is important that you aligned the kit as best you could in the above steps.
Re-wet the outside of the kit and squeegee firmly from the centerline you just squeegeed toward the edge of the kit as shown.
NOTE: This kit was installed with ambient air temps ~75 degrees F and in the afternoon sun. If it is cool out the use of a hair dryer on low will be very helpful for steps 9-14.
Do not overheat the film; you just want to warm to about 90 degrees F.
Continue squeegeeing down from the center toward the outside edge.
Squeegee in .5 - 1.0 inch increments from left to right to distribute the film around the curve as shown.
Continue in short firm strokes
Continue to the bottom of the kit.
Repeat the process in steps 9-12 on the top half of the kit as shown.
As noted earlier steps 13 and 14 are probably easier with the hatch open as the material curves down into the recess a bit.
Continue squeegeeing firmly into recess, being careful not to trap any water / air bubbles along the curve inward.
With a sharp razor knife carefully trim off the handling tabs. If you have any areas that are misaligned or overhanging you can either wrap the edge if it a flat surface or simply trim off the excess.
Go over the edges with a suede detail cloth / paper towel wrapped squeegee to make sure the edge is fully set. Gentle heat from a hair dryer on low can help things along if it is cool out.
Now you are done, stand back and enjoy!
If there are ant small bubbles or small wrinkles they will flatten out as the water evaporated from underneath the film and as the adhesive sets.
DO NOT WASH THE VEHICLE FOR 3 DAYS.
Oops, forget the cold one you need to do the other side!!!
Now that they are done just refrain from washing the vehicle for a few days and you will good to go. A periodic wipe down with a high quality non-petroleum based vinyl conditioner will keep them looking good for years. The Standard Smoke (30%) covers shown in this tutorial will turn the bright red tails to a rich deep dark burgundy red. If you are looking for something darker you can select Stealth Smoke (20%). Unlike painting your tails these can be removed at some point if you or the next owner is so inclined.
You can remove these at some point in the future if you are so inclined - though they can only be used once.
While we do try and make our kits as 'installable' as possible we realize that even an easier kit can be harder than it needs to be if you install them from the seat of your pants. We hope the photos of the process were helpful, and please let us know if you have any questions about the process.
HeadlightArmor.com
Thread Starter
Registered User
Joined: Oct 2005
Posts: 43
Likes: 0
Just a reminder for those of you who bought a set of tails over the holiday weekend and are planning on installing them this weekend; it is important to follow our instructions as we a much stronger material than most and they require a different approach.
Good Luck with your install!
Good Luck with your install!

")
Thread Starter
Registered User
Joined: Oct 2005
Posts: 43
Likes: 0
Pete, if you were following a vehicle with one of our smoked tails kits installed at night in heavy traffic you would be hard pressed to tell which vehicle had smoked tails and which vehicles were stock. During the day both the marker lights and brake lights are still clearly visible.
Thread Starter
Registered User
Joined: Oct 2005
Posts: 43
Likes: 0
Yes they can be installed when it is cold out. We suggest installing them inside a garage, and not out in a blizzard As stated you will need a hair dryer to warm the lamp and material. You want to warm it evenly - not melt it into goo... As both the tails and the heads are nearly flat (though really big) the install is one of the easiest around. Let us know if you have any additional Q's
As stated you will need a hair dryer to warm the lamp and material. You want to warm it evenly - not melt it into goo... As both the tails and the heads are nearly flat (though really big) the install is one of the easiest around. Let us know if you have any additional Q's
Thread Starter
Registered User
Joined: Oct 2005
Posts: 43
Likes: 0
Just a reminder, soaping them down is not part of the application process. It will make the install exponentially harder and much much more time consuming. Follow the above steps and you will be done before you know it!

Thread
Thread Starter
Forum
Replies
Last Post