
DIY-install shift knob


Guest
Posts: n/a
yeah see what happened was it came off the first time but i sold my nismo CF **** and went back to the stock for a while. well it would twist around so i had the dealer spray some loctite on the treading. well then when i wanted to go back to a nismo **** it wouldnt come off. it took them like 2 hours to get it off and they destroyed it in the process. you cant really see from the cell phone pics but the base of the **** is completely chewed up


Thread Starter
New Member
iTrader: (12)
Joined: Jul 2006
Posts: 1,485
Likes: 1
From: orange county-ca
Well i gave it a shot last night but i really couldnt get a good grip on the actual shifter below the cotton stuff with the wrench i was using(adjustable crecent wrench) and was afraid of damaging something so I gave up. Will probably have the people im taking my car to this weekend do it.
What kind of wrench are other people using?
What kind of wrench are other people using?

Registered User
Joined: Dec 2004
Posts: 532
Likes: 0
From: Long Island
I would have somebody do it. I tried to get mine off my 99 Sentra and it worked fine.....until I was driving and did a 2=3 shift and the whole shifter broke off and I was just driving around in 3rd holding a broken shifter that was completely seperated from the car. I guess I twisted it too much??
I just got an oem replacement for my 05 ZR - I have no instructions anyone care to post the step by step instructions & tools needed for each step ??? I thought it would be simple glad I saw this thread !


Originally Posted by MPH350Z
how do you get the shift **** off on an automatic
Bump
I tried giving mine a mild twist yesterday and it seemed to be on pretty tight.
Just wondering if someone could gauge for me (from your experience) how much force should I use when attempting to remove the stock shift **** by hand, before I give up and use the 2 wrench system.
Cheers,
R350z
I tried giving mine a mild twist yesterday and it seemed to be on pretty tight.
Just wondering if someone could gauge for me (from your experience) how much force should I use when attempting to remove the stock shift **** by hand, before I give up and use the 2 wrench system.
Cheers,
R350z
Sorry I don't have pics of the actual install. I did mine about 15 minutes before I was going to leave for a meet and didn't even think about taking pics of it at the time.
This is actually one of the easiest installs you can do. I don't mean to say that you don't have to be careful, though. Like any other work on your car, think it through before you start to work, work slowly and deliberately. Here's my attempt at a how-to install the nismo shift ****.
DISCLAIMER: Do this at your own risk. If you don’t want to mess up your car, call a professional. I am not a mechanic and I am just relaying my own experiences with this mod.
Edit: I have a 2005 model year.
Part 1: The tools
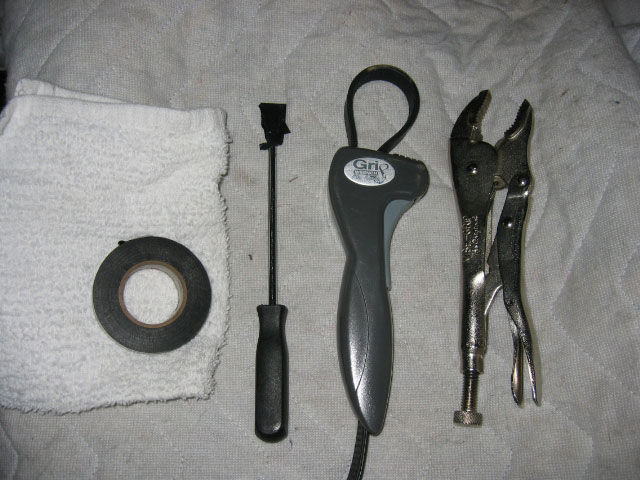
Here is a pic of the tools I used from left to right:
* terry cloth towel, folded twice.
* electrical tape
* flat head screwdriver (shown with electrical tape covering the head to prevent marring)
* large “Grip Wrench” adjustable wrench
* locking vice grips
I am assuming in this how-to that you know how to use these tools properly. That is the most important thing IMO if you don’t want to mess anything up by accident. For example the wrench I used is directional (it only turns one way) and you need to know how to secure the vice grips properly.
Part 2: Removing the center console finisher
For me this is the trickiest part of the whole process.
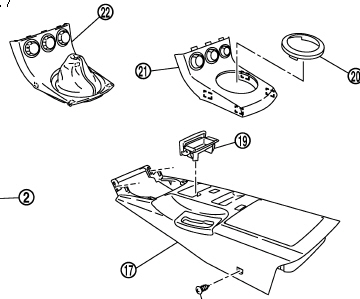
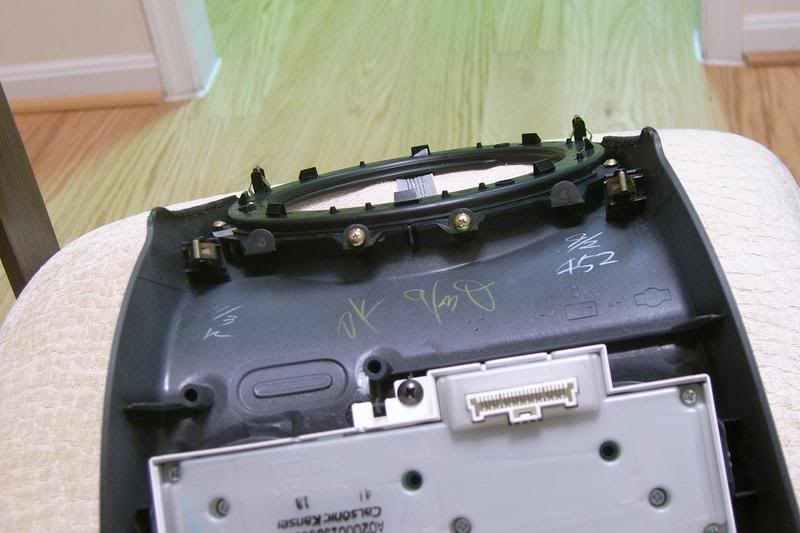
The center console finisher is the piece marked #22 (#21 is for the automatic) in the diagram.
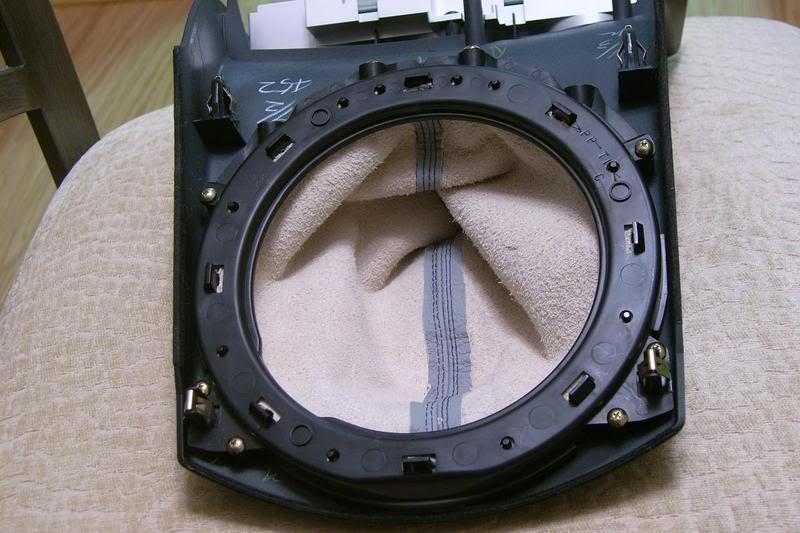
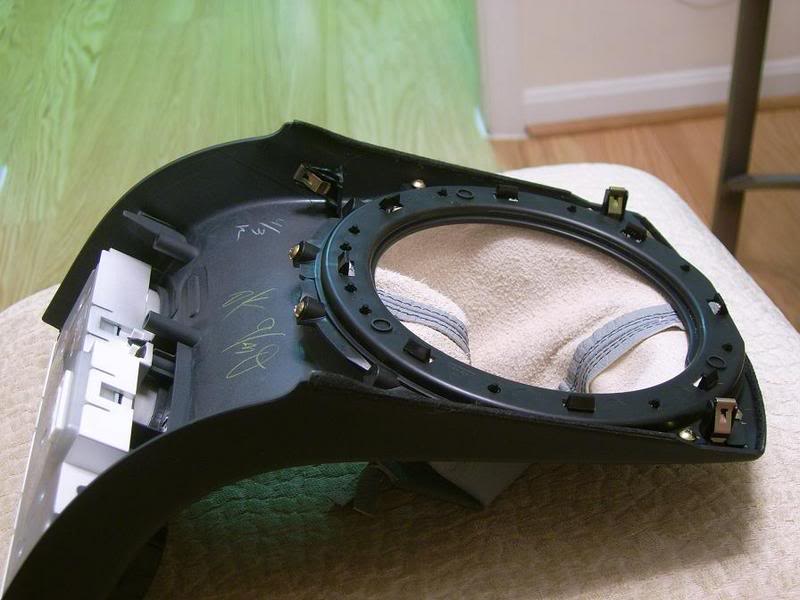
In order to release the finisher from the rest of the console, use the flat head screwdriver and carefully insert it between the finisher and the main center console (#17). I find it easier to twist the screwdriver rather than prying up with it, you only need enough clearance so you can hold it up with slight pressure with your other hand. While holding the center part of the finisher up with one hand, slowly run the tip of the screwdriver along the edge of the finisher. If you do this right you should release the locking tabs on the finisher from the center console without breaking them. I released the two rear tabs first (rear meaning toward the rear of the car), then moved on to the two front tabs (in relation to the front of the car). Once all the tabs are released, it is just a matter of carefully lifting the back of the finisher so it clears the tabs above the climate control dials. Some instructions on the net tell you to unplug the ***** from the instrument panel. I didn’t find it necessary to do that step.
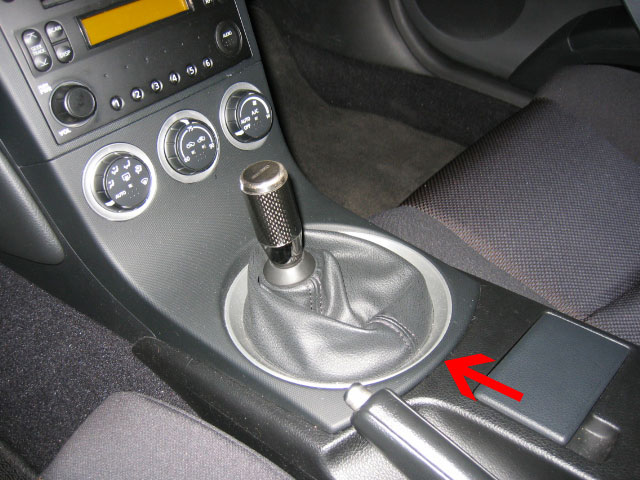
Part 3: Removing the original ****.
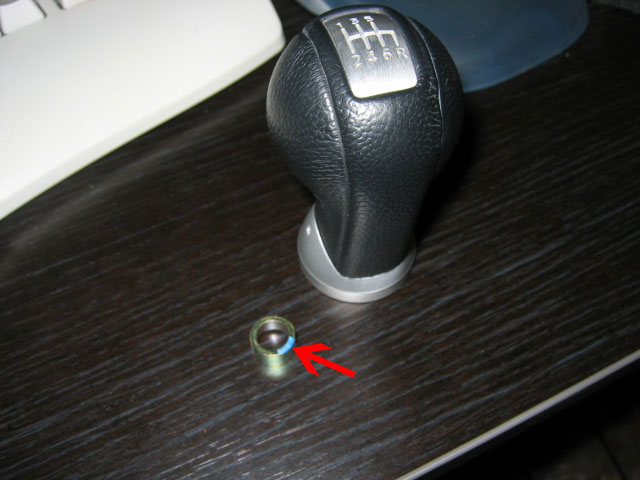
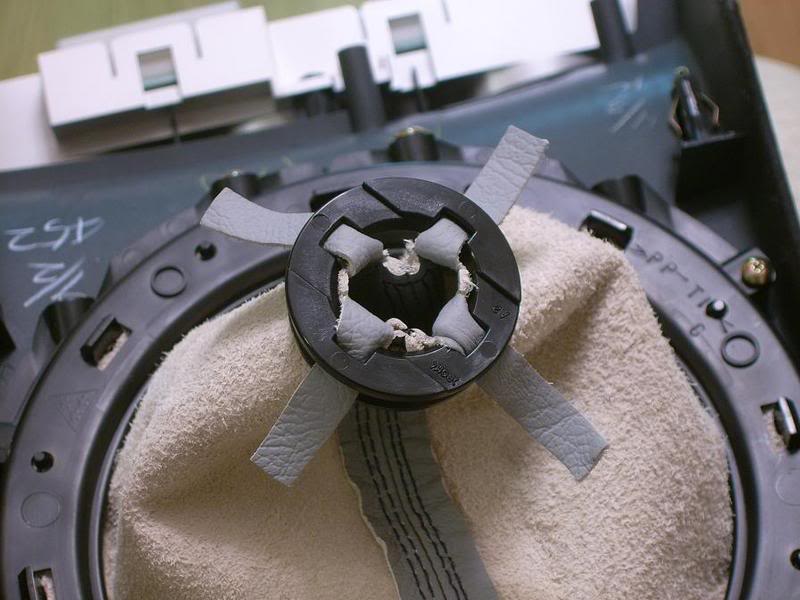
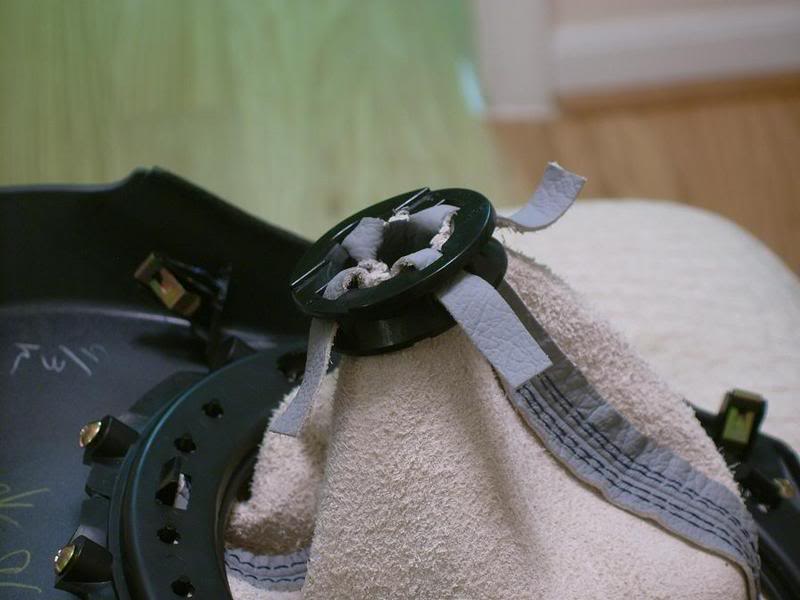
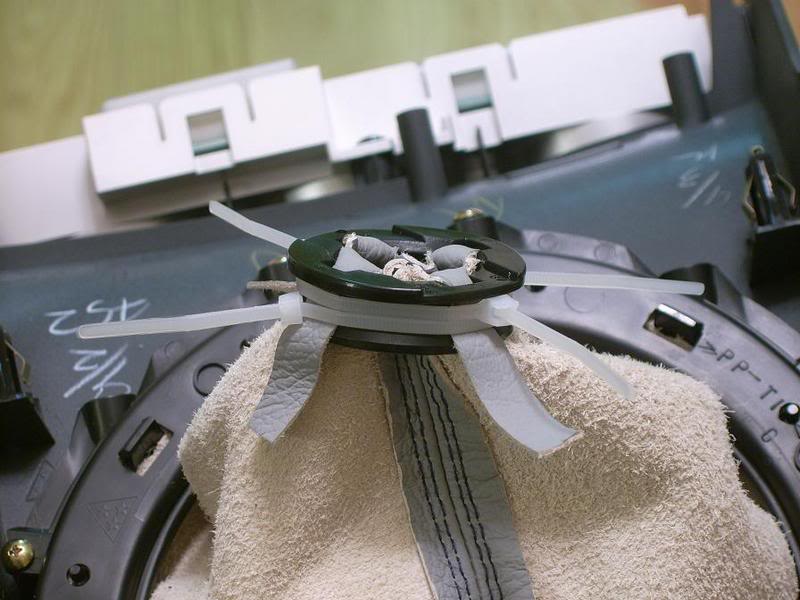
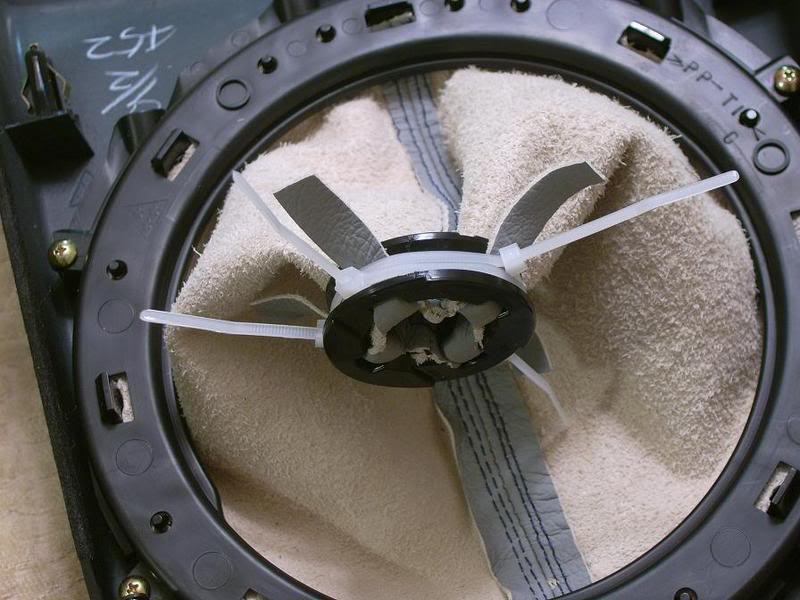
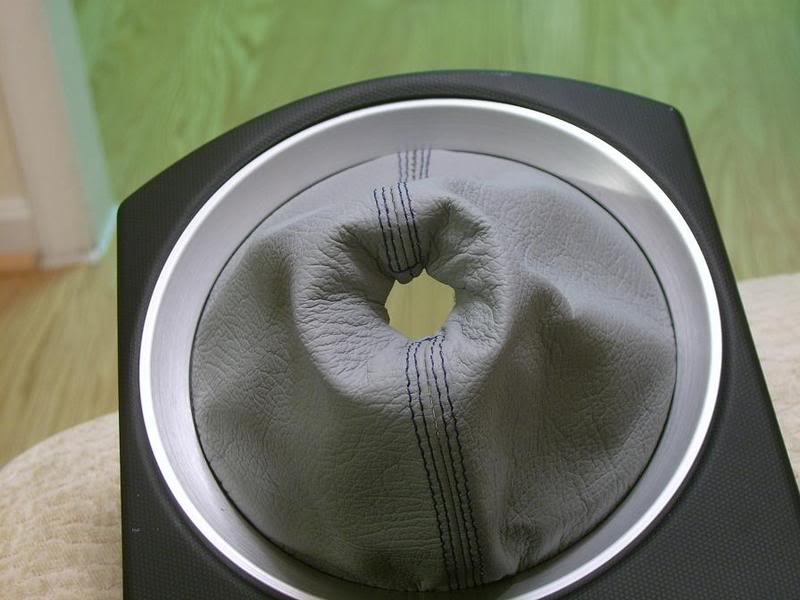
Underneath the finisher there is some padding. I moved the padding out of the way of the shaft of the shifter as best I could without damaging it. I didn’t find it necessary with the vice grips to remove it completely from around the shaft of the shifter. Wrap the towel around the shaft where you will be using the vice grips to keep it from damaging the shaft. Use the vice grips to secure the shaft and prevent it from turning. Use the “Grip Wrench” to turn the shift **** counter clockwise (when you are looking down on the shift ****). You will need to use quite a bit of torque because the OE shift **** is attached with loc-tite (as you can see in the pic). Be sure and not try and apply more torque than necessary to the vice grips to keep it from turning. Whatever you do resist the urge to torque the vice grip one way while trying to torque the **** the other. Also make sure that the shaft isn’t slipping from the vice grip. Only experience (and possibly a grinding noise) will tell you if this is happening so work slowly. Once the **** is off, you can also remove the small spacer (arrow pointing to it in pic) as it will not be needed with the nismo shift ****.
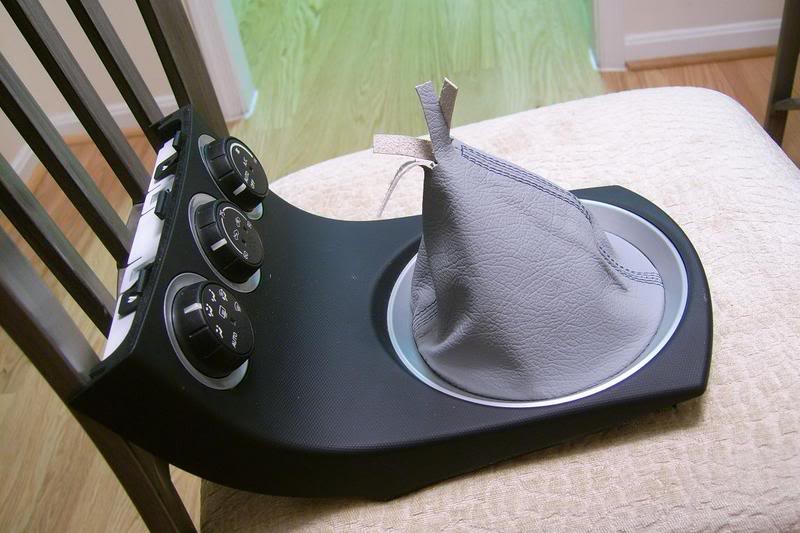
Part 4: Installing the Nismo shift ****
With the vice grips still holding the shifter shaft so it doesn’t twist, insert the rubber shift boot onto the shaft. Torque the new shift **** by hand until it touches the rubber boot. I then gave it one or two more turns until the “NISMO” logo was perpendicular to the travel of the car and I was not able to easily loosen it from the shaft without applying a small amount of torque (I didn’t want to be able to idly turn it at stop lights and I didn’t want the car’s vibration to shake it loose). Straighten out the leather boot. You can now remove the vice grips and put the finisher back in place reversing how you removed it (i.e. insert the tabs above the dials, snap in the front tabs, then the rear tabs) and that’s it, you’re good to go. Enjoy!
This is actually one of the easiest installs you can do. I don't mean to say that you don't have to be careful, though. Like any other work on your car, think it through before you start to work, work slowly and deliberately. Here's my attempt at a how-to install the nismo shift ****.
DISCLAIMER: Do this at your own risk. If you don’t want to mess up your car, call a professional. I am not a mechanic and I am just relaying my own experiences with this mod.
Edit: I have a 2005 model year.
Part 1: The tools
Here is a pic of the tools I used from left to right:
* terry cloth towel, folded twice.
* electrical tape
* flat head screwdriver (shown with electrical tape covering the head to prevent marring)
* large “Grip Wrench” adjustable wrench
* locking vice grips
I am assuming in this how-to that you know how to use these tools properly. That is the most important thing IMO if you don’t want to mess anything up by accident. For example the wrench I used is directional (it only turns one way) and you need to know how to secure the vice grips properly.
Part 2: Removing the center console finisher
For me this is the trickiest part of the whole process.
The center console finisher is the piece marked #22 (#21 is for the automatic) in the diagram.
In order to release the finisher from the rest of the console, use the flat head screwdriver and carefully insert it between the finisher and the main center console (#17). I find it easier to twist the screwdriver rather than prying up with it, you only need enough clearance so you can hold it up with slight pressure with your other hand. While holding the center part of the finisher up with one hand, slowly run the tip of the screwdriver along the edge of the finisher. If you do this right you should release the locking tabs on the finisher from the center console without breaking them. I released the two rear tabs first (rear meaning toward the rear of the car), then moved on to the two front tabs (in relation to the front of the car). Once all the tabs are released, it is just a matter of carefully lifting the back of the finisher so it clears the tabs above the climate control dials. Some instructions on the net tell you to unplug the ***** from the instrument panel. I didn’t find it necessary to do that step.
Part 3: Removing the original ****.
Underneath the finisher there is some padding. I moved the padding out of the way of the shaft of the shifter as best I could without damaging it. I didn’t find it necessary with the vice grips to remove it completely from around the shaft of the shifter. Wrap the towel around the shaft where you will be using the vice grips to keep it from damaging the shaft. Use the vice grips to secure the shaft and prevent it from turning. Use the “Grip Wrench” to turn the shift **** counter clockwise (when you are looking down on the shift ****). You will need to use quite a bit of torque because the OE shift **** is attached with loc-tite (as you can see in the pic). Be sure and not try and apply more torque than necessary to the vice grips to keep it from turning. Whatever you do resist the urge to torque the vice grip one way while trying to torque the **** the other. Also make sure that the shaft isn’t slipping from the vice grip. Only experience (and possibly a grinding noise) will tell you if this is happening so work slowly. Once the **** is off, you can also remove the small spacer (arrow pointing to it in pic) as it will not be needed with the nismo shift ****.
Part 4: Installing the Nismo shift ****
With the vice grips still holding the shifter shaft so it doesn’t twist, insert the rubber shift boot onto the shaft. Torque the new shift **** by hand until it touches the rubber boot. I then gave it one or two more turns until the “NISMO” logo was perpendicular to the travel of the car and I was not able to easily loosen it from the shaft without applying a small amount of torque (I didn’t want to be able to idly turn it at stop lights and I didn’t want the car’s vibration to shake it loose). Straighten out the leather boot. You can now remove the vice grips and put the finisher back in place reversing how you removed it (i.e. insert the tabs above the dials, snap in the front tabs, then the rear tabs) and that’s it, you’re good to go. Enjoy!
Last edited by mikeg8r; Dec 22, 2006 at 12:08 AM.
Originally Posted by LAKERSFAN
Well i gave it a shot last night but i really couldnt get a good grip on the actual shifter below the cotton stuff with the wrench i was using(adjustable crecent wrench) and was afraid of damaging something so I gave up. Will probably have the people im taking my car to this weekend do it.
What kind of wrench are other people using?
What kind of wrench are other people using?

or even better locking vice grips

Mike,
So I got the finisher off no problems. Now I cant get the freaking oem **** off. Because I am unsure of how much force I should use, I am hesitant to try any further..
It seemed as if the shaft may start to twist if I use any more force then I did.
I used a locking vice grip but it still seemed like the shaft was going to twist, so I stopped (it may have slightly, although I did not hear any grinding).
Where did you grab the shaft with the vice grips? below or above the white cotton?
And do I grab it over the rubber boot? or am I supposed to somehow remove that and grab directly on the shaft itself.
Help!
R350z
Originally Posted by Reality350
Mike,
So I got the finisher off no problems. Now I cant get the freaking oem **** off. Because I am unsure of how much force I should use, I am hesitant to try any further..
It seemed as if the shaft may start to twist if I use any more force then I did.
I used a locking vice grip but it still seemed like the shaft was going to twist, so I stopped (it may have slightly, although I did not hear any grinding).
Where did you grab the shaft with the vice grips? below or above the white cotton?
And do I grab it over the rubber boot? or am I supposed to somehow remove that and grab directly on the shaft itself.
Help!
R350z
So I got the finisher off no problems. Now I cant get the freaking oem **** off. Because I am unsure of how much force I should use, I am hesitant to try any further..
It seemed as if the shaft may start to twist if I use any more force then I did.
I used a locking vice grip but it still seemed like the shaft was going to twist, so I stopped (it may have slightly, although I did not hear any grinding).
Where did you grab the shaft with the vice grips? below or above the white cotton?
And do I grab it over the rubber boot? or am I supposed to somehow remove that and grab directly on the shaft itself.
Help!
R350z
you need to use quite a bit of force. The blue loctite stuff needs upto something like 120 ft-lbs of torque to break.
I cleared away some of the padding from right below where the leather shift boot is attached the grips to the shaft. I don't remember there being a piece of rubber there, but if there was something there I would have attached the vice grips below it. I'm pretty sure the shaft is metal from the base of the boot all the way down. I reality you can attach your grips at any spot on the shaft, the location doesn't really matter, you just want to keep that sucker from turning. Don't forget to use a towel under there. Practice on a piece of pipe or metal fence or something with a similar diameter. When you use the grips it should be difficult to close, but you also don't want to crush whatever you are trying to grip. The way I know if I have something securely is that the grips will sort of "pop" closed and when i hit the release lever it will "pop" open. I don't know how else to describe it :|
HTH
^! Mike, You are the man!
I know now that I was not using enough force. I worry only because I know for a fact that if I put my strength into it I will snap the freaking thing.. lol
I will give it a try this weekend and hopefully it will come off. I think I understand what you mean about the vice grips "popping".
Thanks again mike, I really appreciate all your help with this.
Cheers,
R350z
Last edited by Reality350; Dec 27, 2006 at 05:52 PM.

Originally Posted by LAKERSFAN
Sorry, I have an 06Z. So, i have to actually take the shift boot off to install this thing? Any advice on how to pop the shift boot piece up?

just have a quick questions.... does the shift boot and the shift **** detach? cause i've read all the instructions on shift **** removal.. but i still don't understand how the shift **** detaches the shift boot.... are the pieces one piece? cause oh my old honda... the boot would just clip off the ****.. but i can't find a way to unclip the boot from the ****... do you cut it or something?