
DIY - Seat Removal (detailed w/ pics)


Thread Starter
New Member
Joined: Jul 2007
Posts: 2
Likes: 1
From: Texas
Hello, I found myself needing to remove the seats in my Z today, but I couldn't find much information on it on the web, or in the forum here after searching, so I'm going to attempt to write up how I accomplished this small goal.
Note: This is my first post on this forum, so please forgive any newbie mistakes I make. thanks.
My 350Z is a 2004 Touring, with power/heated/leather seats. I removed my passenger seat in about an hour (I'm very methodical). You should be able to do it in less than 20 or 30 minutes with the following picture and descriptions.
FYI, the driver's side seat appears very close to everything mentioned here.
Safety:
Just as I finished putting the seat back after writing this entire post, I grabbed underneath the seat and happened to grab a razor-sharp barb from the metal frame. Do wear gloves or be mindful of the all the various corners/edges/bends of the metal. The last thing you need is blood on your nice seats. Now that the Z has drawn blood though, I feel like it really is my car.
The Basics:
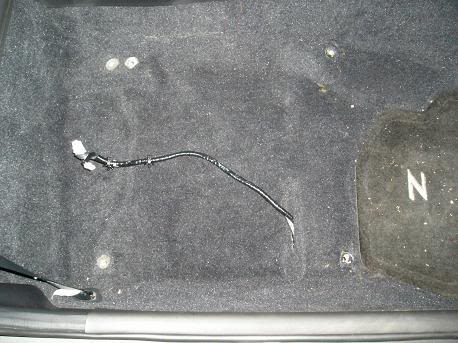
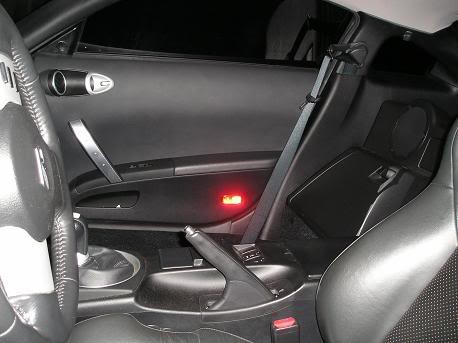
There are four bolts hidden under black caps and a single wire harness that must be tampered with in order to remove each of your seats. The four bolts are of course located at the four corners of the seat and the wire harness sneaks down below the floorboard beneath the seat. Notice the two holes instead of one in the top left corner. The right-most of these is the hole for an alignment peg.
Bolts:
Start by removing the four bolts. Removing the front bolts first, then the rear may save you some seat adjustment effort. The four black caps covering the bolts can be popped off easily. I found a 14mm socket to be the best fit and loosened each bolt with the help of a ratchet. The bolts have a captive washer and are screwed into captive nuts. Mine were pretty tight, and getting an angle on the front ones without putting a hole in my passenger seat was a priority, but I was able to rock it back and forth (loosen then tighten) and get it going.
Wiring:
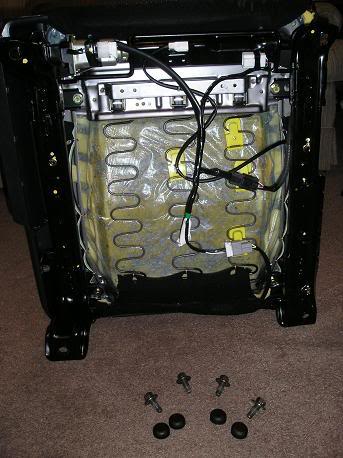
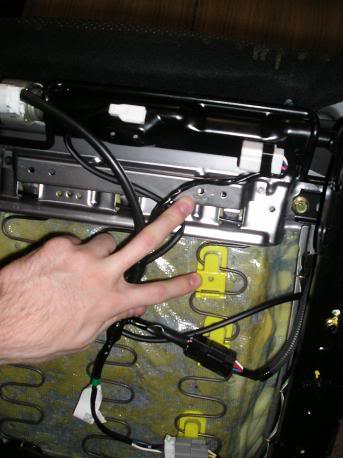
Once the bolts were out, I took a look under the seat to see a bunch of wire harnesses. I was glad to see that only one would actually have to be unplugged. The harness coming out of the floorboard only plugs into the seat in two places, but be mindful that it is connected to the seat in an addition two places. One-way plastic fasteners are used to hold the harness up against the underside of the seat. By 'one-way,' I mean, it was of course meant to be installed once and will not go back in quite the same, but it should still do the job if you are careful. Here's the harness I'm talking about.
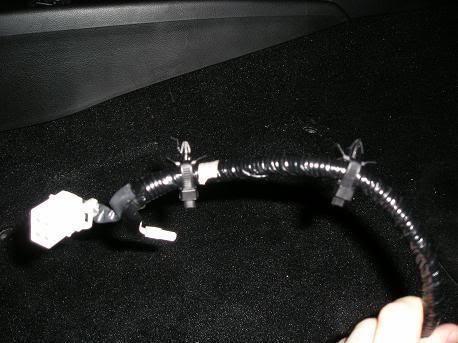
As shown in the picture below, the fasteners (and electrical plugs) are towards the front of the seat, which is why I suggested you remove the rear bolts last with the seat forward. It makes for easier access of these fasteners. One is inserted into metal while the other is in a piece of plastic. Getting these fasteners out in one piece was the hard part. I used one hand to pull on the plastic base and a pair of needle-nose pliers to pry. Prying or twisting the plastic didn't completely destroy the tip of the fastener so it will go back in and hold well enough.
Removal:
Before removing the seat, adjust the back of the seat to better position its center of gravity as well as to reduce its overall size. I suggest scooting the entire seat forward and then tilting it back to clear the top of the door frame. Lift with your legs as much as possible or get some help, because my seat wasn't exactly light. Remember, there is an alignment peg sticking out, downward, from the rear of the seat mounting frame, so it's best not to drop the seat or sit in it while it's out of the car.
Seat Gone:
I kinda like the way the cabin opens up with no passenger seat. Sure, maybe it doubled my road noise, but it made my grocery run a lot more fun in that I was able to watch everything scatter instead of just hearing it in the back.
Re-Installation:
Putting the seat back took me only about 10 minutes. I put the seat in place and made sure I got the alignment peg in it's hole and not the bolt hole. I re-attached the harness to the seat with the fasteners. They both snapped back, even though one was deformed, and I then re-connected the two front plugs. I had only minor difficulty aligning the bolt holes. Maybe try the rear, then the front, starting them by hand and make another round (rear, then front) with a tool. Replace the caps and you're back to square-one. Or at least, square-one plus all your other mods/fixes.
I hope this comes in handy for anyone needing to take out there seat, especially if this is just necessary to reach or have room to work on what the actual issue is.
Good Luck and Good Driving.
Note: This is my first post on this forum, so please forgive any newbie mistakes I make.
thanks.My 350Z is a 2004 Touring, with power/heated/leather seats. I removed my passenger seat in about an hour (I'm very methodical). You should be able to do it in less than 20 or 30 minutes with the following picture and descriptions.
FYI, the driver's side seat appears very close to everything mentioned here.
Safety:
Just as I finished putting the seat back after writing this entire post, I grabbed underneath the seat and happened to grab a razor-sharp barb from the metal frame.
Do wear gloves or be mindful of the all the various corners/edges/bends of the metal. The last thing you need is blood on your nice seats. Now that the Z has drawn blood though, I feel like it really is my car.The Basics:
There are four bolts hidden under black caps and a single wire harness that must be tampered with in order to remove each of your seats. The four bolts are of course located at the four corners of the seat and the wire harness sneaks down below the floorboard beneath the seat. Notice the two holes instead of one in the top left corner. The right-most of these is the hole for an alignment peg.
Bolts:
Start by removing the four bolts. Removing the front bolts first, then the rear may save you some seat adjustment effort. The four black caps covering the bolts can be popped off easily. I found a 14mm socket to be the best fit and loosened each bolt with the help of a ratchet. The bolts have a captive washer and are screwed into captive nuts. Mine were pretty tight, and getting an angle on the front ones without putting a hole in my passenger seat was a priority, but I was able to rock it back and forth (loosen then tighten) and get it going.
Wiring:
Once the bolts were out, I took a look under the seat to see a bunch of wire harnesses. I was glad to see that only one would actually have to be unplugged. The harness coming out of the floorboard only plugs into the seat in two places, but be mindful that it is connected to the seat in an addition two places. One-way plastic fasteners are used to hold the harness up against the underside of the seat. By 'one-way,' I mean, it was of course meant to be installed once and will not go back in quite the same, but it should still do the job if you are careful. Here's the harness I'm talking about.
As shown in the picture below, the fasteners (and electrical plugs) are towards the front of the seat, which is why I suggested you remove the rear bolts last with the seat forward. It makes for easier access of these fasteners. One is inserted into metal while the other is in a piece of plastic. Getting these fasteners out in one piece was the hard part. I used one hand to pull on the plastic base and a pair of needle-nose pliers to pry. Prying or twisting the plastic didn't completely destroy the tip of the fastener so it will go back in and hold well enough.
Removal:
Before removing the seat, adjust the back of the seat to better position its center of gravity as well as to reduce its overall size. I suggest scooting the entire seat forward and then tilting it back to clear the top of the door frame. Lift with your legs as much as possible or get some help, because my seat wasn't exactly light. Remember, there is an alignment peg sticking out, downward, from the rear of the seat mounting frame, so it's best not to drop the seat or sit in it while it's out of the car.
Seat Gone:
I kinda like the way the cabin opens up with no passenger seat. Sure, maybe it doubled my road noise, but it made my grocery run a lot more fun in that I was able to watch everything scatter instead of just hearing it in the back.
Re-Installation:
Putting the seat back took me only about 10 minutes. I put the seat in place and made sure I got the alignment peg in it's hole and not the bolt hole. I re-attached the harness to the seat with the fasteners. They both snapped back, even though one was deformed, and I then re-connected the two front plugs. I had only minor difficulty aligning the bolt holes. Maybe try the rear, then the front, starting them by hand and make another round (rear, then front) with a tool. Replace the caps and you're back to square-one. Or at least, square-one plus all your other mods/fixes.
I hope this comes in handy for anyone needing to take out there seat, especially if this is just necessary to reach or have room to work on what the actual issue is.
Good Luck and Good Driving.
Last edited by Manoc; Oct 15, 2007 at 09:22 PM.


Originally Posted by dc567
i've removed my passenger seat by 5 mins
how come you took over 30 mins....
how come you took over 30 mins....
Thread Starter
New Member
Joined: Jul 2007
Posts: 2
Likes: 1
From: Texas
dc567,
I'm just methodical mainly. It was night time and I don't have an actual shop or garage, so it just wasn't the most productive environment.
Yoichi,
I didn't see any airbag lights, no.
I'm just methodical mainly. It was night time and I don't have an actual shop or garage, so it just wasn't the most productive environment.
Yoichi,
I didn't see any airbag lights, no.
Trending Topics
Thanks for the write up! Just put it to good use. It was as easy as you stated it was.
I had a little cleaning up to do cuz of a little mess my friend made after a long night of drinking...
I had a little cleaning up to do cuz of a little mess my friend made after a long night of drinking...


Registered User
Joined: Jun 2008
Posts: 3
Likes: 0
From: UK
I have just taken my passenger seat out and I get both an airbag warning light (which I can hopefully clear with my OBD II setup) *BUT* now the windows do not close the final gap when closed.
Battery was disconn. for the procedure (as recommended in the service manual and other how-to guide) then connected back up prior to test run (just turnover & idle for a minute) & door closing.
What else do I have to do to get the doors closing properly again???
Battery was disconn. for the procedure (as recommended in the service manual and other how-to guide) then connected back up prior to test run (just turnover & idle for a minute) & door closing.
What else do I have to do to get the doors closing properly again???
Registered User
Joined: Jun 2008
Posts: 3
Likes: 0
From: UK
Found a fix!
1) turn ignition to pos 2 (electrics on) or fully on if you like
2) take windows fully down
3) turn car off
4) open doors (so switch in door frame 'opens')
5) close doors
6) start car again
7) wind window fully up
8) turn off (final time) get out and test close to see it auto-close the final bit.
Apparently there is a reset switch in the door (needs door panel removal) but didn't need to re-learn the up/down positions fortuneately.
phew!


Registered User
Joined: Oct 2008
Posts: 17
Likes: 0
From: schaumburg
Ill ask here first but ill also put up a new post. i own a base 07 z and intrested in buying automatic leather seats for my car but i dont know if the base model come prewired for automatic heated and leather. if some one does know i would greatly appreciate it thanks.


Banned
Joined: Feb 2009
Posts: 4
Likes: 0
From: 1
It seems like that you have already done a good job. Then I should follow your guide. Thanks. Could u please post more in future? Haaa.wow gold cheap wow gold
Banned
Joined: Feb 2009
Posts: 4
Likes: 0
From: 1
You make a good point, Maybe I should swing by the next time I’m in SF. Would be interested to see what kind of effort they have, although I hardly have. runscape gold wow gold

Found a fix!
1) turn ignition to pos 2 (electrics on) or fully on if you like
2) take windows fully down
3) turn car off
4) open doors (so switch in door frame 'opens')
5) close doors
6) start car again
7) wind window fully up
8) turn off (final time) get out and test close to see it auto-close the final bit.
Apparently there is a reset switch in the door (needs door panel removal) but didn't need to re-learn the up/down positions fortuneately.
phew!
1) turn ignition to pos 2 (electrics on) or fully on if you like
2) take windows fully down
3) turn car off
4) open doors (so switch in door frame 'opens')
5) close doors
6) start car again
7) wind window fully up
8) turn off (final time) get out and test close to see it auto-close the final bit.
Apparently there is a reset switch in the door (needs door panel removal) but didn't need to re-learn the up/down positions fortuneately.
phew!