
DIY: HomeLink Mirror Install in 2005 BASE


Ok I scored a HomeLink Mirror at a junk yard for about 30 bucks (stealership costs 300 bucks!) 
I search and searched and found nothing that had pics and details where things should be wired. Just brief statements of tapping into the BCM..
So here we go - THIS IS FOR 2005 MODEL ONLY but if you have the FSM you can certainly do the same for other year models.
First you take off the FUSE panel located next to the dead pedal, Everyone already knows Nissan did simple Snap ins and a few screws..EASY.. Then you take off the pillar on the drivers side (again all snap in - so just pull a lil and it just pops right off)
PIC#1 - As you can see - this is a generic diagram of whats inside. You see R4 listed for the "Auto Anti-Dazzling Inside Mirrror" - You also see R2 - where it all plugs up.
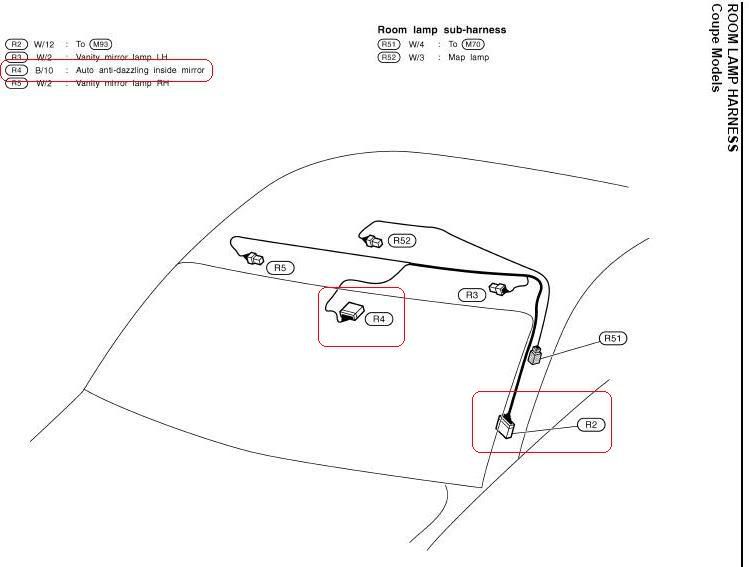
PIC#2 - This is the diagram that helped me do this project, you can see everything is clearly labeled. R4 is the pigtail that plugs into mirror itself. R2 is the connection on the drivers side pillar. Theres 2 of them, one is higher than the other, choose the lower one. Even the color of the wires is clearly shown.
(ie: B/R= Black/Red ; B/OR= Black/Orange; G/Y= Green/Yellow; R/W=Red/White

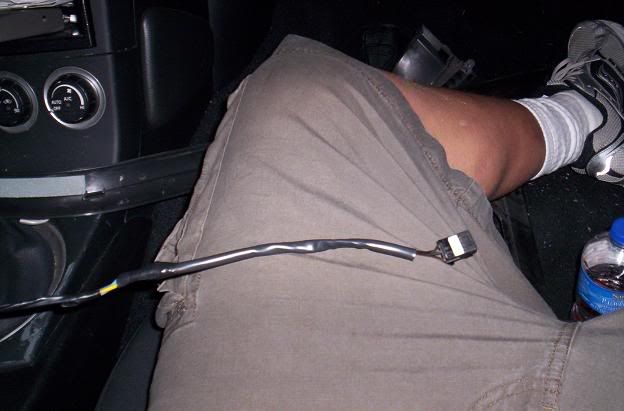
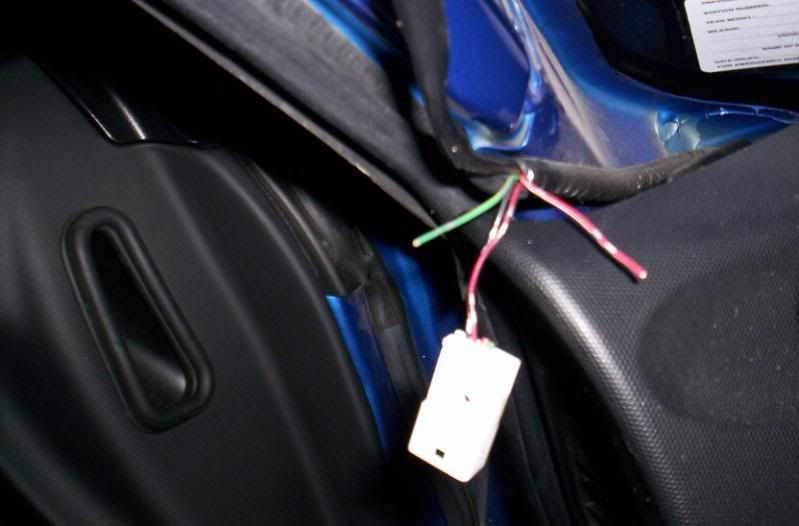
PIC #3 - This is my pigtail (that plugs into the mirror)..Since I got it at a junkyard I had to get longer wires to wire it up - easy, not a big deal. There are 3 Wires - I chose Yellow (spliced to Black/Orange on pigtail), Dark Blue(Ground), Light Blue (Black/Red on pigtail)
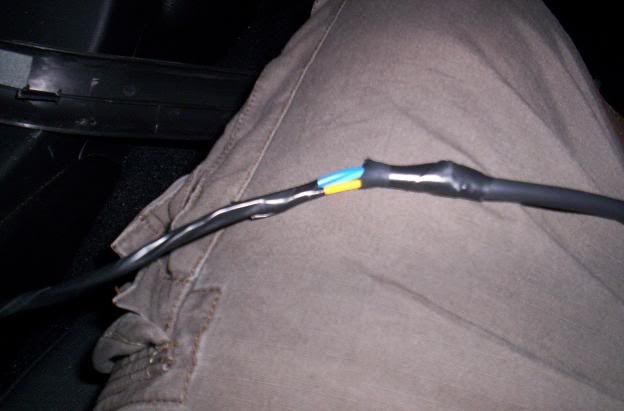
Pic#4 - Just a close up...Just used electrical tape all the way so I wouldnt have wires everywhere. I know its ghetto, but it works...thats all I care about.
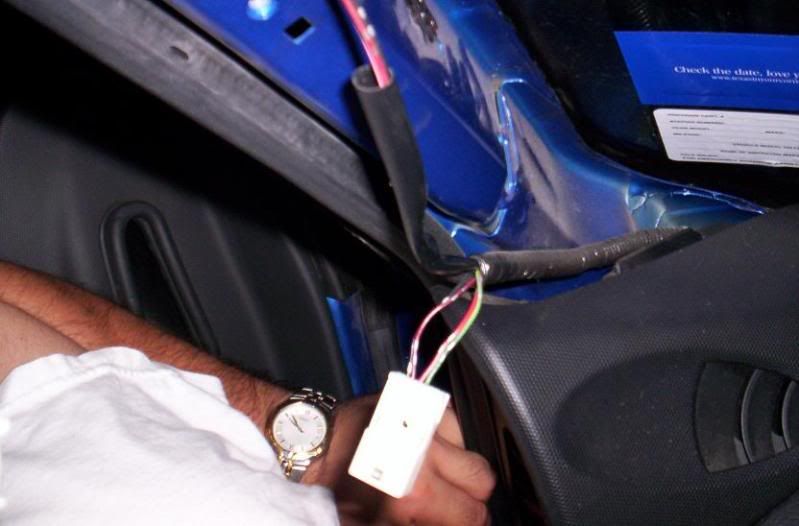
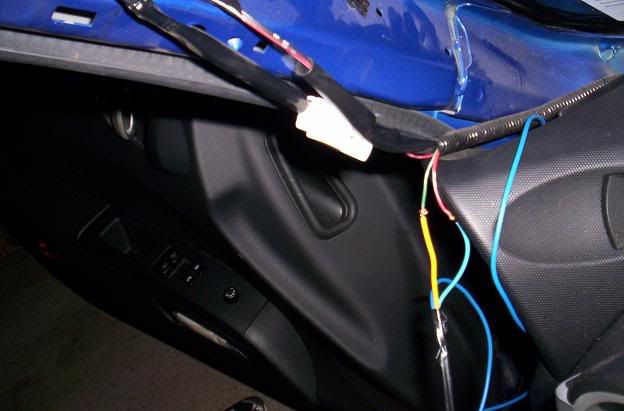
PIC 5 - Here is plug you will be jacking with...you can clearly (kinda-sorry for the sh*tty camera) see there are 4 wires coming up to this point. The plug that goes into it only had 2 wires coming out of it - So you guessed it, the other 2 go to the mirror (R/W and G/Y) Easy Enough..
PIC 6 - Cut both wires individually -
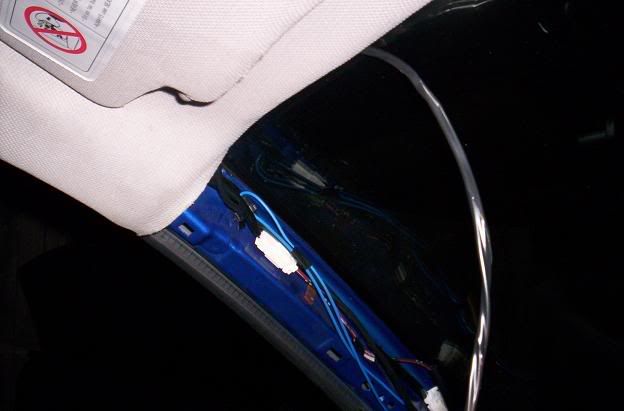
PIC 7 - Now just wire it up according to the diagram in PIC 2. My Yellow was the B/R on the pigtail so that would just go to G/Y. My Light Blue (same as B/O on pigtail) just tied into the R/W. The Ground on the pigtail was Black and you can see that my Dark Blue Wire is going down further into the dash.
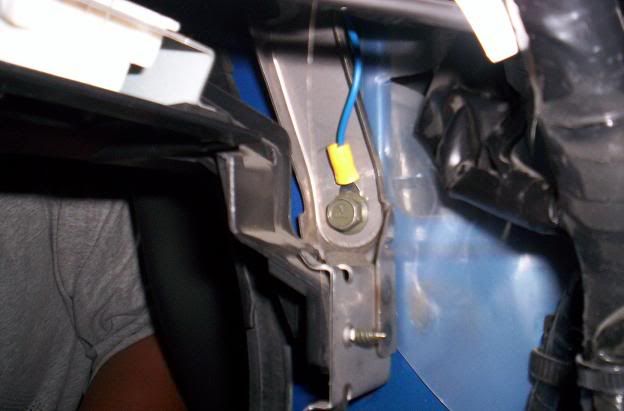
PIC 8 - Just to give you an idea of where my ground went..Simple enough.
PIC 9 - Now just tape it all up AFTER verifying everything works.
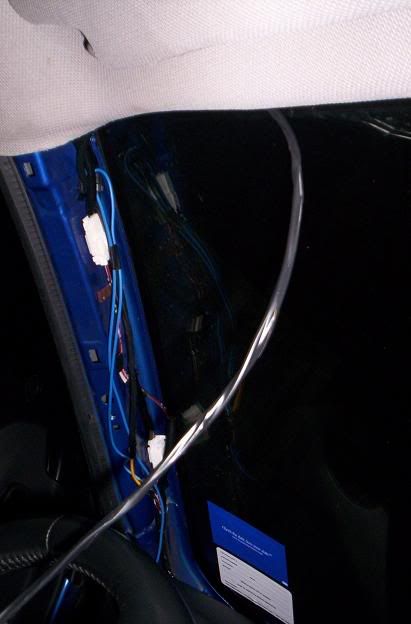
PIC 10 - Tucking it under the headliner..Easy Breezy..
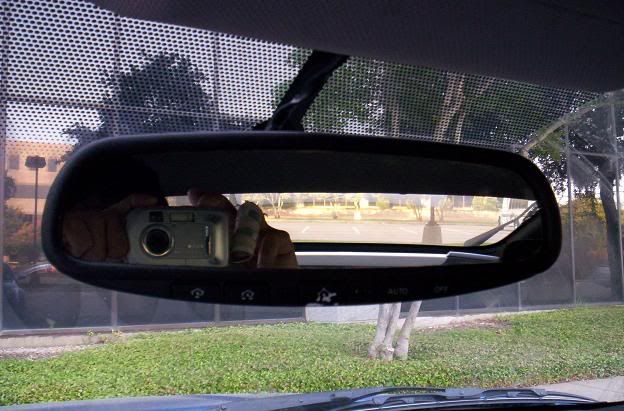
PIC 11 - Now I have Auto Dimm and I can open up my Garage from my Mirror..FOR $30 BUCKS! I also did the rattle fix since I have 2 10's in the back so thats fixed too..
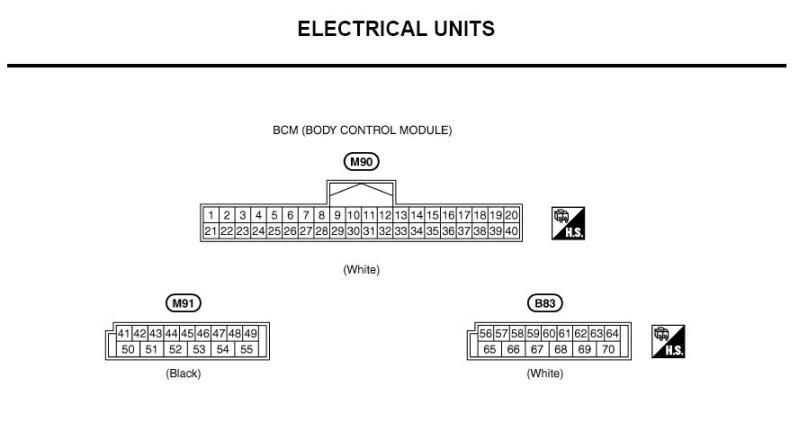
Now Ive read that you CAN just tap into the BCM.. Red/Black goes to PIN 11 (M90) and Black goes to PIN 42 (M91)according to diagram below..(this is going off of other threads so I cannot confirm PIN/WIRE info)
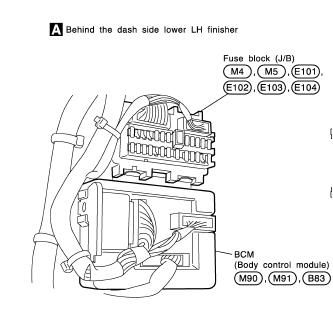
AND THEN I OPENED UP THE PANEL, SAW THIS, AND THOUGHT WTF! I AINT MESSIN WITH THAT!

PIC OF BCM from FSM made it even WORSE - ITS the big BLACK thing in the pic above...All THOSE WIRES! - EH, NO THANKS...
I hope this helps some of you BASE owners who have been looking for a DIY w/the details above..

I search and searched and found nothing that had pics and details where things should be wired. Just brief statements of tapping into the BCM..
So here we go - THIS IS FOR 2005 MODEL ONLY but if you have the FSM you can certainly do the same for other year models.
First you take off the FUSE panel located next to the dead pedal, Everyone already knows Nissan did simple Snap ins and a few screws..EASY.. Then you take off the pillar on the drivers side (again all snap in - so just pull a lil and it just pops right off)
PIC#1 - As you can see - this is a generic diagram of whats inside. You see R4 listed for the "Auto Anti-Dazzling Inside Mirrror" - You also see R2 - where it all plugs up.
PIC#2 - This is the diagram that helped me do this project, you can see everything is clearly labeled. R4 is the pigtail that plugs into mirror itself. R2 is the connection on the drivers side pillar. Theres 2 of them, one is higher than the other, choose the lower one. Even the color of the wires is clearly shown.
(ie: B/R= Black/Red ; B/OR= Black/Orange; G/Y= Green/Yellow; R/W=Red/White
PIC #3 - This is my pigtail (that plugs into the mirror)..Since I got it at a junkyard I had to get longer wires to wire it up - easy, not a big deal. There are 3 Wires - I chose Yellow (spliced to Black/Orange on pigtail), Dark Blue(Ground), Light Blue (Black/Red on pigtail)
Pic#4 - Just a close up...Just used electrical tape all the way so I wouldnt have wires everywhere. I know its ghetto, but it works...thats all I care about.
PIC 5 - Here is plug you will be jacking with...you can clearly (kinda-sorry for the sh*tty camera) see there are 4 wires coming up to this point. The plug that goes into it only had 2 wires coming out of it - So you guessed it, the other 2 go to the mirror (R/W and G/Y) Easy Enough..
PIC 6 - Cut both wires individually -
PIC 7 - Now just wire it up according to the diagram in PIC 2. My Yellow was the B/R on the pigtail so that would just go to G/Y. My Light Blue (same as B/O on pigtail) just tied into the R/W. The Ground on the pigtail was Black and you can see that my Dark Blue Wire is going down further into the dash.
PIC 8 - Just to give you an idea of where my ground went..Simple enough.
PIC 9 - Now just tape it all up AFTER verifying everything works.
PIC 10 - Tucking it under the headliner..Easy Breezy..
PIC 11 - Now I have Auto Dimm and I can open up my Garage from my Mirror..FOR $30 BUCKS!
I also did the rattle fix since I have 2 10's in the back so thats fixed too..Now Ive read that you CAN just tap into the BCM.. Red/Black goes to PIN 11 (M90) and Black goes to PIN 42 (M91)according to diagram below..(this is going off of other threads so I cannot confirm PIN/WIRE info)
AND THEN I OPENED UP THE PANEL, SAW THIS, AND THOUGHT WTF! I AINT MESSIN WITH THAT!
PIC OF BCM from FSM made it even WORSE - ITS the big BLACK thing in the pic above...All THOSE WIRES! - EH, NO THANKS...
I hope this helps some of you BASE owners who have been looking for a DIY w/the details above..

now that you knows whats up, if someone finds a junk yard mirror in good condition like you did, they can also grab the harness that has the R2-R3-R4-R5 section and then it will be plug and play! just plug it into the M4 piece at the A pillar where you spliced...
of course the junk yard owner is gonna probably charge more being its the harness and mirror, but shouldn't be that bad...
-J
of course the junk yard owner is gonna probably charge more being its the harness and mirror, but shouldn't be that bad...
-J
Last edited by JasonZ-YA; Sep 2, 2009 at 05:19 PM.
Damn, you guys need to take me with you one time.
Good write up, Jake.
Good write up, Jake.


Trending Topics

Thx Q, Im kinda excited to have it...I had the "special push button" one that most people put on the side of the garage and you push a code..LOL! So this will certainly come in handy...
I also was surprised something like this hasnt already been posted..
Chris - man when we go, its like kids in a candy store.. I cant believe peops just buy stuff at a stealership (if they have to, I understand).. but for stuff that rediculously overpriced (like this mirror), it makes it FUN to upgrade vs Cringing at the prices..

 Next Weekend!
^ test the ones you do have with a circuit tester..........see if they are ON(hot) with ignition on or ignition off.........from there wire accordingly or look for ignition on, off wires else where......off the other wires in the area or down at the fuse box...
-J
-J
Last edited by JasonZ-YA; Aug 19, 2009 at 01:25 PM.
OK can you tell me this, my homelink mirror has three wires.
black/red stripe
black/orange strip
black (assuming this is the ground)
with the other 2 which one needs to be hot all the time,etc. thanks.
Im pretty sure the 2 wires that are in my plug are for the vanity lights in the visors?
black/red stripe
black/orange strip
black (assuming this is the ground)
with the other 2 which one needs to be hot all the time,etc. thanks.
Im pretty sure the 2 wires that are in my plug are for the vanity lights in the visors?
Last edited by ARMSTRONGARMS; Aug 19, 2009 at 12:56 PM.
OK can you tell me this, my homelink mirror has three wires.
black/red stripe
black/orange strip
black (assuming this is the ground)
with the other 2 which one needs to be hot all the time,etc. thanks.
Im pretty sure the 2 wires that are in my plug are for the vanity lights in the visors?
black/red stripe
black/orange strip
black (assuming this is the ground)
with the other 2 which one needs to be hot all the time,etc. thanks.
Im pretty sure the 2 wires that are in my plug are for the vanity lights in the visors?
black/red stripe = B/R ---> IGNITION!
black/orange strip = B/0R ----> constant BATT. (circled in red in pic above)
black (assuming this is the ground) = yes equals ground!
test the lines, see which is which...........
By the way? what year is your car and what color wires are there for yours?? I figure you just needed to get the Factory service manual page (just like jake did above) for your specific year 350z and the colors would coincide like jake found for his...
FSM - http://www.nicoclub.com/FSM/350Z/
-J
Last edited by JasonZ-YA; Aug 19, 2009 at 01:21 PM.
I will have to go back out and check, im eating some ice cream (butter pecan) it's wicked hot and humid here. Hence my lack of reading comprehension of the diagrams above LOL!
if i remember correctly though black and red w/black stripe. i will double check.
if i remember correctly though black and red w/black stripe. i will double check.
Last edited by ARMSTRONGARMS; Aug 19, 2009 at 01:27 PM.