
Restoring Factory Shift Knob


Thread Starter
Registered User
Joined: Jun 2010
Posts: 11
Likes: 0
From: Huntsville, AL
Goal: Remove coating from aluminum parts of shift **** for a clean even look. Optionally to fill the engraving with enamel paint for a brand new finish.
Materials Needed: Coarse Grit Sandpaper (Around 100-300 grit), Fine Grit Sandpaper (600+ grit)
Optional Materials: Something with a fine point to scrap grime from shift pattern engraving (I used a scratch awl, but even a toothpick would work), ENAMEL Paint Color of your choice(yes, it needs to be enamel), Leather Polish
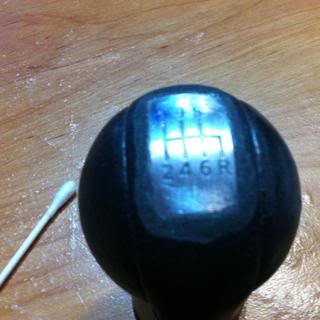
Does your shift **** look something like this? Paint peeling/fading, scratches, grime in the engraved shift pattern:
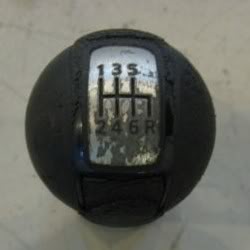
If so, this guide will help restore the shift ****'s appearance considerably.
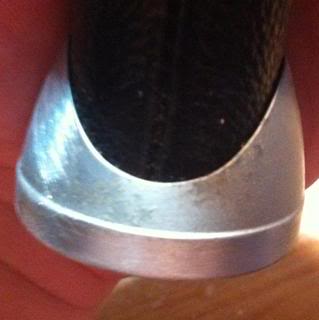
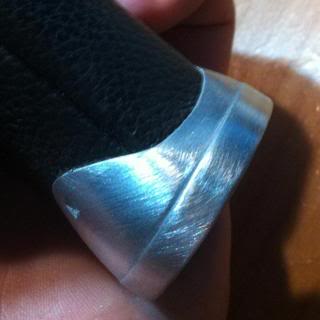
Start out by sanding all the aluminum parts on the shift **** with your coarse grit sandpaper. It should not take long for the coating to come off and the fresh exposed aluminum to appear. Make sure to get in all the cracks and edges (folding the sandpaper and using the creased edge helps with this.) Also get the top of the shift ****, try not to hit the leather since it will give irreversible scratches. Do not worry about the engraving for now. Your goal is to have a clean even finish on the aluminum with noticeable scratch marks:
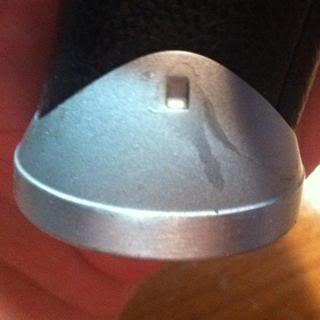
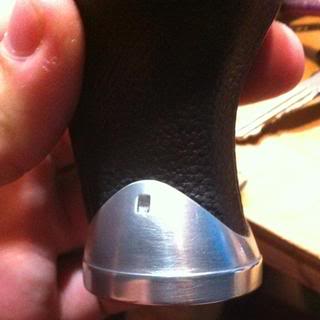
Now it's time to use your fine grit sandpaper to remove the noticeable scratches and a give a refined look. Use the same method as above to sand all aluminum parts. It should look like this:
Your shift **** should already be looking a hell of a lot better than it did, but we will take it one step farther
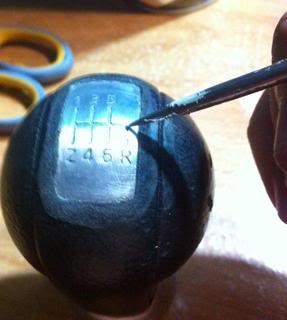
Use your pointed tip tool (toothpick if you can't find anything else ) to get in the shift pattern engraving and remove all the grime (built up sweat and oil from your hands, gross):
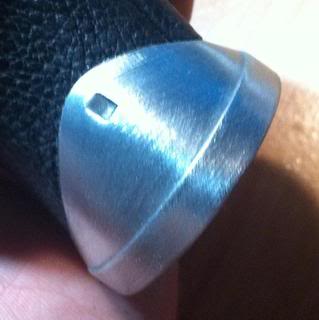
With the grime now gone from the engraving, we can put some enamel paint in to give a nice contrast to the shiny aluminum. I used Dupli-Color Gloss Black Engine Enamel Paint in a spray can for this. I don't think any kind of paint but enamel would stay in the engraving well. I sprayed a little bit in the cap of a Gatorade bottle and use a Q-Tip to dab it into the engraving. You could also just pour it in the engraving, but it's a little more messy. Once you have dabbed paint in all of the engraving, lightly wipe the top of the shift **** with a paper towel to remove excess paint, but do not press down or it will just soak up the paint in the engraving. It takes a little trial and error to get it right, but basically you want to repeat this 2 or 3 times allowing 5-10 minutes between coats to let the paint dry and build up. Do not worry about paint on the top of the shift ****, unless it gets on the leather which you need to clean off immediately. You could tape off the aluminum if you don't feel like messing with it.
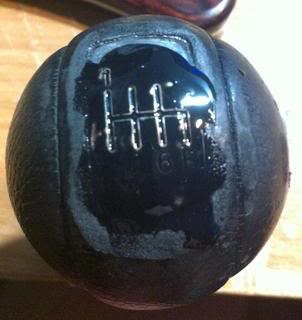
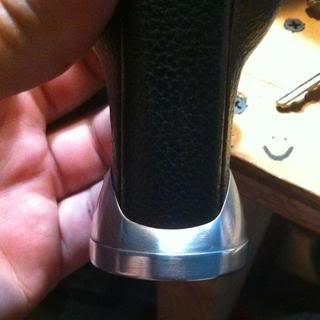
After you have gotten a couple of coats in the engraving, you're going to want to go back and use the fine grit sand paper again on the top of shift ****. It will easily remove all the excess paint, and leave it in the engraving giving you a result that should look something like this:
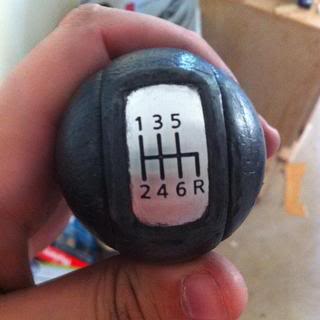
I experimented with clear coating after all this, but found it just kinda ruins the shiny polished aluminum look. I suggest just cleaning with dish soap and water, then applying your favorite leather polish to the leather. Done.
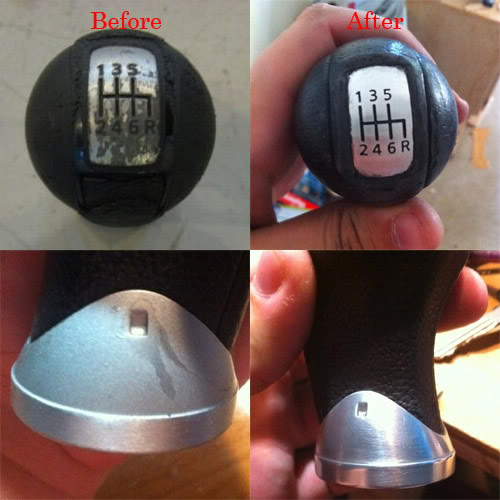
Much better than the start I would say!
This is my first guide so don't be too critical, just a spur of the moment thing. Decided to take some pictures while I did it. Thanks for reading!
Materials Needed: Coarse Grit Sandpaper (Around 100-300 grit), Fine Grit Sandpaper (600+ grit)
Optional Materials: Something with a fine point to scrap grime from shift pattern engraving (I used a scratch awl, but even a toothpick would work), ENAMEL Paint Color of your choice(yes, it needs to be enamel), Leather Polish
Does your shift **** look something like this? Paint peeling/fading, scratches, grime in the engraved shift pattern:
If so, this guide will help restore the shift ****'s appearance considerably.
Start out by sanding all the aluminum parts on the shift **** with your coarse grit sandpaper. It should not take long for the coating to come off and the fresh exposed aluminum to appear. Make sure to get in all the cracks and edges (folding the sandpaper and using the creased edge helps with this.) Also get the top of the shift ****, try not to hit the leather since it will give irreversible scratches. Do not worry about the engraving for now. Your goal is to have a clean even finish on the aluminum with noticeable scratch marks:
Now it's time to use your fine grit sandpaper to remove the noticeable scratches and a give a refined look. Use the same method as above to sand all aluminum parts. It should look like this:
Your shift **** should already be looking a hell of a lot better than it did, but we will take it one step farther
Use your pointed tip tool (toothpick if you can't find anything else
) to get in the shift pattern engraving and remove all the grime (built up sweat and oil from your hands, gross):With the grime now gone from the engraving, we can put some enamel paint in to give a nice contrast to the shiny aluminum. I used Dupli-Color Gloss Black Engine Enamel Paint in a spray can for this. I don't think any kind of paint but enamel would stay in the engraving well. I sprayed a little bit in the cap of a Gatorade bottle and use a Q-Tip to dab it into the engraving. You could also just pour it in the engraving, but it's a little more messy. Once you have dabbed paint in all of the engraving, lightly wipe the top of the shift **** with a paper towel to remove excess paint, but do not press down or it will just soak up the paint in the engraving. It takes a little trial and error to get it right, but basically you want to repeat this 2 or 3 times allowing 5-10 minutes between coats to let the paint dry and build up. Do not worry about paint on the top of the shift ****, unless it gets on the leather which you need to clean off immediately. You could tape off the aluminum if you don't feel like messing with it.
After you have gotten a couple of coats in the engraving, you're going to want to go back and use the fine grit sand paper again on the top of shift ****. It will easily remove all the excess paint, and leave it in the engraving giving you a result that should look something like this:
I experimented with clear coating after all this, but found it just kinda ruins the shiny polished aluminum look. I suggest just cleaning with dish soap and water, then applying your favorite leather polish to the leather. Done.
Much better than the start I would say!
This is my first guide so don't be too critical, just a spur of the moment thing. Decided to take some pictures while I did it. Thanks for reading!
Last edited by mestupryan; Jul 19, 2011 at 03:07 AM.


Wow, I might do that sometime after I'm done with this round of mods, lol. I like the finished look with the exception of the paint in the corners of the aluminum plate. Props to you for posting this

I wonder if this can be done on the steering wheel as well? Probably a thread around here somewhere for that...
Last edited by drivessidewayz; Jul 19, 2011 at 10:35 AM.


Registered User
Joined: Mar 2011
Posts: 84
Likes: 0
From: Marion, NC
I think you're in for a disappointment quite soon if you end up leaving all that sanded aluminum without some sort of protective finish over top of it. I've had a lot of experience with aluminum and alloy parts on bicycles and I can guarantee that the aluminum will discolor and oxidize very quickly if left untreated. The salt from your perspiration is eating away at it even as I type this!
Trending Topics
Thread Starter
Registered User
Joined: Jun 2010
Posts: 11
Likes: 0
From: Huntsville, AL
I think you're in for a disappointment quite soon if you end up leaving all that sanded aluminum without some sort of protective finish over top of it. I've had a lot of experience with aluminum and alloy parts on bicycles and I can guarantee that the aluminum will discolor and oxidize very quickly if left untreated. The salt from your perspiration is eating away at it even as I type this!
Hmm I'll definitely watch out for that. Although if that does happen it wouldn't take 30 secs to sand it back off, lol
Thread Starter
Registered User
Joined: Jun 2010
Posts: 11
Likes: 0
From: Huntsville, AL
Intended or typo? Either way I lol'd.
Wow, I might do that sometime after I'm done with this round of mods, lol. I like the finished look with the exception of the paint in the corners of the aluminum plate. Props to you for posting this
I wonder if this can be done on the steering wheel as well? Probably a thread around here somewhere for that...


Looks great!
But i made an easier way to get rid of the paint. I fine the the sandpaper will scratch up the leather for people who's leather are still in good condition.
https://my350z.com/forum/body-interi...-etchings.html
But i made an easier way to get rid of the paint. I fine the the sandpaper will scratch up the leather for people who's leather are still in good condition.
https://my350z.com/forum/body-interi...-etchings.html


Registered User
Joined: Sep 2012
Posts: 1,490
Likes: 24
From: planet earth
i found the biggest problem with mine was not so much the top with the aluminum but the leather around it. I used TRG #118 leather dye using a couple of light coats and then giving it a bit of a polish with a clean mutton polishing cloth and it came up a treat. Instead of looking like a gearknob that had done about 130k miles it looked like it had done abour 20k miles. It didn't look like it had had sweaty paws around it for a few years.

Thread
Thread Starter
Forum
Replies
Last Post
ars88
Zs & Gs For Sale
18
Apr 4, 2016 07:52 AM